


In this article, we will show you how to disable Pause Updates using Intune and Group Policy. You can block the “Pause Updates” ability on both Windows 10 and Windows 11 devices with a GPO, Local group policy editor, Registry Editor, or Intune Policy to prevent users from pausing the updates.
Occasionally, Windows updates cause so many problems that you just want to turn them off. Although Microsoft updates are essential for Windows PCs, not all users install them on a regular basis. You can disable the Pause Updates feature on your Windows PC to prevent users from delaying updates.
Windows 10 and 11 Home and Pro users can pause the minor updates on their PC by themselves in the Windows Update settings. On Windows PC, you can pause updates for a total of five times to delay the updates for 35 days. You can delay quality updates a week at a time for up to 35 days.

Organizations that use WSUS, Configuration Manager or Intune to manage Windows updates can use the methods described in this article to restrict access to the pause updates feature on Windows devices.
Also Read: Manage Windows Driver Updates with Intune: A Complete Guide
What is Pause Updates Feature in Windows 10 and Windows 11?
The Pause Updates feature in Windows 11 and Windows 10 allows you to disable Automatic Updates installation. With the Pause Updates feature enabled, your PC will not check for or install new updates until you manually resume updates for installation.
Updates download and install automatically on Windows 10 and Windows 11 to help keep your device and data secure and to ensure you have the most recent improvements and bug fixes. However, it is common for updates to be released with flaws that degrade the user experience.
Pausing updates and permanently disabling automatic updates are two entirely different things. Pausing the updates allows you to temporarily halt the installation of automatic updates (1 Week to 5 Weeks). Disabling automatic updates ensures that no updates are downloaded and installed on your Windows PC, putting the PC at risk of security breaches. You can disable updates permanently by configuring the automatic updates policy via Group Policy.
Although Microsoft does not allow you to completely disable automatic updates on Windows, you can temporarily pause updates for one week. Anyone can quickly pause updates with a few clicks under Windows Update settings. It’s important to note that this doesn’t disable updates altogether; it just postpones them.
Related: Turn off Windows Presentation Settings using Intune | GPO
Ways to Pause Updates on Windows PCs
The Pause Updates feature is available for both Windows 10 and Windows 11 users. There are multiple ways to disable the “Pause Updates” feature on your Windows PC, and they are listed below.
- Manually pause the updates on your PC via Windows Update settings.
- Disable the Pause Updates feature using Microsoft Intune
- Create a GPO to block the access to Pause Updates feature for users
- Using the Local Group Policy Editor, limit the ability to Pause Updates feature
- Use Registry Editor to remove access to the pause update button for users
We will demonstrate all of the above methods to block the Pause Updates feature on Windows 10/11 devices.
Related: 4 Ways to Disable Driver Signature Enforcement in Windows 11
How do I Pause Updates on Windows PC?
Anyone who wants to postpone the installation of updates on their Windows 10/11 PC can do so by following the steps below.
- Open the Settings app on your PC.
- Select Windows Update from the sidebar.
- Next to Pause updates, click Pause for 1 week, or open the drop-down menu to pause updates for up to five weeks. You can increase the time in one-week increments.

Method 1: Disable Pause Updates Feature using Intune Policy
Perform the following steps to create a new configuration profile in Microsoft Intune admin center to restrict the pause updates feature for Windows devices. First sign-in to the Microsoft Intune Admin center. Select Devices > Policy > Configuration Profiles > Create Profile.
On the Create a profile window, configure the following settings and select Create.
- Platform: Windows 10 and later
- Profile Type: Settings Catalog

In the Basics tab, enter the following properties.
- Name: Enter a descriptive name for the profile, which you can easily identify them later. For example, a good profile name is Disable Pause Updates Feature.
- Description: Enter a brief description of the profile. This setting is optional, but recommended. For example, you can enter the following description for the profile “Blocks or Restricts access to Pause Updates feature on Windows 10 and Windows 11 devices.”
Click Next.

In the Configuration Settings section, under Settings Catalog, click Add Settings. The Settings catalog in Intune allows managing Windows Updates for Business settings. You can choose to allow or block access to pause updates feature and deploy the policy to devices or users.

On the Settings picker window, type “Pause Updates” in the search box and click Search. From the search results, click on the Windows Update For Business category and select the setting Block “Pause Updates” ability. Close the Settings Picker panel.

The Block “Pause Updates” ability policy in Intune allows the IT admin to disable the Pause Updates feature. When this policy is enabled, the user cannot access the Pause updates feature. The value type is an integer. The default is 0. Supported values 0, 1.
As we want users to prevent pausing the updates on their computer, for the setting Block “Pause Updates” ability, turn the slider to Block. Click Next.

In Intune, Scope tags determine which objects admins can see. In the Scope tags section, you specify scope tags. Specifying scope tags is optional and you may skip this step. Click Next.

In the Assignments window, specify the groups to which you want to apply this policy. I advise deploying the profile for a few test groups first, and then rolling it out to more groups if the testing is successful. Select Next.

On the Review + Create page, review all the settings that you have defined to block the pause updates feature via Intune and select Create.

After you create a configuration policy in Intune, a notification appears: “Policy created successfully“. This confirms that the policy has been created and is being applied to the groups we chose. In Intune, the new profile we created to disable access to the pause updates feature appears in the list of Configuration Profiles.
You must wait for the policy to apply to the targeted groups, and once the devices check-in with the Intune service, they will receive your profile settings. You can also force sync Intune policies on your computers.
To monitor the deployment, select the policy and review the Device and user check-in status. From the screenshot below, we see that the policy that we applied to disable the pause updates feature on Windows devices has been successfully received by devices.

End-User Experience
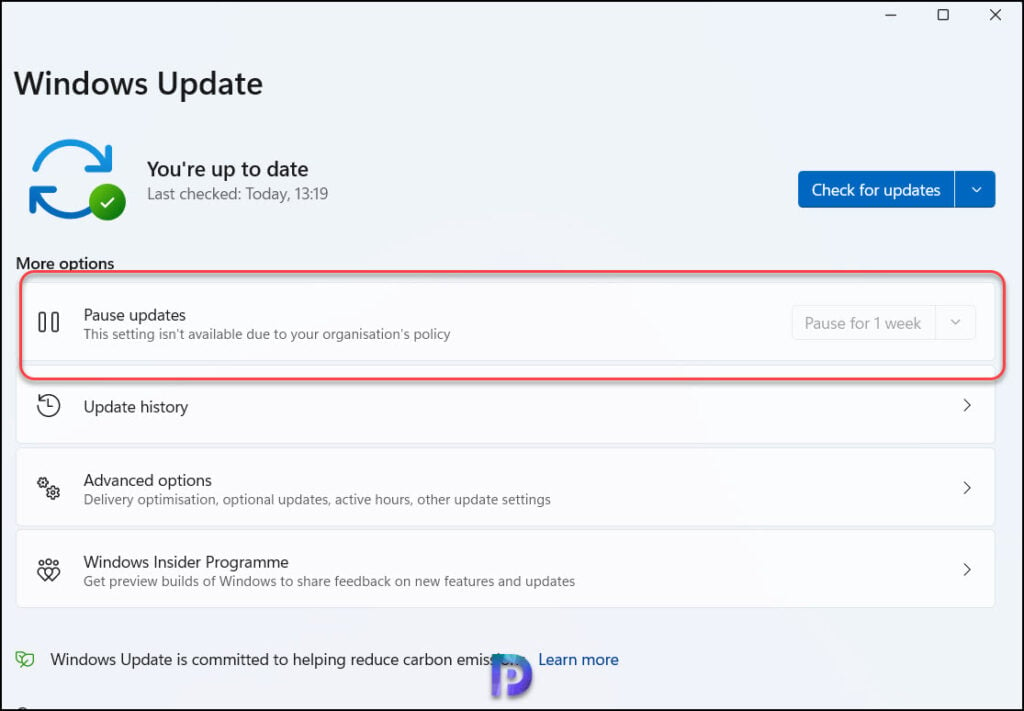
Let’s check if the Pause Updates feature is disabled using Intune Policy that applied to our devices and what users see when they launch Windows Update. From the screenshot below, we see the Pause Updates option has been greyed out, and the user cannot use it anymore to delay installing the updates. It shows this setting isn’t available due to your organization policy.

When you pause the updates on your Windows PC, the Check for Updates button isn’t available. You only see the Resume Updates button. Your device won’t be up-to-date until updates resume.

Method 2: Disable Pause Updates using Group Policy (GPO)
On Windows devices, you can deploy a group policy to block the pause updates feature. When your organization does not use Microsoft Intune and computers are joined to an active directory domain, the GPO method is preferred.
To create a new GPO, you can either log in to a domain controller or a member server installed with GPMC. You can also install the GPMC on Windows 11 and configure the group policies.
Use the following steps to create a group policy to remove access to the pause updates feature:
- Launch Server Manager from the Start menu and select Tools > Group Policy Management Console.
- In the Group Policy Management console, expand the domain, right-click Group Policy Objects or an OU, and select New.
- Enter the name for the group policy, such as “Disable Pause Updates Feature” and click OK.

Right-click the GPO that you just created and select Edit. In the Group Policy Management Editor, navigate to Computer Configuration\Administrative Templates\Windows Components\Windows Update. Here, look for the policy setting “Remove access to Pause Updates feature“, right-click the policy setting and select Edit.

From the policy description, we see that this policy setting removes access to Pause Updates feature. Enable this policy setting by choosing the option “Enabled” and clicking “Apply” and “OK.”

After the group policy object is configured, you need to link the GPO to an OU if you haven’t already. You can also link it to the domain, but doing so will make the GPO applicable to every computer in the domain, so it is not advised. The best approach is to choose a test OU, connect your GPO, and test the policy settings.
It’s time to update the group policy on the client computers and check to see if the access to pause updates feature is removed. You can use multiple ways to perform the group policy update on remote computers. On a test client machine, you can manually perform the group policy update by running the gpupdate /force command.
After the group policy has been refreshed, go to Settings > Windows Update on your Windows devices, and now you’ll see that users cannot pause the updates because it’s greyed out. This confirms that the GPO that we deployed was successful in disabling the pause updates ability.
Method 3: Disable “Pause Updates” feature using Local Group Policy Editor
In this method, we’ll use the Local Group Policy Editor to turn off access to the Pause Updates feature. The Local Group Policy Editor is available only on Windows Pro and Enterprise editions. Windows 10 Home Edition users don’t have access to the GP Editor on their computer. Learn how to upgrade Windows 11 Home edition to Windows 11 Pro.
If you’re running Windows 10 /11 Pro or Enterprise, the easiest way to remove access to the “Pause Updates” feature is to use the Local Group Policy Editor with these steps:
- Right-click Start and select Run.
- In the Run box, enter the command gpedit.msc and click OK to open the Local Group Policy Editor.
- Go to the following path: Computer Configuration > Administrative Templates > Windows Components > Windows Update.
- On the right side, double-click the policy setting Remove access to “Pause updates” feature and select Enabled.
This setting allows you to remove access to the “Pause Updates” feature. Once enabled, user access to pause updates is removed. Click Apply and OK.

Method 4: Disable Pause updates feature using Registry
As mentioned earlier, Windows 10 Home users do not have access to local group policy editor. As a workaround, a simple registry tweak will remove the access to pause updates feature. Remember that before making any changes to the registry, you must back up the entire registry as a best practice. Furthermore, make sure you are running Windows 10 Version 1809 or later and recent version of Windows 11 for this method to work.
Use the following steps to disable the pause updates feature using the registry:
First, launch the Registry Editor by running the command regedit.exe. In the registry editor, navigate to the following registry path: HKEY_LOCAL_MACHINE\Software\Policies\Microsoft\Windows\WindowsUpdate.
Now right-click on the WindowsUpdate key and select New > DWORD (32-bit) Value.

Enter the value name as ‘SetDisablePauseUXAccess‘ and value data as ‘1‘. This change will remove access to the pause update feature for Windows users.
- SetDisablePauseUXAccess = 1, the pause updates feature is disabled
- SetDisablePauseUXAccess = 0, the pause updates feature is enabled

