


In this post I will cover the steps to install and configure WSUS (Windows Server Update Services) on Windows Server 2019. This guide should help you if you decide to install and configure WSUS from scratch.
In the past I have published several posts on WSUS. That includes installing WSUS and configuring WSUS. In addition to that I also published a post on WSUS troubleshooting. Since then I have been using Configuration Manager and never bothered to focus on WSUS.
Few days ago a colleague on mine contacted me and asked if I can publish a post on setting up WSUS on Windows Server 2019. The company where he works uses only WSUS to deploy the updates to computers. So he was looking for a guide that can help him setup and configure WSUS from scratch.

So I decided to publish this guide that is exclusively for admins who wish to install and configure WSUS to manage updates in their setup. I will also cover some WSUS basics which answers basic questions and the importance of WSUS.
It been quite a long time that I have actually configured anything in WSUS. That’s because the moment you start using SCCM to deploy updates, you forget about the WSUS console.
I have chosen Windows Server 2019 to install and configure WSUS. After Server 2012 R2 I believe Server 2019 is a stable release. I hate Windows Server 2016 because I have spent lot of time in troubleshooting windows update issues. For me the most important complain is that updates just don’t install properly on Server 2016.
What are Windows Updates
Let’s start with some basics. When you install an operating system or image a machine, you always ensure it is patched with latest updates. Not just operating system but almost every software that we use needs to be constantly updated.
Windows updates are released to fix bugs, fix security issues in OS and to add new features to operating system. The Windows Updates rely on Windows Update service which is set to start automatically by default.
Windows Update service downloads and installs recommended and important updates automatically.
Microsoft updates can be classified into following categories :-
- Critical Updates
- Security Updates
- Definition Updates
- Drivers
- Update Rollups
- Service Packs
- Tools
- Feature Packs
- Updates
If you have migrated from Windows 7 to Windows 10, you will notice lot of new options under Windows Update. You get some cool options such as pause the updates for 7 days, change active hours for installing updates. In addition to that there are many useful options under Advanced Options. When you get time, go ahead and explore all of them.
Introduction to Windows Server Update Services
Windows Server Update Services (WSUS) enables the administrators to deploy the latest Microsoft product updates. WSUS is a Windows Server server role and when you install it, you can efficiently manage and deploy the updates.
One of the most important task of system administrators is to keep client and server computers updated with the latest software patches and security updates. Without WSUS it would be really hard to manage the updates deployment.
When you have a single WSUS server in your setup, the updates are downloaded directly from Microsoft Update. However if you install multiple WSUS server, you can configure WSUS server to act as an update source which is also known as an upstream server.
Rather than letting multiple computers download updates directly from internet, you can setup WSUS server and point the clients to download all the updates from a WSUS server. With this you save your Internet bandwidth and also speed up the Windows update process.
I can talk a lot about WSUS but let’s get started with installing WSUS.
WSUS Lab Setup
First of all let me cover about WSUS lab setup. I believe the best way to master WSUS is to install and configure it in your test or lab setup first. You can then start working on it and try several things.
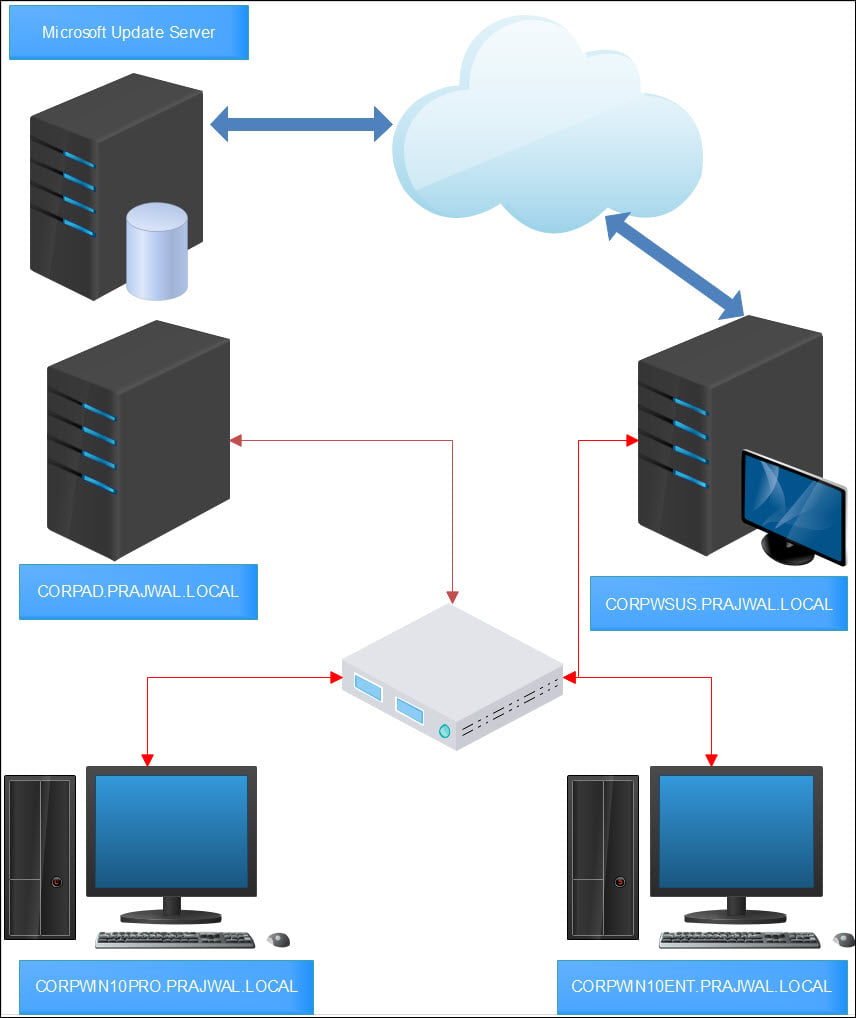
I have created some virtual machines in my lab. Let me give you a list of machines and the OS info.
| Server Name | Operating System | Roles |
| CORPAD.PRAJWAL.LOCAL | Windows Server 2019 Datacenter | Active Directory, DNS, DHCP |
| CORPWSUS.PRAJWAL.LOCAL | Windows Server 2019 Datacenter | WSUS |
| CORPWIN10ENT.PRAJWAL.LOCAL | Windows 10 Enterprise | None |
| CORPWIN10PRO.PRAJWAL.LOCAL | Windows 10 Pro | None |
And if I had to show my setup in the form of a network diagram, this is how it’s going to look.
WSUS System Requirements
When you have decided to implement WSUS in your setup, you must first look into WSUS requirements. To plan your WSUS deployment I recommend reading this article from Microsoft. It covers all the information required to WSUS requirements, deployment scenarios, performance considerations etc.
This post covers the procedure to install Windows Server Update Services using Windows Internal Database (WID).
WSUS Firewall Ports / Exceptions
When you set up WSUS server, it is important that the server connects to Microsoft update to download updates. If there is a corporate firewall between WSUS and the Internet, you might have to configure that firewall to ensure WSUS can obtain updates.
To obtain updates from Microsoft Update, the WSUS server uses port 443 for HTTPS protocol. You must allow Internet access from WSUS to the following list of URLs :-
- http://windowsupdate.microsoft.com
- http://*.windowsupdate.microsoft.com
- https://*.windowsupdate.microsoft.com
- http://*.update.microsoft.com
- https://*.update.microsoft.com
- http://*.windowsupdate.com
- http://download.windowsupdate.com
- https://download.microsoft.com
- http://*.download.windowsupdate.com
- http://wustat.windows.com
- http://ntservicepack.microsoft.com
- http://go.microsoft.com
- http://dl.delivery.mp.microsoft.com
- https://dl.delivery.mp.microsoft.com
Install WSUS Role on Windows Server 2019
The steps to install Windows Server Update Services (WSUS) Role on Windows Server 2019 include :-
- Log on to the Windows 2019 server on which you plan to install the WSUS server role using an account that is a member of the Local Administrators group.
- In Server Manager, click Manage and click add Roles and Features.
- On the Before you begin page, click Next.
- In the select installation type page, select Role-based or feature-based installation option. Click Next.
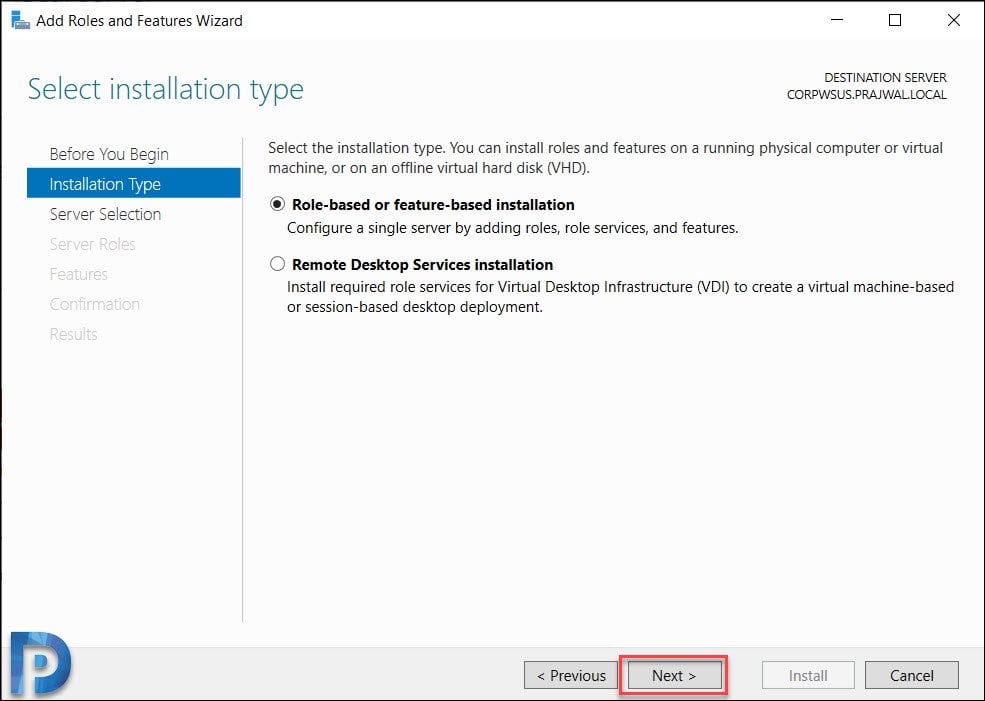
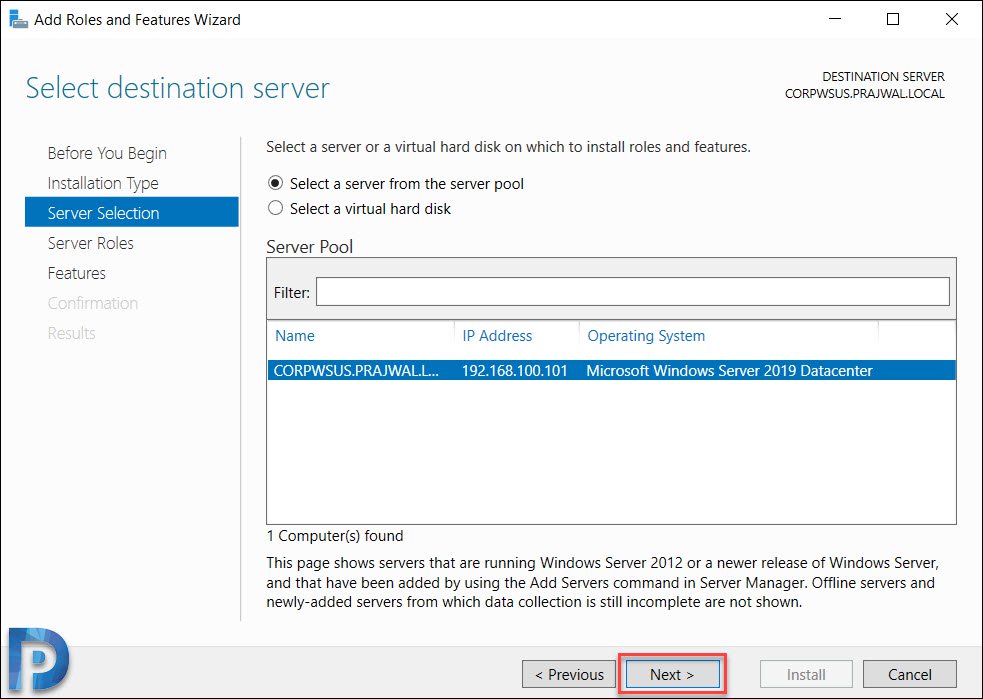
On the Server Selection page, verify the server name and click Next.
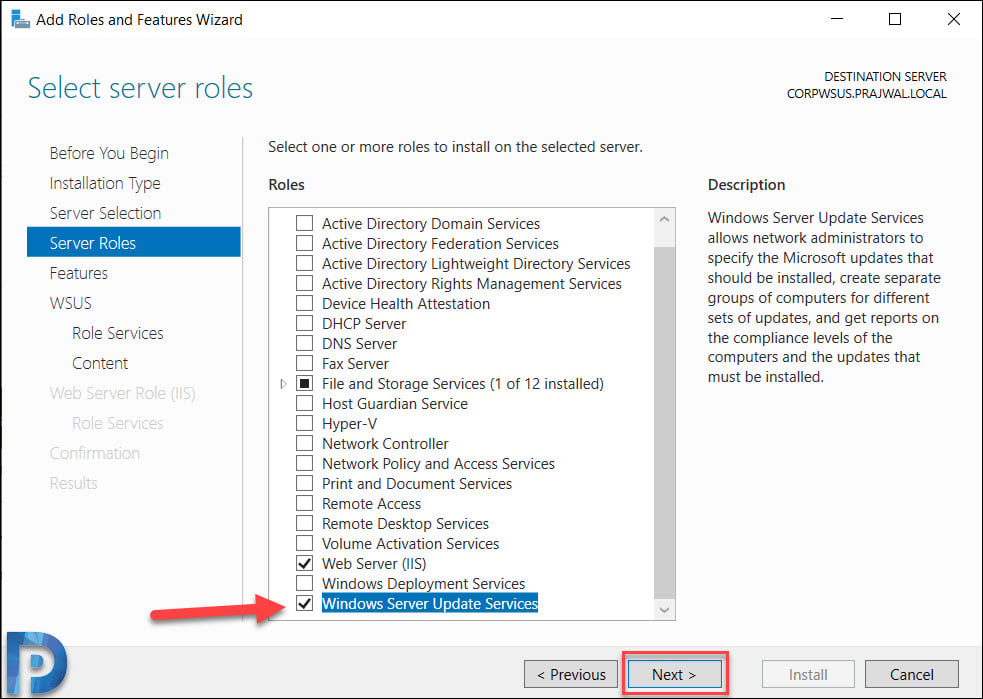
Server Roles – Windows Server Update Services
On the Server roles page, select the role “Windows Server Update Services“. You should see Add features that are required for Windows Server Update Services box. Click Add Features, and then click Next.
On the Select features page, leave the options to default and click Next.

On the Windows Server Update Services page, click Next.
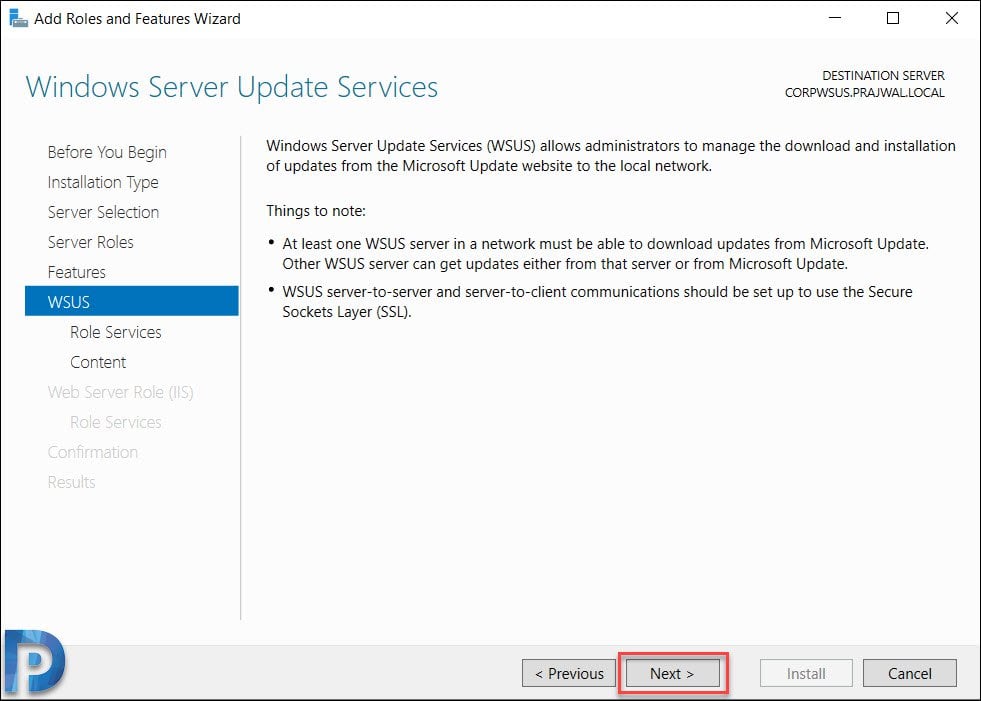
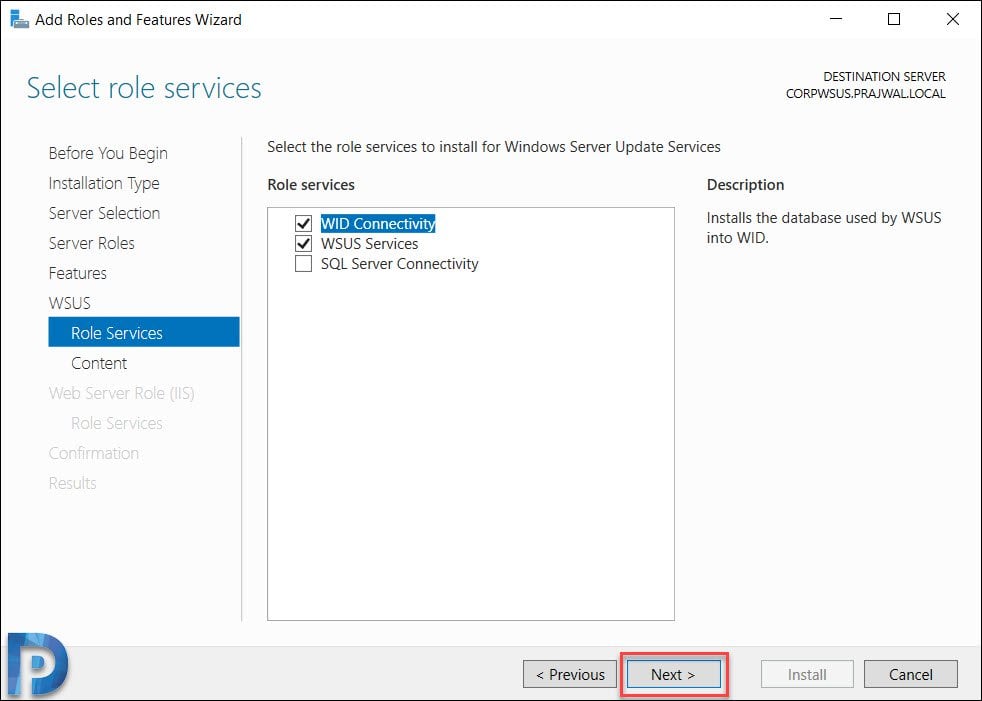
WSUS Database Type – Role Services
You must select role services / Database type to install for Windows Server Update services. Select WID Connectivity and WSUS Services. Click Next.
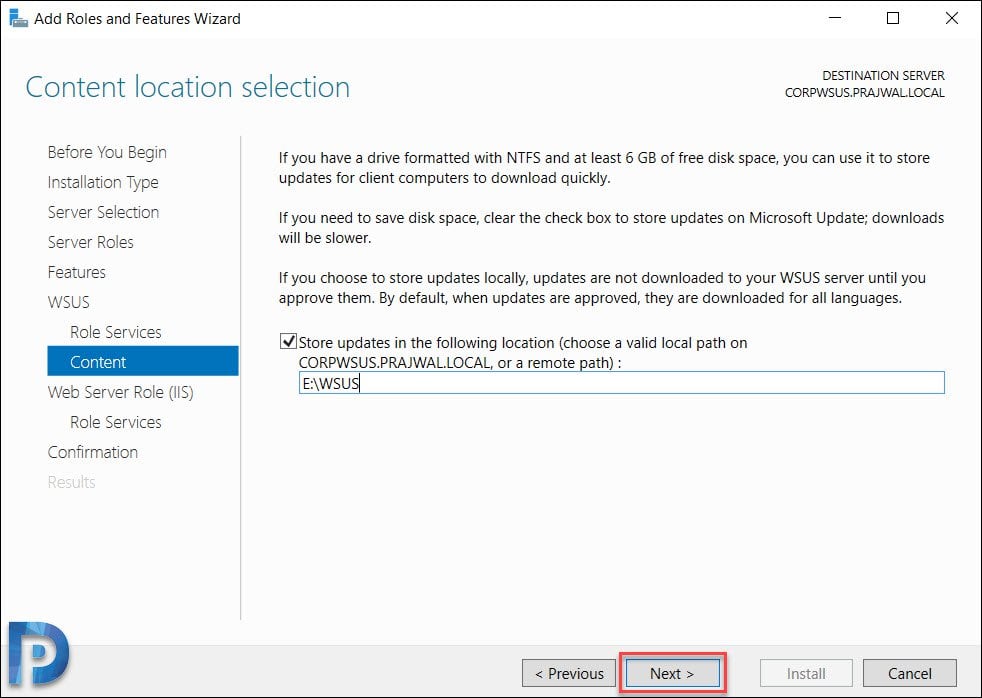
WSUS Content Location
Specify a content location to store the updates. I would recommend storing the updates on another drive and not on your C: drive. The size of this folder can grow eventually and you don’t want this folder to reside on C: drive. Hence choose either a separate drive or store the updates on remote server.
Click Next.
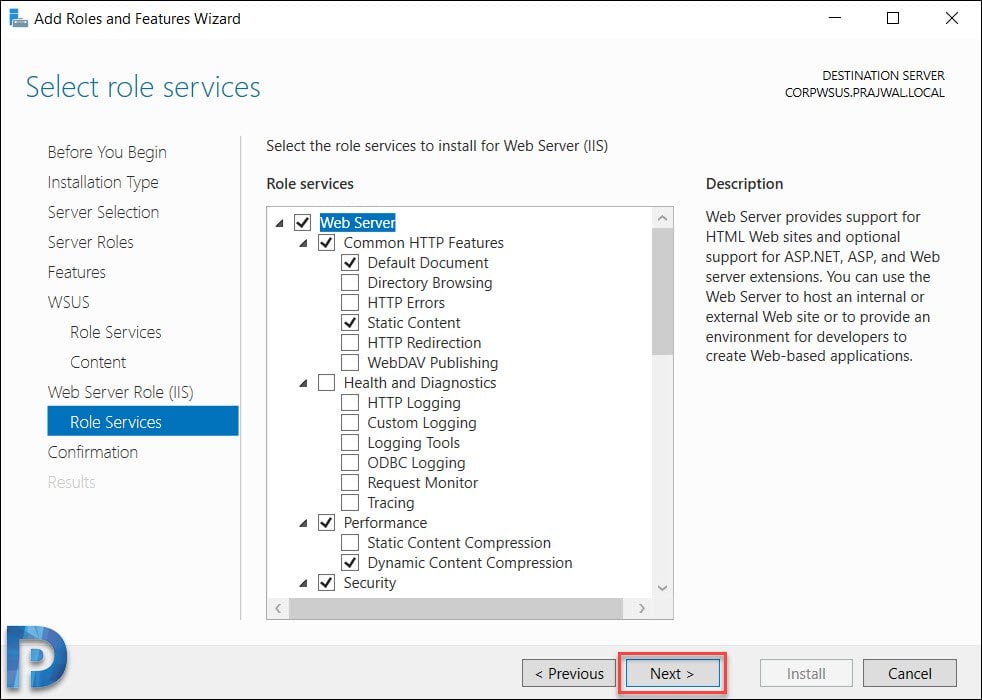
On the Web Server Role (IIS) page, click Next.
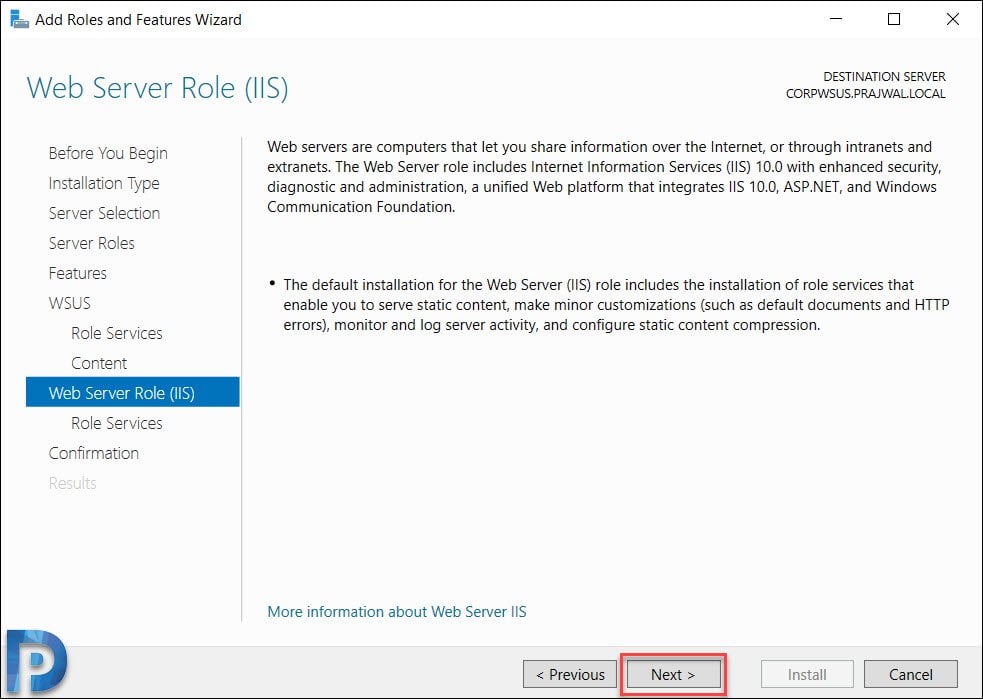
The role services to install web server (IIS) are select automatically. Do not change anything here and click Next.
A final confirmation before you install WSUS. Review the settings and click Install.

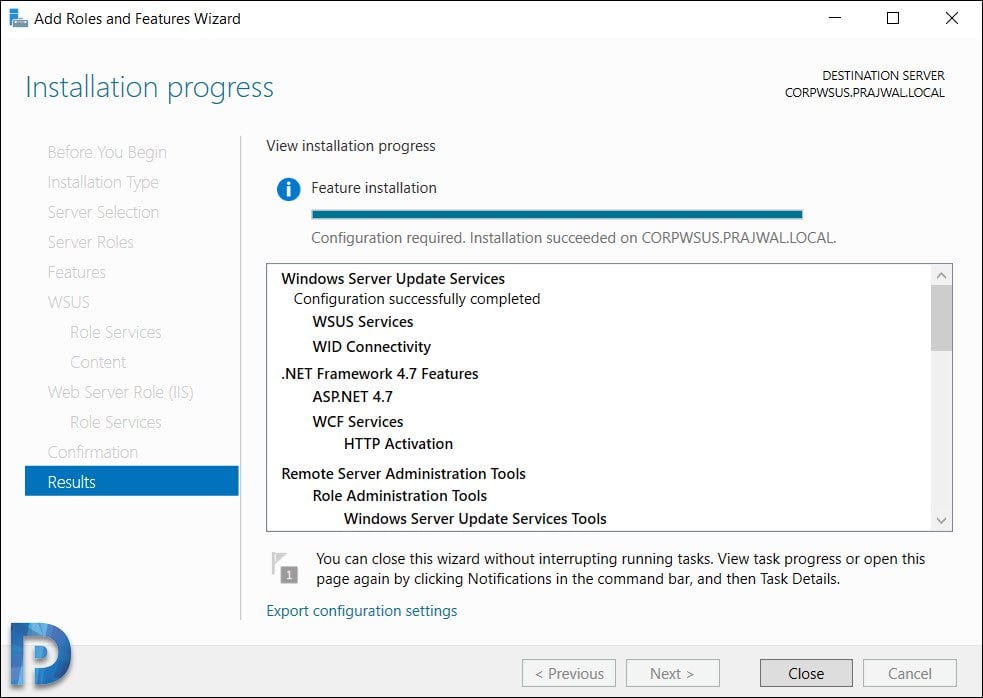
Once WSUS installation is complete, click Launch Post-Installation tasks.

Wait for the message Configuration successfully completed. Click Close.
Configure Windows Server Update Services (WSUS)
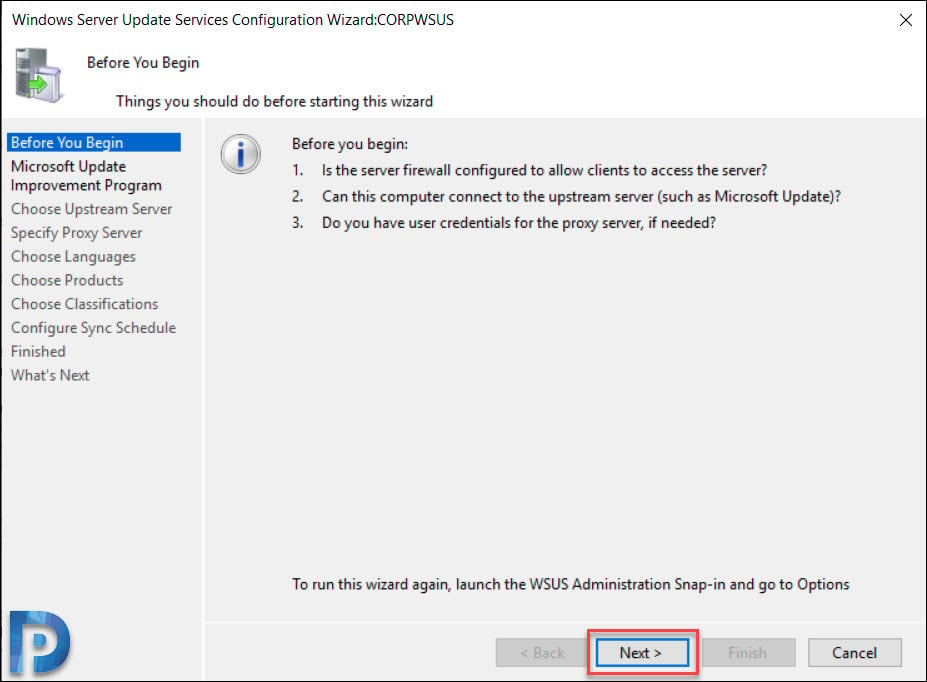
After you install WSUS, you can configure the WSUS server using WSUS Server configuration wizard. This is a one time configuration where you will configure some important WSUS options.
If you don’t see a WSUS Server configuration wizard or if you have skipped it by mistake, don’t worry. You can launch it by opening the WSUS Console > Options > WSUS Server Configuration wizard.
Note – Before you start to configure WSUS, some important points.
- Ensure the server firewall allows the clients to access the WSUS server. If the clients have issues connecting to WSUS server, updates won’t be downloaded from server.
- The WSUS downloads the updates from upstream server which is Microsoft update in our case. So ensure the firewall allows the WSUS server to connect to Microsoft Update.
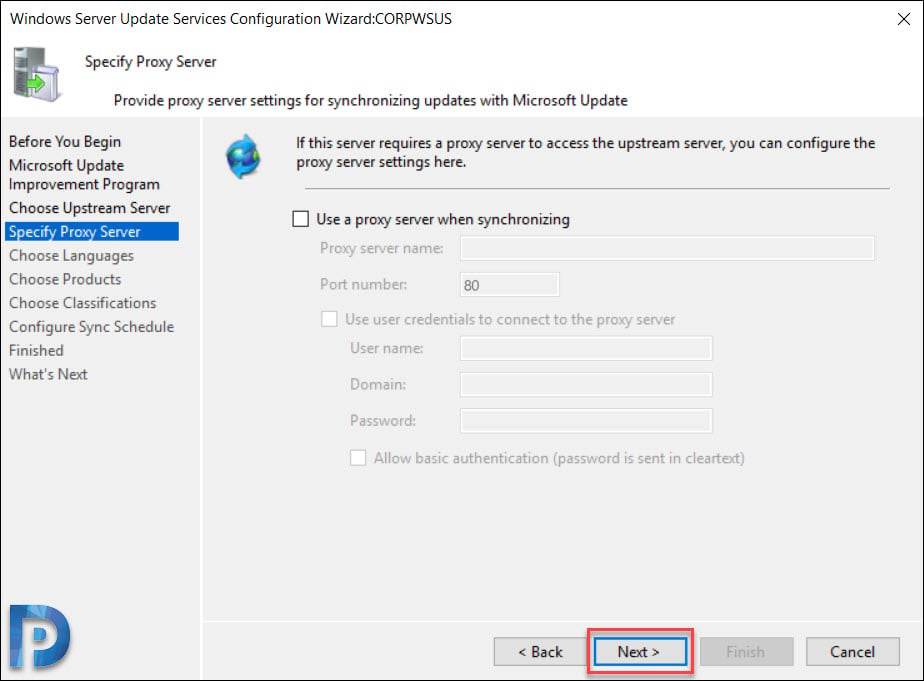
- In case there is a proxy server in your setup, you must enter the credentials for proxy server while configuring WSUS. Have them handy as they are required.
On the Before you begin page, click Next.
Click Next.

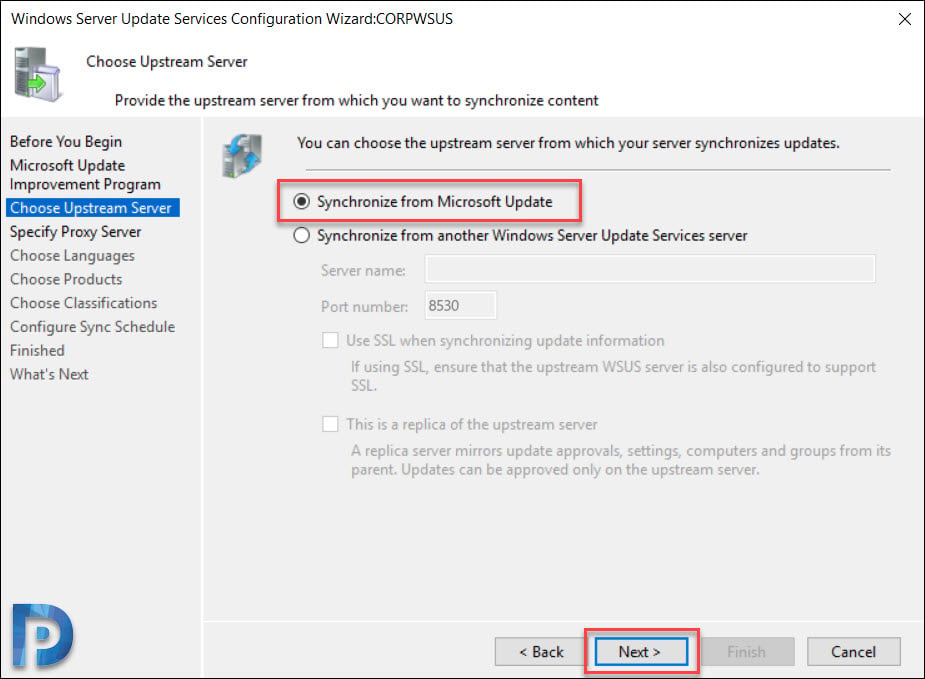
Choose WSUS Upstream Server
This is an important section where you select the upstream server. You get two options.
- Synchronize from Microsoft Update – Selecting this option will download the updates from Microsoft update.
- Synchronize from another Windows Server Update Services server – Select this option if you want this WSUS server to download updates from already existing WSUS server. You must specify the server name and port number (8530) by default. If you are selecting the option to use SSL during updates synchronization, ensure that upstream WSUS server is also configured to support SSL.
Since this will be my only WSUS server, I will select Synchronize from Microsoft Update. Click Next.
Proxy Server
Specify Proxy server information if you have got one. If this option is selected, ensure you specify proxy server name and port number. In addition to that specify the credentials to connect to the proxy server. If you want to enable basic authentication for the user connecting to the proxy server, click Allow basic authentication (password in clear text).
Click Next.
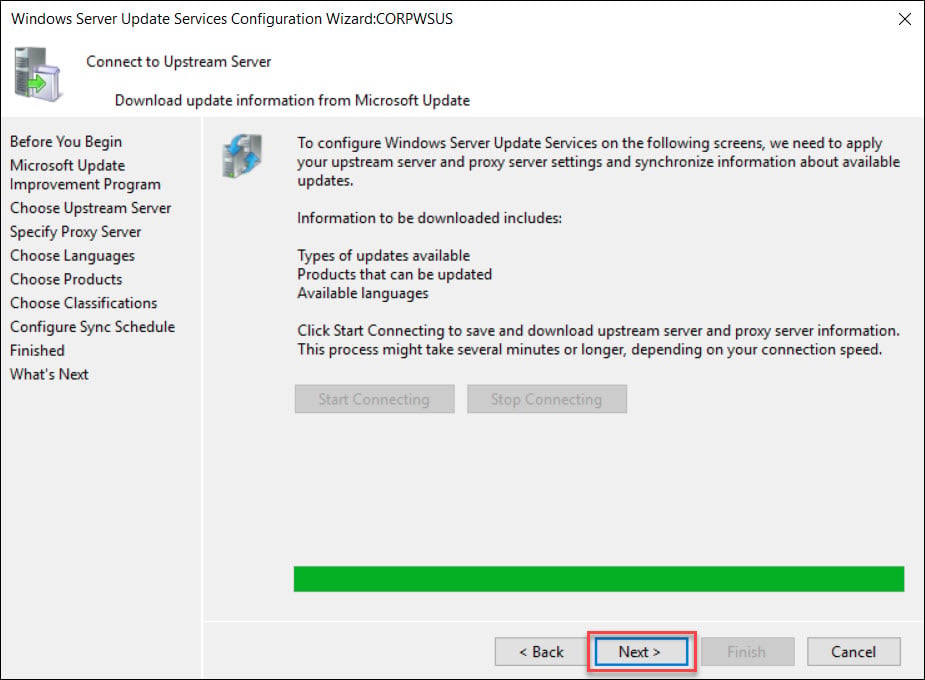
On the Connect to Upstream Server page, click Start Connecting button.
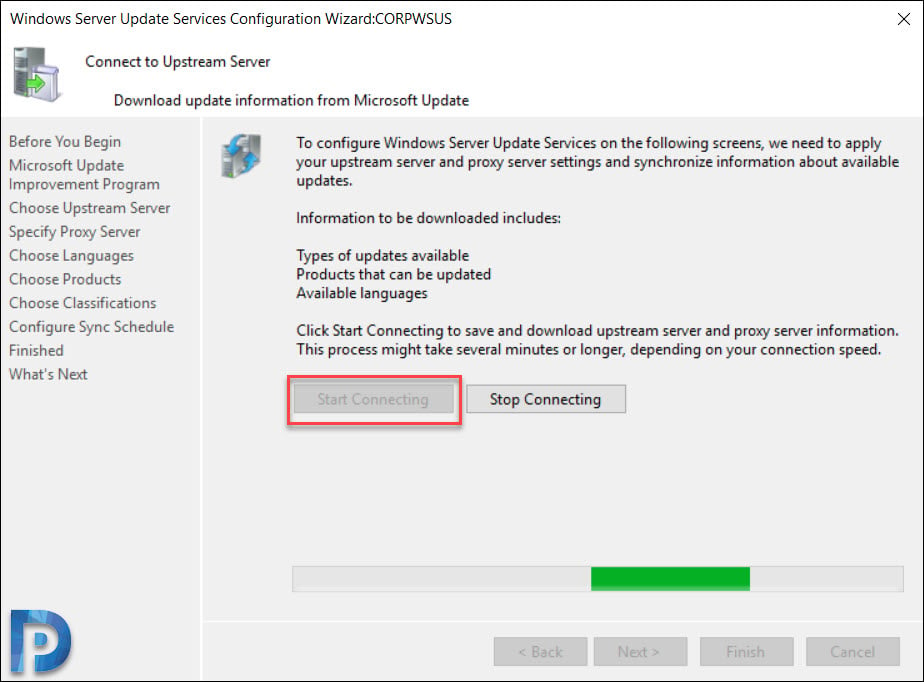
Once it is complete, click Next.
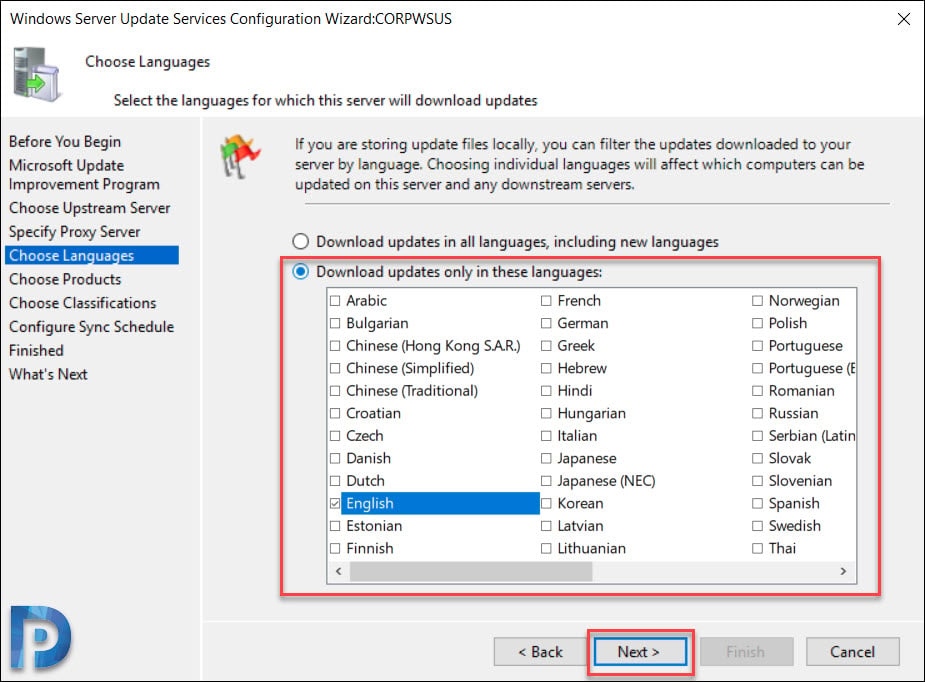
Choose Languages for Updates
On the Choose Languages page, you have the option to select the languages from updates. If you choose to download updates in all languages, you would find updates with all languages in the WSUS console.
However if you choose to get updates only for specific languages, select Download updates only in these languages. Select the languages for which you want updates.
Click Next.
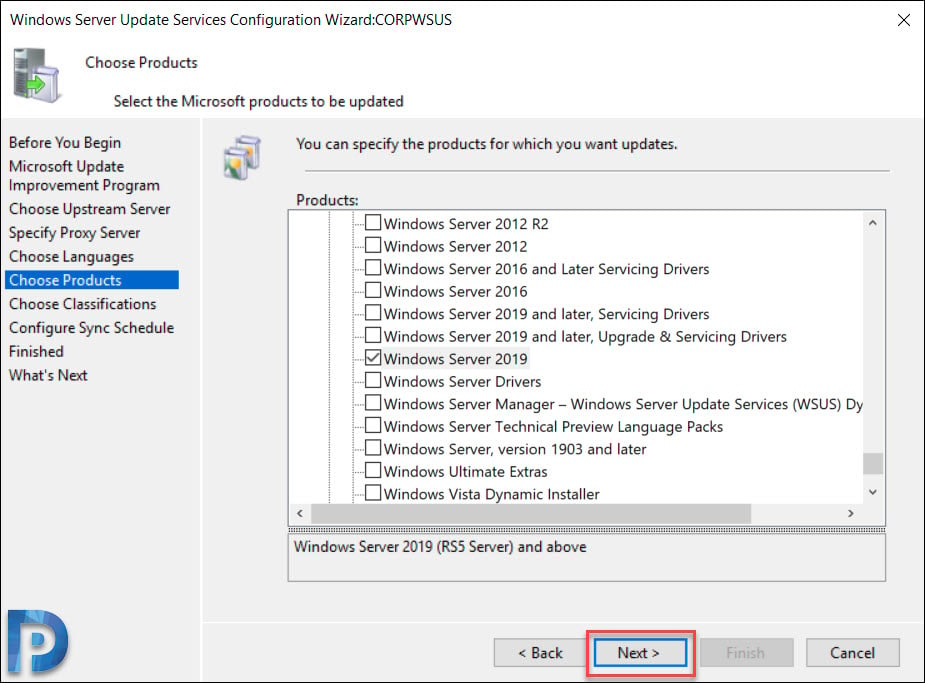
Choose Products
This is the page where you select the products for which you want the updates. A product is a specific edition of an operating system or application.
From the list of products you can select individual products or product families for which you want your server to synchronize updates. In this case I am going to select Windows Server 2019 and Windows 10 1903 as products.
Click Next.
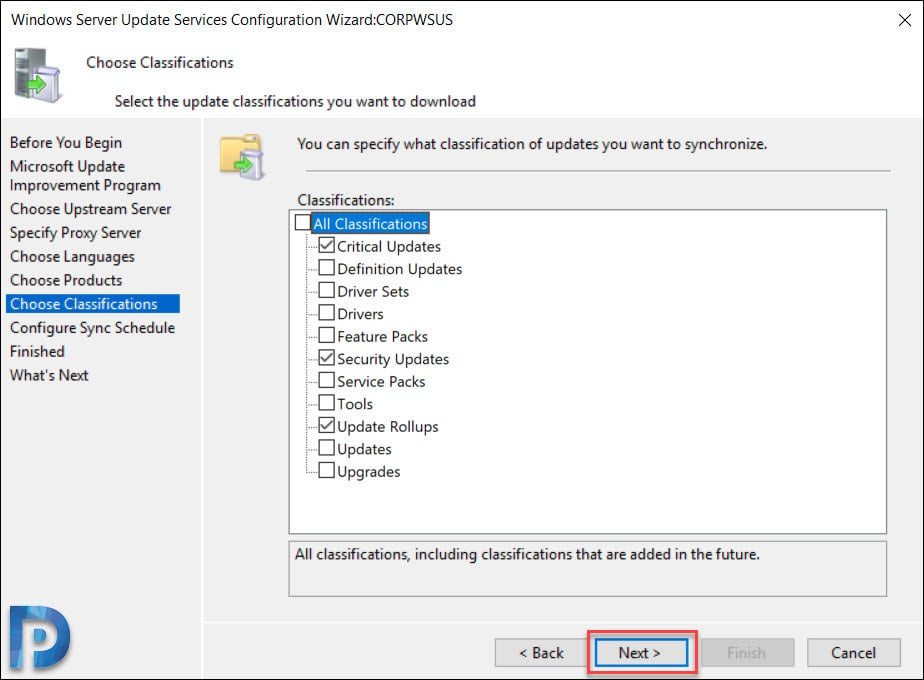
Choose Update Classifications
In the beginning of the post I have listed the types of updates. On the Choose Classifications page, select the required classifications. I have selected Critical Updates, Security Updates and Update Rollups.
Click Next.
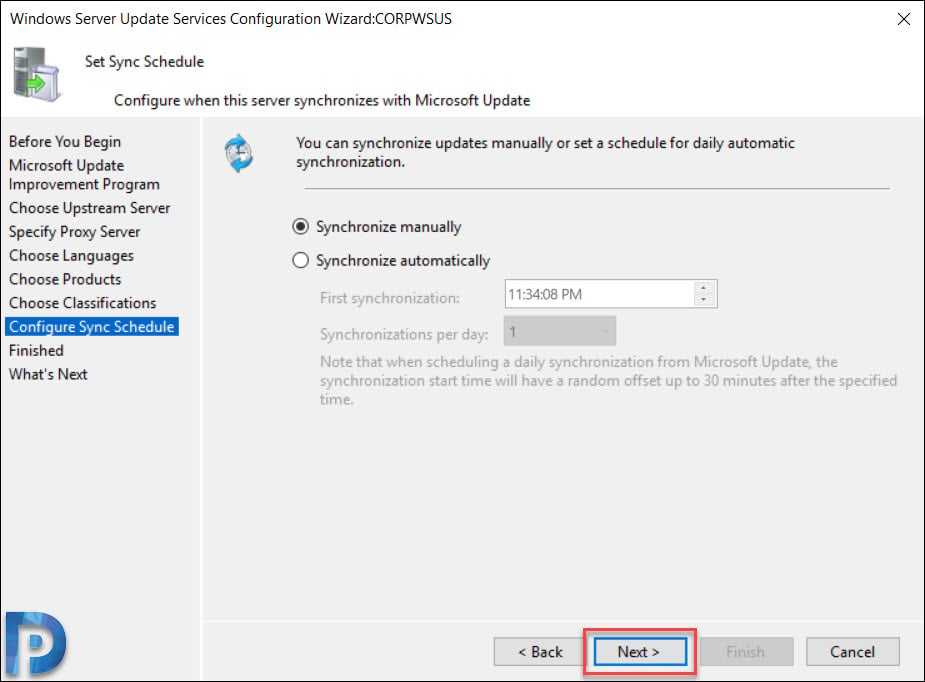
Configure WSUS Synchronization Schedule
You must decide on how do you want to perform WSUS sync. The Set Sync Schedule page lets you select whether to perform synchronization manually or automatically.
If you choose Synchronize manually, you must manually start the synchronization process from the WSUS Administration Console. With this option selected, you have to manually perform the sync every time. Therefore do not select this option if you are setting up the WSUS in production.
If you choose Synchronize automatically, the WSUS server will synchronize at set intervals. You can set the time of First synchronization. Then set the number of synchronizations per day. From the drop-down you can choose the value between 1-24.
Click Next.
Click Begin initial synchronization. Click Next.
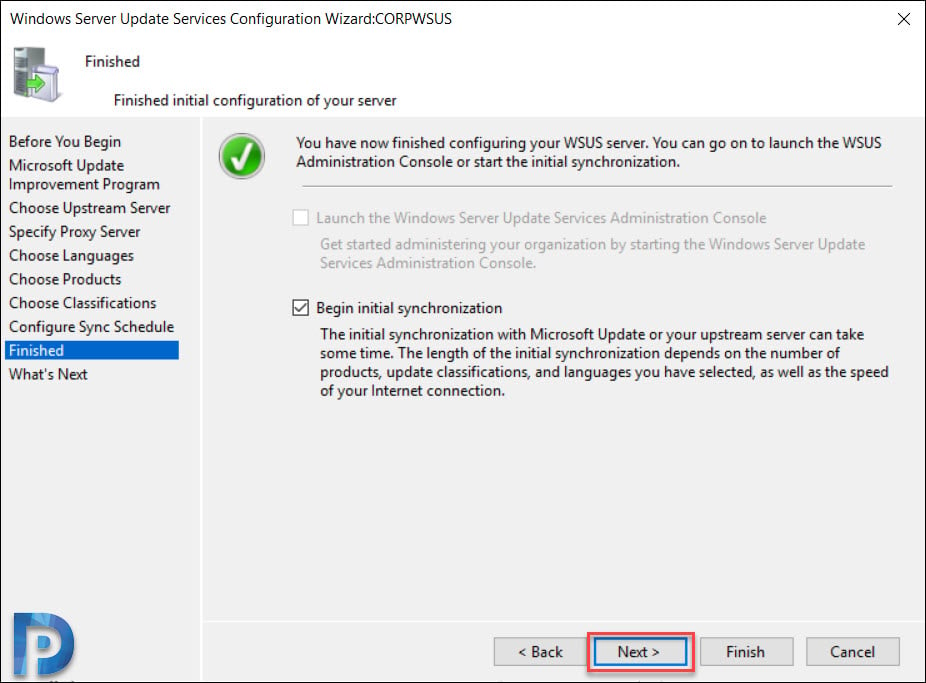
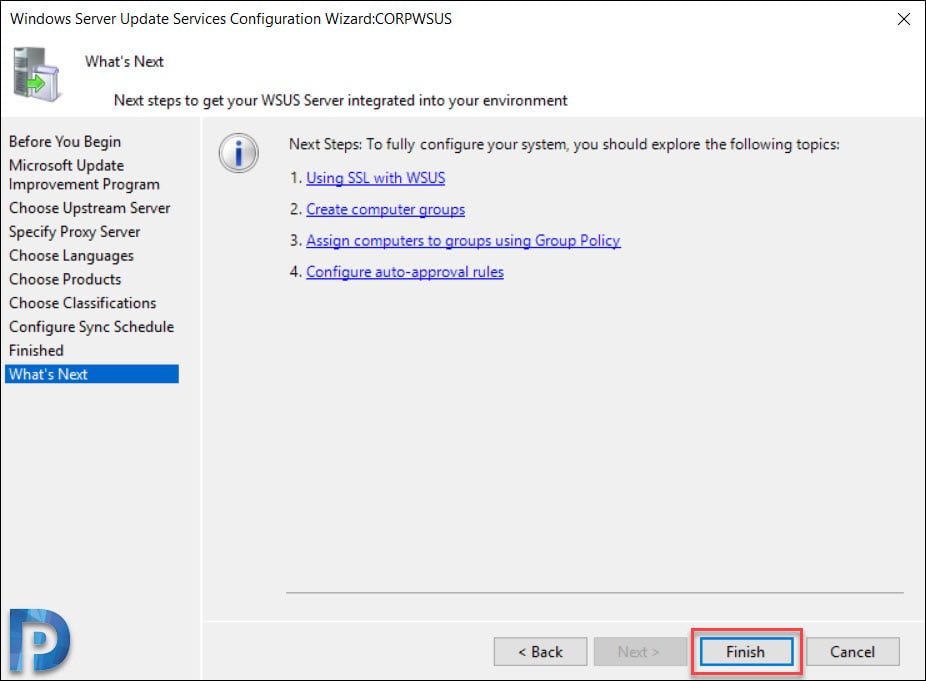
Finally on the last page, click Finish. This completes the steps to configure WSUS.
Configure Group Policy Settings for WSUS
After you install and configure WSUS, the next important task is to configure group policy settings for automatic updates. The new clients still don’t know about the new WSUS server that you just setup. Using group policy you can point your client machines to new WSUS server.
In an active directory environment, you can use Group Policy specify the WSUS server. The group policy settings will be used to obtain automatic updates from Windows Server Update Services (WSUS).
You can create the group policy and apply it at domain level. Or you can create and apply the GPO to a specific OU (containing your computers).
While there are many Windows Update policy settings, I am going to configure few of them. For a list of all windows update policy settings, read this article from Microsoft.
Configure Automatic Updates WSUS
To configure Automatic Updates group policy settings for WSUS
- Open the Group Policy Management console, and open an existing GPO or create a new one.
- Navigate to Computer Configuration > Policies > Administrative Templates > Windows Components > Windows Update.
- Double-click Configure Automatic Updates and set it to Enabled.
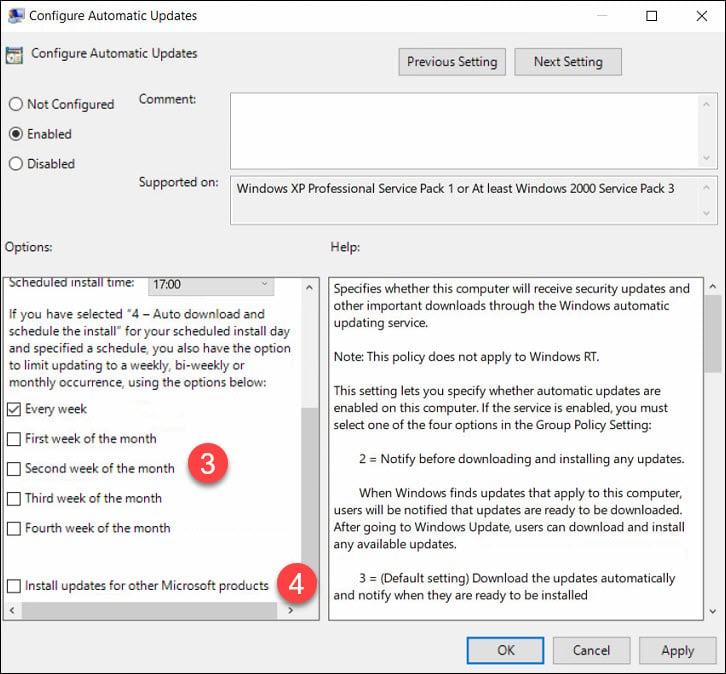
Under Configure automatic updating, select the desired option. Under Schedule install day, select the day when you want the updates to be installed. Set the scheduled install time.
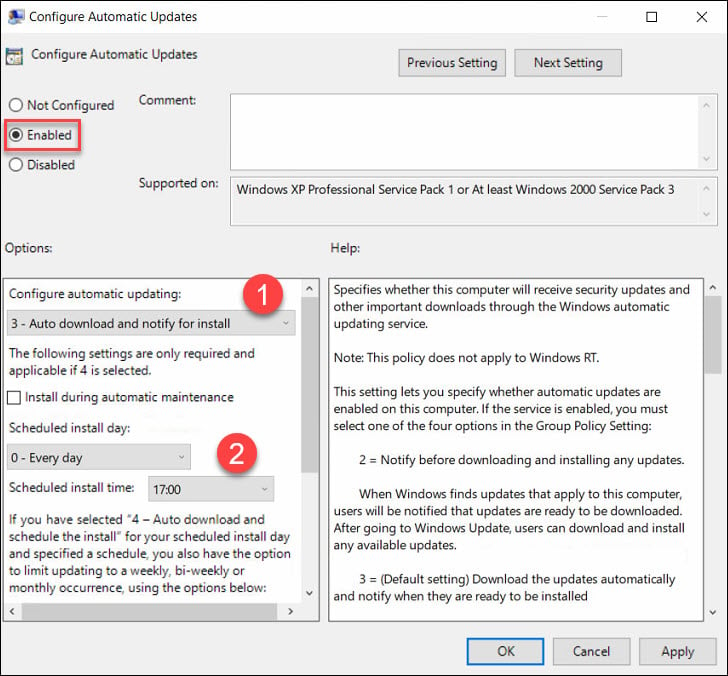
In case you select Auto download and schedule the updates install, you get some options to limit updating frequency. If you have configured the settings, click Apply and OK.
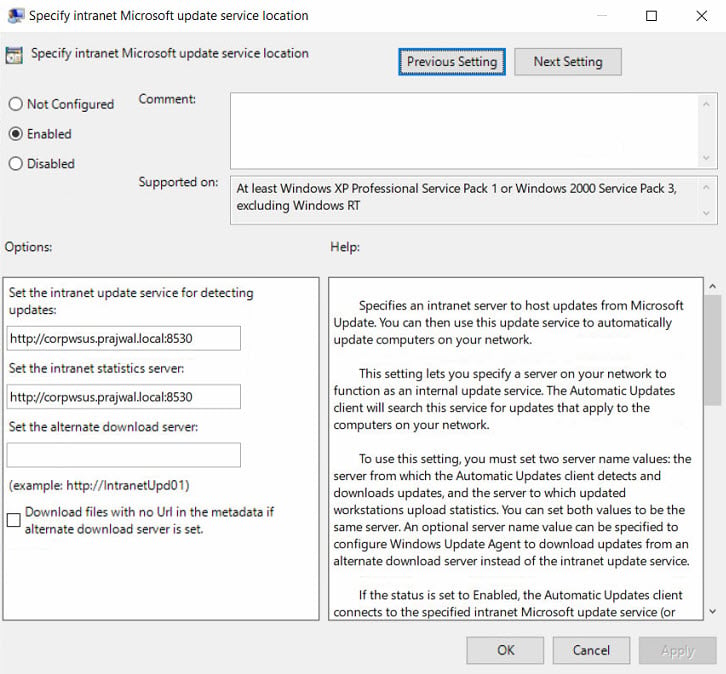
Specify Intranet Microsoft Update Service Location
The next setting that you should configure is specify an intranet Microsoft update service location. The idea behind this is to ensure the client computers contact the specified intranet server instead of downloading updates from internet. Unless you configure this policy setting, the client computers wouldn’t know about the intranet server.
To enable the policy, click Enabled. Specify the intranet update service and intranet statistics server. Click Apply and OK.
On the client computer, check the resultant set of policy to confirm if the WSUS GPO is applied.
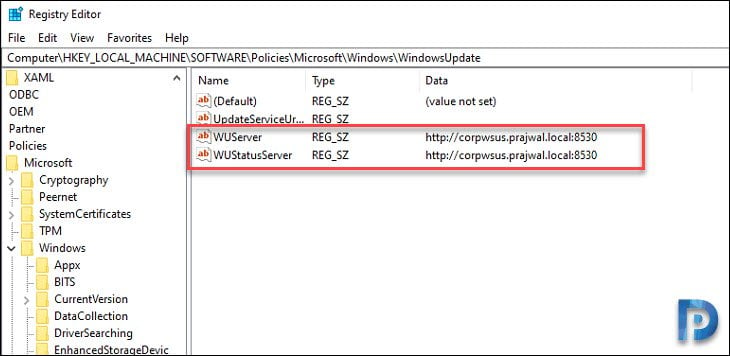
 You can also verify the intranet update service location on client computers using registry. On the client computer, open Registry Editor and go to HKLM\SOFTWARE\Policies\Microsoft\Windows\WindowsUpdate.
Check the values of WUServer and WUStatusServer and confirm if the values match the one that you supplied in WSUS GPO.
Configure WSUS computer groups
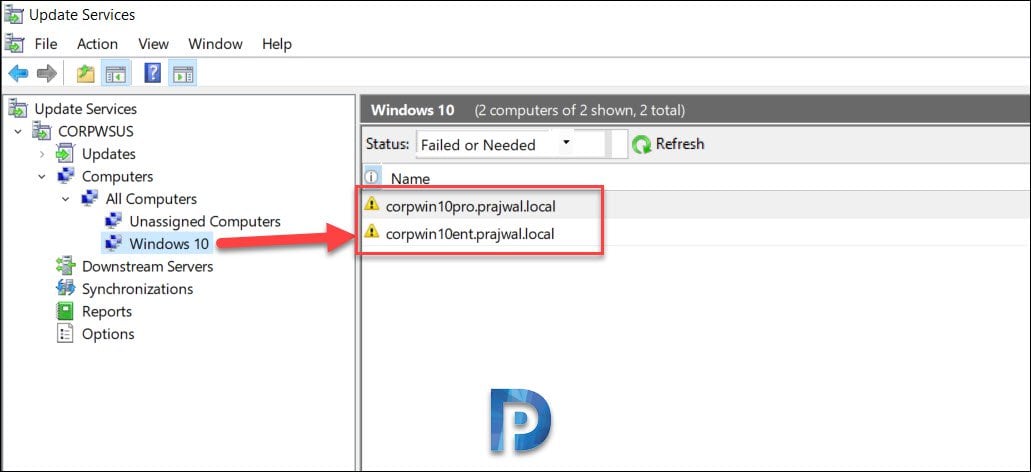
By creating computer groups you can first test and target updates to specific computers. When you open WSUS console, you will find two default computer groups – All computers and Unassigned computers.
You can create custom computer groups to manage updates in your organization. As per Microsoft you must create at least one computer group in the WSUS console. Test updates before you deploy them to other computers in your organization.
To create a new computer group in WSUS console
In the WSUS Administration Console, under Update Services, expand the WSUS server. Expand computers, right-click All computers, and then click Add computer Group.
In the add computer Group dialog box, specify the name of the new group, and then click Add.

Click All Computers and you should see list of computers. Select the computers, right click and click Change Membership.

On the Set Computer Group Membership box, select the new group that you just created. Click OK.

Click the new group and you should find those computers.
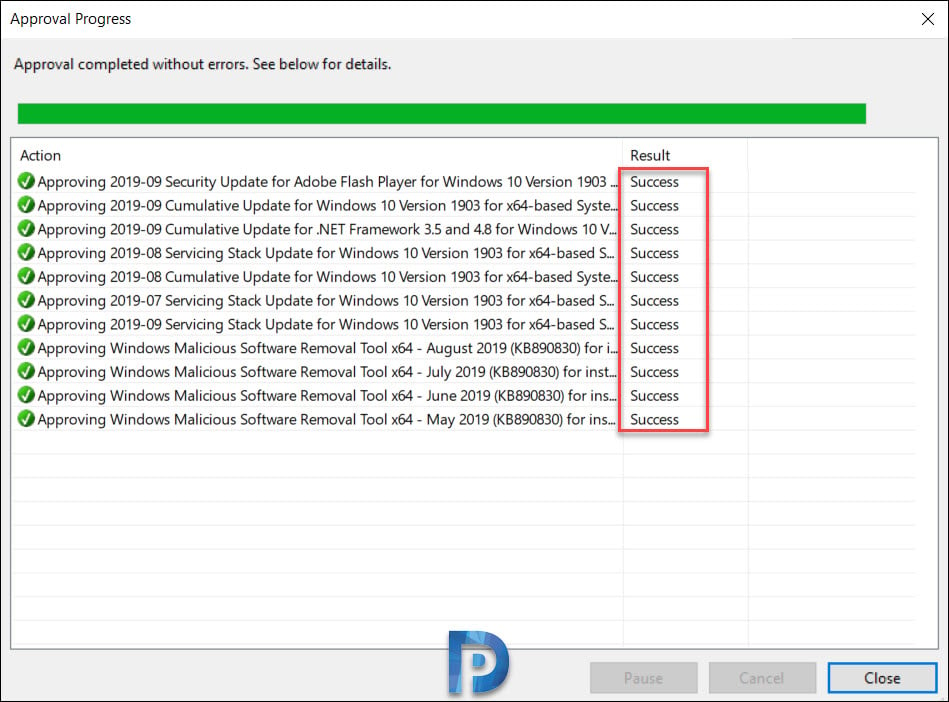
Approve and Deploy Updates in WSUS
Once you have a test computer group created, your next task to deploy the updates to the test group. To do so you must first approve and deploy WSUS updates.
To approve the updates in WSUS
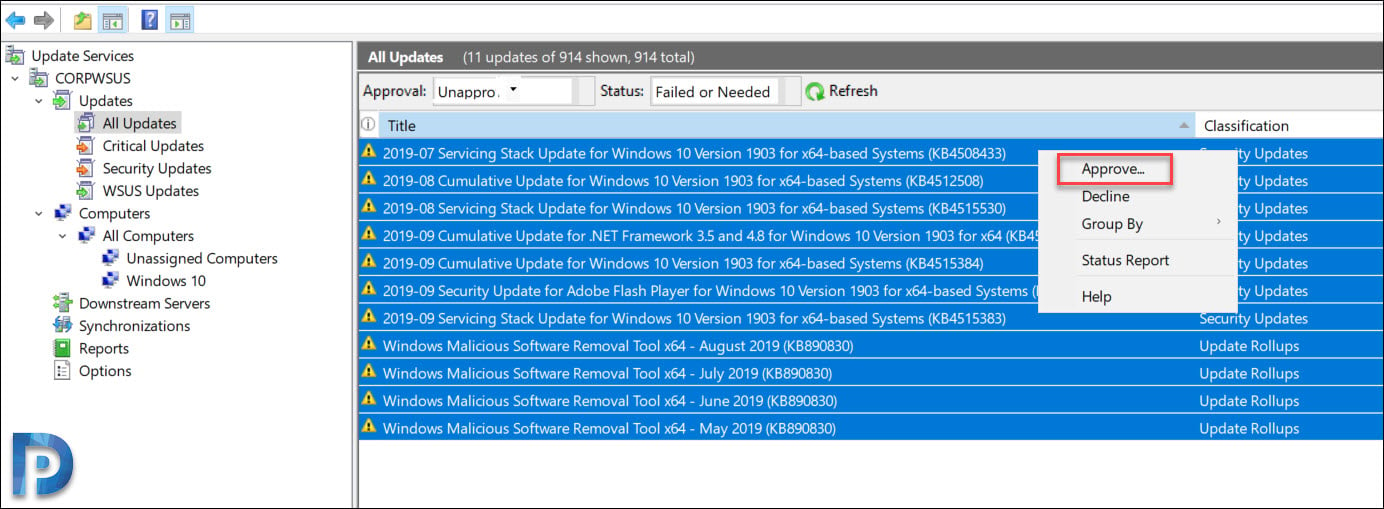
- Launch the WSUS Administration Console, click Updates > All Updates.
- In the All Updates section, select the updates that you want to approve for installation in your test computer group.
- Right-click the updates and click Approve.
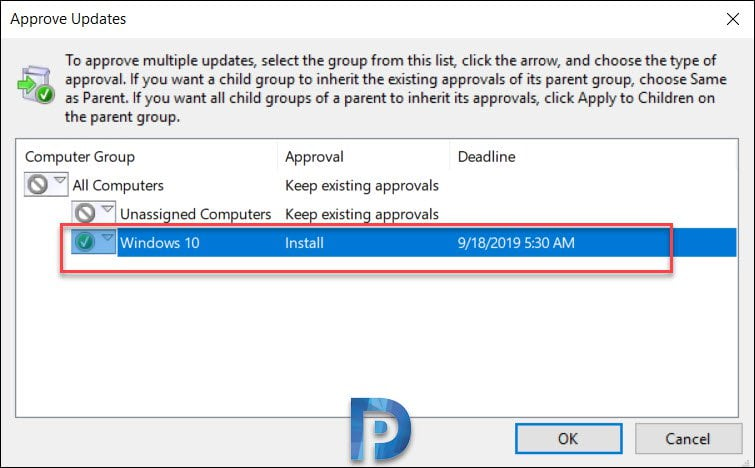
Most of all in the Approve Updates dialog box, select your test group, and then click down arrow. Click Approved for Install. You an also set a deadline to install the updates. Click OK.
The Approval Progress window appears, which shows the progress of the tasks that affect update approval. When the approval process is complete, click Close.
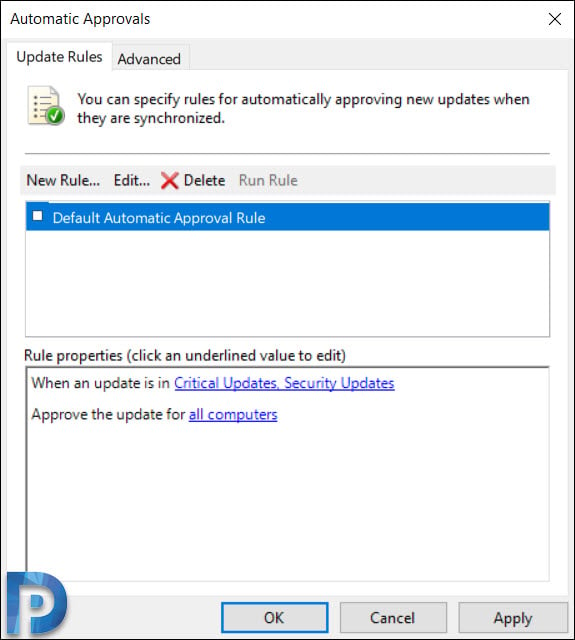
Configure Auto Approval Rules in WSUS
If you don’t want to manually approve the updates you can configure auto approval rule in Windows Server Update Services.
To configure Automatic Approvals in WSUS
- Launch WSUS Administration Console, expand the WSUS server, and then click Options.
- In Options, click Automatic Approvals.
- You should find the default automatic approval rule and if you wish you can edit it and use it.
- To create a new approval rule, click New Rule.
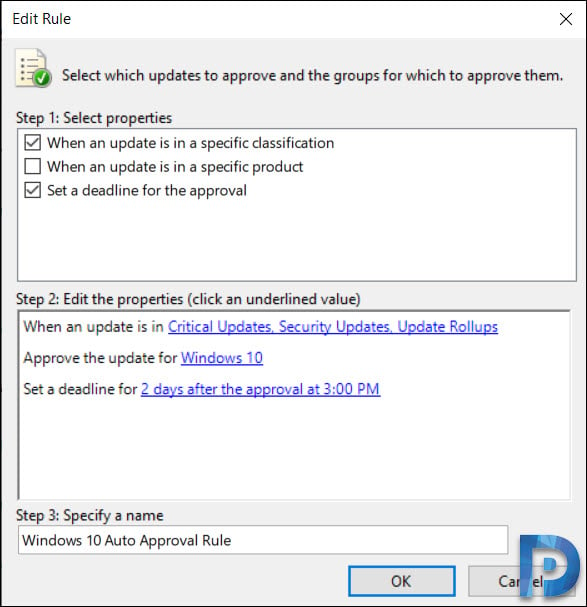
Check the box When an update is in a specific classification. Select the classifications. You can also approve the update for computers groups. I am going to select Windows 10 as that is my test computer group. Finally you can set a deadline for the update approval and specify auto approval rule name.
After you configure the rule, click OK.
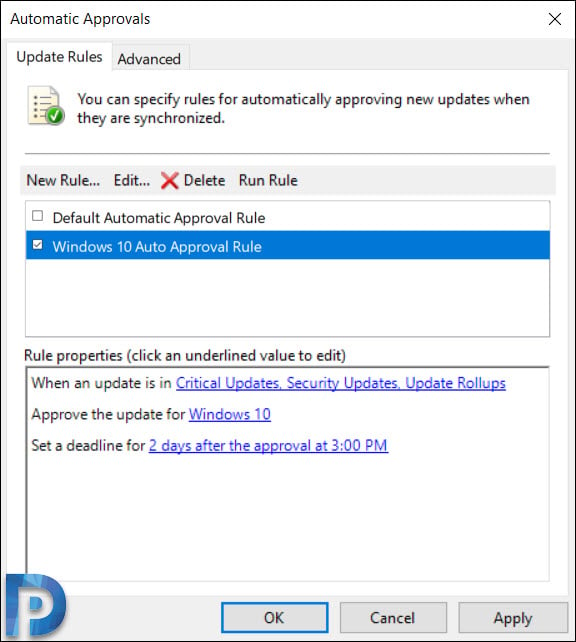
On the Automatic Approvals window, you can find the rule that you just created. If you wish to run this rule, click Run Rule.
WSUS Reports
The last section that I want to cover is the WSUS reports. Clicking Reports in the WSUS console shows the list of reports. WSUS comes with several reports to help you find the updates deployment status, sync reports and computers reports.
- Update Reports – Includes Updates status summary, detailed and tabular status, tabular status for Approved Updates.
- Computer Reports – Computer Status Summary, Detailed Status, Tabular Status and Computer tabular Status for approved updates.
- Synchronization Reports – Shows the results of last synchronization.
 This completes the steps to install and configure WSUS. I am sure this guide will help you to setup WSUS in your lab setup. If you have any questions related to WSUS, do let me know in comments section.

HI Prajwal,
we have done the all configureations related to WSUS and we noticed out our web site is now pointing to local server IIS.
my AD – xxx lk
my website is also xxx lk which have hosted on azure cloud. what are the actions i can take to avoid this.
Thanks
KJ
Hi Prajwal,
I have configured WSUS Server separately and it is on Child domain’s Server CDC2 one member Server VM3 is visible and populated also patched.
I tried creating another Server 2019 VM4 which is same CDC2 domain member.
And issue is that VM4 is not populating on WSUS Server.
Kindly advise -why vm4 not populating
Hi,
I am facing this error while sync the wsus with Microsoft update services. any help…
WebException: The underlying connection was closed: Could not establish trust relationship for the SSL/TLS secure channel. —> System.Security.Authentication.AuthenticationException: The remote certificate is invalid according to the validation procedure.
at System.Web.Services.Protocols.WebClientProtocol.GetWebResponse(WebRequest request)
at Microsoft.UpdateServices.ServerSync.ServerSyncCompressionProxy.GetWebResponse(WebRequest webRequest)
at System.Web.Services.Protocols.SoapHttpClientProtocol.Invoke(String methodName, Object[] parameters)
at Microsoft.UpdateServices.ServerSyncWebServices.ServerSync.ServerSyncProxy.GetAuthConfig()
at Microsoft.UpdateServices.ServerSync.ServerSyncLib.InternetGetServerAuthConfig(ServerSyncProxy proxy, WebServiceCommunicationHelper webServiceHelper)
at Microsoft.UpdateServices.ServerSync.ServerSyncLib.Authenticate(AuthorizationManager authorizationManager, Boolean checkExpiration, ServerSyncProxy proxy, Cookie cookie, WebServiceCommunicationHelper webServiceHelper)
at Microsoft.UpdateServices.ServerSync.CatalogSyncAgentCore.SyncConfigUpdatesFromUSS()
at Microsoft.UpdateServices.ServerSync.CatalogSyncAgentCore.ExecuteSyncProtocol(Boolean allowRedirect)
“The remote certificate is invalid according to the validation procedure.” – This could be the reason why you are facing the error.
hello everyone,
i have created wsus server windows 2019. Now all i have set configuration including GPO also clients are showing my console i select 2 system and approve to install when i check from client side downloading is still pending from yesterday shown 0% only so to do the next step kindly help me
Thanks & Regards
Amol.
Hello ,
I Went through your installation method of WSUS Followed each method.
My servers & client machines are turned off of xxxDays today when I open my WSUS Server
all are showing FAILED .
getting error msg “this computer has not reported status in xxx days ”
I tried to report them
gpupdate /force
wuauclt/reportnow
wuauclt/detectnow
I run this for 3 hours continuously but not yet reported.
please suggest !!
Hi,
how can i update the wsus server 2019 console to the latest version available?
My update services version is 10.0.17763.1.
Thanks
Hi,
how can i update the wsus server 2019 console to the latest version available?
thanks
Whether WSUS required to be connected to Internet after successful synchronisation? Actually I wish to update my LAN PCs and don’t want to connect WSUS to internet once connected to my LAN.
Thanks for this as it was exactly what I needed today. You create easy to follow and read guides. Keep up the great work and thanks again.
Hii
Thanks in advance
We are facing a typical problem.
we have one internet facing WSUS which download updates from Microsoft wsus. There we export updates and import updates to disconnected upstream WSUS server.
From this disconnected upstream server successfully downloaded updates to Sccm . But same updates failed to download into another downstream WSUS server
Software distribution log and event viewer log ID 364 showing same error
Content file download failed Reason HTTP status 401: the requested resource requires user authentication
But clients can download updates(older updates, which are Allready downloaded) from downstream WSUS server
When I was clicked on “Start Connecting” the below error raised.
Synchronization Error Details
WebException: The underlying connection was closed: An unexpected error occurred on a send. —> System.lO.lOException: Unable to read data from the transport connection: An existing connection was forcibly closed by the remote host. at System.Web.Services.Protocols.WebClientProtocol.GetWebResponse(VVebRequest request) at System.Web.Services.Protocols.HttpWebClientProtocol.GetWebResponse(WebRequest request) at Microsoft.UpdateServices.ServerSync.ServerSyncCompressionProxpGetWebResponse(WebRequest webRequest) at System.Web.Services.Protocols.SoapHttpClientProtocolinvoke(String methodName, Object[] parameters) at Microsoft.UpdateServices.ServerSyncWebServices.ServerSync.ServerSyncProxy.GetAuthConfig() at Microsoft.UpdateServices.ServerSync.ServerSyncLibinternetGetServerAuthConfig(ServerSyncPrw proxy, WebServiceCommunicationHelper webServiceHelper) at Microsoft.UpdateServices.ServerSync.ServerSyncLibAuthenticate(AuthorizationManager authorizationManager, Boolean checkExpiration, ServerSyncProxy proxy, Cookie cookie, WebServiceCommunicationHelper webServiceHelper) at Microsoft.UpdateServices.ServerSync.CatalogSyncAgentCore.SyncConfigUpdatesFromUSSO at Microsoft.UpdateServices.Serve
Please suggest it’s appropriate solution.
After installation and first initialization completed. Which GPO option we have to choose. That is GPEDIT.MSC (Local Group Policy) or GPMC.MSC (Domain Group Policy) that has not defined here in this article.
In a domain environment, you must always use Domain group policy to configure and apply policies to domain computers.
I went through your WSUS guide, its excellent and help me lot. I have question regarding the port open between upstream server and downstream server. Here we use default port,8530. do I need to open the bidirectional traffic between upstream server and downstream server? and what are the ports we need to open between these servers?
Appreciate your response
Thank you
The GPO setting to “Configure Automatic Updates” takes the Scheduled Time in which TimeZone?
As per my understanding it is UTC/GMT.
Can anybody please confirm it for me?
Hi Everyone,
I have setup a WSUS server in Windows 2019 STD, all of my domain computers reported to the WSUS server, but half of them did not show the Last Reported. Any idea of why? Please help. Thanks in advanced.
WSUS was working fine on Server 2019 but it was on older hardware that was starting to fail. I replace the MB plus OS drive and created another WSUS server from scratch using Server 2019. Since I didn’t want to download all the updates again I disconnected the D: hard drives (they were Raid/Mirror) which was a dedicated set of drives just for WSUSContent.
I when through these steps:
1. Did an wsusutil.exe export export.cab export.log to save the Metadata on the old existing WSUS server.
2. Turn off the old server and pulled out the System drive (c:) and put them aside. Just because.
3. Built a new Server 2019 and installed WSUS and used a temporary D: drive (during the WSUS configuration process I forgot the “\” after the D: drive where to put the Content folder but didn’t realized it yet). Also at this point it wasn’t connected to the domain.
4. Removed the temporary D: drive and put in the previous used D: drive (it was a dedicated set of drives just for WSUS content.
5. Did a wsusutil.exe import export.cab import.log to import in the Metadata.
6: Join this new WSUS server (2019) to the domain
7. Did my first sync on this new server and existing WSUS content and download from MS was stuck at 0% download
8. I then realized I forgot the “\” after the D: during the install – it happened to me years ago. I installed SSMS updated the LocalContentCacheLocation from D:WsusContent to D:\WsusContent.
9. Updates from MS started to download as expected.
10. Updated the GP and changed the old server name to the new server name – related to Windows Updates.
Here is the real issue …
10. None of Windows clients (all are Windows 10 Enterprise) will download any new updates. They are stuck at Downloading 0%. They worked just fine for years on the previous WSUS Server setups.
11. They see new updates from the new WSUS server but will not download – Stuck at Download 0%
12. The new WSUS Server see all of the existing workstation.
13. I then built a brand new workstation with Windows 10 Pro and after I installed the OS, I immediately manually set the local GP to look at the new WSUS server to download any updates. (Note: this workstation is not connected to domain.) It does the same thing, finds new needed updates but download is stuck at Downloading 0%. WSUS sees this new workstation.
It must be someone on the new WSUS server setup. Any suggestions? Are the logs I can look at to tell me what is going on?
My guess is that it has something to do with the new WSUS server and not with any of the workstations.
Hello Prajwal,
There are multiple Windows 10 line items. Which one do we need to select? We use Windows 10 Pro .
Wondering if someone can help me here! I recently did an in-place OS upgrade on my SCCM server from 2012 to 2016. As part of the upgrade I removed the WSUS role and once the upgrade completed I followed some guides including this one to re-install the WSUS role. This completed and I ran the post install step via the WSUS console and let it run and went home. I came back in the morning and the post install step completed and I closed it and went about my usual work. I noticed then that a device next to me received a windows upgrade, Win10 20H2. I thought that is interesting, I dont have that upgrade downloaded or deployed anywhere with SCCM. I then noticed another one and then it turns out everyone in the environment is getting updates, not just the Windows 10 20H2 upgrade but other random updates like drivers etc which we don’t publish with SCCM at all.
I started checking group policy which is all set correctly and was not changed before the inplace OS upgrade.
I am currently still trying to find out why this is happening. It seems to me that clients must be getting updates from WSUS directly regardless of the GPO settings that restrict that from happening. Very strange problem to have and at this point I still havent found out why this is happening.
hello!
i am thinking about setting up a new wsus server since i am having problems installing .net framework 3.5 on clients which get their updates from (the old) wsus server. trying to enable .net framwork 3.5 feature results in 0x800F0954 on the client – i then have to edit the clients registry to bypass wsus, install .net framework and enable wsus again.
now, that i convinced myself to make a new one from scratch, does anyone here know if there is something i have to look out for during installation to avoid having to deal with this problem on the new server again? does anyone know where it comes from? 🙂
thank you 🙂
Try command mode manual installation from OS DVD/ISO – Dot net 3.5
DISM /Online /Enable-Feature /FeatureName:NetFx3 /All /LimitAccess /Source:d:\sources\sxs
D: \ — means DVD/ISO drive name
What an excellent article. Thank you very much for all the posts on the excellent site
Thank you 🙂
should i install wsus at each distribution point/remote location? if so how should i go about configuring that?
Hello Prajwal,
Hope you are doing good.
Huge fan of your post/articles. All my bookmarks have your articles only. Great work Prajwal.
Thanks,
Prateek
Is it possible to link a 2019 server with WSUS as a sup role on a SCCM 2012 R2 (Config Manager 2006) installed on a 2012 R2 server ?
Dear Prajwal,
I have followed a lot of your tutorials down to every single detail, but yet again i am in need of your dire expertise. Now that MS has enforce SSL to be used for your systems are you planning to make a tutorial how to configure this?. I was wondering if you could use a self signed certificate to achieve what Microsoft is demanding or you need to buy a certificate from a CA e.g. Comodo or other venders if so i was wondering how this can be achieve. I have successfully deployed it using a self-signed certificate but seeing no updates is being downloaded from the WSUS server using this method is it possible for you to create a tutorial showing this.
Another question I have is, what type of certificate should I buy?
What behavior would be expected for automatic approval when:
“When an update is in = Windows 10”
“Approve the update for = Windows 10”
“Set a deadline for “2 days after the approval at 3:00am”
What updates would the group “Windows 10” actually get as the specific classification hasn’t been set\defined?
Is it possible to do without AD or domain
yes
go the Regedit path shown in the article and add the values manually in each machine
Hey Prajwal
Thanks for the info and step by step.
I have a different scenario.
current config is , wsus server is not showing the clients in the console and not collecting statistics data.
[
get updates from Microsoft site
]
Would like to have setup like
[
get updates from microsoft site.
report to statistics local intranet site.
]
any help in suggestions?
Your explanations are good. Is it possible to setup without AD or DOMAIN? is it possible to setup or configure on workstations?
Hello
Thank you very much. It was very good
Good luck
Good one
Great article. Thanks for the simple concise instructions!
Hi there – great article. You mentioned issues installing & configuring WSUS on Windows Server 2016. That is the OS we run on our server. The Server was bought from Dell in 2018. I am nervous doing an upgrade to MS Server 2019 only to install and configure WSUS for my convenience. (It is a pain having to update 11 PCs on in our office on the domain and make sure they are all patched). The server runs smoothly and has software critical to our business (our EMR).
I am looking for an easier solution and I believe we ran WSUS on our prior server. I still have our prior server that we do not use anymore. It is a Dell purchased in 6/2014. I am unsure what OS it is running but probably Windows Server 2012 R2. Should I boot it up and see if WSUS role is installed on that server or install it? If WSUS was not installed should I upgrade the OS to Server 2019 before installing it?
I think i mentioned about WS 2016 servers not getting properly patched with WSUS. That was my experience and if you know WSUS + WS 2016 works fine in your setup, you don’t need to worry.
Cheers, You have great Knowledge Base Creating skills. Keep going.
Hi, great help, but i upgraded my domain to windows 2019 and i can’t see the options to schedule the updates monthly, could someone please help?
Hi Prajwal, excellent documentation as always.
I’ve installed Windows 2019 and enabled the WSUS role, no proxy in my test environment, but when I try a manual “Import Updates” from the Microsoft Catalog Server, I search for KB890830, add to my basket and the download. The download fails with;
“Some updates could not be imported. If you cancelled the process, try again to import the updates. If an error occurred, click Failed in the progress column next to each update to see how to solve the problem.”
When you open the Fail Button Contents, you get the error message [Error number: 80131509] and useful messages about check proxy setting and contact your WSUS administrator.
If I open the Internet browser and navigate to the Microsoft Catalog Website, I can download the patch to a local folder, all works ok. Regular Sync’s and update downloads work OK once approved. There are no entries posted in the Application, System or Security logs related to this failure.
I noticed in you instructions you don’t go through downloading individual updates into WSUS, did you get this problem in your test environment with Server 2019 ? If you have, have you managed to fix it, changing the protocol in the opening webpage from 1.20 to 1.8 has not worked for me.
Thanks
AndyB
Update: From our investigation so far we have demonstrated if WSUS 2019 / 2016 is installed on a Windows 10 Hyper-V environment we can observer this problem, however in the same Hyper-V environment with WSUS on Windows 2012 WSUS works correctly, if WSUS 2016 is installed on a physical server, Manual Import of Updates work correctly, testing continuing.
It is a wonderful detailed and very helpful article . Thank you very much
Hi Prajwal,
This was a very detailed document, thank you! We have a WSUS server setup, but for some reason my Windows 10 computers don’t auto install. I have one computer I’m testing with and I’ve restarted it multiple times. I’ve also left it on all weekend to see if it would do it over night. Nothing is working. I can see in the registry that it’s pointing to the right server. I can see on the server that the updates that are waiting are approved for install so I’m not sure why it’s not working. Can you help me troubleshoot this issue?
Hello,
Can I have a WSUS server for a closed environment that is not connected to the internet?
Thanks!
Yes, you would need one that is connected to the internet as well though. Here is a link to microsofts instructions on how to perform this action. https://docs.microsoft.com/en-us/mem/configmgr/sum/get-started/synchronize-software-updates-disconnected
Hi Prajwal
thanks for sharing this information. I am learning MCSA2019. I have a question, I installed WSUS on windows server but I cant launch it to complete configuration.
It has joint to Active Directory and they have ping of each other. firewall, date and time is right. but the launch of WSUS fails.
pls let me know where I am going wrong.
Thanks.
Hi Prajwal, I have a question, in production is it good idea to install the WSUS role on SCCM primary site? if not can you share a post where you have installed WSUS ,SCCM primary site and SQL server on three different servers. I have configured the same lab but WSUS is not working. I went through your post and did all but nothing worked out. Thanks Adnan
Hi Prajwal, thank you for the article….
Any ideas why GPO not applying to Windows 10 – I have my computers in the correct OU ect…..
“Open the Group Policy Management console, and open an existing GPO or create a new one.
Navigate to Computer Configuration > Policies > Administrative Templates > Windows Components > Windows Update.
Double-click Configure Automatic Updates and set it to Enabled”
Great Detail. I looked to rerun the configuration wizard at WSUS Console > Options > WSUS Server Configuration wizard but the only thing I see there is “Disk Cleanup”. Running this did not result in the configuration wizard option being available. I am also running Server 2019. Do you know if there is another way to launch the configuration wizard?
What a wonderfully detailed and concise article. Thank you very much.
Glad to hear that. Thank you.
Very helpful article.
Awesome article!!!!!!!!!!!!!!!!
great post. many thanks
Very good post!!!!
works fine.
Thank You.
The WSUS administration console was unable to connect to the WSUS Server via the remote API.
Verify that the Update Services service, IIS and SQL are running on the server. If the problem persists, try restarting IIS, SQL, and the Update Services Service.
The WSUS administration console has encountered an unexpected error. This may be a transient error; try restarting the administration console. If this error persists,
Try removing the persisted preferences for the console by deleting the wsus file under %appdata%\Microsoft\MMC\.
System.IO.IOException — The handshake failed due to an unexpected packet format.
Source
System
Stack Trace:
at System.Net.Security.SslState.StartReadFrame(Byte[] buffer, Int32 readBytes, AsyncProtocolRequest asyncRequest)
at System.Net.Security.SslState.StartReceiveBlob(Byte[] buffer, AsyncProtocolRequest asyncRequest)
at System.Net.Security.SslState.CheckCompletionBeforeNextReceive(ProtocolToken message, AsyncProtocolRequest asyncRequest)
at System.Net.Security.SslState.ForceAuthentication(Boolean receiveFirst, Byte[] buffer, AsyncProtocolRequest asyncRequest)
at System.Net.Security.SslState.ProcessAuthentication(LazyAsyncResult lazyResult)
at System.Threading.ExecutionContext.RunInternal(ExecutionContext executionContext, ContextCallback callback, Object state, Boolean preserveSyncCtx)
at System.Threading.ExecutionContext.Run(ExecutionContext executionContext, ContextCallback callback, Object state, Boolean preserveSyncCtx)
at System.Threading.ExecutionContext.Run(ExecutionContext executionContext, ContextCallback callback, Object state)
at System.Net.TlsStream.ProcessAuthentication(LazyAsyncResult result)
at System.Net.TlsStream.Write(Byte[] buffer, Int32 offset, Int32 size)
at System.Net.ConnectStream.WriteHeaders(Boolean async)
** this exception was nested inside of the following exception **
System.Net.WebException — The underlying connection was closed: An unexpected error occurred on a send.
Source
Microsoft.UpdateServices.Administration
Stack Trace:
at Microsoft.UpdateServices.Administration.AdminProxy.CreateUpdateServer(Object[] args)
at Microsoft.UpdateServices.UI.SnapIn.Scope.ServerSummaryScopeNode.GetUpdateServer(PersistedServerSettings settings)
at Microsoft.UpdateServices.UI.SnapIn.Scope.ServerSummaryScopeNode.ConnectToServer()
at Microsoft.UpdateServices.UI.SnapIn.Scope.ServerSummaryScopeNode.get_ServerTools()
Hi I am getting
error:connection error Please reset node
please make a video of it and also specify what to do if computers do not apper in computer group
Great post, thank You
Here’s one thing that can’t be overstated enough, and perhaps the article could be amended to make a strong point: When you configure the policy and specify the WSUS server name, *make sure you provide the port as well* (…:8530). I’ve been running WSUS (on 2008 R2) for over a decade, and the policy has successfully been in use since then, just by providing the name. I’ve spent days trying to figure out what the problem was. When I saw your screenshot, I decided to add the port number (even though I haven’t changed it from the default, which was still the same even back on 2008 R2), and then after refreshing the policy, systems started trickling in almost immediately. I’ve wasted days on this.
Hopefully this saves someone some grief.
Thanks for shairing such greatful installation step by step.
Thanks a lot for the post
Thanks a lot for the post Iam setuping now the WSUS .If any information i will get back to you
hi,
MY WSUS is showing connection type Non-SSL during Synchronization. I want it to be SSL. Can anyone please guide me.
Thanks for the post. I have WSUS working on a fresh install of 2019 Server and machines migrated and are updating. However the report viewer is not available. What things did you install (and in what order) to get that working?
When you click on report viewer it will give you a link to Click on to download report viewer. If you receive an error explaining you need frame work 2.0 you need to install it by adding to roles and features and select frame work 3.5. You will more then likely get do you need to specify an alternate source path that is highlighted in yellow at the top of the page. In that case select the specify an alternate source path link and point to your 2019 OS sources folder.
I had to first install the SQLSysClrTypes then the report viewer. Weird that we have to install 2012 Server programs, but it’s working. Thanks.
do you also have some troubleshooting guides?
I followed your guide, but I can’t see any computers or updates in WSUS.
If you have just configured WSUS, wait for atleast a day to see computers in the console.
You should add that information to the tutorial, also please add how to get the URL for the Local Intranet site.
Thank you for the post.
Sadly, wsus is not usable with Powershell 7. It uses methods, this the windows compatibility workaround is not usable. And the module uses SOAP which is not supported in .NET core.
Why are you referencing something that has nothing to do with it?
Great post..
Hi Prajwal, window 10 machines were connected with wsus and getting update regular but now machine are out of network and unable to get update directly from internet and showing error computer is managed by organization. In current situation what policy should be applied on domain controller for wsus so that remote machine can get directly from internet as wsus
Remove those computers from the group policy. you can create a SG and add into exclusion.