In this article, I will explain how to install group policy management console on Windows 11. You can install GPMC on Windows 11 using PowerShell and optional features. The Group Policy Management Console is also known as GPMC.
Using GPMC, Active Directory administrators can manage Group Policy Objects (GPOs) from a single console. On Windows 11 PCs, you can manage the GPOs by installing the group policy management console.
The Group Policy Management Console (GPMC) also allows editing of settings within individual GPOs and provides a view of all organizational units, domains, and sites within a company. The Active Directory Users and Computers, Active Directory Sites and Services, Resultant Set of Policy (RSOP), Access Control List Editor, and GPMC Delegation Wizard functions are all combined in GPMC.
Differences between GPMC.msc and GPEdit.msc
If you are new to the concept of group policies in Windows Server and are exploring it, you may get confused between GPMC and gpedit.msc. Here are some important differences between GPMC and GPEdit.
- GPEdit.msc (GPO editor) is used to configure local policies whereas the GPMC is used to administer global (per Site, Domain or OU) Active Directory policies.
- GPEdit.msc is a built-in windows utility that allows administrators to manage local policies. On the other hand, the GPMC must be installed via RSAT and you can then use it to administer the Active Directory policies.
- The GPO editor can be launched with gpedit.msc command whereas the GPMC can be launched with gpmc.msc command.
- GPO editor is best suited for workgroup environment whereas the GPMC is available only in Active Directory based environments.
Recommended: Disable Server Manager at Startup Using Group Policy
Two Ways to Install GPMC on Windows 11
You can use the following methods to install the Group Policy Management Console on Windows 11:
- Use optional features in Windows 11 to install GPMC.
- Install GPMC using PowerShell
We will look at both the methods of installing the GPMC in this article.
Install GPMC using PowerShell
On your Windows 11 PC, you can use the DISM to install the Group Policy Management Console using the following steps:
1. Click Start and type “PowerShell“. From the list of results, select Windows PowerShell and click Run as administrator. This will launch the PowerShell interface on your computer.

2. Enter the below command to install the group policy management console using DISM in the PowerShell window.
DISM.exe /online /add-capability /CapabilityName:Rsat.GroupPolicy.Management.Tools~~~~0.0.1.0
In the DISM command output, we see ‘The operation completed successfully‘, which confirms the GPMC has been installed successfully.

3. To verify if the GPMC is installed, click Start ![]() and type “Group Policy“. This should list the Group Policy Management app, and from here you can launch it and start to manage group policies.
and type “Group Policy“. This should list the Group Policy Management app, and from here you can launch it and start to manage group policies.

Also Read: How to Enable Controlled Folder Access Using Group Policy
Install Group Policy Management Console on Windows 11 using Optional Features
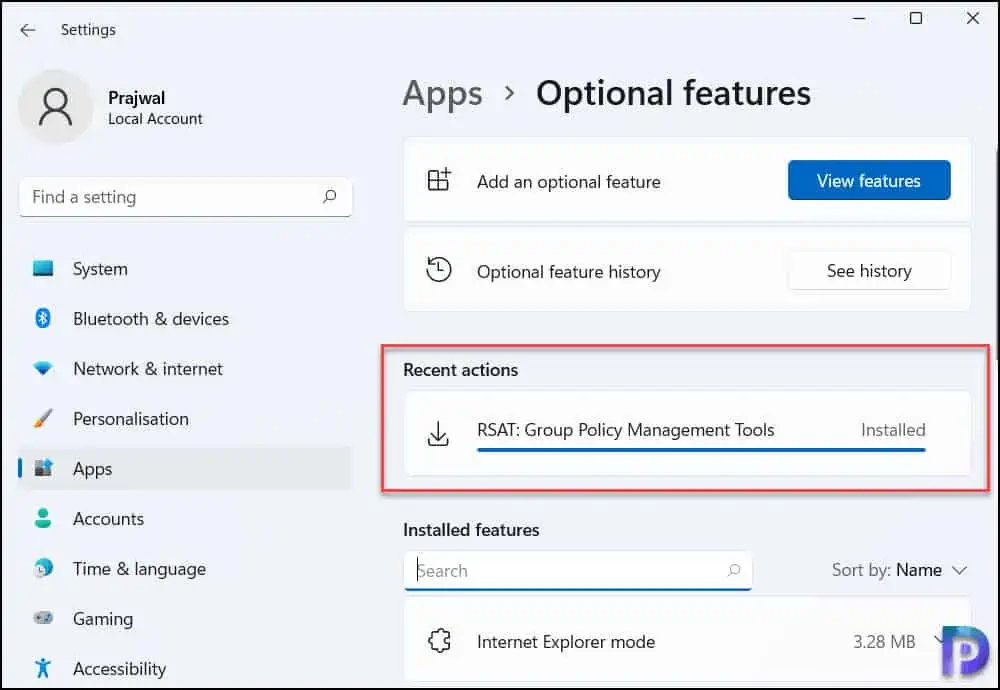
You can use the optional features of Windows 11 to install the Group Policy Management Console. The RSAT: Group Policy Management Tools include the Group Policy Management Console, Group Policy Management Editor, and GP Starter GPO Editor.
Click Start and in the search box, type Optional Features and launch it. You can also launch the optional features by going to Settings > Apps > Optional features.

In the optional features window, seek the option “Add an optional feature” and click View Features.

In the Add an optional feature window, search for Group Policy Management Tools and press the enter key. Select “RSAT: Group Policy Management Tools” and click Next.

Click on the Install button to install the Group Policy Management Tools on your Windows 11 PC.

RSAT: Group Policy Management Tools have been successfully installed on the computer. You don’t have to restart your PC. Close the optional features window.

Use PowerShell to uninstall the Group Policy Management Console
If you don’t need the group policy management console on your Windows 11 PC, you may remove it. Removal of GPMC can be done with two methods and I will show you how to do that.
Click Start and launch the PowerShell as administrator. Run the following PowerShell command to uninstall the Group Policy management tools on Windows 11 PC.
DISM.exe /online /remove-capability /CapabilityName:Rsat.GroupPolicy.Management.Tools~~~~0.0.1.0

Uninstall GPMC using Optional Features
You can uninstall group policy management console on Windows 11 from optional features. If you don’t like to use PowerShell to remove GPMC, this method is best option.
Click Start and in the search box, type Optional Features and launch it. You can also launch the optional features by going to Settings > Apps > Optional features. Scroll down to find the RSAT: Group Policy Management Tools and click on Uninstall. This will remove the group policy management console from your Windows 11 computer.

Launch the Group Policy Management Console in Windows 11
If you have installed GPMC using any of the above described methods, I will show you how you can launch this tool. Press the Windows + R keys to open the run box. Type gpmc.msc and hit enter key. This will launch the group policy management console.

When you attempt to open the Group Policy Management console on a workgroup computer, you will encounter the following error: To manage Group Policy, you must log on to the computer with a domain user account.
To resolve the error, ensure you install the GPMC on a domain joined computer and the user account has permissions to manage the policies remotely.

Please let us know if you found this article to be useful in the comments area below. Gratitude for reading!


