


In this article, you’ll learn how to enable Remote Desktop using Group policy. On Active Directory domain joined computers, you can enable Remote Desktop using GPO.
Remote desktop is an operating system feature that allows a user to connect to a computer in another location, see that computer’s desktop and interact with it as if it were local.
Windows 11 Remote Desktop feature is majorly used by IT for remote administration. Typically, the IT teams relies on Remote Desktop access to connect to the devices such as Windows 11, Windows Server 2022 and manage tasks.

The need for enabling the Remote Desktop comes when you have a remote site, and you have to support remote users. Enabling the Remote Desktop via group policy on all computers seems to be the best solution.
In most organizations, the remote desktop feature is enabled by default. Typically, in an Active Directory environment, a GPO is used to enable the Remote Desktop. So let’s get started with enabling the Remote Desktop feature.
Read: Intune Remote Help Feature in Endpoint Manager
Steps to Enable Remote Desktop Using Group Policy
There are three configurations you require to enable the remote desktop on computers:
- Allow users to connect remotely by using Remote Desktop Services
- Require user authentication for remote connections by using Network Level Authentication
- Allow Port 3389 (Remote Desktop Port) through Windows Firewall
All the above configurations needs to be in place for the Remote Desktop feature to work on computers. And all the configurations can be applied via group policy.
Learn: How to Disable Check for Updates using Group Policy (GPO)
When you create a group policy, you need not apply it at domain level. You can either apply it for selected OU’s or link the GPO to multiple OU’s.
In this article, I am going to create and apply the GPO at domain level as I am doing this in my lab setup. Applying the GPO at domain level means you are enabling the remote desktop feature on all domain joined computers.
In your case, you might have to test the policy first on a pilot batch of computers and then link the GPO to the required OU’s or group of systems. The steps to enable remote desktop will remain the same no matter where and how you apply the policy.
Also Read: How to Enable Remote Assistance Using Group Policy
Note: You can create a separate GPO for every configuration or create a single GPO and add all the above configurations in a single GPO.
Step 1 – Create a GPO to Enable Remote Desktop
We will now look at the steps to enable Remote Desktop using Group Policy.
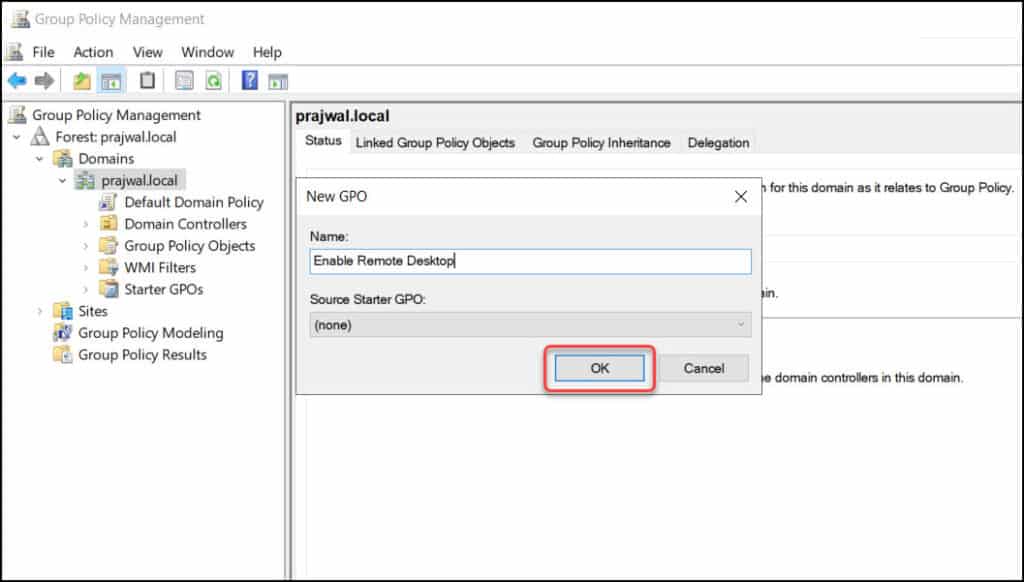
- Log in to Windows Server and open the Group Policy Management console (GPMC)
- Expand the Domains and right-click your domain and select Create a GPO in this domain and link it here.
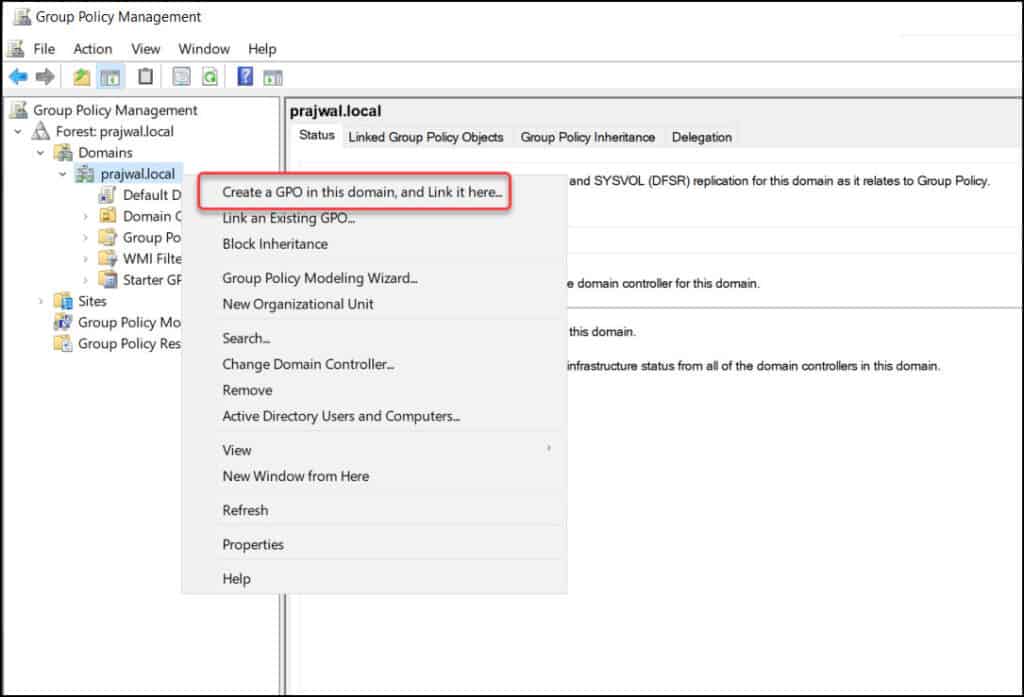
Enter the name of this new GPO as “Enable Remote Desktop” and click OK.
You have to edit the GPO and proceed with configuring the following policies.
Step 2 – Enable Allow users to connect remotely by using Remote Desktop Services
The first policy that we will configure is to Allow users to connect remotely by using Remote Desktop Services. This policy setting allows you to configure remote access to computers by using Remote Desktop Services.
If you enable this policy setting, users who are members of the Remote Desktop Users group on the target computer can connect remotely to the target computer by using Remote Desktop Services.
If you disable this policy setting, users cannot connect remotely to the target computer by using Remote Desktop Services. The target computer will maintain any current connections, but will not accept any new incoming connections.
Read: How to Allow logon through Remote Desktop Services
In the Group policy management editor, navigate to Computer Configuration > Policies > Administrative Templates > Windows Components > Remote Desktop Services > Remote Desktop Session Host > Connections.
Right-click the policy setting “Allow users to connect remotely by using Remote Desktop Services” and select Edit. Now enable this policy setting by selecting Enabled. Click Apply and OK.

Step 3 – Enable Network Level Authentication for Remote Connections
The “Require user authentication for remote connections by using Network Level Authentication” policy setting allows you to specify whether to require user authentication for remote connections to the RD Session Host server by using Network Level Authentication.
Network Level Authentication is a method used to enhance RD Session Host server security by requiring that a user be authenticated to the RD session Host Server before a session can be created.
This policy setting enhances security by requiring that user authentication occur earlier in the remote connection process.
If you enable this policy setting, only client computers that support Network Level Authentication can connect to the RD Session Host server.
Read: Disable Windows Spotlight using GPO
To determine whether a client computer supports Network Level Authentication, start Remote Desktop Connection on the client computer, click the icon in the upper-left corner of the Remote Desktop Connection dialog box, and then click About. In the About Remote Desktop Connection dialog box, look for the phrase Network Level Authentication supported.
If you disable this policy setting, Network Level Authentication is not required for user authentication before allowing remote connections to the RD Session Host server.
It is recommended that you enable this policy setting when you enable Remote Desktop using Group Policy.
In the Group policy management editor, navigate to Computer Configuration > Policies > Administrative Templates > Windows Components > Remote Desktop Services > Remote Desktop Session Host > Security.
Right-click the policy setting “Require user authentication for remote connections by using Network Level Authentication” and click Edit. Enable this policy setting by selecting Enabled. Click Apply and OK.

With the above policy settings enabled, you can select the “Enable Remote Desktop” GPO and take a look at the configured settings. The settings are visible when you select the Settings tab of the GPO in GPM console.

Step 4 – Allow Port 3389 (Remote Desktop Port) through Windows Firewall
Remote Desktop Protocol listens on TCP port 3389 and UDP port 3389. If your domain firewall doesn’t have the port 3389 allowed, the RDP connections will fail.
The below procedure shows how to open RDP port 3389 through Windows Firewall. In case the port 3389 is allowed though firewall, jump to next section.
Recommended: Configure Domain Controller Interactive logon Message
As mentioned earlier, you can either edit an existing GPO and allow port 3389 or create a new GPO to enable Remote Desktop Port 3389.
In the Group Policy Management Editor, go to Computer Configuration > Windows Settings > Security Settings > Windows Defender Firewall with Advanced Security.
We want to allow the incoming RDP connection to all computers (TCP 3389 port). Right-click the Inbound Rules section and select New Rule.
On the Rule Type window, select Port. Click Next.
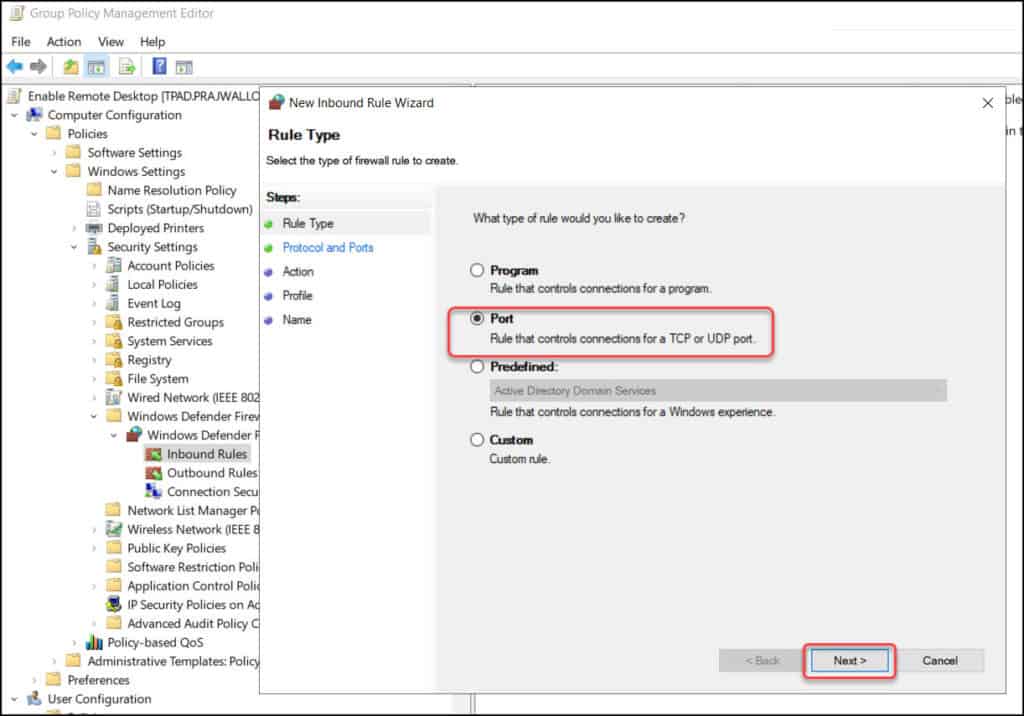
On the Protocol and Ports window, configure the following:
- Does this rule apply to TCP or UDP – Select TCP.
- Does this rule apply to all local ports or specific local ports? – Select Specific local ports and enter the port number – 3389.
Click Next to continue.

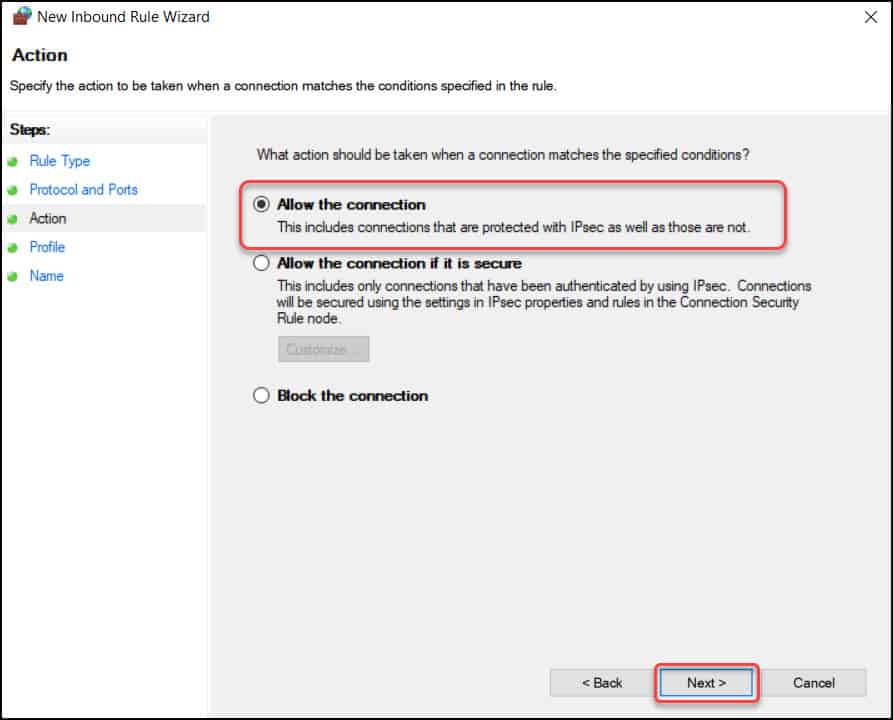
As we want to allow port 3389 through our firewall, select Allow the connection. Click Next.
This is an important section where you have to select a profile and specify when does this rule apply. Ultimately, domain profile is where you want the port 3389 to be allowed. Click Next.

Specify the name and description of this rule and click Finish.

We have successfully created an inbound rule allowing port 3389 along with enable remote desktop GPO policy.

Step 5 – Test the “Enable Remote Desktop GPO” on Client Machines
This is the final step where we check if the GPO has been successfully deployed to client machines. By default, the group policy refresh interval is 90 minutes. You can modify the GP refresh interval if required.
On the client computer, launch the CMD as administrator and run the command gpupdate. Wait for the computer policy update and user policy update to finish.

Now go to System Properties and select the Remote tab. Notice that Allow remote connections to this computer is enabled along with Network Level authentication for RDP connections. This confirms that we have successfully enabled the Remote Desktop using Group Policy.


This works to enable RDP through the classic System Properties, but isn’t enabling the setting in Remote Desktop Settings and I’m unable to use RDP to connect.
Unfortunately there is no dates listed on comments so I am unsure when you wrote this. But did you happen to find a solution for this? I started facing the same issue.
Hi, RDP has been used long time, but recently found on problem. We have one specifice program which can use smart card for login to the system but smartcard redirecting does not seem to be working with windows 10 21H2.
SmartCard authentication for that same program works on local computer, but when testing same over RDP with remote computer the authentication gives error, though it has all the same program and drivers installed.