


In this post, I will show you different ways to enable Remote Desktop on Windows 11. To connect to a device remotely, you can configure Remote Desktop on Windows 11 using methods such as PowerShell, CMD Prompt, WAC, Settings etc.
Remote desktop protocol (RDP) is an operating system feature that allows a user to connect to a computer in another location, see that computer’s desktop and interact with it as if it were local.
By default, the Remote Desktop feature is disabled on a Windows 11 PC. Enabling it is a one-time setup, and you can easily disable it when not in use. If you don’t plan to access your PC remotely, there’s no need to enable the Remote Desktop feature.

RDP Feature on Windows 11 Home
The Remote Desktop feature is not available on Windows 11 Home. You can turn on the remote desktop feature only on Windows 11 Pro and Enterprise editions. If you have the Home edition of Windows 11, you can use the Chrome Remote Desktop as an alternative.
This guide will walk you through different approaches to enable RDP on Windows 11, allowing you to manage your computer or access files and applications from anywhere.
Method 1: Enable Remote Desktop from Windows 11 Settings
Step 1: On a Windows 11 PC, click Start and launch the Settings app.

Step 2: Click on System and in the right pane select Remote Desktop.

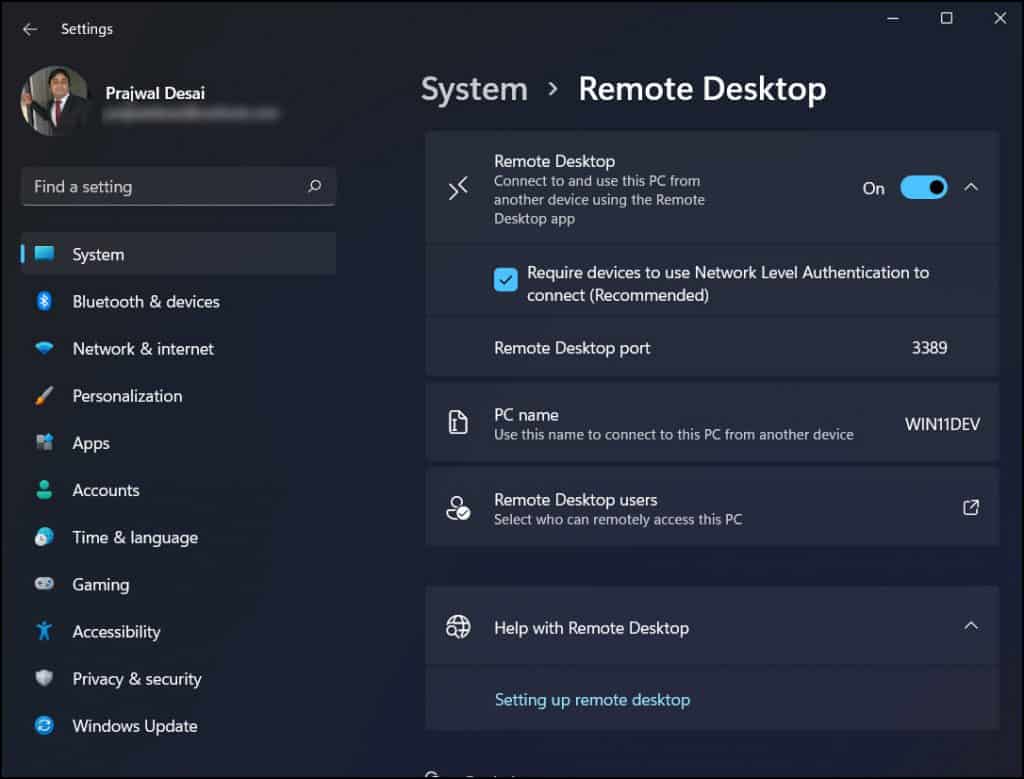
Step 3: Turn on the Remote Desktop toggle switch. On the confirmation box “Enable Remote Desktop?” Click Confirm.
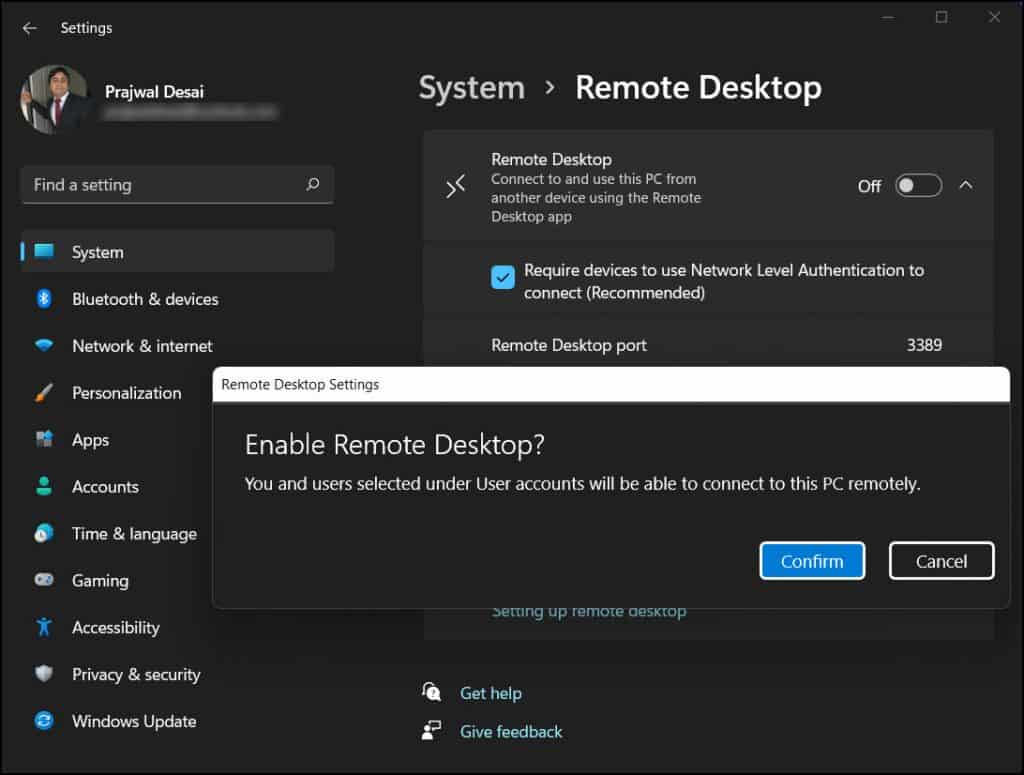
Ensure the Network Level Authentication option is enabled. Once you complete the above steps, you can connect to your Windows 11 computer using the Remote Desktop app. The settings page displays the current Remote Desktop port in case you need to configure a router to allow remote connections outside the network. Port 3389 is the Remote Desktop Port.
Method 2: Enable Remote Desktop from System Properties
The quickest way to turn on the Windows 11 remote desktop feature is from the System Properties:
- On the Windows 11 PC, right-click Start and select Run.
- In the Run, type the command sysdm.cpl.
- On the System Properties window, switch to the Remote tab.
- Enable “Allow Remote Connections to this computer“. Click Apply and OK.

When you turn on the remote desktop feature, the Network level Authentication is also enabled by default. I recommend keeping this option enabled.
Network Level Authentication is a more secure authentication method that can help protect the remote computer from malicious users and malicious software. It can help provide better security by reducing the risk of denial-of-service attacks.
Method 3: Enable Remote Desktop on Windows 11 using Command Prompt
To enable the remote desktop protocol with Command Prompt, use these steps:
- On your Windows 11 PC, click Start and search for Command Prompt.
- Launch the Command Prompt as administrator.
- Type the following command to enable the remote desktop protocol and press Enter:
reg add "HKEY_LOCAL_MACHINE\SYSTEM\CurrentControlSet\Control\Terminal Server" /v fDenyTSConnections /t REG_DWORD /d 0 /fTo allow the Remote Desktop connections through Windows Firewall, run the below command.
netsh advfirewall firewall set rule group="remote desktop" new enable=Yes
After you turn on the remote desktop on Windows 11 via the command prompt, log off from the Windows 11 PC for settings to apply.
Method 4: Enable RDP using PowerShell on Windows 11
Perform the below steps to enable the remote desktop on Windows 11 using PowerShell:
- On the Windows 11 PC, click Start and search for PowerShell.
- Right-click Windows PowerShell and select Run as administrator.
- To enable the remote desktop, run the below command in PowerShell window.
Set-ItemProperty -Path 'HKLM:\System\CurrentControlSet\Control\Terminal Server' -name "fDenyTSConnections" -value 0To allow the Remote Desktop connections through Windows Firewall, run the below command.
Enable-NetFirewallRule -DisplayGroup "Remote Desktop"
Method 5: Enable RDP on Windows 11 from Windows Admin Center
In the Windows Admin Center dashboard, select the server you want to enable Remote Desktop on from the list of managed servers. In the server’s management pane, navigate to “Remote Desktop”. Click on “Enable” to turn on Remote Desktop.

After you complete the steps, you can use the Remote Desktop app on Windows 11 to remotely access the device, even when the firewall is enabled.
