


Let’s go through the steps for deploying Zoom with Intune. Using Microsoft Intune, you can create a line-of-business app and deploy the Zoom desktop client with AutoUpdate enabled.
For large organizations, Zoom provides MSI installers for mass deployments. Prior to this, administrators employed the method of deploying Zoom as a Win32 App with Intune. However, with Zoom MSI installers, you can create a Windows Line-of-Business app and upload the zoom msi installer in Intune admin center and deploy the app to endpoints.
If you are using Configuration Manager for application deployments, you can deploy Zoom desktop client using SCCM. The Zoom application deployment with SCCM is much simpler with MSI installers. ConfigMgr has the ability to populate install and uninstall commands, as well as the method for detecting the Zoom client.

Zoom is a cloud-based video conferencing software that lets organizations hold virtual meetings and work together in real time using integrated communication tools. Users of Zoom can take advantage of HD video and audio to virtually converse with meeting participants in any video call. The other features include unlimited voice and video conferencing, virtual backgrounds, screen sharing etc.
Methods to Bulk Deploy Zoom Client in Enterprise
The Zoom desktop client application can be installed and configured in bulk for Windows in three different ways:
- Using MSI Installer, deploying the Zoom client using GPO or SCCM.
- Active Directory administrative templates via GPO or Intune.
- Updating registry keys on Windows machines manually.
Download Zoom Installer for Deployment
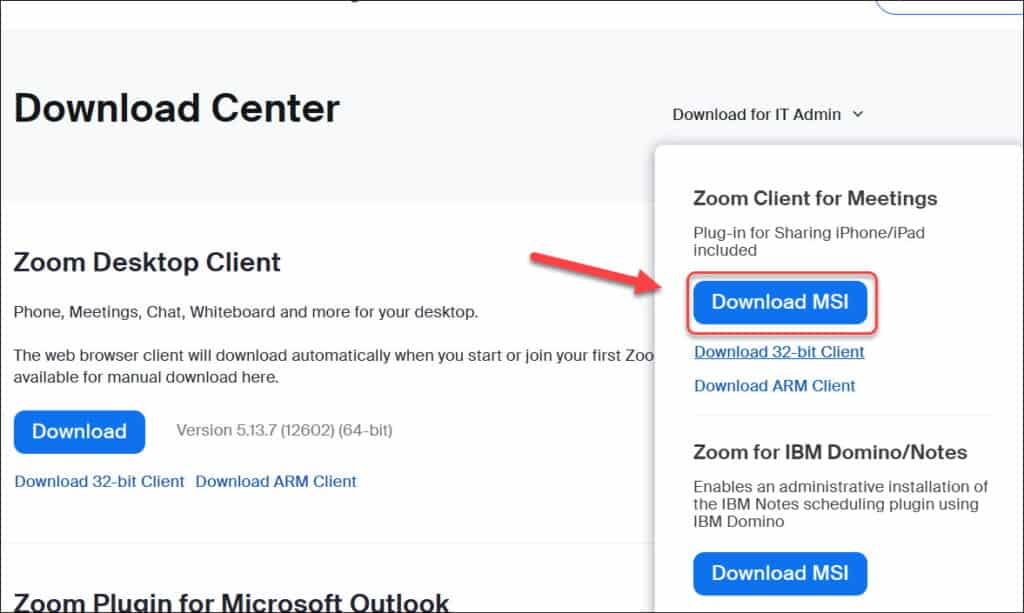
For mass deployment of zoom with pre-configured settings we will be using MSI Installer of Zoom. To download the Zoom installer, go to the Zoom Download Center. Once you are on Zoom Download Center site, click on Download for IT Admin, and then select Download MSI. This will download the 64-bit version of Zoom client on your computer. The other Zoom client download options include 32-bit client and ARM client.
Steps for Deploying Zoom with Intune
We will now go through the steps for deploying Zoom using Intune. The high-level steps for Zoom deployment using Intune include:
- Add Zoom Desktop Client as a Windows line-of-business app to Microsoft Intune.
- Configure the Zoom client application deployment.
- Deploy or Assign the Zoom application to Users/Devices.
- Monitor and validate the Zoom deployment using Intune.
Step 1: Add Zoom Application to Intune
In this section, we’ll add Zoom to Microsoft Intune as a line-of-business app. To accomplish that, sign in to the Intune Portal. Select Apps > All Apps > Windows Apps and click +Add.

On Select app type page, click the drop-down and select Line-of-business app. For Windows, the line-of-business apps supported includes: .msi, .appx, .appxbundle, .msix, and .msixbundle. Click Select to continue to next step.

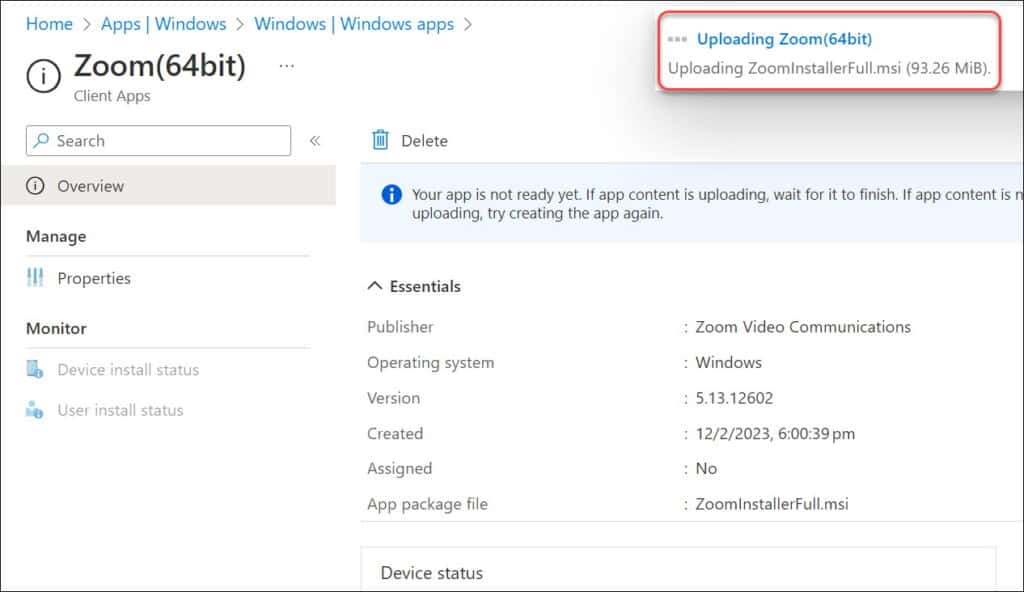
On the App information tab, click Select app package. On the App package file window, click on upload icon and select the ZoomInstallerFull.msi file. The following details are populated from the ZoomInstallerFull.msi installer by Intune.
- Name: Zoom(64bit)
- Platform: Windows
- Size: 93.26 MiB
- MAM Enabled: No
- Execution Context: Dual Purpose
Click OK to continue to the next step.

Step 2: Configure Zoom App Information in Intune
After you add a Zoom LOB app in Intune, you can specify the application details similar to what you do for applications in Configuration Manager. Configure the following details for the Zoom application in Intune app information page.
- Name: Enter a name of the application, for example, Zoom Meeting.
- Description: Enter the description of the application.
- Publisher: Enter the name of the Publisher of the app, for example, Zoom Video Communications.
- App install context: Select App install context as Device.
- Ignore app version: Select No.
Command line arguments: When you deploy Zoom with Intune, the EnableSilentAutoUpdate or AlwaysCheckLatestVersion options are no longer supported. You can enter the below command-line arguments during the deployment.
ZConfig="nogoogle=1" ZRecommend="AudioAutoAdjust=1" ZoomAutoUpdate=True ZoomInstallOption=8
Important: ZoomAutoUpdate=True enables the feature where the Zoom application is updated automatically on the devices. If Auto-update is enabled, users will be able to check for updates in the client and will not require elevated admin rights to update.
Optionally, you can choose to display Zoom applications as a featured app in the company portal. Refer to the guide to learn how to display featured apps in Intune company portal.

Specify a logo for the Zoom application. Intune allows you to specify logo for every application that you create. Click Change Image and select the Zoom desktop client logo and click Next.

Step 3: Assign Zoom Deployment to Devices
After you have specified the application details for the Zoom app, you can now assign the application to devices. On the Assignments tab, select Required for enrolled devices based on your requirements. To view the Review and Create tab, click Next.
Note: Wondering why the “Available for enrolled devices” option is missing on Assignments tab? On the App information tab, if you select App install context as Devices, you don’t get an option to make it Available for enrolled devices. If you change the App install context from devices to User, you will get the option Available for enrolled devices.

Review the values and settings you entered for the Zoom deployment. When you are done, click Create to add the Zoom app to Intune. The Overview blade for the line-of-business app is displayed showing the Zoom application deployment.

Step 4: Monitor Zoom Deployment in Intune Admin Portal
After you deploy Zoom using Intune, you must wait for the deployment to apply to the targeted groups, and once the devices check in with the Intune service, they will receive the application. The Zoom installer is uploaded to the Intune admin center and this process may take few minutes depending on the size of the application and internet connectivity. You’ll see a notification “Upload Finished” which confirms the Zoom application has been successfully upload to Microsoft Intune.
Once the Zoom application is successfully uploaded to Intune, you can force sync Intune policies on your computers in case you don’t find the Zoom application installed on the endpoints. See also how to resolve Intune Company Portal issues if you don’t see it working.
In this section, we will go through the steps to monitor the Zoom deployment using Intune. It is important to ensure the application deployments are successful on managed Windows devices.
To monitor the application installation in Intune admin portal, from the list of apps, select the Zoom app and on the Overview blade, you can monitor how many users or devices have successfully installed the Zoom app. From the below screenshot, Intune portal shows that Zoom application is currently in “Install Pending” state.
Deployment of the Zoom Desktop Client on target Windows device can take time. The software will be downloaded and then installed on the device during the next Intune policy refresh sync cycle.

Confirm Zoom Desktop Client Application Installation
There are several methods for determining whether the Zoom application has been successfully installed on Windows computers. You can open Control Panel > Programs and Features to check if Zoom is installed.
In addition to the above method, you can determine if the Zoom client application is installed on the computer by looking at the icon shortcut on the desktop.

Use Event Viewer to Check Zoom Installation Status
You can check the Event Viewer logs to see if the Zoom application was installed correctly. To check the status of the deployment of the Zoom application, follow these steps:
- Launch Event Viewer MMC running the shortcut command
eventvwr. - In the Event Viewer, expand Application and Services logs > Microsoft > Windows.
- Look for DeviceManagement-Enterprise-Diagnostics-Provider folder.
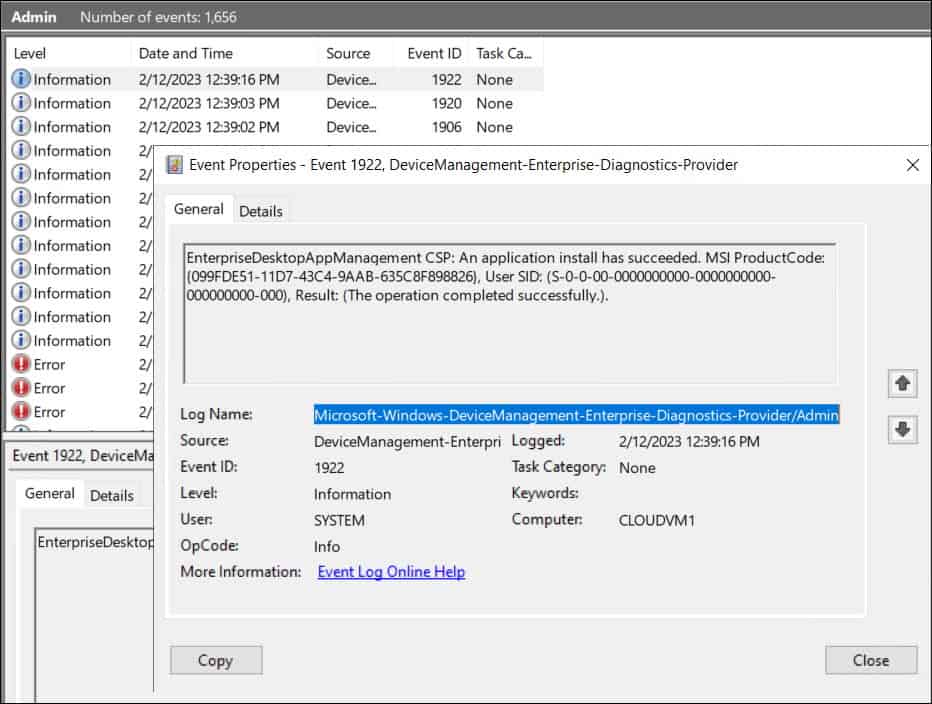
- Click on Admin and go through the logs to find the Zoom application deployment status.
EnterpriseDesktopAppManagement CSP: An application install has succeeded. MSI ProductCode: {099FDE51-11D7-43C4-9AAB-635C8F898826}, User SID: (S-0-0-00-0000000000-0000000000-000000000-000), Result: (The operation completed successfully.).
Read Next
Check out some useful guides for application deployment with Microsoft Intune.

please edit the steps
currently it is [Ignore app version: Select No.]
change it to below;
Ignore app version: Select Yes
This configuration creates a race condition. Intune installs app / Zoom auto updates / Intune enforces app version / Zoom auto updates / Intune enforces app version.
Thank you so much Brother.
this setting is not working, after zoom client is automatically updated, this app setting will uninstall the updated one and install this new one, this is being recorded in ManageEngine software history.
How do you configure Zoom to be allowed through the firewall on the device via Intune?