

In this post, I will show you how to deploy Zoom client using SCCM (ConfigMgr). We will download the latest version of the Zoom MSI installer, create a Zoom application in SCCM, and then deploy the application to our endpoints.
For large organizations, Zoom provides MSI installers for mass deployments. You can use tools such as Microsoft Intune, Configuration Manager to roll out Zoom client to multiple computers in your enterprise.
With MSI installers, the Zoom application deployment with SCCM because much easier. ConfigMgr can populate the install and uninstall commands including the detection method for Zoom client.

Zoom is a cloud-based video conferencing software that lets organizations hold virtual meetings and work together in real time using integrated communication tools. Users of Zoom can take advantage of HD video and audio to virtually converse with meeting participants in any video call. The other features include unlimited voice and video conferencing, virtual backgrounds, screen sharing etc.
What is Zoom Client for Meetings?
Zoom client for meetings provides simplified video conferencing and messaging across any device. The free Zoom client offers video conferencing for up to 100 participants, provided the meeting runs for no longer than 40 minutes.
The Zoom client and plugins are available for almost all the modern devices and clients. In addition, the Zoom extensions for modern browsers are also available. With these extensions installed, you can join a Zoom meeting without having to download and install Zoom client on your computer.
- Zoom Client for Meetings
- Zoom Plugin for Microsoft Outlook
- Zoom Plugin for IBM Notes
- Zoom Extension for Browsers
- Zoom Extension for Browsers
- Zoom Mobile Apps
- Zoom Client Plugin for Sharing iPhone/iPad
- Zoom Rooms for Conference Rooms and Touchscreen Displays
- Controllers for Zoom Rooms
- Zoom Plugin for Skype for Business
Download Zoom Client for Meetings
Use the following steps to download the latest version of the Zoom MSI installer.
- Launch your browser and visit the Zoom download center.
- Go to Download Center, and select Download for IT Admin.
- Click Download MSI which downloads the Zoom MSI Installer file.
- Save the Zoom Installer into the sources folder on your ConfigMgr Server.
To save your time, you can use the direct link to download Zoom client full installer – https://www.zoom.us/client/latest/ZoomInstallerFull.msi

Note: The Zoom client for meetings is available for download as executable and MSI version. If you are installing Zoom client for meetings on your Windows 10/11 computer, downloading the executable is a recommended option. If you are deploying Zoom to multiple computers in your organization, then download MSI installer and deploy Zoom client using ConfigMgr.
Ways to Mass Deploy Zoom Client
There are several ways to deploy the Zoom client. Some of these methods are listed below.
- Use the MSI installer to deploy Zoom via GPO.
- Deploy Zoom Client using ConfigMgr (Zoom MSI Installer).
- Install Zoom client using GPO script.
Some administrators prefer to deploy the Zoom client using GPO because they either don’t use SCCM in their organization or they think the GPO method is simple. Regardless of the deployment strategy you select, the Zoom client should be successfully deployed in the end. ConfigMgr makes it easy and time-efficient to deploy the Zoom client.
Create Zoom Application in SCCM
You should be able to create the Zoom application in ConfigMgr by following the steps listed below.
- Launch the Configuration Manager console.
- Navigate to Software Library\Overview\Application Management\Applications.
- Right click Applications and create a new application for Zoom client.

Specify the location of the Zoom MSI installer file. Click Next.

The benefit of using the Zoom MSI installer is that the installation commands, uninstallation commands, product code, and detection method are all pre-populated. Click Next.

The Zoom Client Application’s name, publisher, software version, and other details are specified in this step. The Installation program is pre-populated by the Zoom MSI installer, so do not alter it. Users will see this information in Software Center once the Zoom client has been deployed using ConfigMgr. Click Next.

On the Summary window, verify the settings for the Zoom Client application, and then click Next.

Using the Zoom MSI Installer, we successfully created the Zoom Client for meetings applications in SCCM.

Set Zoom Application Software Center Icon
You can set the Zoom client’s icon in SCCM by going to the application properties page and doing so under the software center tab. You first download the Zoom application icon (a 512×512 icon) and save it along with the Zoom MSI installer.
Right-click the Zoom Client application and select Properties to set an icon. Under the application properties, select the Software Center tab. Click Browse, select the Zoom Client for Meetings icon, and click OK.

Deploy Zoom Client Using SCCM
We will now deploy Zoom client application using ConfigMgr to a device collection. You can also create a device collection and include a set of devices for testing the application deployment.
To deploy the Zoom client application in the SCCM console, go to Software Library > Application Management > Application. Right-click the Zoom Client for Meetings app and select Deploy.

On the General page of Deploy Software Wizard, click Browse and select a device collection to which you want to deploy the Zoom client application. Click Next.

On the Content page, click the Add button and specify the distribution points to which you would like to distribute the Zoom application content. You may also select distribution point groups. Click “Next” to continue.
On the Deployment Settings window, specify the settings to control the deployment of Zoom client application. Select the Action as Install and Purpose as Available. Learn the difference between Available and Required deployment in SCCM. Click Next.

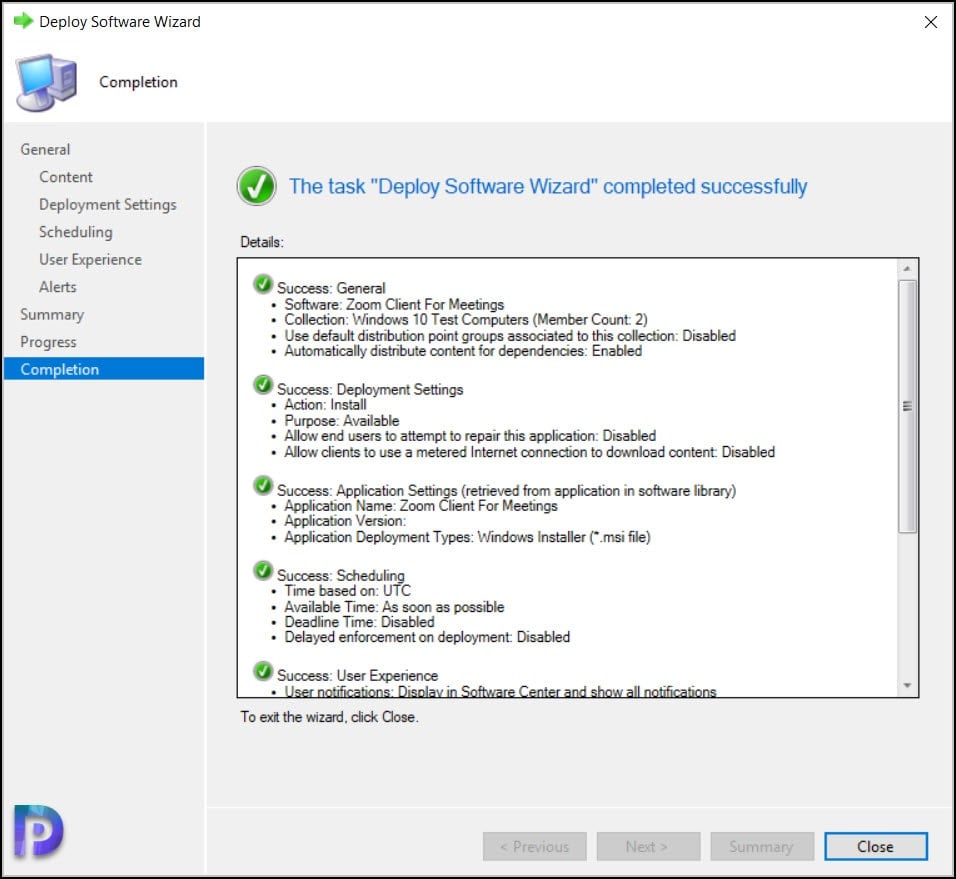
Complete the remaining steps of Deploy Software Wizard and on Completion window, click Close.
Test Zoom Application Installation on Client Computers
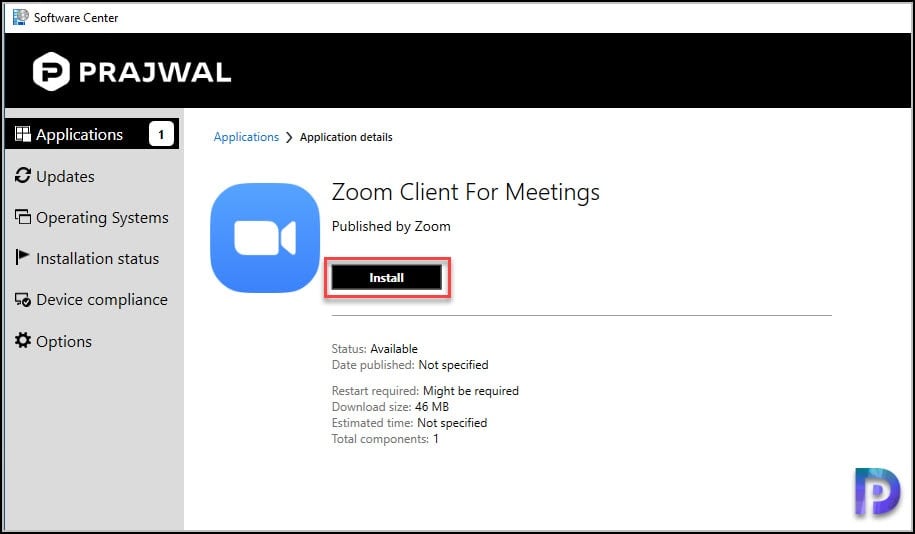
In this part, we’ll check to see if the Zoom app installs correctly on the client computers. Log in to a client computer and launch the Software center. Click on the Applications tab and select the Zoom Client for Meetings application.
On the Zoom client application details page, click Install. The Zoom application is now downloaded from the local distribution point server for installation. Using AppEnforce.log, you can check the status of the installation of the Zoom application. To know the location of this file and other files, refer to the SCCM Log files.
The Zoom client for meetings installed successfully on my test Windows 10 device. Matched exit code 0 to a Success entry in the exit codes table confirms that the Zoom application has been installed successfully. The uninstall command that we specified during application packaging should work fine.

To monitor the Zoom client installation, on the client computer, review the AppEnforce.log file. This log file can be found in the C:Windows\CCM\Logs directory.
+++ Starting Install enforcement for App DT "Zoom - Windows Installer (.msi file)" ApplicationDeliveryType - ScopeId_CB0EA915-B510-4346-898D-3135D86180BC/DeploymentType_c9f64b9f-3c16-4de4-b984-a8845dda3a96, Revision - 1, ContentPath - C:\Windows\ccmcache\1, Execution Context - Any     Performing detection of app deployment type Zoom - Windows Installer (.msi file)(ScopeId_CB0EA915-B510-4346-898D-3135D86180BC/DeploymentType_c9f64b9f-3c16-4de4-b984-a8845dda3a96, revision 1) for system.
 +++ MSI application not discovered [MSI Product Code: {9A0F6468-2A0B-4E6A-B212-40C55E9B4B4B}, MSI Product version: ]
     App enforcement environment:
     Context: Machine
     Command line: msiexec /i "ZoomInstallerFull.msi" /q
     Allow user interaction: No
     UI mode: 1
     User token: null
     Session Id: 1
     Content path: C:\Windows\ccmcache\1
     Working directory:  AppEnforce
     Prepared working directory: C:\Windows\ccmcache\1
 Found executable file msiexec with complete path C:\Windows\system32\msiexec.exe
     Prepared command line: "C:\Windows\system32\msiexec.exe" /i "ZoomInstallerFull.msi" /q /qn
 Valid MSI Package path = C:\Windows\ccmcache\1\ZoomInstallerFull.msi
     Advertising MSI package [C:\Windows\ccmcache\1\ZoomInstallerFull.msi] to the system.
     Executing Command line: "C:\Windows\system32\msiexec.exe" /i "ZoomInstallerFull.msi" /q /qn with user context
     Working directory C:\Windows\ccmcache\1
     Post install behavior is BasedOnExitCode
     Waiting for process 4684 to finish.  Timeout = 120 minutes.
     Process 4684 terminated with exitcode: 0
     Looking for exit code 0 in exit codes table…
     Matched exit code 0 to a Success entry in exit codes table.
     Performing detection of app deployment type Zoom - Windows Installer (*.msi file)(ScopeId_CB0EA915-B510-4346-898D-3135D86180BC/DeploymentType_c9f64b9f-3c16-4de4-b984-a8845dda3a96, revision 1) for system.
The users can also uninstall the Zoom Client from Software Center, as the Zoom MSI installer that we used had the uninstall commands with it. This concludes the post on deploying Zoom Client with ConfigMgr.
Video Tutorial to Deploy Zoom Using ConfigMgr
I’ve posted a video on YouTube that walks through the ConfigMgr deployment process for the Zoom application. If you find this video useful, do like the video and subscribe to the channel.

How can i uninstall zoom from all computers using SCCM?
Any tips on updating Zoom later in SCCM? I enabled the ‘enablesilentautoupdate’ flag, but versions still report 5.2
Hi Prajwal!
Thanks for this nice post.
I have question about:
“The users can also uninstall the Zoom Client from Software Center as the Zoom MSI installer that we used had the uninstall commands with it.”
What if this button is grayed out? How to activate it, so that end user can manually uninstall this app, if such a need?
Thanks!
If the uninstall button is greyed out then check the uninstall command under application properties. Probably it is wrong or missing. If you use the Zoom msi installer and package the app, the uninstall command should be populated automatically.
Hello Praj, What if under “Installation Program” I enter this swtich:
msiexec.exe /i ZoomInstallerFull.msi /quiet /qn /norestart MSIRESTARTMANAGERCONTROL=”Disable” ZoomAutoUpdate=”true” ZSILENTSTART=”true”
I deployed it in the past pointing to a batch file where it has the above content. But I guess my question is what would be the best practice for the above?
thank you.