This post covers the MSI application deployment in Microsoft Intune. This guide will show you the steps to upload an MSI to Intune, perform application deployment to users/devices.
The process outlined here also works for other, non MSI, applications that can be installed silently via install parameters, Notepad++ being an example of one of those applications. (Notepad++.exe /S).
Intune MSI Application Deployment
As an Intune admin, your main priority is to ensure that end users have access to the apps they need to do their work. This guide will show you, end to end, the method for preparing and uploading an MSI to Intune, for distribution/installation to users/devices.
To get started with Microsoft Intune click here.
Adding MSI Application (Line of Business) to Intune
To begin, login to your Intune Portal at https://devicemanagement.microsoft.com or browse via the Azure Portal, to Intune.
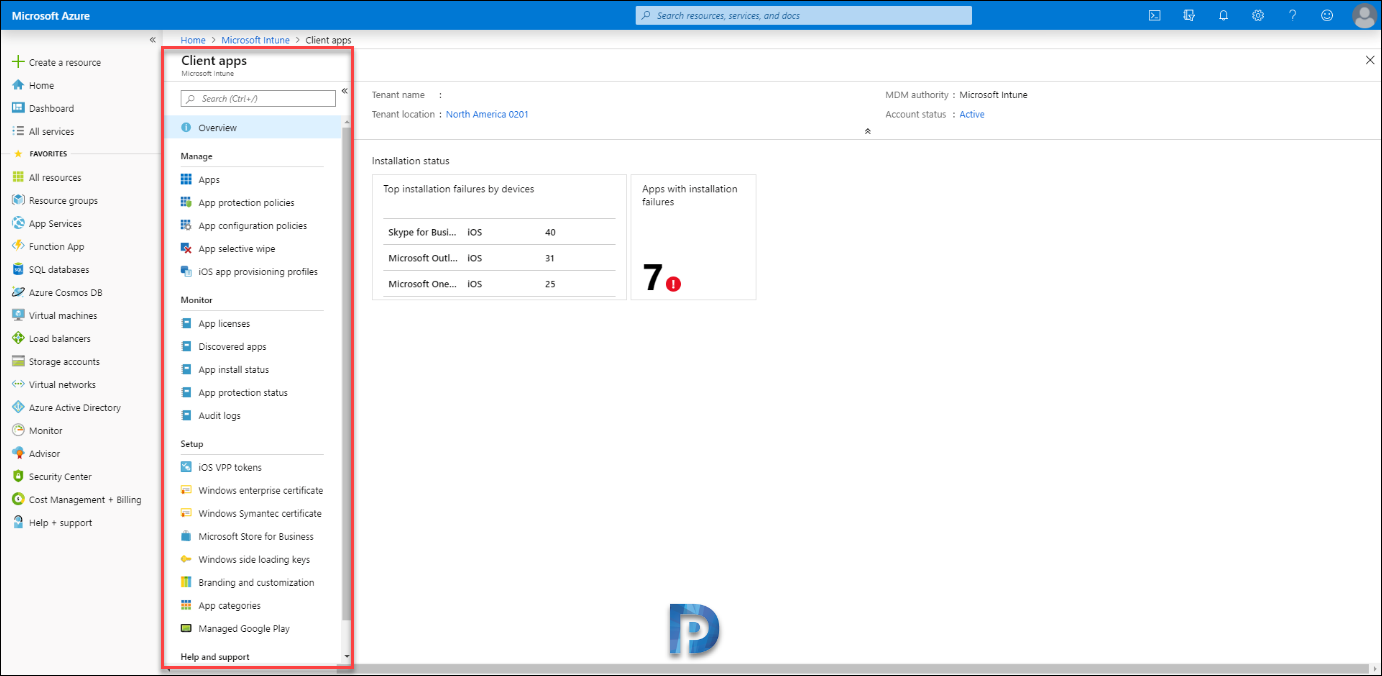
 From the Intune portal, click on Client Apps in the menu down the left hand side.
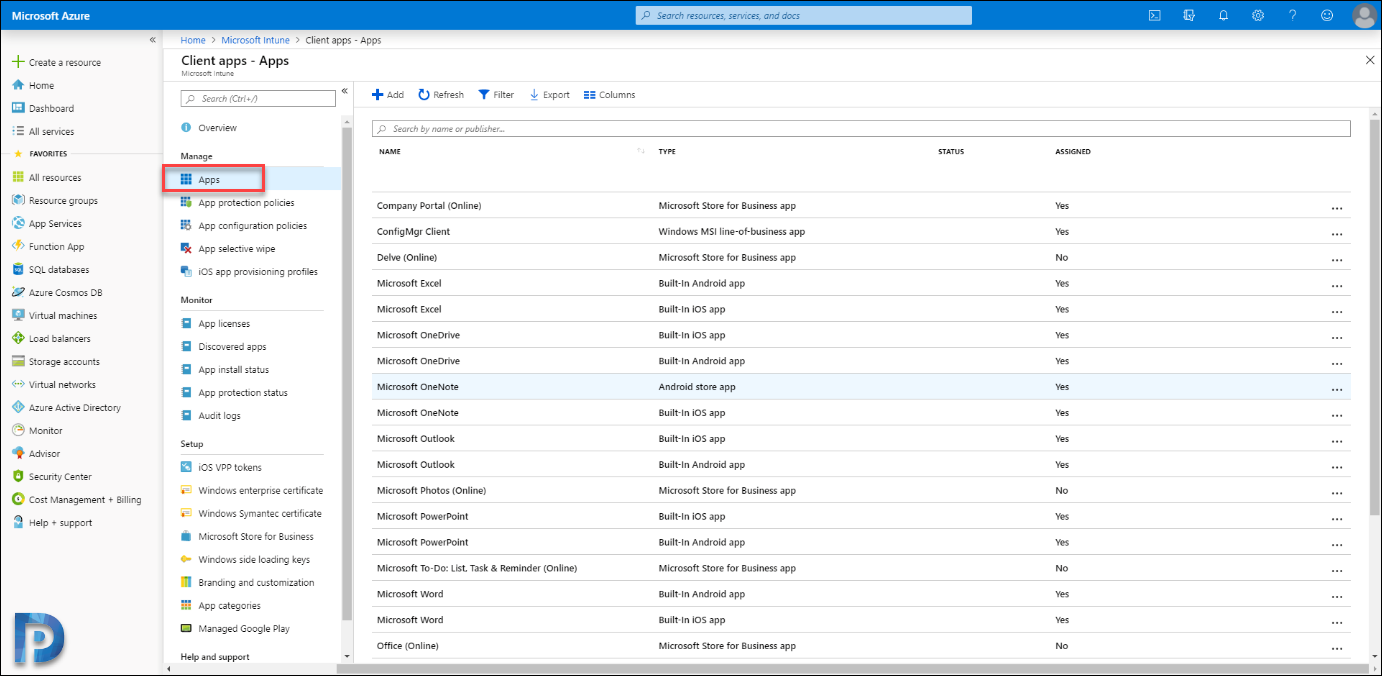 Click on Add in the upper middle of the window, within the App Type drop down, select Other > Line of Business Application, and click Add.
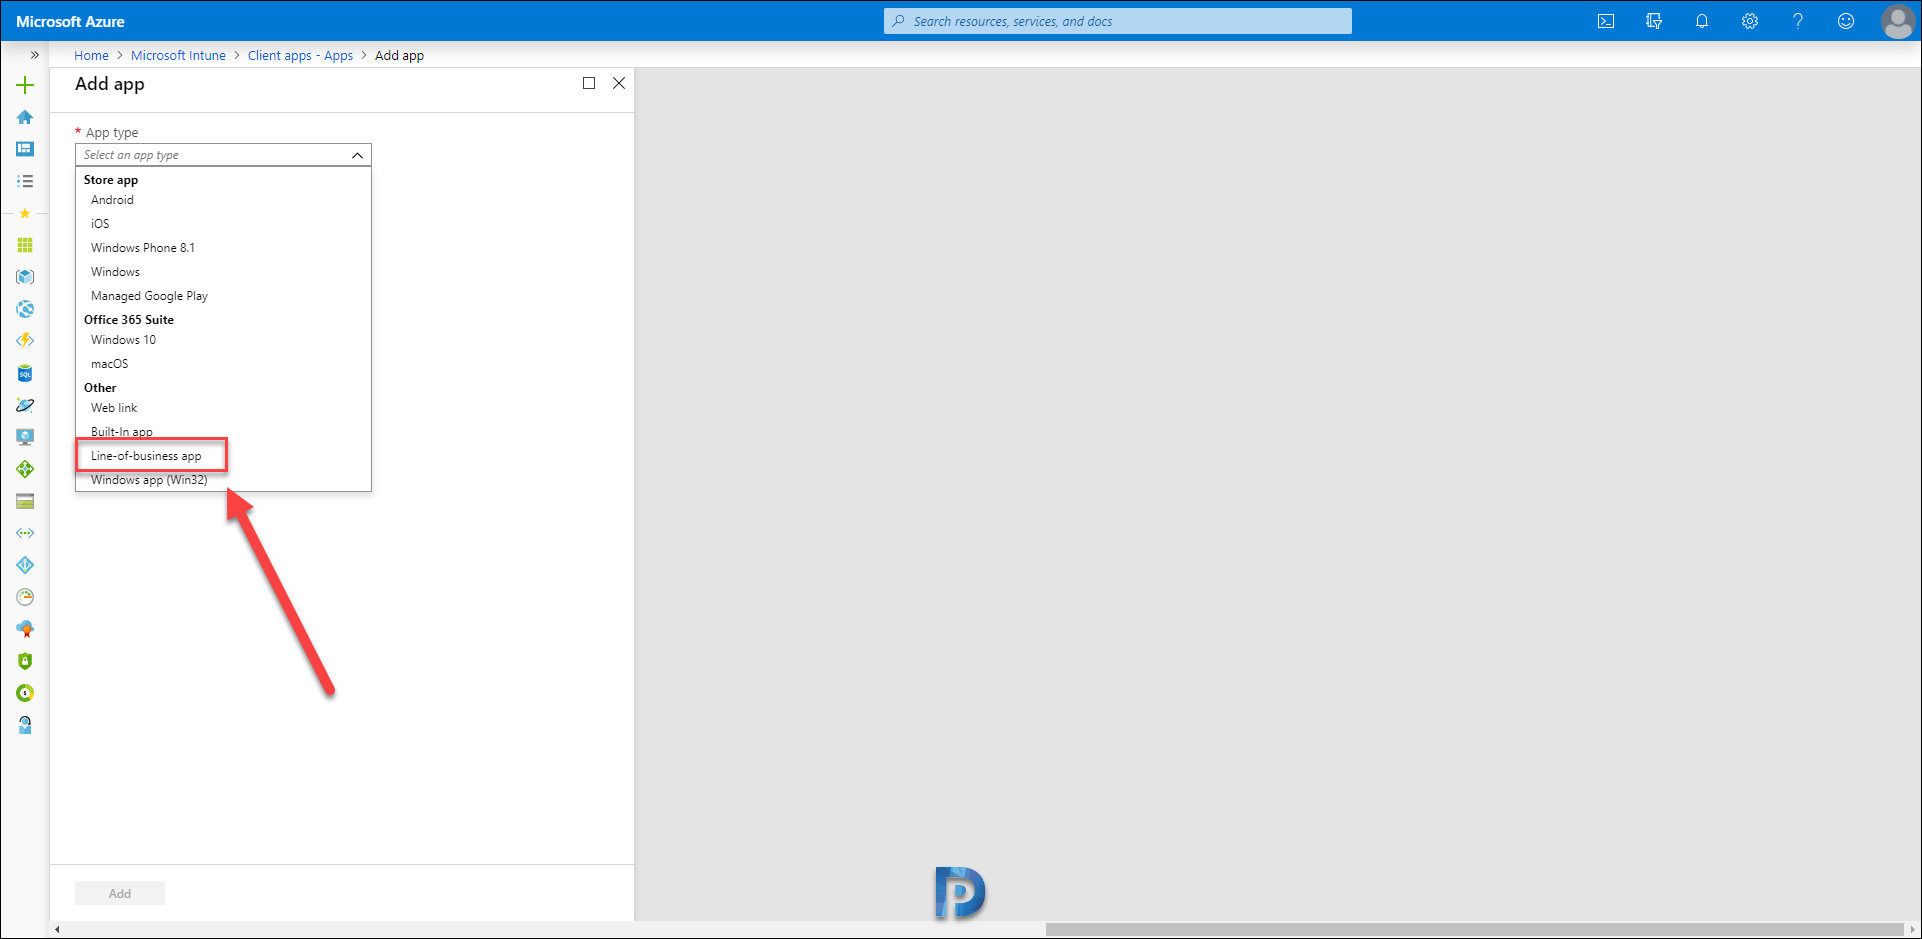 In the Line of Business Application configuration section, you need to specify the actual installation file for deployment, the information for the application, and you can also specify the scope for installation using tags.
Upload MSI Application in Intune
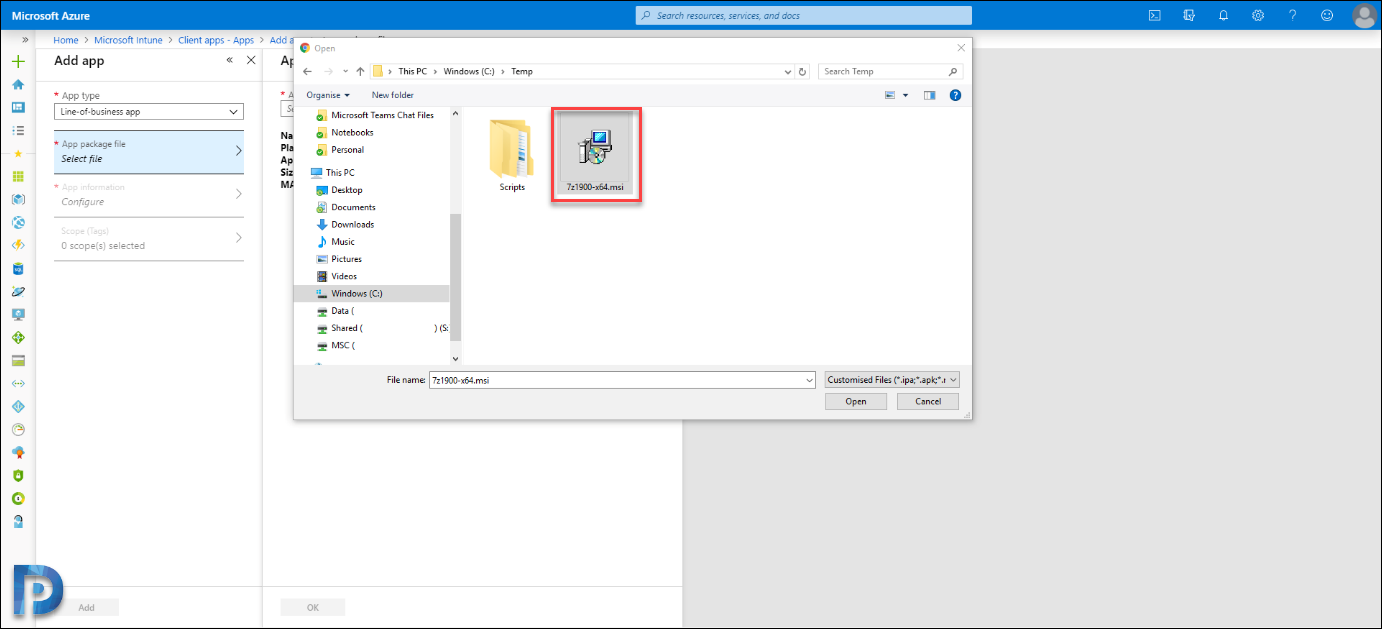
Click on App Package File, and select the installation file that you have on your local machine. In this instance, we’re using 7z1900-x64.msi.
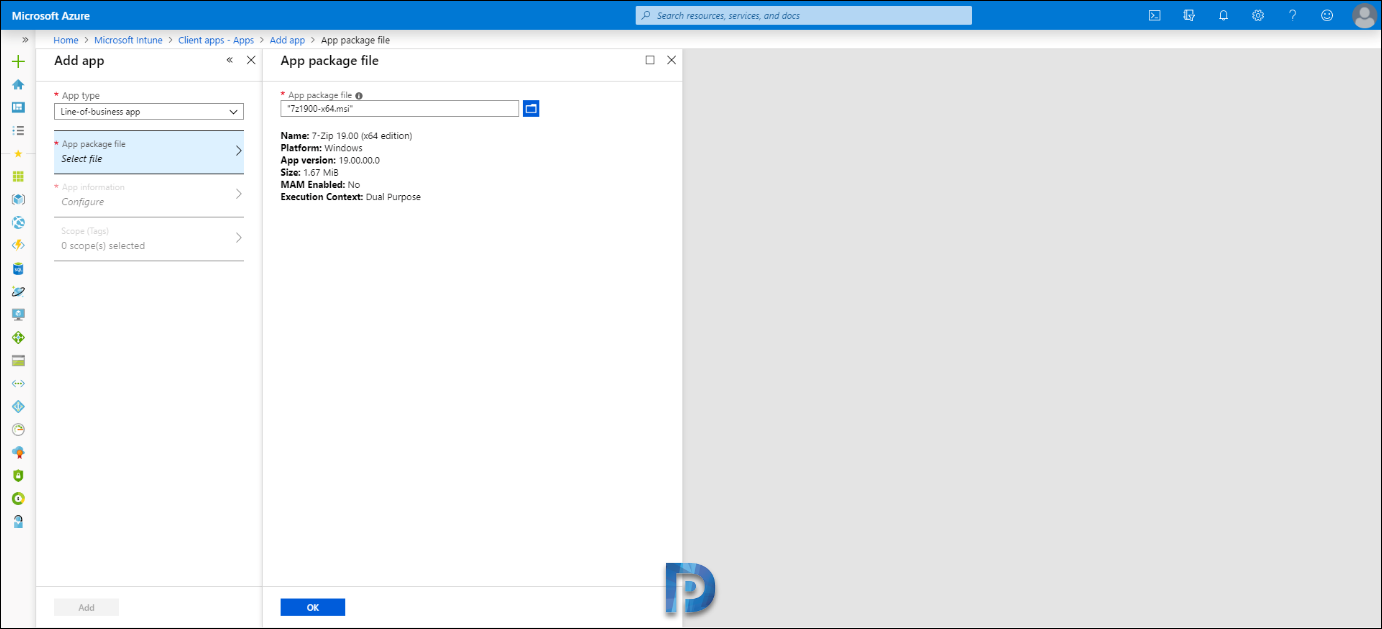
Select the file and Intune reads the installer and a brief summary shown. Click OK.
Configure Application Information
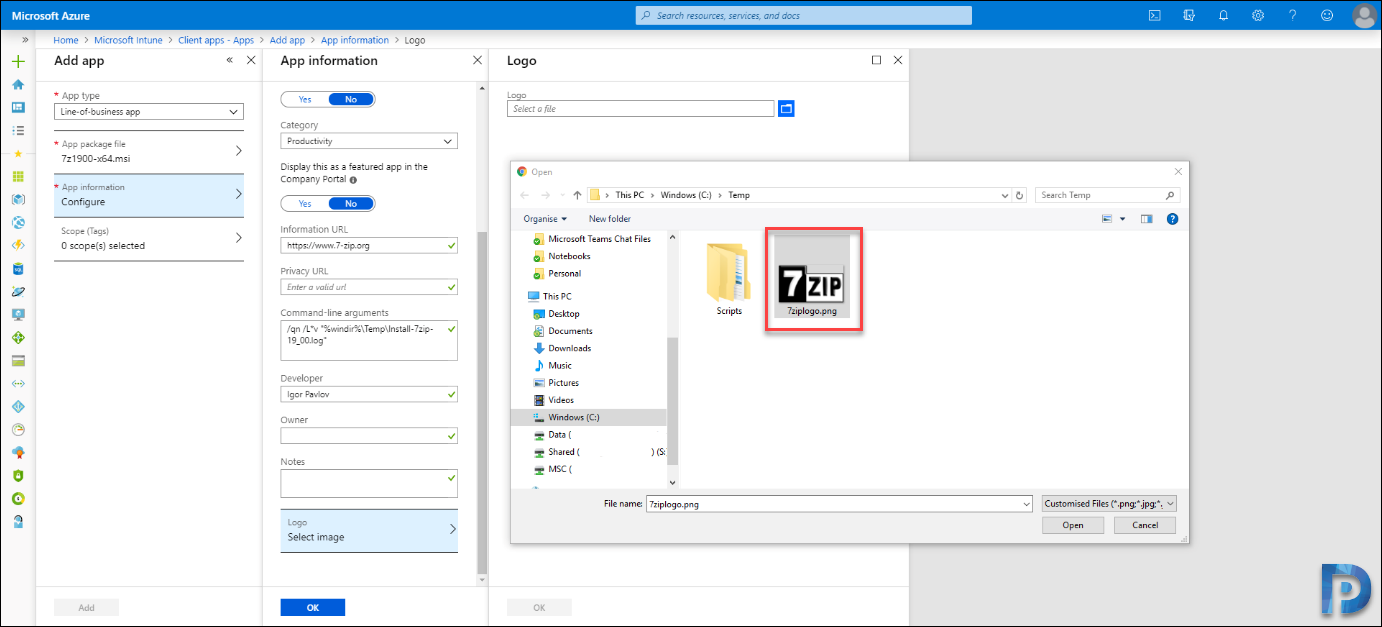
Under App Information, click Configure. You will need to enter details specific to the application, such as Description, Publisher, Developer etc. Most of all the command line parameters that should be used when this application is installed.
The more information you enter here, the more details your end users will see. This helps everybody.
Within App Information, you have 2 buttons.
- Ignore App Version
- Highlight in Company Portal
- Ignore App Version is used for applications with self-updating installers, such as Google Chrome. The Intune info tip shows; Set this to “Yes” for apps that are automatically updated by the app developer (such as Google Chrome).
- Highlight in Company Portal does exactly that, when using the Company Portal application (Similar to Software Center in the ConfigMgr world, this application, if selecting this option, would be highlighted as an application that may appeal to your users).
Under Command-line arguments is where you would enter your usual MSI/EXE installation params. In this instance, we’re simply using /qn /L*v “%windir%\Temp\Install-7zip-19_00.log”, this should, using MSI standards, result in a quiet (silent) install with no User Interface being displayed. The /L*v switch, requires a path to be entered, and will output a verbose Log file.
Specify Application Information
In addition to adding an application, you can also add the Product Icon/Logo. This just makes the whole end user experience so much better. You can use image file such as (.jpg, .gif, .png). However always use images under 512px. A happy medium is 250px to 500px.
After uploading the logo, click OK, and you will return to the top level menu for the App.
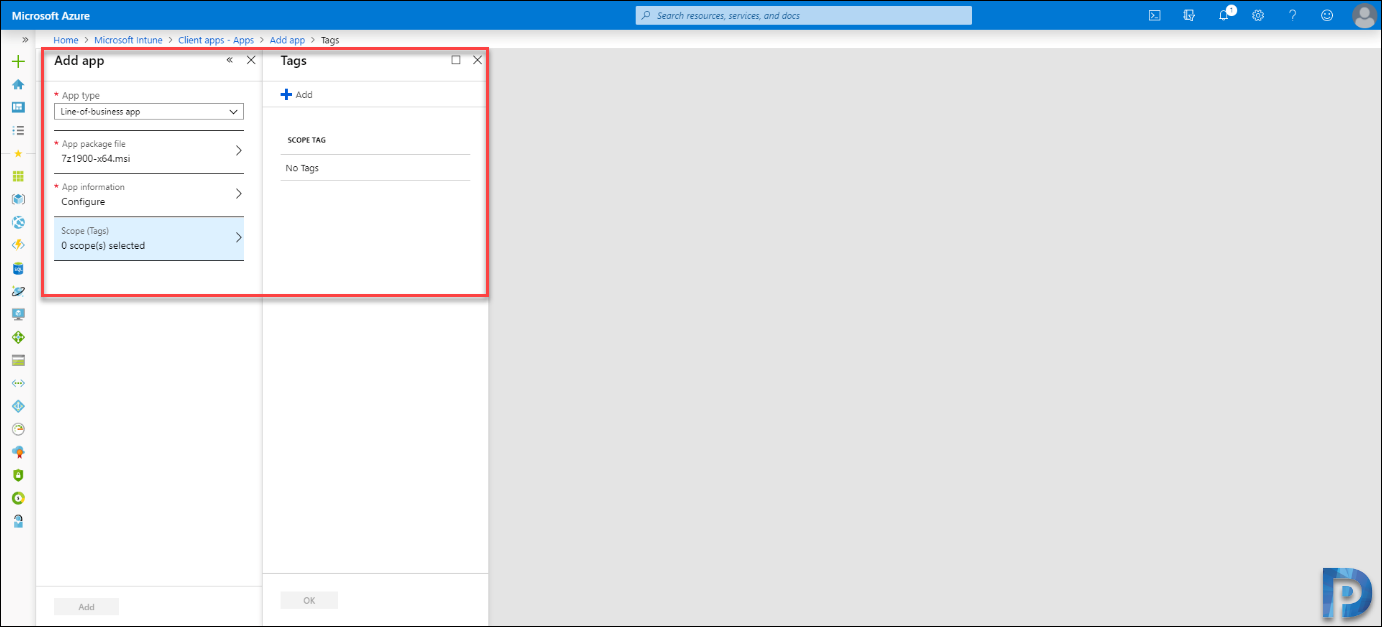
 Here you can choose to scope/limit this application by tag. This could be useful for restricting the application to specific users. In this guide I am not going to cover the scope (tags).
 Finally after you have populated all the information/completed all the options, you can then select Add
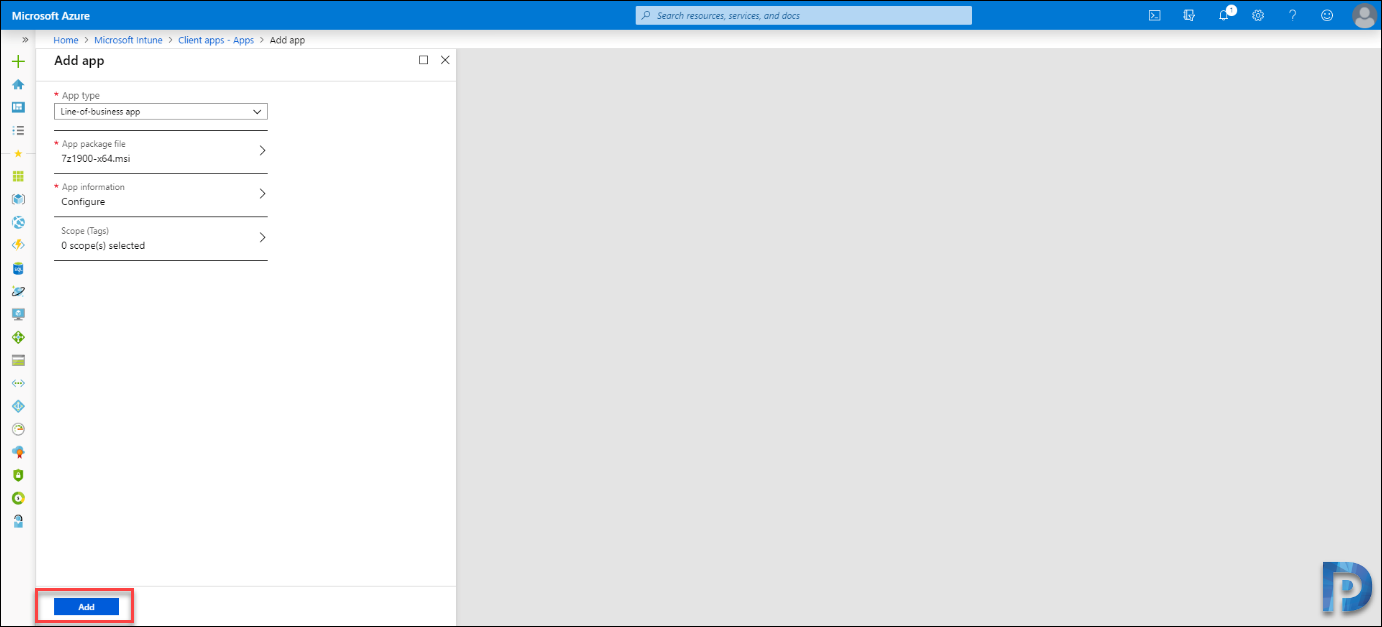 At this stage, your installation file that is local to your machine, will be uploaded to the Intune Portal. Depending on the size of your installer, and your connection speed, this could take some time. Whilst the file is uploading, the Intune Portal displays a red banner, stating “Your app is not ready yet. Check back again soon”.
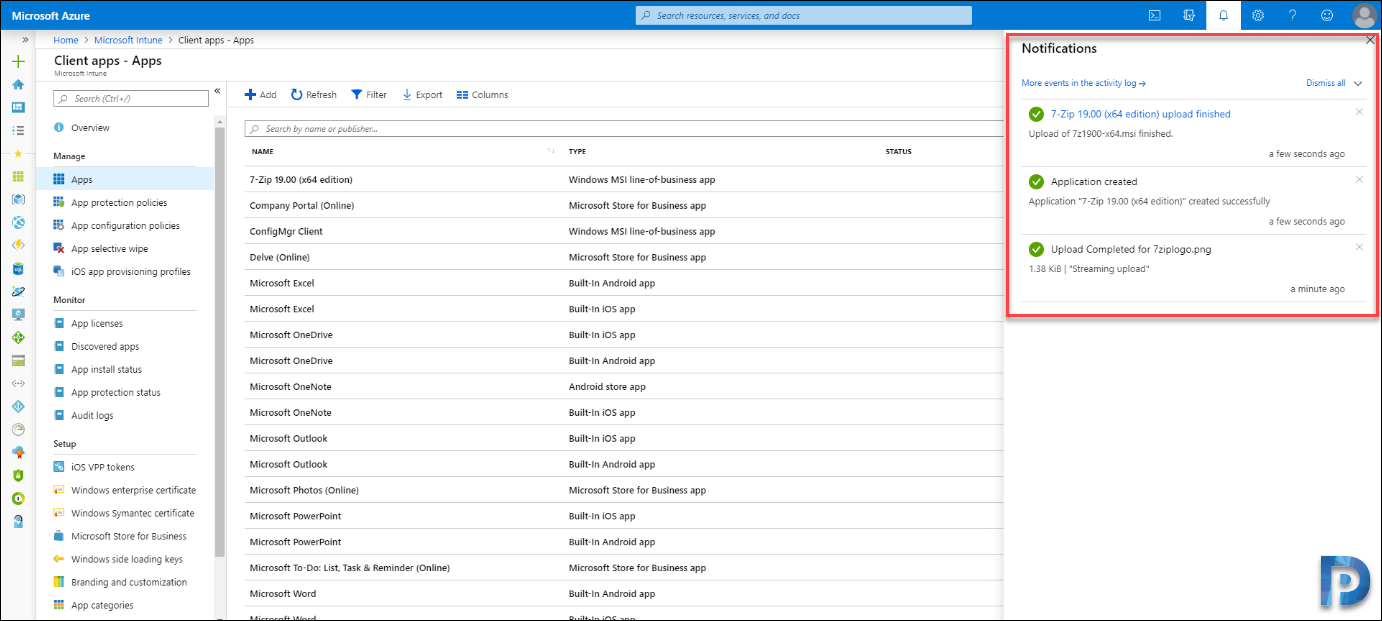
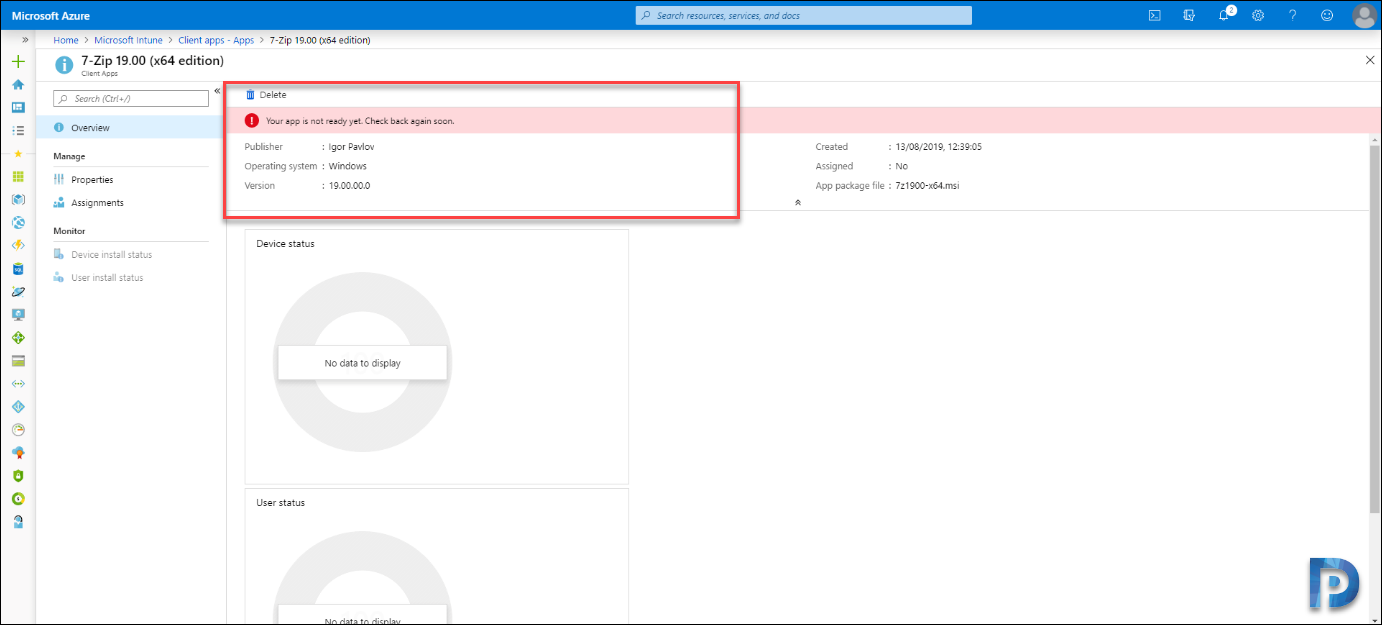 Once the upload is complete, you will receive an in-dash notification. You will also see the application appears in the Client Apps – Apps list of applications available for you to deploy.
Assign applications to groups with Intune
When you revisit the application, there is no red banner. The next step is to configure an assignment. After you add an application to Microsoft Intune, you can assign the app to users and devices. Without an assignment, the application is useless.
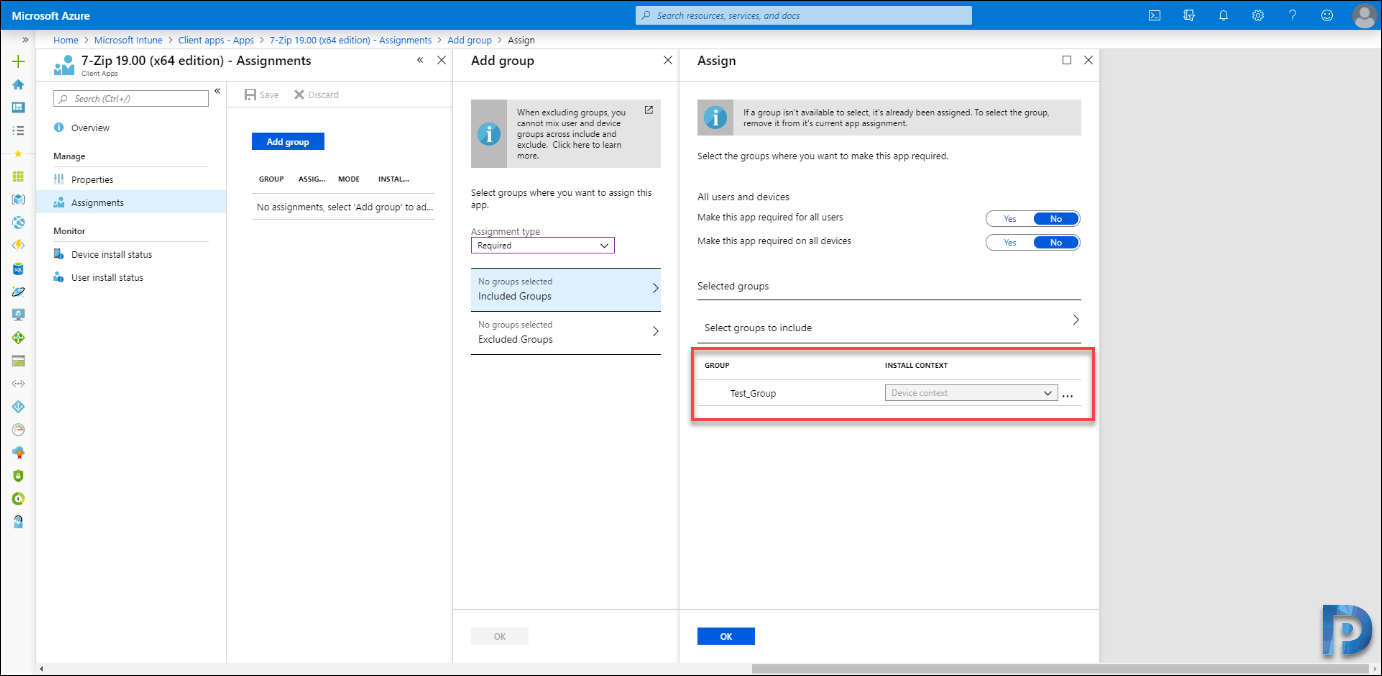
 From the left menu, click Assignments. You can assign applications to security groups configured within Azure Active Directory. The recommendation, on the basis that you can assign an “Installation“ and “Uninstallation” would be to have two groups for each application.
For example:-
- G_AppInstall_7zip
- G_AppUninstall_7zip
In this example, we’re targeting a Device for required installation. So using the example groups above, you would add Computer Objects into the respective groups.
- Computer Objects in the G_AppInstall_7zip group, would receive the required (forced) installation of the application.
- Computer Objects in the G_AppUninstall_7zip group, would receive the instruction to uninstall said application.
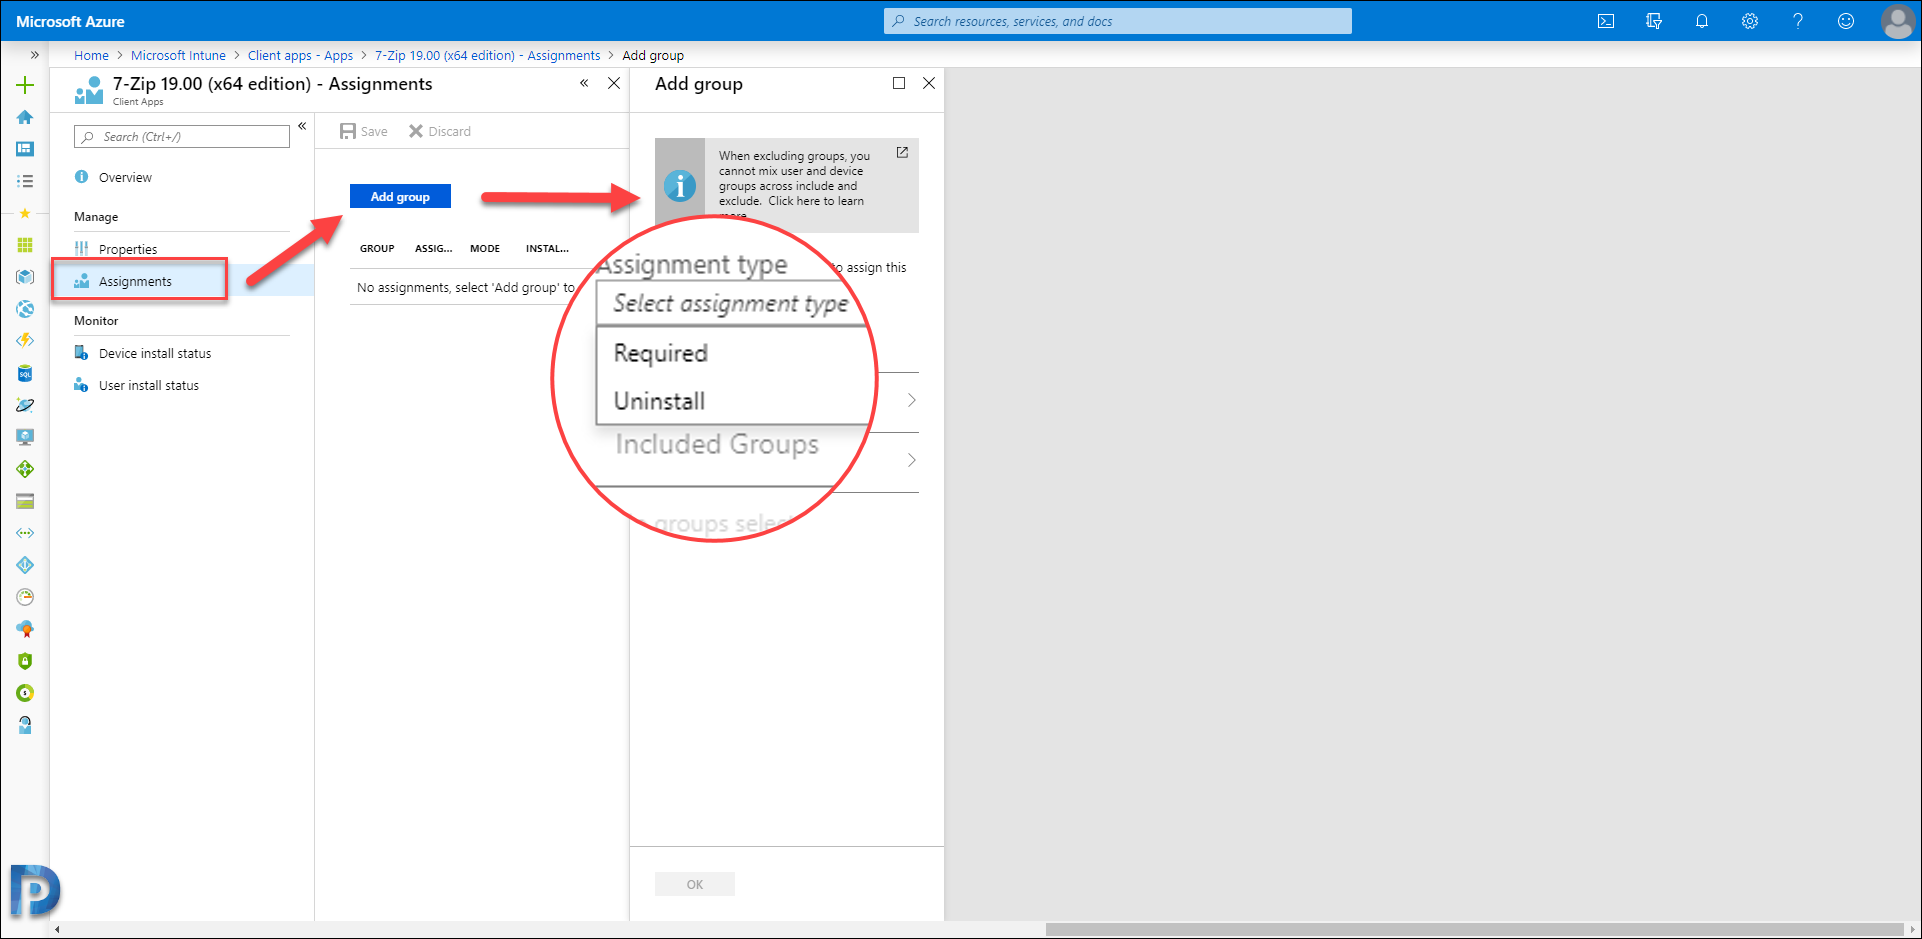 You can also choose to exclude groups during assignment. This could be useful if you needed to exclude a group of users such as VIPs, or even users of a specific device type, such as Mac Users. It would all depend on your Security Group configuration, and your specific requirements.
You can also choose to make this app a requirement for all users and/or devices. For example an Antivirus Product, Company Specific product, or perhaps even the ConfigMgr client.
Anyway, back to this example. Search for your Assignment Group, and click on Select when done.
Monitor MSI Application Deployment in Intune
In the above steps we have successfully added the application in Intune. It is now time to test the application deployment.
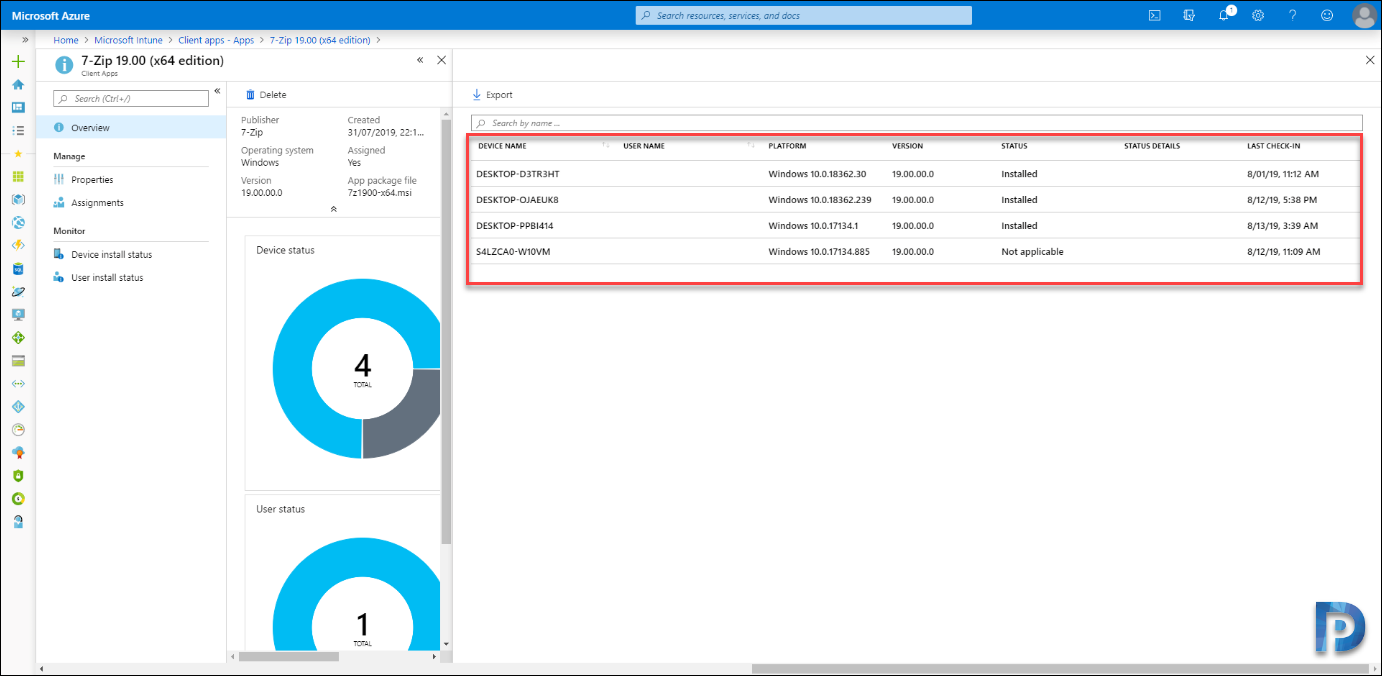
After some time, your Assigned Application, should begin to roll out and land on devices. You can track the progress and view installation status, from within the Application page in the Intune Portal.
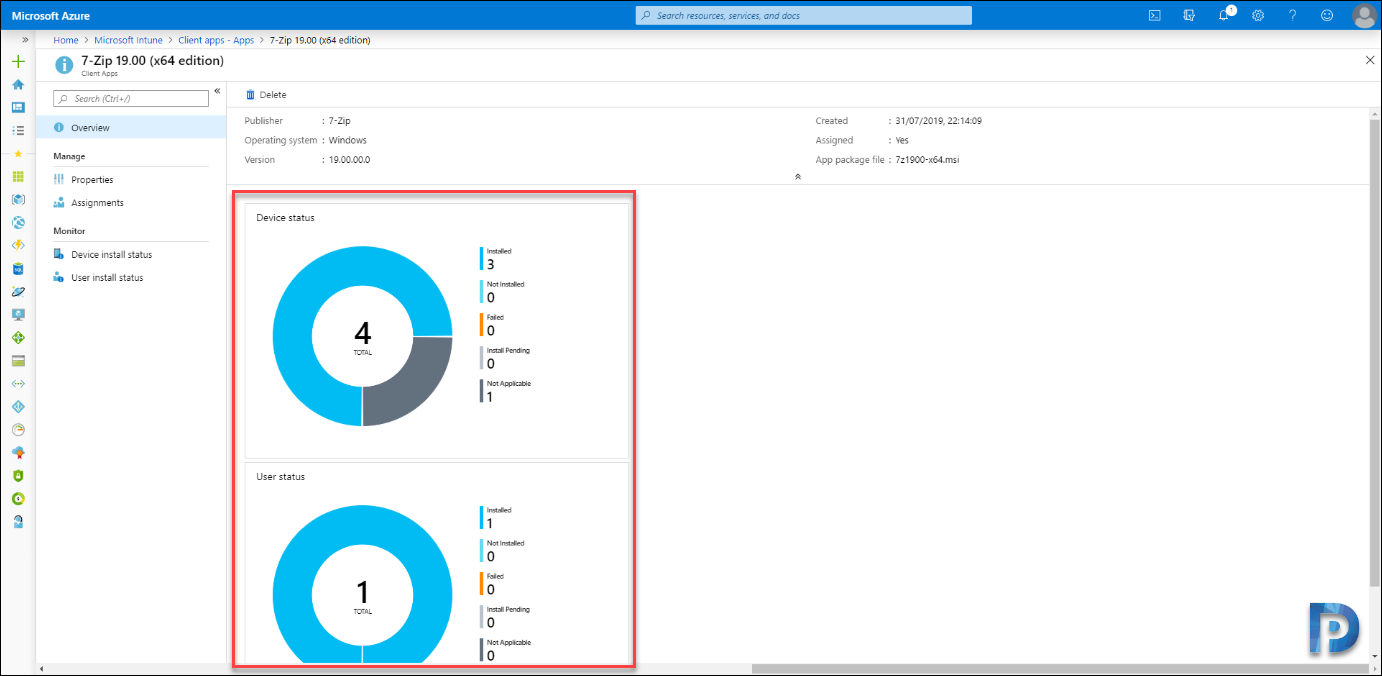 Notice the status column on the right pane. This should show the application installation status.
 This concludes the guide demonstrating how to package MSI application for Intune deployment.





Thank you so much for your help
i would like to create a Kofax Power PDF Advanced 5 in Intune and deploy it to 500 Users .
The install required a Key.
Please help
I want to achieve this if a user is descoped, there installed application would be uninstalled automatically.
How can I achieve this?
I have tried “Install as Managed”, but failed to achieve this, maybe I’m missing something.
Please help
I have an application that has a .json file. How do I add that to the package? Any suggestions?
Hello, I have deployed several applications using this method, 8 in total. The problem is that some install correctly and others do not. The MSI files with the installation commands work correctly locally. But from Intune in the autodeployment, they randomly fail with error “0x80190191” user does not have permissions (it is a BITS error). I have seen that it does not download the files and gives error 30 = DownloadFailed. The event viewer does not generate the jobID and also does not contain errors. The test device is a W11 created in Hyper-V with direct access to the internet.
Can you reupload those failed installers again and give a try?
Dear,
I think intune does not interprate correctly the % sign. You will need to hardcode the path to c:\windows in stead of %windir%
Or may be there are an escape character?
Great info and thanks.
How about when an app needs a serial number or token to complete the install?
What command line parameters are used?
I am getting this error whenever I am trying to publish MSI.
An error occurred creating application Error: ajaxExtended call failed
Hi, I followed your article with the same app to install and it just stays on “Your app is not ready yet, If app content is uploading ……..” that status never changes for this app or any app I wish to create within Intune
My MSI ask to browse the source , when i launch the shortcut
what could be the issue?
Hi, Can you share a way to auto update apps that are already pushed into the network.
Hello. Does this work on windows 10 home too? System is AAD registered. Not AAD joined. Thanks
Only Windows Pro or ENT editions