


Looking to deploy Win32 apps with Intune? Look no further! In this comprehensive guide, we’ll walk you through the step-by-step process of deploying Win32 apps using Microsoft Intune. Whether you’re an IT administrator or a system administrator, this article will provide you with the knowledge you need to efficiently manage and distribute your Win32 apps.
Intune is a cloud-based service by Microsoft that allows you to manage and secure your organization’s devices and applications. With Intune, you can easily deploy Win32 apps to your Windows devices, streamlining the app deployment process and saving you time and effort.
We will go over everything from Win32 app prerequisites to packaging your apps with the Intune Win32 app packaging tool, uploading them to Intune, and deploying them to your devices.

What are Microsoft Intune Win32 apps?
Win32 apps are programs built for the Windows operating system. Microsoft Intune for Windows applications supports both 32-bit and 64-bit operating system architectures and offers Win32 app management capabilities.
Microsoft Intune enables Windows Win32 app management. The Intune management extension is installed automatically when a PowerShell script or Win32 app is assigned to the user or device.
Note: It is possible for cloud-connected customers to use Configuration Manager for Win32 app management. However, Intune-only customers will have greater management capabilities for their Win32 apps.
Benefits of deploying Win32 apps with Intune
Deploying Win32 apps with Intune offers several benefits for organizations. Firstly, it provides a centralized management solution, allowing you to control the deployment process from a single platform. This eliminates the need for manual installations on individual devices, saving you time and resources.
Secondly, Intune offers a seamless user experience. Users can install Win32 apps directly from the company portal, making it convenient and user-friendly. This ensures that employees have access to the latest versions of the apps they need, boosting productivity and efficiency.
Lastly, you can configure installation time for Win32 apps in Intune, specify application requirements, and also enable uninstall options in the app properties. This makes it easy to configure Win32 apps before deploying them to Windows devices.
Prerequisites for Win32 app deployment in Intune
Before you can begin deploying Win32 apps with Intune, there are a few prerequisites you need to fulfill.
- Firstly, you’ll need an active Microsoft Intune subscription. If you don’t have one, you can sign up for a trial or purchase a subscription from the Microsoft 365 admin center.
- You’ll need to ensure that your devices meet the requirements for Intune. This includes having Windows devices enrolled in Intune with the Intune Company Portal app installed.
- Devices must be enrolled in Intune and either: Azure AD registered, Azure AD joined or Hybrid Azure AD joined.
- Windows application size must not be greater than 8 GB per app
- Lastly, you’ll need to prepare your Win32 apps for deployment. This involves using the Intune Win32 app packaging tool to create an installation package for your app. The packaging tool converts your app into an Intune-compatible format, making it easier to deploy and manage.
In our recent article, we covered about deploying PowerShell script using Intune. Microsoft has made it so easy to deploy PowerShell scripts and applications with Intune. There are many other possibilities, and we will explore them one by one. Let’s get started on simplifying app management with Intune!
Win32 App Deployment Flowchart
The architectural flow that occurs behind Intune Win32 app deployment is depicted in the diagram below. When you create and deploy a Win32 app with Intune, there is a process associated with it. The Microsoft team produced the diagram below.

Steps to Deploy Win32 apps with Intune
We will use the following high-level steps to deploy Win32 apps with Intune:
- Get the Win32 Content Prep tool
- Package your Win32 app
- Upload your Win32 app to Intune and configure app information
- Configure Win32 deployment settings
- Monitor and track app deployment
Download Microsoft Win32 Content Prep Tool
Before you can add a Win32 app to Microsoft Intune, you must prepare the app by using the Microsoft Win32 Content Prep Tool. The Microsoft Win32 Content Prep tool converts application installation files into the .intunewin format. Download the Microsoft Win32 Content Prep Tool from the GitHub and save it on your PC.

The advantage of using this packaging tool is that it automatically detects the parameters required by Intune to determine the application installation state. You must extract the contents of the.zip file that contains the Intune Win32 Content Prep tool before saving it to a folder.

Package your Win32 app
Start by using the Intune Win32 app packaging tool to package your Win32 app. This tool creates an installation package that can be uploaded to Intune for deployment. Follow the instructions provided by the packaging tool to ensure your app is properly packaged.
We will take an application like Adobe Acrobat Reader DC and convert it to a Win32 app before deploying it. You can also customize Adobe Reader before deploying it. Check out my post on how to customize and deploy Adobe Acrobat Reader DC using SCCM.
In the folder where the Adobe Acrobat setup files are present, create a new text file and rename it install_adobe.cmd. Save the file after editing it with the command below. The below command installs Adobe Reader with a customization file (AcroRead.mst).
msiexec /i "%~dp0AcroRead.msi" TRANSFORMS="%~dp0AcroRead.mst" /Update "%~dp0AcroRdrDCUpd2100120155.msp" /qn

Note: The Microsoft Win32 Content Prep Tool zips all files and subfolders when it creates the .intunewin file. Be sure to keep the Microsoft Win32 Content Prep Tool separate from the installer files and folders, so that you don’t include the tool or other unnecessary files and folders in your .intunewin file.
Prepare Win32 app content for upload
Now that we have selected an application to deploy, we will run the Microsoft Win32 Content Prep tool and convert the application to .intunewin format. This tool is easy to run and supports the command-line parameters as well.
If you are new to the Win32 content prep tool, the steps below will help you get started.
On your Windows PC, launch the command prompt as administrator and change the path to the folder that contains the Win32 content prep tool. Run the command IntuneWinAppUtil.exe.
When you enter the above command, you need to input the details.
- Please specify the source folder – Enter the folder that contains your application setup files.
- Please specify the setup file – Enter the setup file which is your main application.
- Specify the output folder – The Win32 Content prep tool will place the final .intunewin file in this folder.
- Do you want to specify catalog folder – Type N.
Wait for a few minutes while the Win32 Content Prep Tool runs and prepares the .intunewin app for you.

In the screenshot below, we see the AcroRead.intunewin file has been generated. There should be no errors here unless you are using incorrect commands. Close the command prompt.

Browse to the output folder, and we see our AcroRead.intunewin file is ready. In the next step, we will upload this file to Intune and deploy it to Windows devices.
Tip – The .intunewin file contains two folders – Contents and Metadata. These folders contain the application package (the installer), and the Detetection.xml file

Upload Win32 app to Intune
Once the Win32 app content is ready, the next step is to upload it to Intune. Use the following steps to upload Win32 app to Intune:
- Sign in to the Microsoft Intune admin center.
- Select Apps > All apps > Add.

On the Select app type pane, under the Other app types, select Windows app (Win32).

Select the Win32 app package file
On the Add app pane, click Select app package file.

On the app package file pane, select the browse button. Then, select a Windows installation file with the extension .intunewin. The app details appear on the screen populated by Intune. When you’re finished, select OK on the App package file pane.

Configure Win32 App Information
On the App Information tab, make sure you have selected the correct Win32 app for deployment. The app name cannot be changed here. However, you can add an application description by clicking Edit Description.
Enter the Publisher information and the category to which this app belongs. You may choose to display this as a featured app in the company portal by turning that slider to Yes.
In addition to the above information, you can specify the following details for your Win32 app:
- Information URL
- Privacy URL
- Developer
- Owner
- Notes
Finally, the last option is to specify the application logo. This icon is displayed with the app when users browse through the company portal. We recommend specifying the logo here because it makes easy for users to identify the applications via the logo. Click Next.

Configure Program Information
In the Program section, you specify the details about the program. These are important details that you must supply before you deploy Win32 apps with Intune. Win32 apps will experience error 0x80070002 if the install or uninstall command is entered incorrectly.
- Install Command: The install command should be automatically populated for the Win32 app. However, in this case, we will change it and use the correct command, which is install_adobe.cmd. That’s because that’s the file that contains the Adobe Reader install command.
- Uninstall Command: This is also populated automatically in our case. If you wish to specify another uninstall command, or rather, a script, you can do that.
- Install Behavior: Set the install behavior to either system or user. User context refers to only a particular user. System context refers to all users of a Windows device.
- Device Restart Behavior: The section has some options. You have to select one option out of these.
- Determine behavior based on return codes: Choose this option to restart the device based on the return codes.
- No specific action: Choose this option to suppress device restarts during the app installation of MSI-based apps. This is a preferred option if you don’t want reboot to occur on machines post application installation.
- App install may force a device restart: Choose this option to allow the app installation to finish without suppressing restarts.
- Intune will force a mandatory device restart: Choose this option to always restart the device after a successful app installation.
Specify return codes to indicate post-installation behavior: Add the return codes that are used to specify either app installation retry behavior or post-installation behavior. Return code entries are added by default during app creation. However, you can add more return codes or change existing return codes.
Suppose you select the device restart behavior to Determine behavior based on return codes, you need to set the Code type to one of the following.
- Failed – The return value that indicates an app installation failure.
- Hard reboot – The hard reboot return code does not allow the next Win32 app to be installed on the client without reboot.
- Soft reboot – The soft reboot return code allows the next Win32 app to be installed without requiring a client reboot. Reboot is necessary to complete installation of the current application.
- Retry – The retry return code agent will attempt to install the app three times. It will wait for five minutes between each attempt.
- Success – The return value that indicates the app was successfully installed.
Click Next.

Configure Requirements
On the Requirements page, specify the requirements that Windows devices must meet before the Win32 app is installed:
- Operating system architecture: Select the OS architecture which is either 32-bit or 64-bit.
- Minimum operating system: Select the minimum operating system needed to install the app. As an Intune admin, you should know what OS is installed on the client machines.
- Disk space required (MB): This is an optional entry where you can add the free disk space needed on the system drive to install the app.
- Physical memory required (MB): Add the physical memory (RAM) required to install the app. This is optional.
- Minimum number of logical processors required: Specify the minimum number of logical processors required to install the app. This is optional.
- Minimum CPU speed required (MHz): Optionally, add the minimum CPU speed required to install the app.
If you want to configure additional requirement rules, you can do so by clicking +Add option. Click Next.

Configure Detection Rules for Win32 Apps
When you deploy Win32 App with Intune, you need to specify the correct detection rules. The detection rules are very similar to what we have in Configuration Manager for applications. The Win32 app installation is entirely decided on the rules that you specify here.
Rules format: Here you select how the presence of the app will be detected. You can choose to either manually configure the detection rules or use a custom script to detect the presence of the app. You must choose at least one detection rule.
In the example below, we have selected ‘Manually configure detection rules‘ which is a bit easier when compared to using script for detection. Click +Add.

On the detection rule window, click on Rule Type drop-down and select MSI. The MSI product code is populated automatically, however, if you don’t see it, add it manually. For MSI product version check, we are going to select No.

The detection rules have been configured for Win32 app, click Next.

Win32 App Dependencies
You can specify app dependencies where the applications that must be installed before your Win32 app can be installed. Any Win32 app dependency needs to also be a Win32 app. It doesn’t support depending on other app types, such as single MSI LOB apps or Microsoft Store apps.
You can select those other apps by clicking +Add. In this example, we are not going to specify any dependencies. Click Next.

Supersedence
When you supersede an application, you can specify which Win32 app will be updated or replaced. To update an app, disable the uninstall previous version option. To replace an app, enable the uninstall previous version option. On the Supersedence tab, we are not going to configure anything. Click Next.

Assignments
On the Assignments tab, you can select the Required, Available for enrolled devices, or Uninstall group assignments for the app. The options are explained below.
- Required: The Win32 app is installed on devices in the selected groups.
- Available for enrolled devices: Users install the Win32 app from the company portal app.
- Uninstall: The Win32 app is uninstalled from devices in the selected groups.
After you select your groups, you can also configure End user notifications, Availability, and Installation deadline for Win32 apps.

Review and Create
On the Review+Create tab, go through the values and settings that you entered for the Win32 app. Verify that you configured the app information correctly. Select Create to add the Win32 app to Intune.

Monitor and track Win32 app deployment
Once the Win32 app is deployed, you can monitor its deployment status and track installation progress. Intune provides detailed reports and logs, allowing you to troubleshoot any deployment issues and ensure successful app installation.
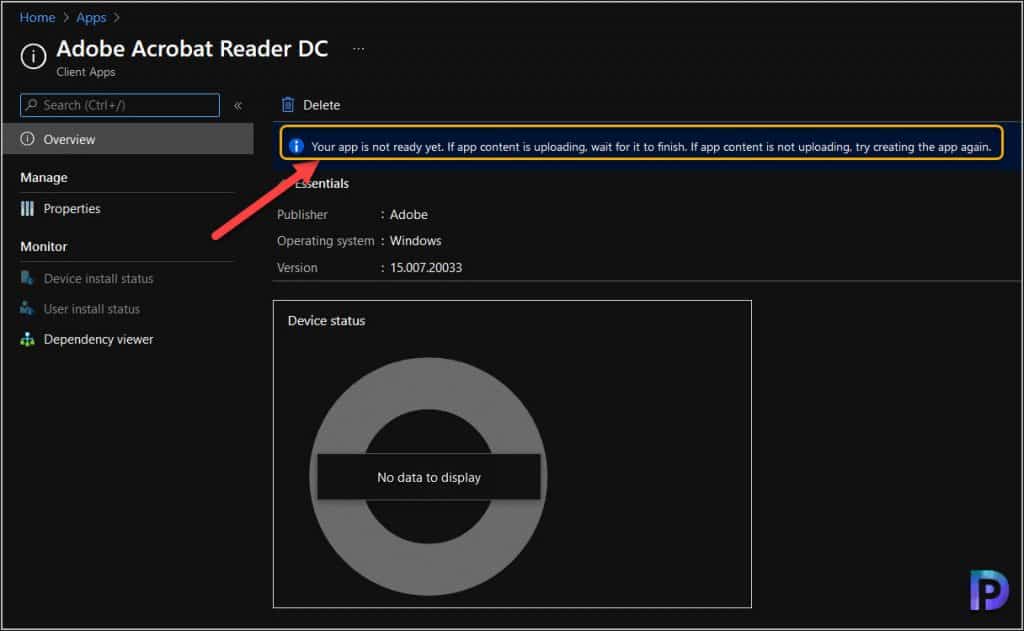
When you create a Win32 App in Intune using the above steps, you must wait until the app is uploaded to Intune. In the below screenshot you see the app is not ready yet. If app content is uploading, wait for it to finish.
How long does it take to upload a.intunewin file? This is determined by the size of the file. The longer it takes to upload a.intunewin file, the larger its size.
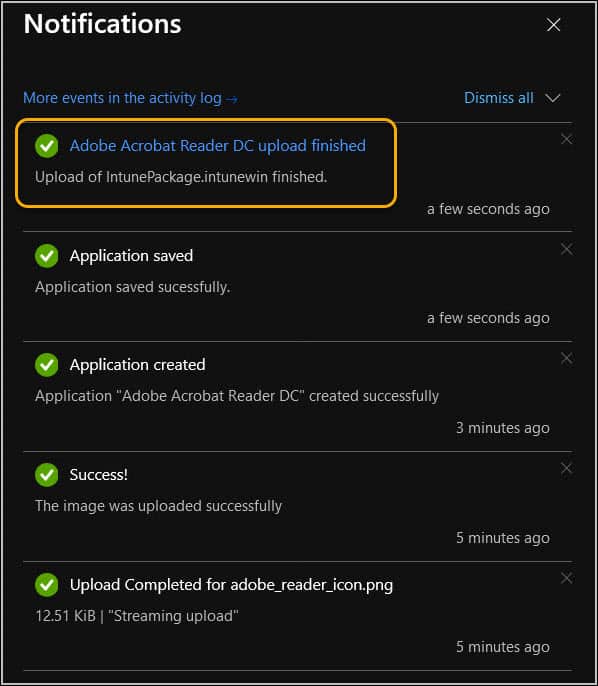
Keep an eye on the notifications as these are really important. Look for the final notification which says Application upload finished. This confirms that Win32 app is successfully created in Intune.
Tip: During our testing, the Win32 application failed to upload to Intune for some reason. So we had to create the app again and upload it. You must wait until you see app upload finished successfully in notifications.
End user Experience
For end users, the Win32 apps appear in the company portal like any other apps. If the Win32 app is set to display as featured app, it appears under the Featured apps section of the company portal. The Adobe Reader DC app that we deployed as Win32 app is available for installation in the company portal.

Select the Adobe Acrobat Reader DC application and click Install.

The application (.intunewin file) is downloaded and installed on the device.

To view the Win32 app deployment status in Intune, select the app and go to the device installation status. Here you can view the devices that successfully installed the Win32 app that you assigned.

Troubleshoot Win32 App Installation Errors
When you deploy Win32 Apps with Intune, some devices may fail to install the app and report an error. Like Configuration Manager, we also have log files from troubleshooting Win32 App deployment in Intune. You can collect Intune logs from Windows devices and analyze errors.
You can use CMTrace log file viewer to view the log files on Windows device managed by Intune. I would recommend reading this excellent article on Troubleshooting Win32 Apps in Intune.
The Agent logs on the client machine are located in C:\ProgramData\Microsoft\IntuneManagementExtension\Logs. This location mainly contains the following log files that track the following information:
- AgentExecutor.log: This log file tracks PowerShell script executions (deployed by Intune).
- ClientHealth.log: This log file tracks the sidecar agent-client health activities.
- IntuneManagementExtension.log: The IME log that can be used to troubleshoot Win32 App deployments
Troubleshooting common issues during Win32 app deployment in Intune
During the Win32 app deployment process, you may encounter some common issues. Here are a few troubleshooting tips to help you resolve them:
- Win32 App installation failure: If the Win32 app fails to install on target devices, check the deployment settings and ensure that the app is assigned to the correct user groups. Also, verify that the devices meet the requirements for app installation, such as having enough disk space or meeting the OS version requirements.
- Win32 App installation timeout: If the app installation takes longer than expected or times out, check the network connectivity and ensure that the devices have a stable internet connection.
- Win32 App compatibility issues: If the Win32 app doesn’t function properly after installation, check for compatibility issues with the target devices. Ensure that the app is compatible with the OS version and hardware specifications of the devices. You can also consult the app developer or Intune support for assistance.
Best practices for deploying Win32 apps with Intune
To ensure a smooth and successful deployment of Win32 apps with Intune, here are some best practices to consider:
- Test app deployment in a pilot group: Before deploying the Win32 app organization-wide, test it in a small pilot group to identify and resolve any potential issues. This allows you to validate the deployment process and gather feedback from users before rolling out the app to a larger audience.
- Keep app packages up to date: Regularly update the app packages in Intune to ensure that users have access to the latest versions of the Win32 apps. This helps to address any security vulnerabilities or performance issues and provides users with the latest features and improvements.
- Monitor app deployment and usage: Continuously monitor the deployment status and usage of your Win32 apps through Intune’s reporting and analytics tools. This allows you to track app adoption, identify any deployment or usage issues, and make data-driven decisions to optimize app management.
Conclusion
Deploying Win32 apps with Intune offers numerous benefits, including centralized management, user convenience, and enhanced security. By following the step-by-step guide, troubleshooting common issues, and implementing best practices, you can efficiently deploy and manage your Win32 apps with Intune. We hope this guide makes it easy for you to deploy Win32 apps with Intune.

Here’s a big question: What if you build a deployment package for Intune, but you also need to deploy a settings file or some other file with the package. For example, let’s say you deploy a Cisco AnyConnect app, which also requires a JSON file to be downloaded or deposited within the installation folder so that when it is first run, it automatically configures the VPN connection(s) for the user. Is this possible with Intune, and if so, how would you proceed to include this in the installation package?
Hi Prejwal Desai,
Thanks for this comprehensive post. It addressed so many issues re Win32 app deployment in Intune. Great work.
Hi There,
Thanks for the detailed Article. I am wondering if there is any rerun behaviour can be set for Intune app deployment.
For Instance, if one app has been installed using SCCM until& unless its re-advertised ( SCCM term not sure if any term is there in Intune) it shouldn’t auto install. Few of my auto pilot steps has application uninstall command at the end of the deployment process unfortunately few users are not in internet when this process is completing. Later, the moment those devices come to internet it reinstall those software again.
Thanks
Hi Prajwal,
I am trying to deploy in house application as Windows app (Win32).
Application prepared with right extensions (setup.intunewin)
I am confused here that how I can get the correct information
1 Install command – setup.intunewin_install.cmd Or install.cmd
2 Uninstall command – setup.intunewin_uninstall.cmd
Detection Rules.
I used Files – Not worked
I am trying registry – HKEY_LOCAL_MACHINE\SOFTWARE\WOW6432Node\Microchip
Still not working let me know what I am missing