


In this post, I will show how to automate WinSCP deployment using Intune for Windows devices. You can silently configure and deploy WinSCP using Intune to all Windows clients.
WinSCP is an open-source, free SFTP client, FTP client, WebDAV client, S3 client, and SCP client for Windows. WinSCP lets you file transfer between a local and a remote computer. It is the best alternative to popular software like FileZilla.
There are multiple ways to automate the deployment of WinSCP software in your enterprise. The WinSCP application can be deployed using several well-liked techniques, including Group Policy, Configuration Manager, Intune, etc. You can use the following guide for WinSCP ConfigMgr deployment.

Before you read further, here are some application deployment guides using Intune.
- Deploy Remote Help App using Intune as Win32 App
- Create Win32 Applications using Patch My PC in Intune
- Deploy Company Portal App using Intune: A Step-by-Step Guide
- Deploy WARP Using Intune: Enterprise Deployment Guide
- Best Guide to Deploy Microsoft Store Apps using Intune
Deploy WinSCP using Intune as Win32 App
Let’s go through the steps to deploy WinSCP using Intune. First, we will download the latest version of WinSCP installer and create a Win32 app. Then upload the WinSCP win32 app to Intune, configure the app information, define a detection rule and perform WinSCP deployment using Intune.
Step 1: Download WinSCP Installer for Intune
WinSCP doesn’t provide MSI installers for enterprise deployments, you have to use the executable setup file for deployment. You can download the latest version of the WinSCP app directly from the WinSCP download site. Always the download the latest version of the WinSCP installer. In the screenshot below, I am going to download WinSCP version 5.21.7 which is the latest version at the time of writing this.

When you download the WinSCP installer, the installer name is something like this: WinSCP-version-setup.exe. To make the WinSCP deployment easier, I am going to rename this file to WinSCP.exe. Along with the WinSCP application, you may also download the logo for the app. We will assign this logo to the app in the Intune which will appear in the Company Portal for users.
Step 2: Convert WinSCP to WinSCP.intunewin file
Before adding WinSCP as a Win32 app in Intune, we will convert WinSCP.exe to WinSCP.intunewin file using the Microsoft Win32 Content Prep Tool. This free tool converts application installation files into the.intunewin format.
I’m going to assume that you’ve already downloaded the Win32 content prep tool. Launch the command prompt on your computer and run IntuneWinAppUtil.exe. Before it can make a Win32 app for WinSCP, the tool needs some basic information.
- Specify the source folder: The folder where the WinSCP installer executable is located.
- Specify the setup file: Enter the file name as WinSCP.exe.
- Provide the output folder location: Specify the folder where you want the WinSCP Win32 app to be created.
- Do you want to specify catalog folder: Type N
The tool converts the WinSCP application installation files into the .intunewin format. The tool also detects some of the attributes that Intune requires to determine the application’s installation state. After running this tool, we have the WinSCP.intunewin file ready for deployment. This is the WinSCP Win32 app that will be used to create a Win32 app in the Microsoft Intune admin center.

Step 3: Add WinSCP Win32 App to Intune
In this step, we will create a new Win32 app for WinSCP in Intune:
- Sign in to the Microsoft Intune admin center.
- Click Apps and select All Apps.
- Click + Add to create a new app in Intune.

On the Select app type page, click the drop-down for App type and from the list of options, select Windows app (Win32).

On the App information page, locate the WinSCP.intunewin file you’ve previously prepared, and then select OK. The following details are populated from the WinSCP Win32 app.
Name: WinSCP.exe
Platform: Windows
Size: 10.47 MiB
MAM Enabled: No

Step 4: Configure WinSCP App Information
After you have uploaded the WinSCP win32 app to Intune, the next step is to configure the app information. This involves providing basic details about the app such as Name, Publisher, Description, App Logo, etc. The details that you specify will be presented to users when they launch the company portal app and view the application.
In addition to providing basic details about the app, you can choose to display the app as a featured app in company portal for users.

On the App information page, scroll down to find the logo option. Here you can specify a logo for the WinSCP application. The icon will be visible along with the WinSCP app in the company portal. Click Next to continue.

Step 5: Specify WinSCP Install and Uninstall Command
On the Program page, you need to specify the install and uninstall command for WinSCP app. For any version of WinSCP, the following install and uninstall commands will work.
- For the WinSCP Install command line, specify WinSCP.exe /SILENT /ALLUSERS /NORESTART
- For the WinSCP Uninstall command line, specify “C:\Program Files (x86)\WinSCP\unins000.exe” /SILENT.
- Install Behavior: System.
- Device Restart Behavior: App install may force a device restart.
You can also add a configuration file if you need by adding /LOADINF=XXXXX at the end of the install command.

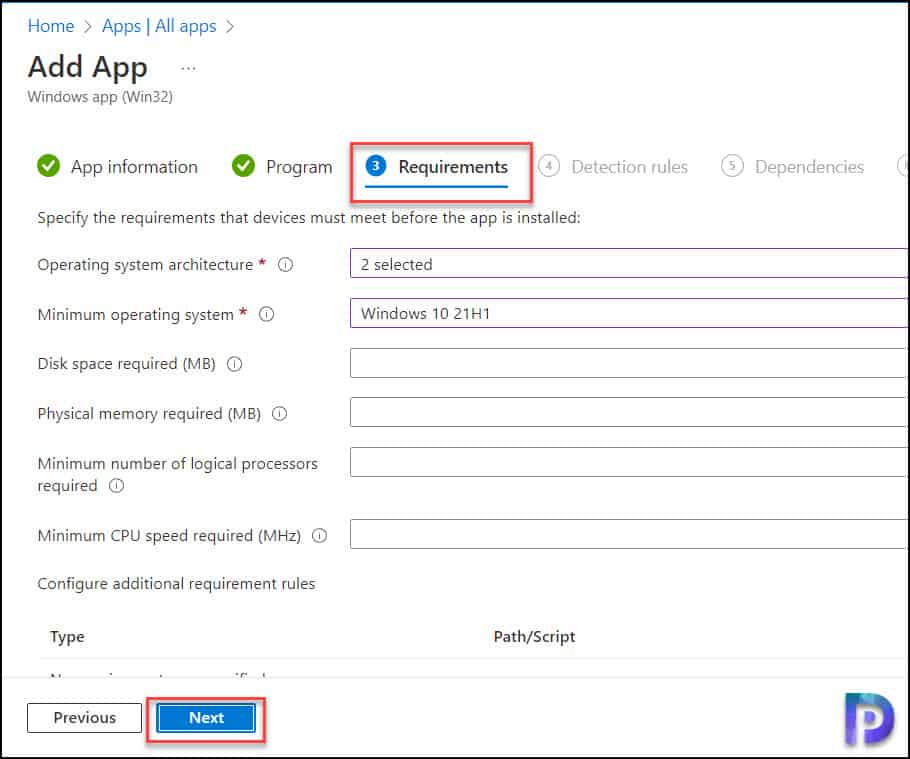
Step 6: Configure the WinSCP App Requirements
The Requirements page allows you to specify the requirements that devices must meet before the app is installed. You should have a clear idea about the devices that are managed by Intune in your setup and their architecture and version before you configure the requirements.
I have configured the following requirements for WinSCP app deployment:
- Operating system architecture: 32-bit and 64-bit
- Minimum operating system: Windows 10 21H1
The remaining requirements are optional, and you may configure them if required. Click Next.
Step 7: Add Detection Rule for WinSCP Deployment
In this section, we will add the detection rule for the WinSCP app. Be it Configuration Manager or Intune, this is essential for any app that you deploy.
Configure the following options to detect the presence of WinSCP app on Windows devices:
- Rule type: File
- Path: %ProgramFiles(x86)%\WinSCP
- File or folder: WinSCP.exe
- Detection method: String (version)
- Operator: Equals
- Value: Specify the version of WinSCP you are deploying.
- Associated with a 32-bit app on 64-bit clients is configured to Yes.
Click OK and select Next.

Step 8: Configure the Dependencies and Supersedence for Deployment
Intune allows you to configure the dependencies for Win32 apps. The dependencies are the applications that must be installed before this application can be installed. WinSCP doesn’t rely on any other software for it to work, so click Next.

On the Supersedence page, click Next.

Step 9: Assign WinSCP Win32 App to Groups
In this step, you’ll have to assign the WinSCP app to your device or user groups. You can either assign the app as Required or Available for enrolled devices. Select an applicable device group or groups that should install the WinSCP app. Click Next.

On the Review+Create page, you can find the summary of all the configuration that you have performed for the WinSCP app. If everything looks good, click Create.

The WinSCP Win32 app is now created in Intune, and we can see some notifications for that. Keep an eye on the notifications as these are really important. Look for the final notification which says, “WinSCP.exe” upload finished. You should find the WinSCP app listed under All Apps in the Intune admin center.
Step 10: Install WinSCP App using Intune
In this step, we will log in to Windows computers and check if the WinSCP app installs correctly. After you deploy the WinSCP app using Intune, you must wait for the deployment to apply to the targeted groups, and once the devices check in with the Intune service, they will receive the application. You can also force sync Intune policies on your computers in case you don’t find the WinSCP app listed in the company portal.
Launch the company portal on the computer. The WinSCP app should be shown under Recently published apps. Select the WinSCP application and click Install. The application is now downloaded on to the client computer and installed.

After a few minutes, we see the WinSCP application is successfully installed on the computer. The company portal shows the application status as Installed which confirms successful WinSCP deployment using Intune.


Hi Prajwal, my WinSCP.intunewin file is over 2 GBs. Can I still use with file or is there something wrong with this converter tool?
How come it’s grown to 2GB?. Can you log this issue in the forums, I will look into it.
Hi, why did the size of my program increase several times after converting it to an .intunewin file?
Can you tell me what is the size of the that file?