


In this post, I will show you how to deploy WinSCP using SCCM (Configuration Manager). We will download the latest version of WinSCP and perform the WinSCP application deployment using SCCM.
WinSCP is an open-source, free SFTP client, FTP client, WebDAV client, S3 client, and SCP client for Windows. Its main function is file transfer between a local and a remote computer. It is the best alternative to popular software like FileZilla.
There are multiple ways to automate the deployment of WinSCP software in your enterprise. The WinSCP application can be deployed using a number of well-liked techniques, including Group Policy, Configuration Manager, Intune, etc.

With Configuration Manager, you can automate the WinSCP application deployment on multiple computers. To deploy WinSCP silently, you can build an application or program. You can also designate the WinSCP application’s icon, which will be visible to users in the Software Center.
I’ll also share the WinSCP setup parameters in this post, which you can use to automate application installation and uninstallation.
Download WinSCP Application
You can get the WinSCP application from the WinSCP download page. Click on the “Download” button to get the WinSCP installer. The WinSCP installer is an executable file (.exe file), and there is no MSI installer available. WinSCP is also available from the Microsoft Store for $9.99.
You may also download the icon for the WinSCP application and display the icon in the Software Center for users. At the time of writing this post, WinSCP-5.21.5 was the latest available version. I am going to download the setup file and save it to the Sources folder on my ConfigMgr server.

WinSCP Setup Silent Install Uninstall Parameters
WinSCP setup lets you use optional command-line parameters to automate the installation. You can use following parameters to automate the installation:
| WinSCP Setup Parameters | Description |
|---|---|
| /LANG | Runs the WinSCP installer using the specified language. |
| /SILENT | Runs the installer without any prompts (except for installation mode selection and error messages). Default selections are used for destination folder, components, etc. To select the installation mode, use /ALLUSERS or /CURRENTUSER. |
| /VERYSILENT | Same as /SILENT, but without showing the progress window. |
| /ALLUSERS | Instructs installer to install the WinSCP in administrative install mode. |
| /CURRENTUSER | Instructs installer to install in non-administrative install mode. |
| /NORESTART | Instructs installer not to reboot even if it’s necessary. |
| /LOG | Define the Setup to create a log file for troubleshooting WinSCP installation errors. |
| /LOADINF | Instructs Setup to load the settings from the specified file after having checked the command line. This file can be prepared using the /SAVEINF parameter. |
| /SAVEINF | Instructs Setup to save installation settings to the specified file. |
| /NOCLOSEAPPLICATIONS | Prevents Setup from closing applications using files that need to be updated by Setup. |
Create WinSCP Application in SCCM
We will now add a new application for WinSCP in the Configuration Manager console. Perform the following steps to create WinSCP application in SCCM.
- Launch the Configuration Manager console.
- Go to Software Library > Overview > Application Management.
- Right-click Applications and select Create Application.

On the General window, select Manually specify the application information and click Next.

Specify the WinSCP application details such as name of the application, administrator comments, Publisher information, software version etc. The application details that you specify here will be visible in Software Center for users. Click Next.

In this step, you can specify the WinSCP application icon for Software Center. Adding an icon to the application can be optional, but doing so makes it easier for users to recognize it. On the Software Center page, click Browse and select an icon for the WinSCP application. Click Next.

On the Deployment Types page, click the Add button to add a new deployment type for WinSCP software. At this point, you can read this useful guide on Supported Deployment Types for Applications in SCCM. Click Next to continue.

On the General window of Create deployment type wizard, select Manually specify the deployment type information. Click Next.

In Configuration Manager, you can add multiple deployment types to a single application. For every application deployment type that you add, specify the name, comments, and language. Click Next.

In the Content window, we will specify the install and uninstall commands for the WinSCP application. The client computers will use these commands to install and uninstall the WinSCP application.
- Content Location: Specify the content location which is the actual folder path where you have the WinSCP setup application.
- Installation Program: To silently install WinSCP application using SCCM, specify the command: “WinSCP-5.21.5-Setup.exe” /SILENT /ALLUSERS /NORESTART
- Uninstall Program: To uninstall WinSCP using SCCM, use the following command: “C:\Program Files (x86)\WinSCP\unins000.exe
- Enable the checkbox “Run installation and uninstall program as 32-bit process on 64-bit clients.“
Click Next to continue.

Configuration Manager allows you to create multiple detection rules to detect the presence of an application on the computer. If the detection method finds the application is already present, the Configuration Manager won’t re-deploy the same application.
Let’s add a new detection method for WinSCP application in SCCM. To add a new detection method, click Add Clause. On the Detection Rule window, create a rule with the following settings.
- Setting Type: File System
- Type: File
- Path: %ProgramFiles(x86)%\WinSCP
- File or Folder Name: WinSCP.exe
- Enable the option “This file or folder is associated with a 32-bit application on 64-bit systems.”
- Property: Version
- Operator: Equals
- Value: 5.21.5.12858
After you specify the above detection method details, click OK to continue with the Create Deployment Wizard.

Specify the user experience settings for WinSCP application. I have configured the following settings in the below example.
- Installation behavior: Install for system.
- Logon requirement: Whether or not a user is logged on.
- Installation program visibility: Hidden.
Click Next.

You can specify the requirements for deploying the WinSCP application with SCCM. This is completely optional, and you can define the requirements even after creating the application. Click Next.

Additionally, you can specify the dependencies for the WinSCP application. Click Next.

Review the application settings in the Summary window and click Next and on Completion window, click Close.

We have added a new deployment type for WinSCP application and that is now visible on Deployment Types tab. Click Next.

Review the application deployment settings and close the Create Application Wizard. This completes the steps to create WinSCP application in SCCM. In the next step, we will deploy the WinSCP application to a device collection and verify if the installation works correctly on client computers.

Deploy WinSCP using SCCM | Configuration Manager
We will now deploy the WinSCP application using SCCM to a device collection. For testing the application deployment, I advise building a device collection with a set of pilot devices. After confirming that the application was successfully installed, you can extend the deployment in Configuration Manager to additional device collections.
To make device collections in SCCM for Windows devices, you can use the following guides:
- Create Windows 10 device collection in SCCM
- Create Windows 11 device collections in Configuration Manager
To deploy the WinSCP application in SCCM console, go to Software Library > Application Management > Application. Right-click WinSCP application and select Deploy. Click Browse and select the device collection to which you want to deploy the WinSCP application. Click Next.

On the Content page, click Add button and specify the distribution points to which you would like to distribute the WinSCP application content. You may also select distribution point groups. Click Next to continue.

On the Deployment Settings window, specify the settings to control the deployment. Select the Action as Install and Purpose as Available. Refer to the following post to understand the difference between Available and Required deployment in SCCM. Click Next.

While deploying the application, Configuration Manager lets you schedule the deployment of the application. You can deploy the application as soon as possible or schedule it to be available at a specific date and time. Choose whether you want to schedule the application deployment, pick the options based on your requirements, and click Next.

You can define user experience for installation of this application. Click Next.

Close the Deploy Software Wizard. The WinSCP application is now distributed to the DP, and the client machines should now have the new WinSCP application listed in the Software Center. WinSCP application deployment is now complete. We will test the installation of the application in the next section.

Test WinSCP Application Deployment on Client Computers
In this step, we will verify if the WinSCP application deployment works correctly on the client computers. If you don’t see the WinSCP application in Software Center, you can download Computer Policy and run the Evaluate Application Deployments actions on client PC. Take a look at all the available Configuration Manager client actions.
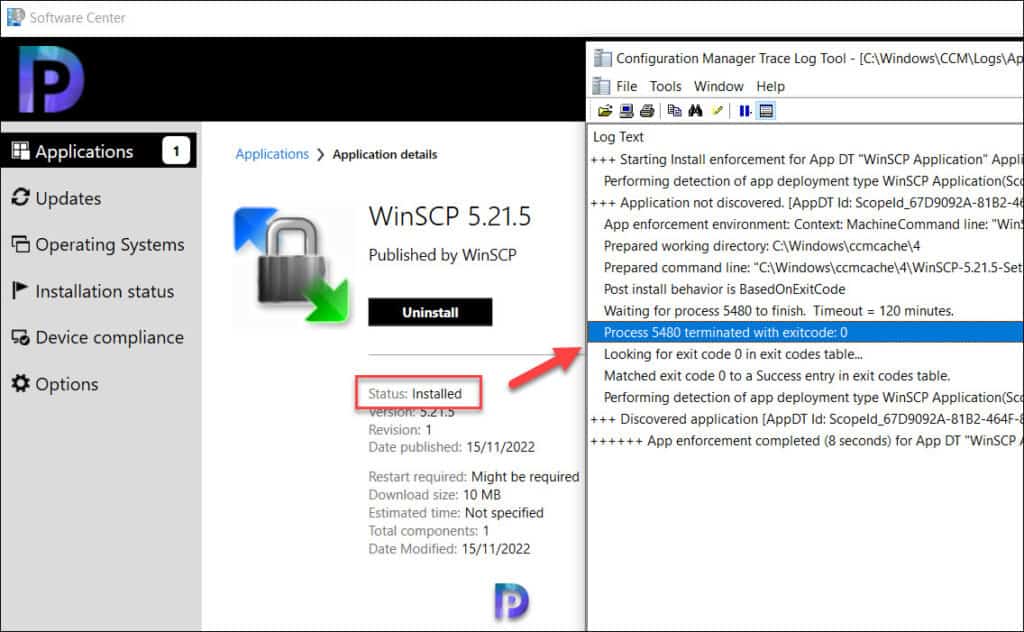
Log in to a client computer, and launch the Software center. Click on the Applications tab and select the WinSCP application. On the WinSCP application details page, click Install. The application is now downloaded from the local distribution point server for installation.
You can monitor the WinSCP application installation progress by opening the AppEnforce.log. To know the location of this file and other files, refer to the SCCM Log files.
Matched exit code 0 to a Success entry in the exit codes table confirms that the WinSCP application has been installed successfully. The uninstall command that we specified during application packaging should work fine.
+++ Starting Install enforcement for App DT "WinSCP Application" ApplicationDeliveryType - ScopeId_67D9092A-81B2-464F-8F38-4D634303C416/DeploymentType_92b2d131-4a5e-4e98-9c23-2690f1ed30da, Revision - 1, ContentPath - C:\Windows\ccmcache\4, Execution Context - System
    Performing detection of app deployment type WinSCP Application(ScopeId_67D9092A-81B2-464F-8F38-4D634303C416/DeploymentType_92b2d131-4a5e-4e98-9c23-2690f1ed30da, revision 1) for system.
    Prepared working directory: C:\Windows\ccmcache\4	AppEnforce
    Prepared command line: "C:\Windows\ccmcache\4\WinSCP-5.21.5-Setup.exe" /SILENT /ALLUSERS /NORESTART
    Post install behavior is BasedOnExitCode	AppEnforce
    Waiting for process 5480 to finish.  Timeout = 120 minutes.
    Process 5480 terminated with exitcode: 0
    Looking for exit code 0 in exit codes table...
    Matched exit code 0 to a Success entry in exit codes table.

Thanks for this. Very helpfull.
Unfortunately the uninstall does not work. Software Center gives a removal failed error.
Then expanding that it says “The software could not be found on any servers at this time.”
I used “C:\Program Files (x86)\WinSCP\unins000.exe” as the uninstall program. Then I changed it to “%ProgramFiles(x86)%\WinSCP\unins000.exe” but that didn’t work either as I get the same error.
So I copied unins000.exe, unins000.dat, and unins000.msg to my content location and redistributed to my distribution points. Then I set the uninstall program to unins000.exe. No it just sits there saying uninstalling forever.
WinSCP says there is no silent uninstall option which is unfortunate.
Any ideas how to resolve this?
Figured it out…..
Install Program must be: “WinSCP-5.21.6-Setup.exe” /SILENT /ALLUSERS /NORESTART
Uninstall Program must be: “C:\Program Files (x86)\WinSCP\unins000.exe” /VERYSILENT /NORESTART
Thank you Chris for the update.