


This article details the steps to set up SCCM Cloud Management Gateway role. SCCM CMG provides a simple way to manage Configuration Manager clients on the internet.
You can use this implementation guide to install and configure CMG in your setup. Setting up the cloud management gateway is straightforward in SCCM, and thanks to Microsoft for simplifying the deployment.
You deploy CMG as a cloud service in Microsoft Azure. The best thing about implementing CMG is you don’t need to expose your on-premises infrastructure to the internet. When using CMG, your Management Points are not at risk when they’re facing the internet.

In this guide, we will understand what SCCM CMG is and how to set up and configure CMG and CMG log files for troubleshooting.
What is SCCM Cloud Management Gateway?
The Cloud Management Gateway (CMG) is a feature in Microsoft Configuration Manager (SCCM) that allows organizations to manage their on-premises and internet-based devices using the power of the cloud. It provides a secure, scalable, and reliable way to manage devices over the internet without requiring them to connect to the corporate network.
Benefits of using CMG
Using the Cloud Management Gateway offers the following benefits:
- Simplified Remote Management: IT teams can manage remote devices without the need for VPNs or other traditional methods.
- Reduced On-Premises Infrastructure: CMG leverages Azure, which reduces dependency on on-premises servers. There is almost no downtime when the servers are placed in the cloud.
- Enhanced Security: Communication is encrypted, and authentication is managed using Azure Active Directory (Azure AD) or PKI certificates.
- Support for Hybrid Scenarios: CMG works seamlessly with devices that are hybrid Azure AD joined or internet-based.
- Scalability: CMG can handle workloads of various sizes by scaling Azure resources as needed.
SCCM CMG Ports and Data Flow
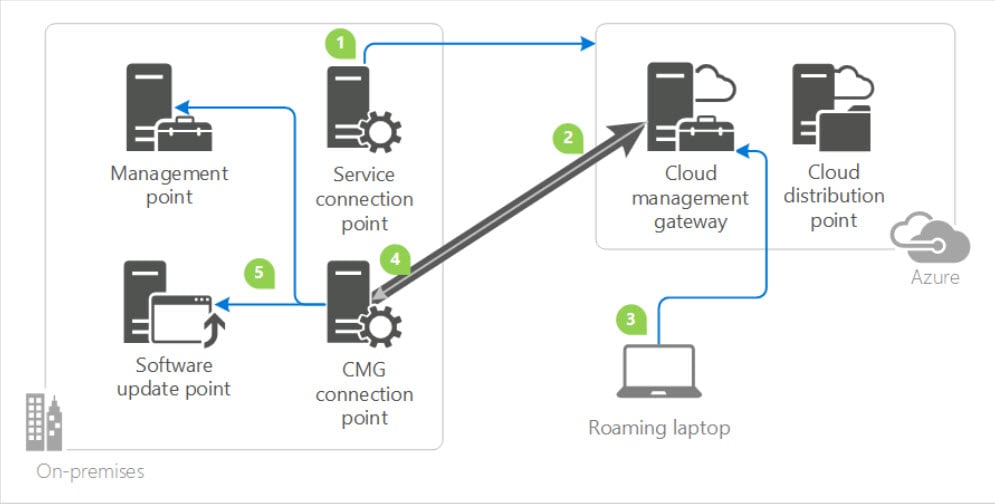
When you plan to set up SCCM CMG, you don’t need to open any inbound ports to your on-premises network. The service connection point and CMG connection point are the ones that initiate all communication with Azure and the CMG.
The service connection point deploys and monitors the service in Azure, and therefore it must be in online mode. The connection point connects to the CMG to manage communication between the SCCM CMG and on-premises site system roles.
The below screenshot shows the SCCM cloud management gateway diagram. For complete information about SCCM cloud management gateway ports, read the following article.
SCCM CMG Prerequisites
Listed below are important requirements or prerequisites for setting up CMG in SCCM:
- To host the cloud management gateway, you must first have an Azure subscription. It can be either in the Global Azure cloud or the Azure US Government cloud.
- Customers with a Cloud Service Provider (CSP) subscription need to use SCCM version 2010 or later with a virtual machine scale set deployment.
- Your user account needs to be a full administrator or infrastructure administrator in Configuration Manager.
- If you are deploying CMG, you need a subscription admin. To integrate the site with Azure AD for deploying the CMG using Azure Resource Manager, you need a global admin.
- The SCCM service connection point should be in online mode before setting up cloud management gateway.
- You need a server authentication certificate for the CMG.
- Clients must use IPv4.
- Configure the management point to allow traffic from the CMG. It also needs to require HTTPS, or configure the site for Enhanced HTTP.
- Integration with Azure AD for deploying the service with Azure Resource Manager.
- When you integrate the site with Azure AD for deploying the CMG using Azure Resource Manager, you need a Global Administrator.
- When you create the CMG, you need an account that is an Azure Subscription Owner and an Azure AD Global Administrator.
- You need at least one on-premises Windows Server to host the CMG Connection Point.
- The following client settings in the Cloud services group are enabled for devices that will use the CMG:
- Enable clients to use a cloud management gateway.
- Allow access to cloud distribution point
- Starting in ConfigMgr version 2203, the option to deploy a CMG as a cloud service (classic) is removed. All CMG deployments should use a virtual machine scale set.
Supported Configurations for Cloud Management Gateway
When planning for a CMG, it is crucial to understand which configurations are supported by the Cloud Management Gateway.
- For Windows versions, almost all Windows versions supported by Configuration Manager are supported for CMG.
- CMG only supports the management point and software update point roles. You can also deploy task sequence over internet using CMG.
- The CMG doesn’t support clients that only communicate with IPv6 addresses. The IPv4 clients are fully supported by CMG.
- Software update points using a network load balancer don’t work with CMG.
- Starting in version 2203, the option to deploy a CMG as a cloud service (classic) is removed. All CMG deployments should use a virtual machine scale set.
Cost of Cloud Management Gateway
When you plan for a CMG in SCCM, you must know that it is not free and there are costs associated. with it. The CMG comes with a cost because it uses several components in Azure.
The cost charges are incurred to your Azure subscription account. Some costs are fixed, but some vary depending upon usage.
Transferring data to the CMG and the cost of the virtual machine hosting the CMG service are the two primary CMG expenses.
The following components are involved when you calculate the cost for CMG:
- Virtual machine scale set
- Outbound data transfer
- Content storage
For more information on CMG Cost, refer to cost of cloud management gateway article.
Configuration Manager CMG Components
When you plan for a CMG, the deployment and operation of the CMG includes the following components:
- The CMG cloud service in Azure authenticates and forwards Configuration Manager client requests over the internet to the on-premises CMG connection point.
- The CMG connection point site system role enables a consistent and high-performance connection from the on-premises network to the CMG service in Azure. It also publishes settings to the CMG, including connection information and security settings. The CMG connection point forwards client requests from the CMG to on-premises roles according to URL mappings.
- The service connection point site system role runs the cloud service manager component, which handles all CMG deployment tasks. Additionally, it monitors and reports service health and logging information from Azure Active Directory (Azure AD). Make sure your service connection point is in online mode.
- The management point and software update point site system roles service client requests per normal.
- The CMG uses a certificate-based HTTPS web service to help secure network communication with clients.
- Internet-based clients connect to the CMG to access on-premises Configuration Manager components. There are multiple options for client identity and authentication:
- Azure AD
- PKI certificates
- Configuration Manager site-issued token
- The CMG creates an Azure storage account, which it uses for its standard operations. By default, the CMG is also content-enabled to provide deployment content to internet-based clients. This storage account doesn’t support customizations, such as virtual network restrictions.
Certificate Requirements
Before you set up ConfigMgr CMG, one thing that you must really work on is the CMG certificates. I have not included this info under the SCCM CMG prerequisites section because this topic is quite complex. However, I will try my best to make it easy for you.
- CMG server authentication certificate
- CMG trusted root certificate to clients
- Server authentication certificate issued by public provider / Enterprise PKI
- Client Authentication Certificate
- Client trusted root certificate to SCCM CMG
- HTTPS certs for management points
- Azure Management Certificate
SCCM CMG Server Authentication Certificate
The server authentication certificate is required while creating the cloud management gateway in the Configuration Manager console. The SCCM CMG setup basically creates an HTTPS service to which your internet clients connect.
For a valid Configuration Manager CMG server authentication certificate, you can either acquire a certificate from a public provider or issue it from your public key infrastructure (PKI). In this post, I will be issuing the cert from my PKI.
If you are using SCCM version 1802 and above, you can use the wildcard certificates as CMG server certs. Before you create this certificate, make sure the Azure domain name that you use for CMG is unique.
SCCM CMG trusted root certificate to clients
This certificate is for clients that must trust the CMG server authentication certificate. There are two methods to accomplish this:
- Use a certificate from a public and globally trusted certificate provider.
- Use a certificate issued by an enterprise CA from your public key infrastructure (PKI).
Client trusted root certificate to SCCM CMG
You supply this root certificate when you set up the cloud management gateway in the Configuration Manager console. The CMG must trust the client authentication certificates. If you’re using PKI client authentication certificates, then you must add a trusted root certificate to the CMG.
HTTPS certs for management points
To configure HTTPS on management points requires PKI, and this topic is huge. Don’t worry; I have covered the step-by-step deployment of the PKI certificates for SCCM here.
Azure management certificate
The Azure management certificate is required for classic service deployments. With SCCM 1810 and above, the classic service deployments in Azure are deprecated. So you should start using Azure Resource Manager deployments for the cloud management gateway.
Specify Unique DNS Name for CMG
The DNS name that you use for setting up CMG in Azure must be unique. You can check the availability of the CMG DNS name in the Azure portal. When you enter the DNS name, you should see either a green tick or a red X. A green tick means YES, the domain name is available, and a red X means the DNS name is not available.
Log in to the Azure portal and select Cloud Services (classic). Click the +Add button.
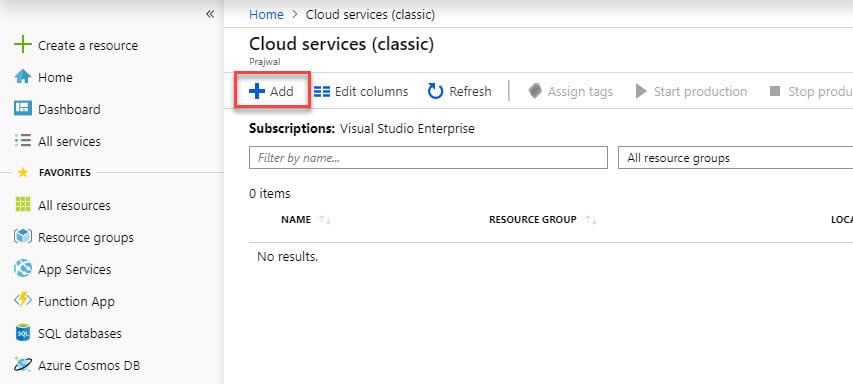
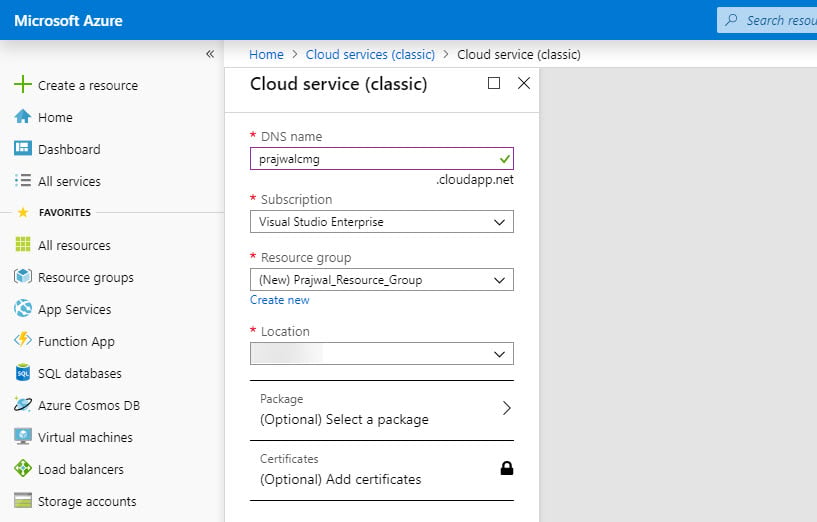
Enter the DNS name, which should be unique, as I mentioned earlier. In my case, I see a green tick, so I will be using prajwalcmg.cloudapp.net as the CMG DNS name.
At this point, there are two options that you have. You can skip creating this service because it will be created automatically when we set up SCCM CMG. You may also create the service and use it while setting up SCCM CMG.
Configure Azure Services for Cloud Management
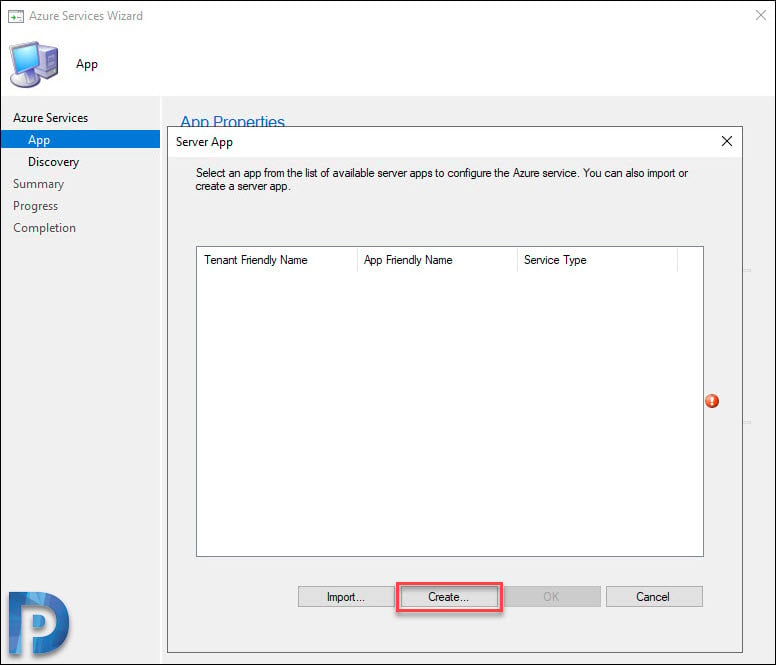
We will now configure Azure cloud services for CMG that you can use with SCCM using the Azure Services Wizard. In order to authenticate communications with Azure AD, we will set up a web application and a native client application that offer subscription and configuration details.
Go to Administration > Overview > Cloud Services > Azure Services. Right-click Azure Services and click Configure Azure Services.

Select the Azure services as Cloud Management and specify a name and description. Click Next.

Select the Azure environment, which is AzurePublicCloud. First we will create a web app; click Browse.
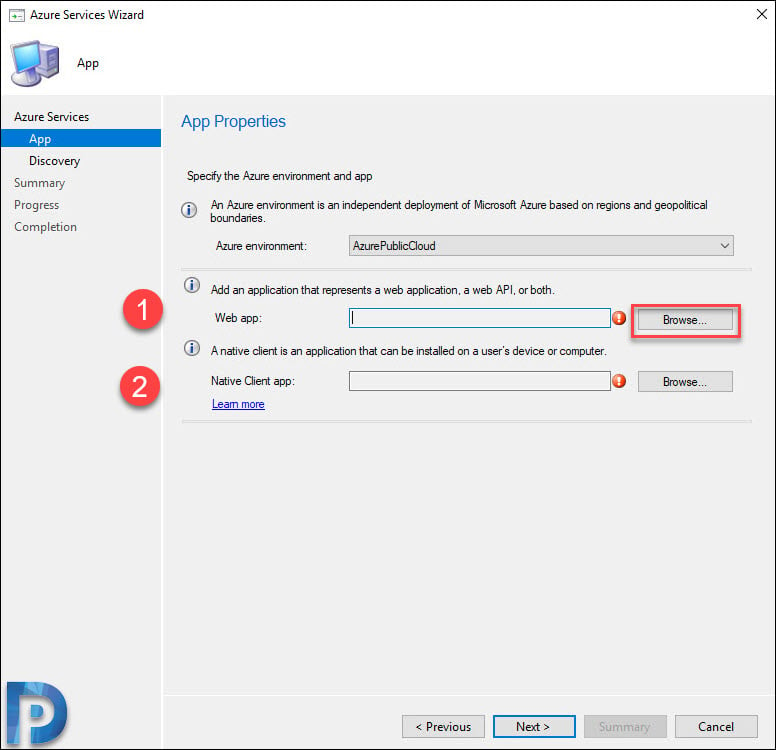
In the Server App box, click Create.
In the Create Server Application box, enter the application name. It can be anything. Specify the key validation period and then click the Sign-in button.
You should now see a box wherein you must sign in. Once you enter the correct credentials, your Azure AD tenant name will be shown along with the Signed in successfully message. Click OK.

Select the server app that you just created and click OK.

We will now create a native client app, so click Browse.
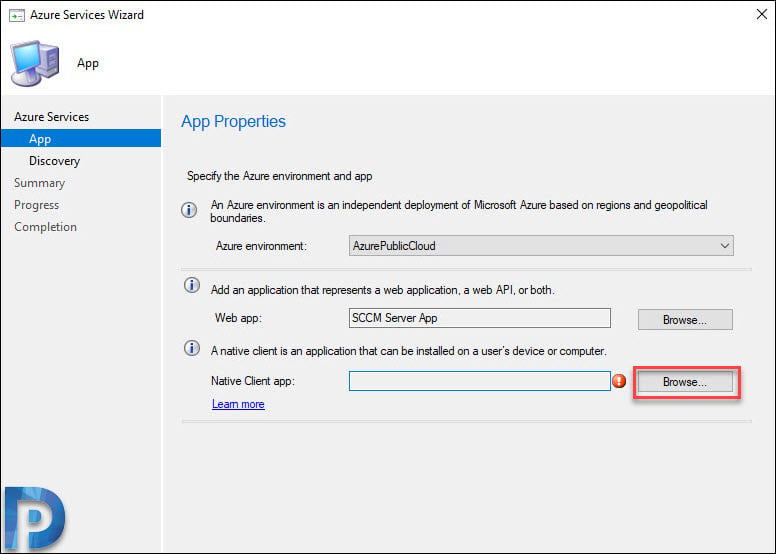
Enter the application name, and you must sign in again. When you do that click OK.

Now we have Server and Client app created. Click Next.
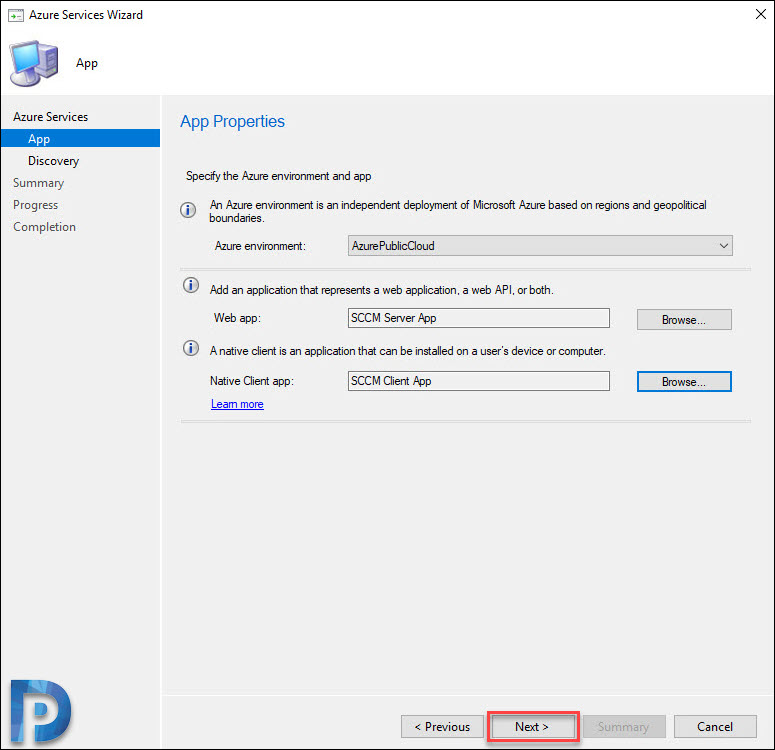
You can leave this option, “Enable Azure Active Directory User Discovery,” selected. Click Next.

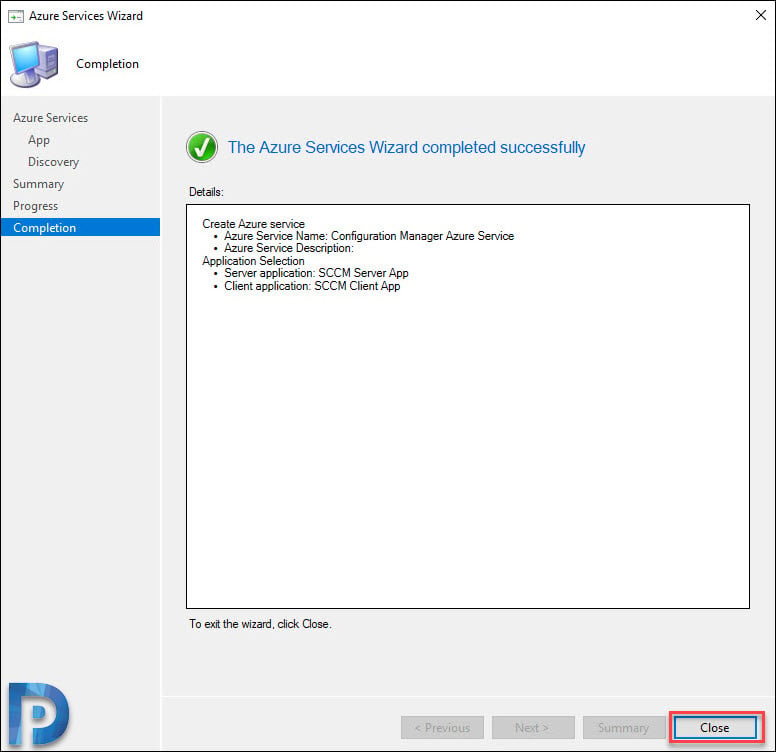
Click Next on the Summary page.
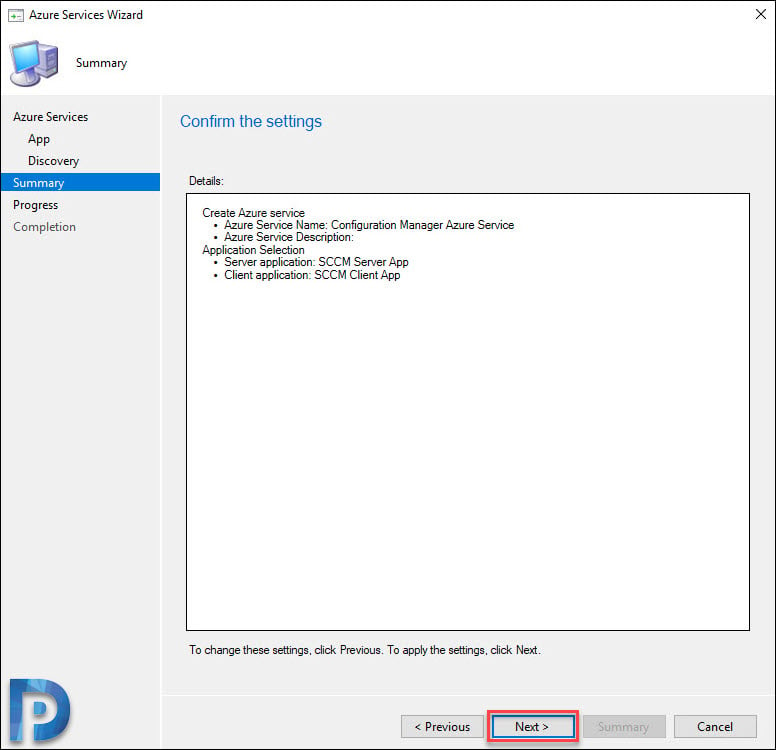
Finally, on the Completion window, click Close.
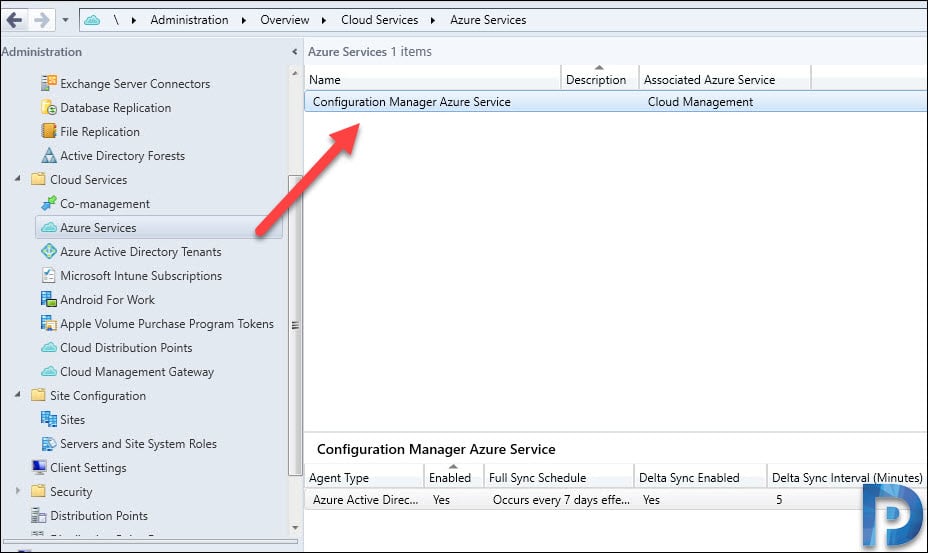
Verify Configuration Manager Azure Service
To verify the Azure service that you created for Configuration Manager, click Azure Services. On the right pane you should see the Azure service and Associated Azure Service which is Cloud Management.
If you click Azure Active Directory Tenants, you should see the tenant name and tenant ID. In addition to that, you will see the Application Name, Tenant ID, Client ID in the bottom pane.

Create and Issue Web Server SCCM CMG Certificate Template
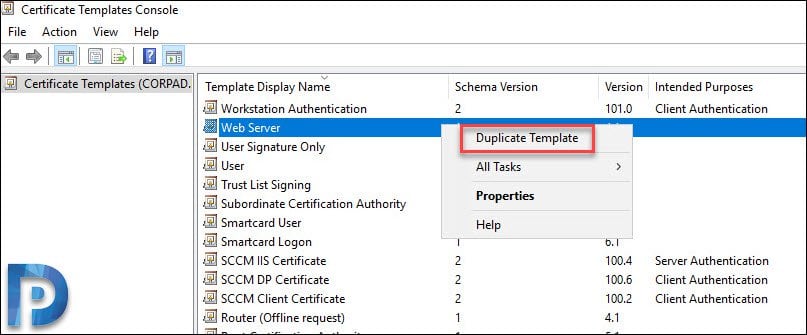
In this section, we will create a new custom certificate by using the web server certificate template. At this point, if you have templates created during implementing PKI, you can simply duplicate the SCCM IIS Certificate and use it.
If not, you can duplicate the web server template and configure it. This certificate will be used for the installation of the SCCM cloud management gateway.
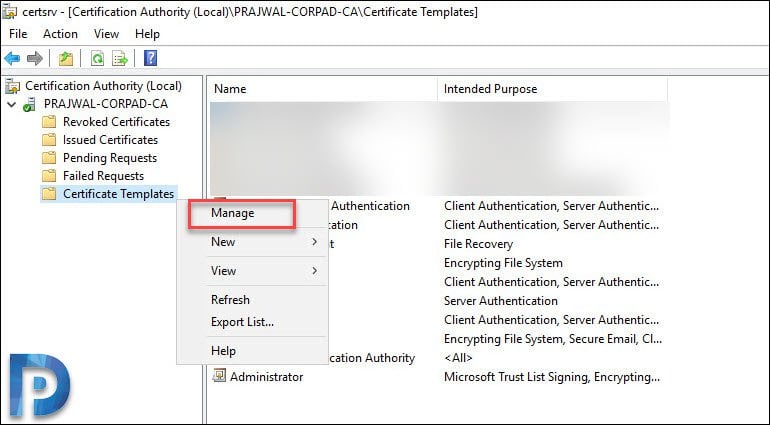
Log in to the Certification Authority server and open the Certification Authority console. Right-click Certificate Templates and select Manage.
Right click Web Server and click Duplicate Template.
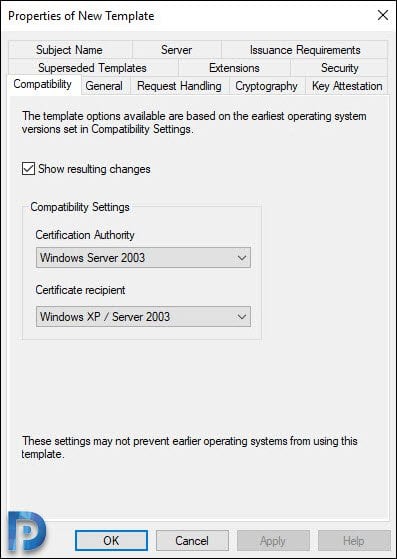
Click Compatibility tab and ensure the settings are same as per below screenshot.
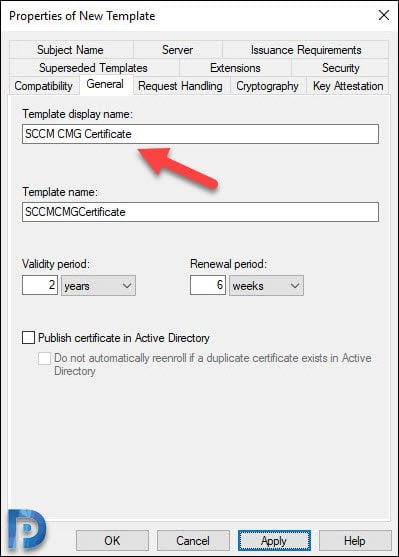
Click General tab and specify a name to this temple. I will name it as SCCM CMG Certificate.
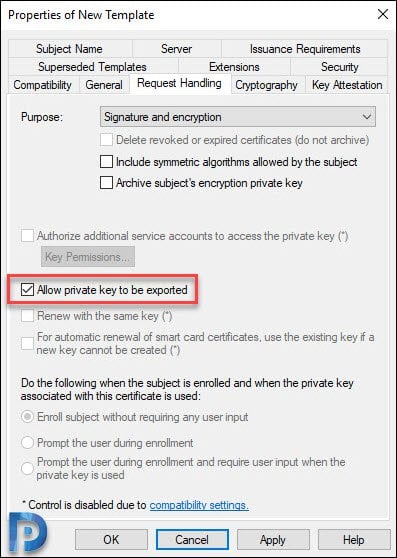
Click Request Handling and ensure Allow private key to be exported is checked.
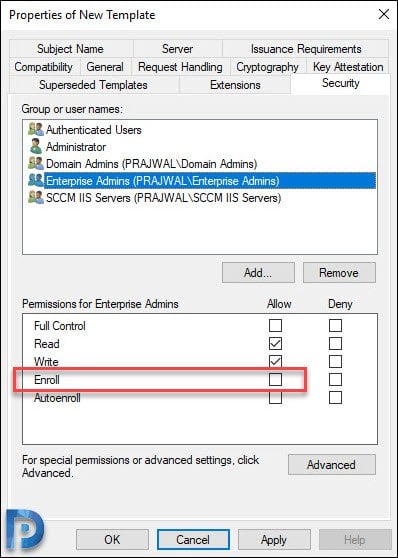
Now click Security tab, add the group that contains your SCCM Primary Site server computer account. Select the group and enable Enroll permission.
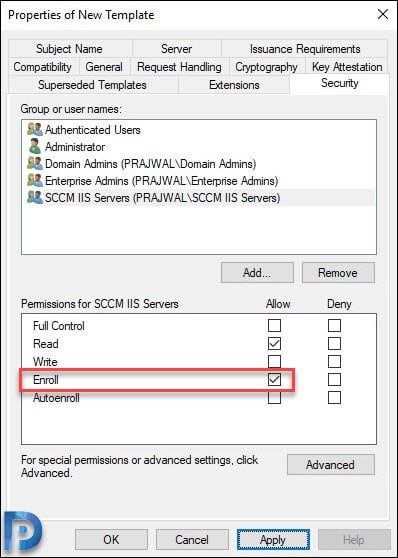
For Enterprise Admins, you can uncheck Enroll permission. Click Apply and OK. Close the console.
Now right click Certificate Templates and click New > Certificate Template to Issue.
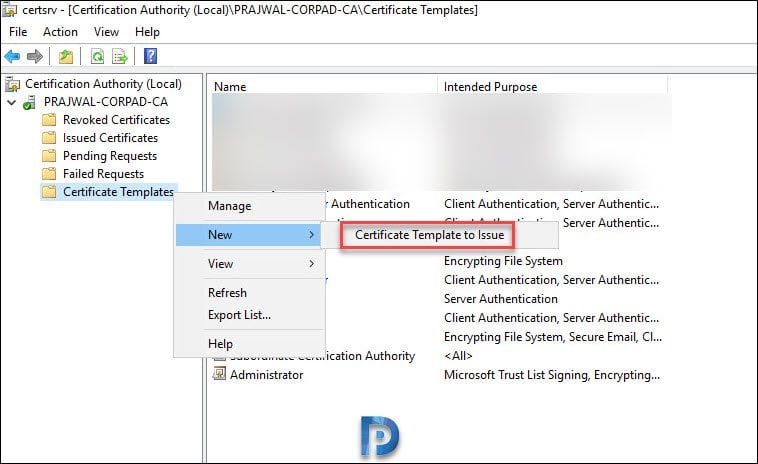
Select the SCCM CMG Certificate and click OK.

Import Web Server CMG certificate on the Primary Site Server
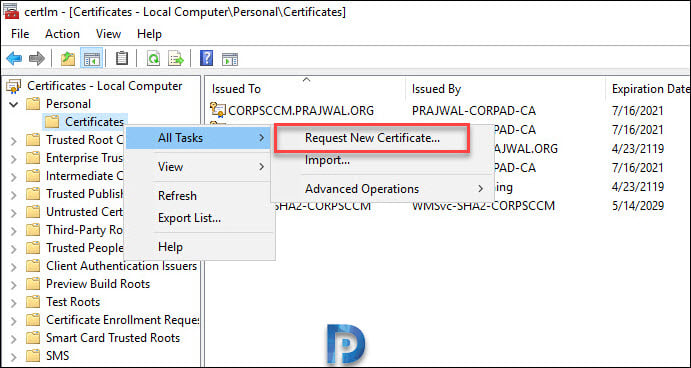
After you have created the SCCM CMG certificate, we will now import this certificate on our SCCM server.
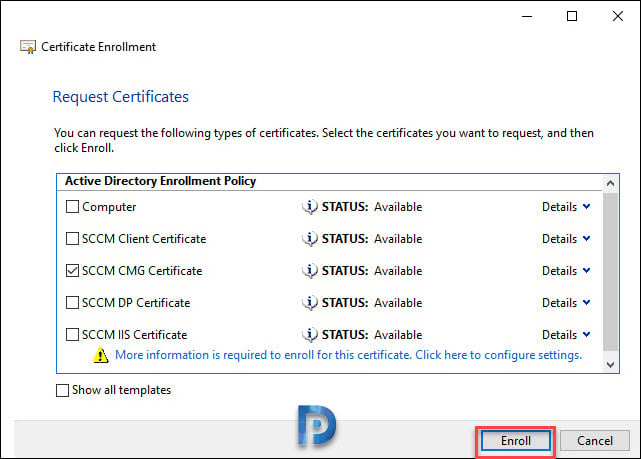
Login to SCCM server. Open the Certificates console (run the command certlm.msc – this saves your time). Expand Personal > Certificates. Right click Certificates > All Tasks > Request New Certificate.
From the list of certs, select SCCM CMG Certificate and click the link below it.
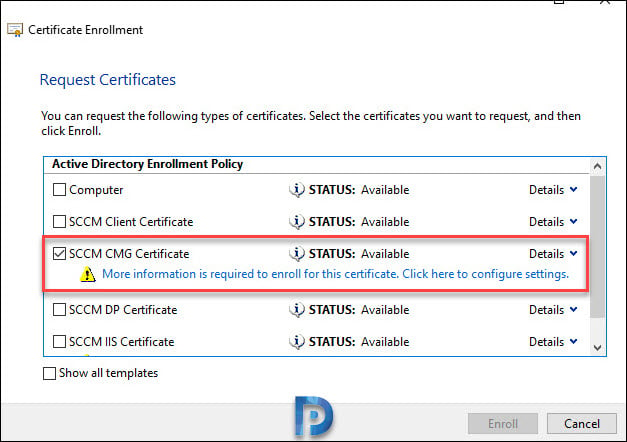
In the Certificate Properties dialog box, under for Subject name, select Type as Full DN. Under Alternative name, select Type as DNS and enter the service name.
Enter a public DNS name that you want to use with SCCM CMG. I will enter *.prajwal.org here which allows me to use any subdomain for CMG.
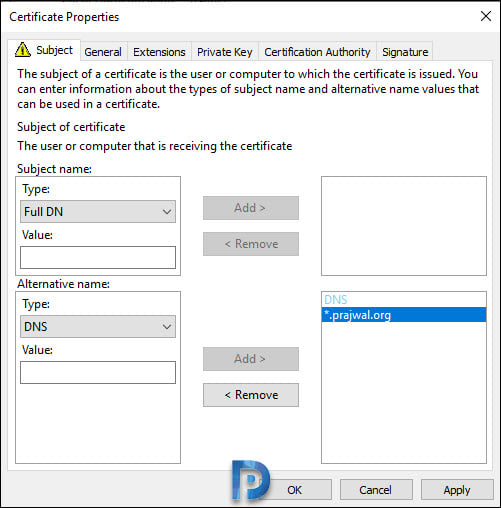
Click General tab and specify a friendly name for this certificate and then click Apply and OK.

Click Enroll.
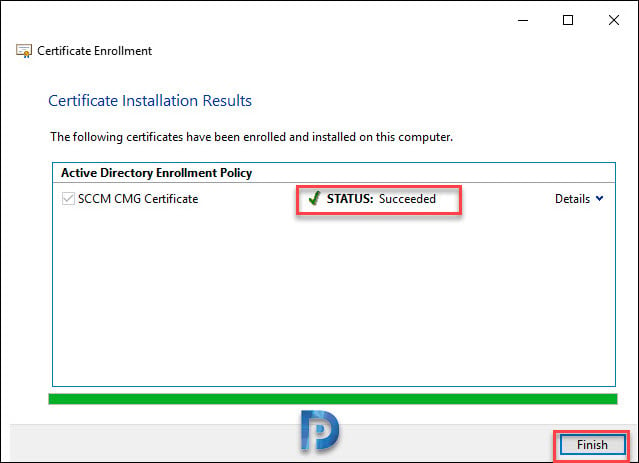
The certificate is enrolled successfully. Click Finish.
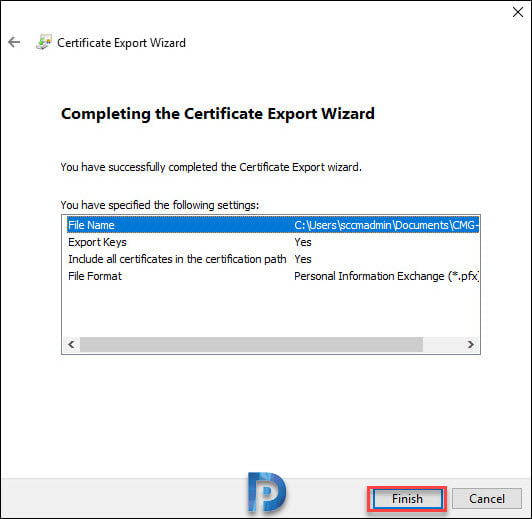
Export CMG Web Server Certificate
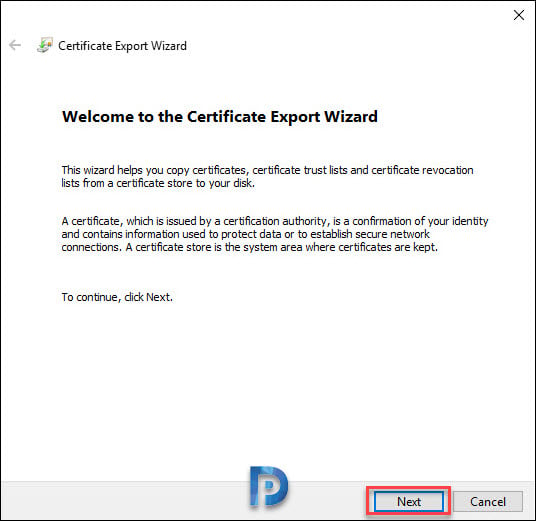
In the above step, on the site server, you requested the CMG certificate and enrolled it. Now we will export this certificate in a .PFX format. This certificate will be required while creating cloud management gateway.
Select the CMG certificate, right click and click All Tasks > Export.

On welcome to certificate export wizard, click Next.
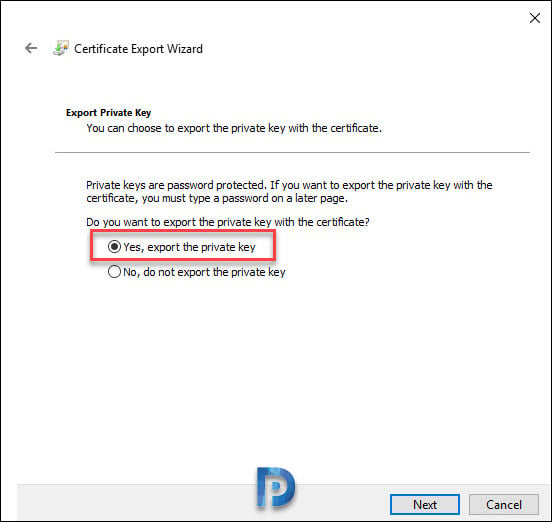
Select Yes, export the private key. Click Next.
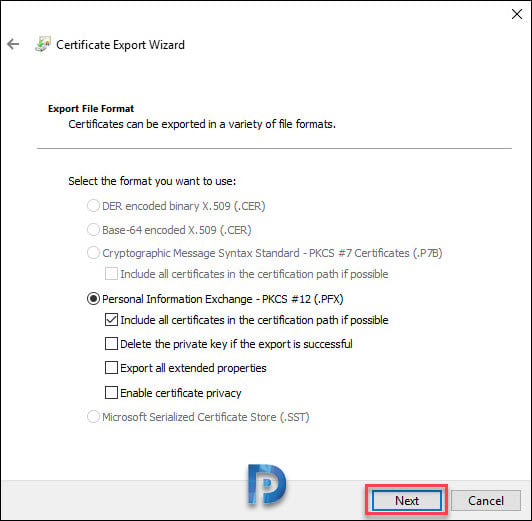
Make no changes here and click Next.
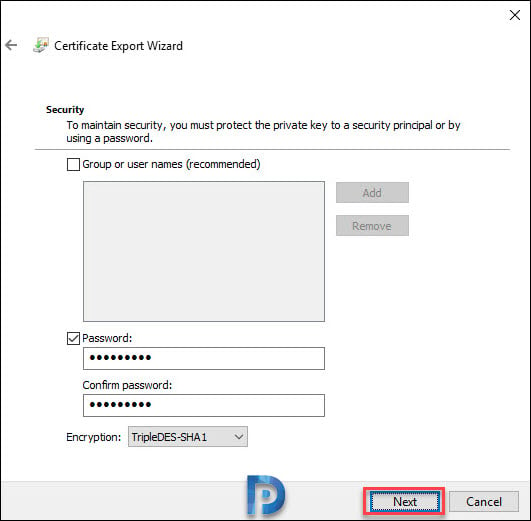
Enter a password for the CMG certificate and click Next.
Save the CMG certificate on your computer. Click Next.
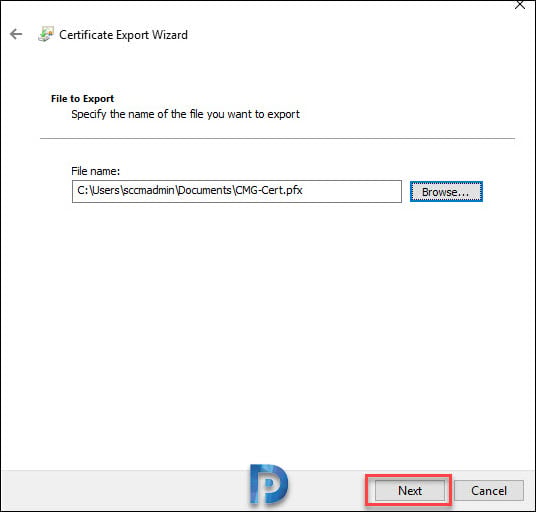
Click Finish. This completes the CMG certificate export process.
Setup SCCM Cloud Management Gateway (SCCM CMG)
Follow the below steps to set up cloud management gateway in SCCM:
- Launch the SCCM console.
- Navigate to Administration > Cloud Services > Cloud Management Gateway.
- Right click Cloud Management Gateway and click Create Cloud Management Gateway

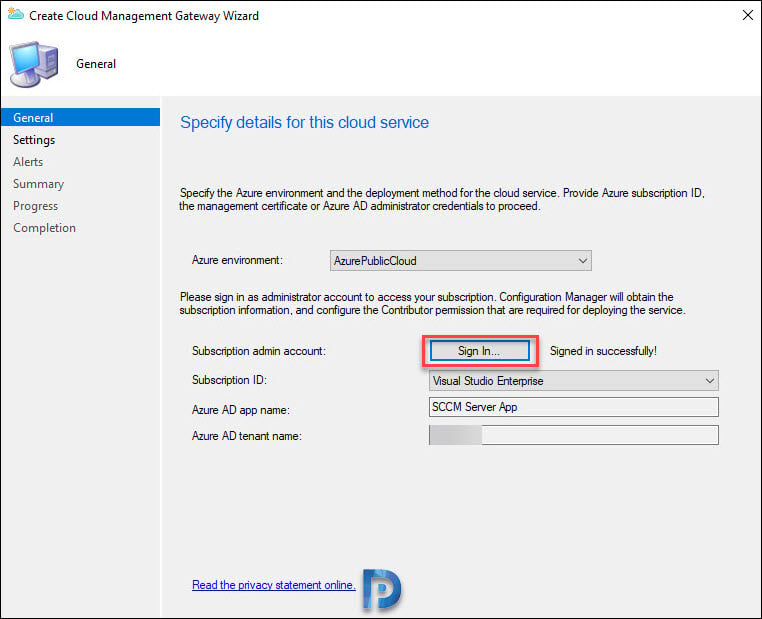
You should now see the Create Cloud Management Gateway Wizard. Click Sign-in and login with your subscription admin account.
On successful sign-in you should see Subscription ID, Azure AD app name and tenant name automatically populated. Click Next
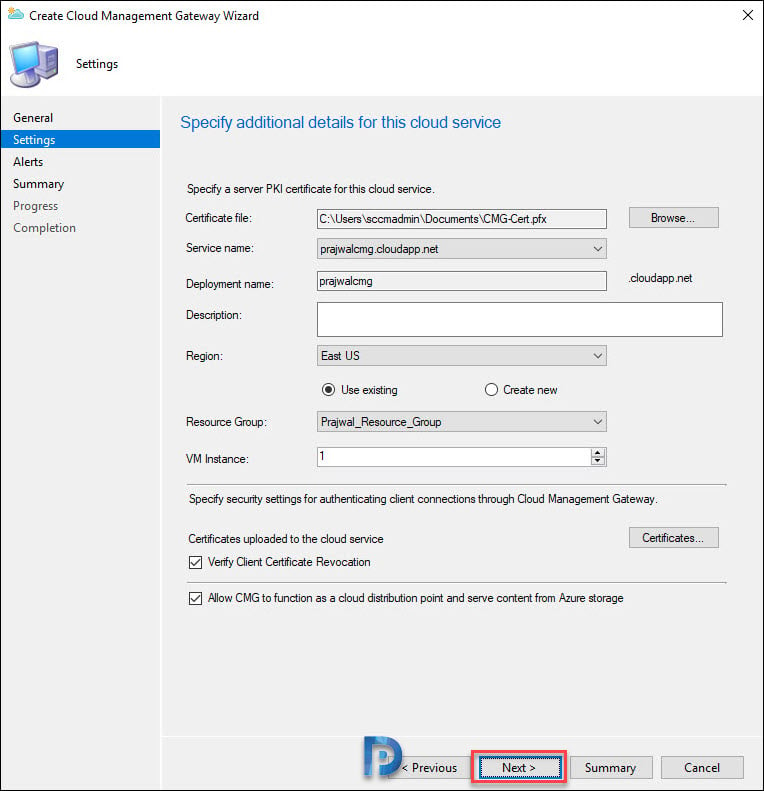
On the Settings page, click Browse and select the CMG certificate. The Service name and deployment name are populated automatically.
You can use an existing resource group or create a new resource group. I will go with just 1 VM instance.
You see two options and a certificates button.
- Verify Client Certificate Revocation.
- Allow CMG to function as a cloud distribution point and serve content from Azure storage – With SCCM 1806, you get this new option. Now a CMG can also serve content to clients. This functionality reduces the required certificates and cost of Azure VMs.
I will leave both the above options checked. Next click Certificates.
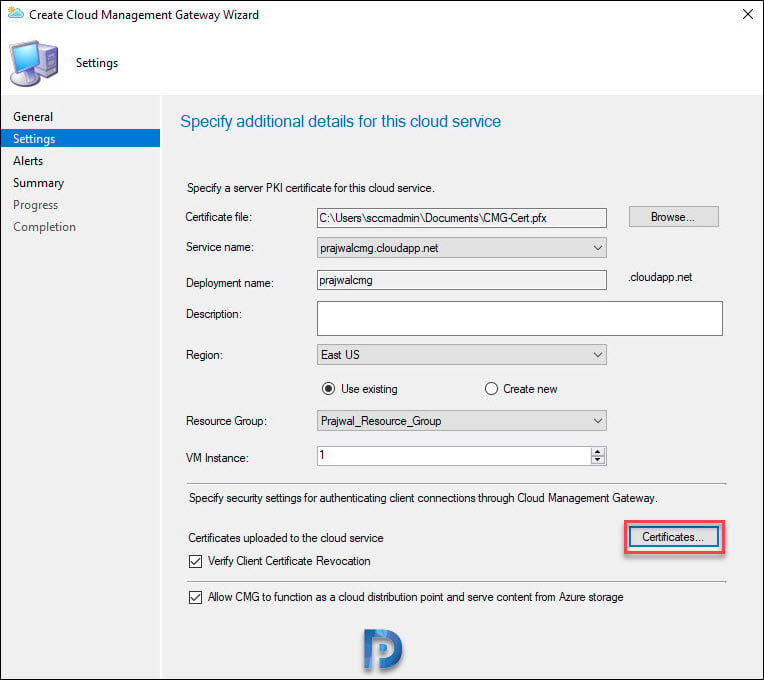
You need to specify a certificate that tells CMG what certs it needs to trust. In my case, I have got an PKI setup, so I will add the root certificate. If you need help with exporting the root certificate, refer to how to export Root CA certificate for ConfigMgr.

Click Next.
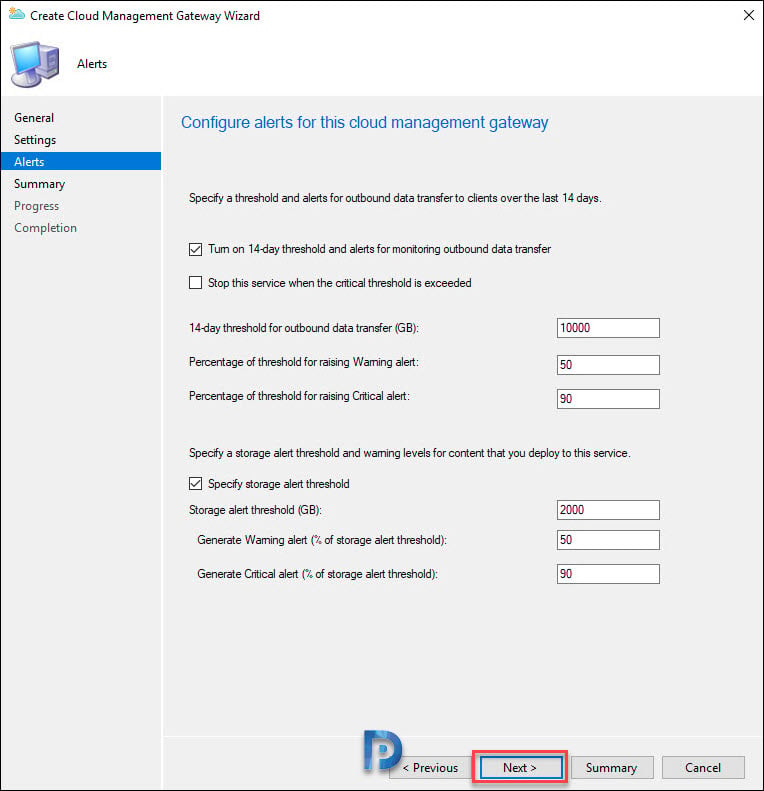
On the Alerts page, click Next.
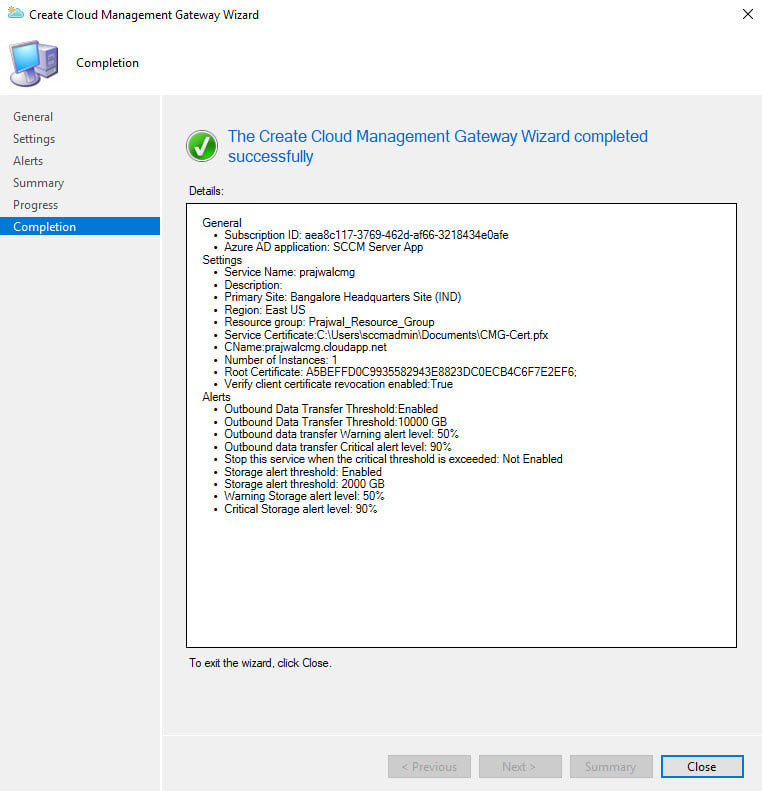
On the Completion page click Close.
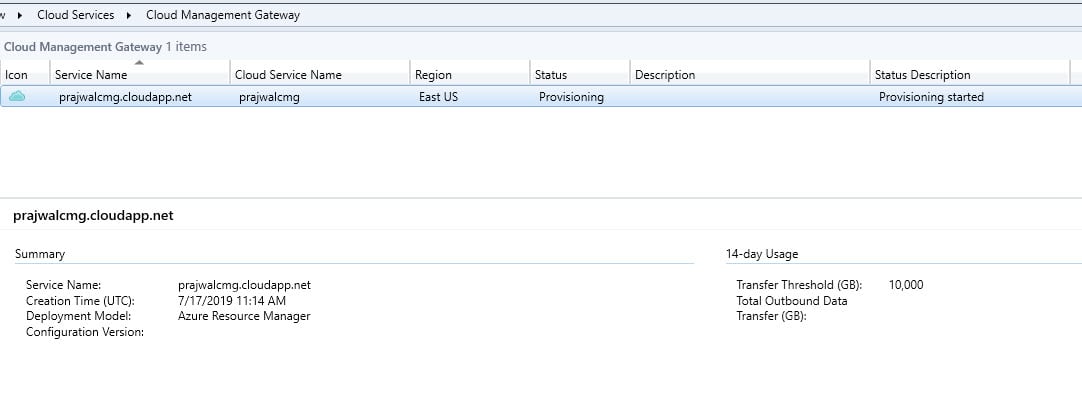
Cloud Management Gateway Status
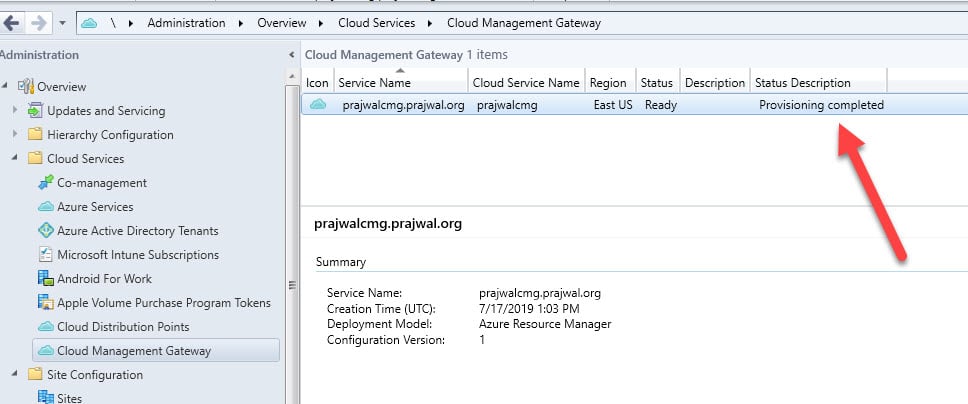
After you set up cloud management gateway, monitor the status in the SCCM console. Right now, the status in Provisioning.
After few minutes the status is changed to Provisioning Completed. Later I will cover what log file do you need to monitor for this.
Install Cloud Management Gateway Connection Point
Here’s how you add the Cloud Management Gateway connection point role in SCCM:
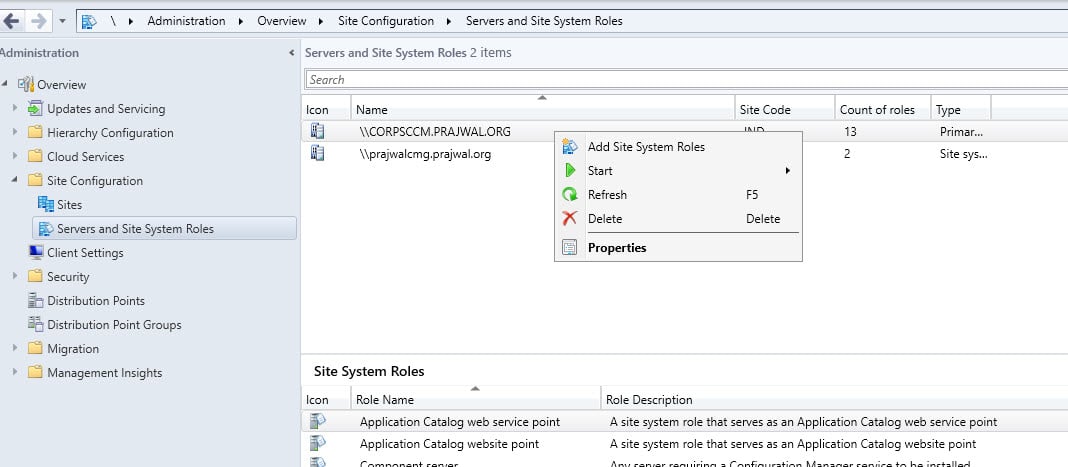
- In SCCM console, go to Administration > Site Configuration > Servers and Site System Roles.
- Right-click the site server and select Add Site System Roles.
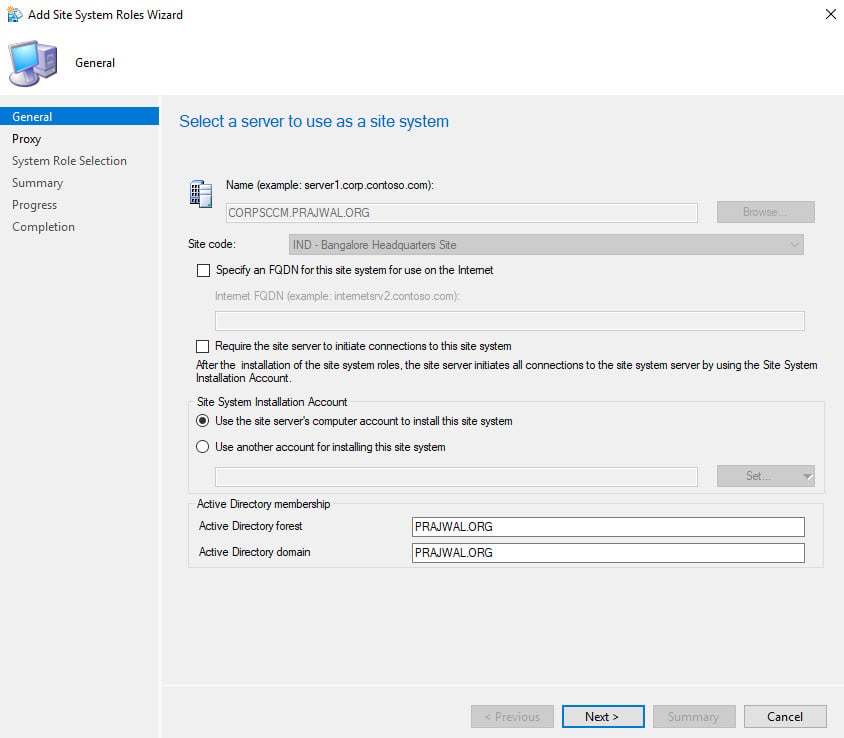
On the General window of the Add Site System Roles wizard, click Next.
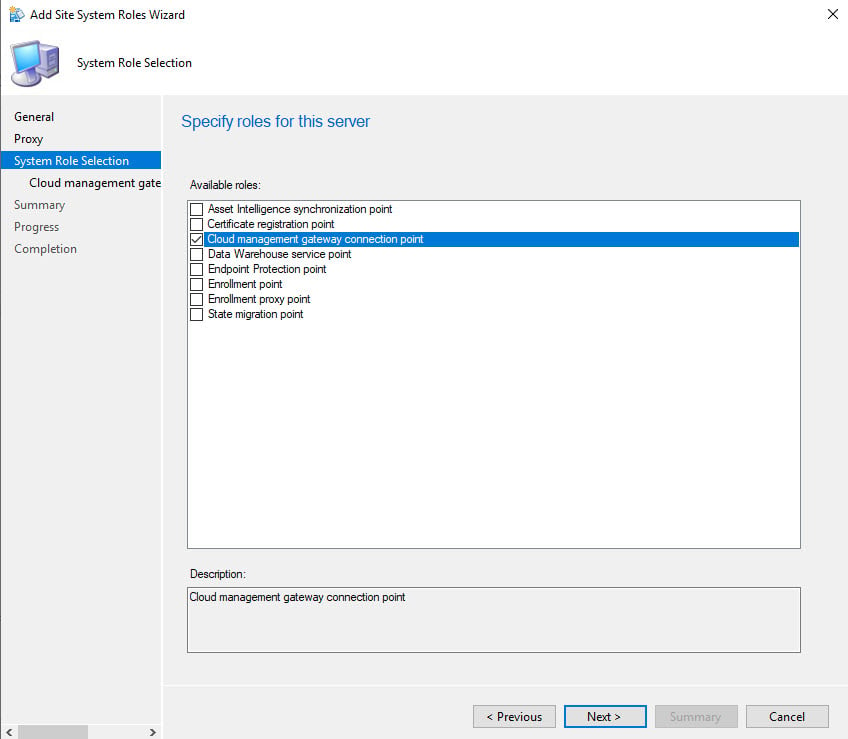
Check the box for the Cloud Management Gateway connection point. Click Next.
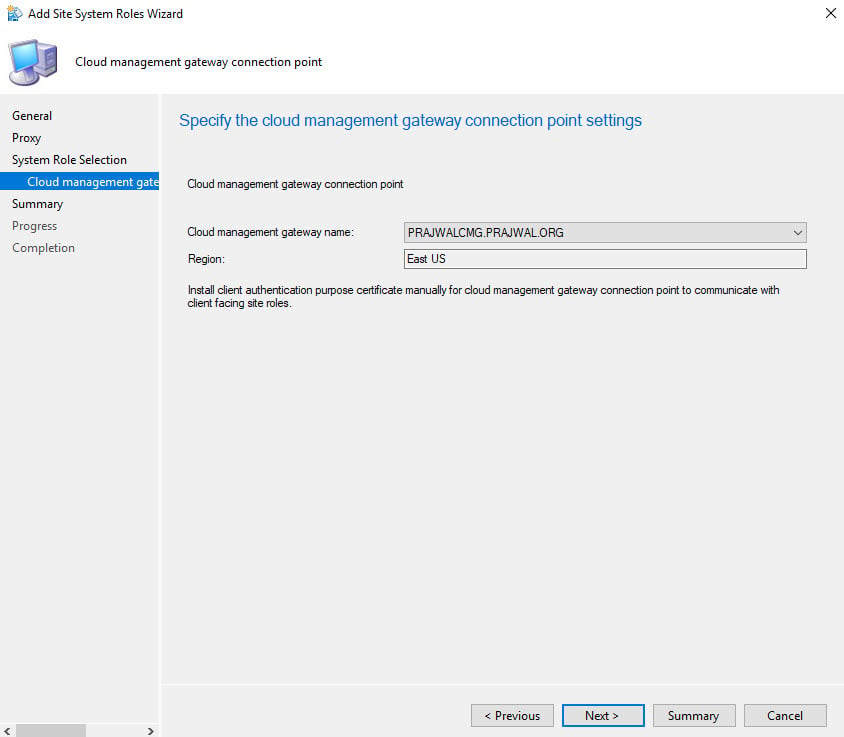
Select your cloud management gateway and click Next.
On the Completion window, click Close.

Allow Cloud Management Gateway Traffic
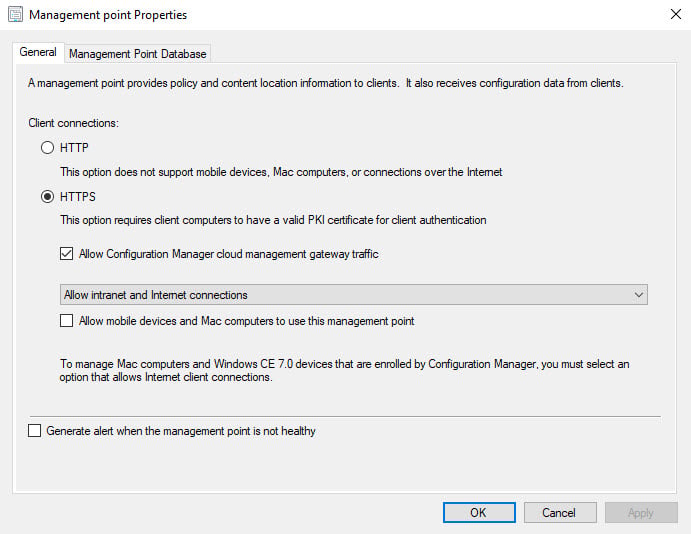
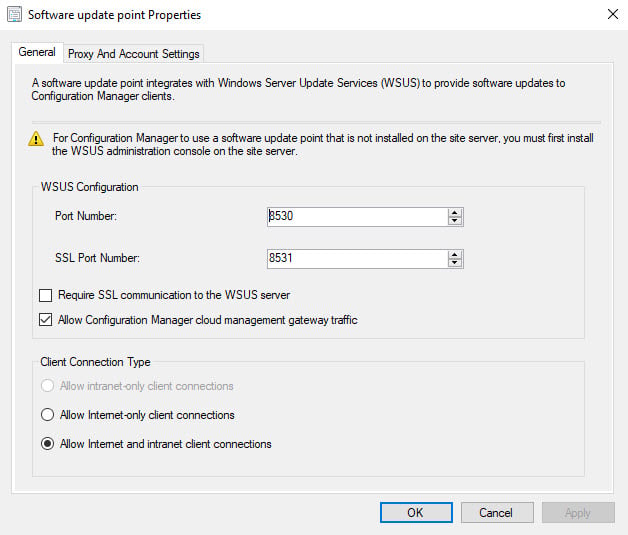
You must configure the management point and software update point site systems to accept cloud management gateway traffic. Do this procedure on the primary site for all management points and software update points that service internet-based clients.
Go to Administration > Site Configuration > Servers and Site System Roles. Select the site server, and in the bottom pane, right-click Management Point and click Properties.
Under Management Point Properties, check the box Allow Configuration Manager cloud management gateway traffic. Click OK.
Under Software update point properties, check the box Allow Configuration Manager cloud management gateway traffic. Click OK.
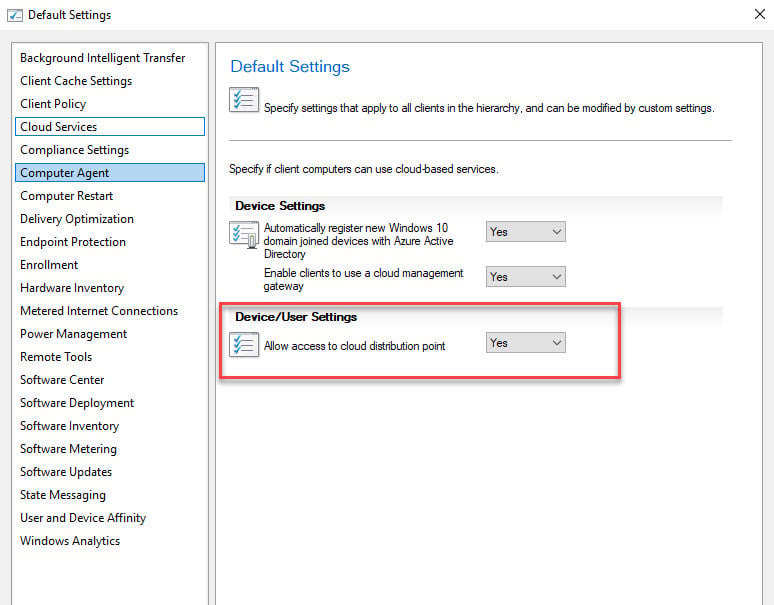
Allow access to Cloud Distribution Points
Under the client settings, click Cloud Services. Under Device/User Settings, set Allow access to cloud distribution point to Yes.
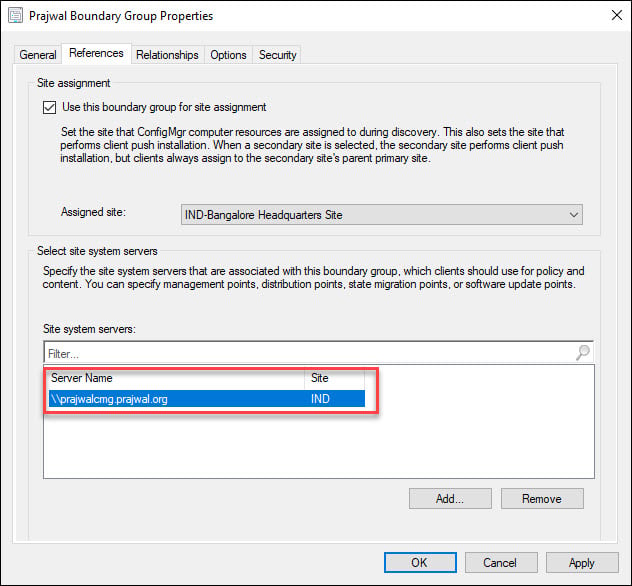
Link CMG to a Boundary Group
If you are using Configuration Manager current branch, you can associate the Cloud Management Gateway server with a boundary group. Create or configure a boundary group, go to the References tab, and add your CMG server. That’s it.
Configure Clients for CMG
After you set up the cloud management gateway and all the site system roles are running, clients get the location of the CMG service automatically on the next location request.
Most of all, the clients must be on the intranet to receive the location of the CMG service. By default, the polling cycle for location requests is every 24 hours. However, to speed up the request, you can restart the SMS Agent Host service (ccmexec.exe) on the computer.
Occasionally, when you switch the client to the internet, the client still talks to your internal management point. In such cases, you can force the client to always use the CMG with a registry key change. This configuration is useful for testing purposes or for clients that you want to force to always use the CMG.
You can set the following registry key on the client. By setting ClientAlwaysOnInternet value to 1, the clients will use the SCCM CMG service.
HKEY_LOCAL_MACHINE\SOFTWARE\Microsoft\CCM\Security, ClientAlwaysOnInternet = 1To verify that clients have the policy specifying the CMG, open a Windows PowerShell command prompt as an administrator on the client computer, and run the following command:
Get-WmiObject -Namespace Root\Ccm\LocationServices -Class SMS_ActiveMPCandidate | Where-Object {$_.Type -eq "Internet"}To troubleshoot CMG client traffic, use CMGHttpHandler.log, CMGService.log, and SMS_Cloud_ProxyConnector.log. I will cover more about CMG troubleshooting and other stuff related to it in another post.
Enable Remote Desktop on SCCM CMG
Once you set up CMG, you can enable remote desktop and access the virtual machine located in Azure. After enabling the RDP, you can review the IIS log files from the CMG Virtual Machine. Here is a step-by-step guide on how to enable remote desktop for CMG.
Logs for Troubleshooting CMG Issues
CMG troubleshooting is complex, especially if you are dealing with it for the first time. However, the CMG logs come to the rescue when you are dealing with content transfer failures, deployment, and upgrade issues.

It looks like Microsoft may have clarified the recommendations for the APP ID registration url to show the following recommened formatting:
api://{tenantId}/{string}, for example, api://5e97358c-d99c-4558-af0c-de7774091dda/ConfigMgrService
https {verifiedCustomerDomain}/{string}
In testing, I found that the https Configmgrservice formatting prevents AAD user token retrieval. Device management seemed to work ok, but things like application request approval through the CMG did not until the App ID registration url was changed to recommended format. CcmAADBroker.log will show an error if this is not working properly.
Hi Prajwal,
I am facing issue where i dont see any Cloud Distribution Points. I have enabled it in the Client Settings -> Cloud Services and my Cloud Management Gateway has been installed and it is ready – in Status and Connected as well.
Can you please tell me where is the other entry point i should look for Cloud Distribution Points.
Thank you,
Regards,
Shailesh
You won’t see it under Cloud Distribution Points. This is a legacy option for when you needed a separate Cloud Distribution Point. If you’ve checked the box for the CMG to also be a Cloud Distribution Point, it will show up under your normal distribution points
Hi Prajwal,
Could you tell me if i can find this vm to cmg somewhere in Azure? I can’t see this vm in my resource group. Can I check cost of this running service somewhere in Azure?
Regards,
Antoonioo
Everything appeared in Azure 🙂
For CMG service deployment in Azure:
az login
az provider register -n Microsoft.KeyVault
az provider register -n Microsoft.Microsoft.Network
az provider register -n Microsoft.Microsoft.Storage
then you can create the service from CM console
What I would do is reinstall the client (FTP it over to them or whatever) with the command line option SMSMPLIST containing the FQDN of your CMG in the list. I can’t type what that would look like into this response due to blocking URLs but you can find info about SMSMPLIST at Microsoft’s site:
Search for the title: About client installation properties smsmplist
——————–
Since you already have an SCCM client on the device populating HKLM – SOFTWARE – Microsoft – CCM – CMGFQDNs with your CMG server’s FQDN might work, but there also may be more needed so I’d just go with the client reinstall.
Hey Praj, just ran into an issue with one of my client’s sites. They were setting up CMG but didn’t have the feature “Virtual machine scale set” turned on. It took about an hour troubleshooting to realize this was the problem. Now that Virtual machine scale set is the only way to install a CMG, and “classic” is the default used by SCCM, the install will always fail until you turn on this feature. Without turning it on you will not be presented with an option to select virtual machine scale set. Figured I’d send to you since a lot of people use your documents (thanks from all of us) and I have not seen “Turn on Virtual machine scale set before installing CMG” in anyone’s blogs thus far.
Hello Prajwal Desai,
Nice work as usual ! Do you have the Visio stencil you used to create your diagrams ? (B&W SCCM servers in the SCCM CMG Ports and Data Flow part)
Thank you. The first fig in the post is actually from Microsoft. I will try and find out if there are new stencils available for download.
Congrats for the great post!!!
Thank you
HI,
Thanks for this great post
I have a question: what boundaries should i add to the CMG boundary group for computer full internet (not on lan or vpn)
There is something i don’t really understand as i want to use this CMG for internet only computers and not intranet and so impossible to know ip ranges
Thanks
Gérard
Your internet only machines will be recognized as on internet, and thus serviced only by the CMG, because your domain is not in any active network connection. Example, your are running mycorp.com. Well, since no active internet connection has the domain suffix of mycorp.com the device is known to be on internet.
The CMG boundary group is for redirecting VPN connections away from on-prem distribution points (and maybe away from on-prem MPs as well), it has nothing to do with managing computers that are neither on-prem nor on VPN.
Hi , i tried all these and getting error while creating CMG.
Below is the error,
“Error occured when granting contributor permission to AzureAD app for resource group ****CMG. For more information, see SmsAdminUi.log”
Can you please help ?
Add the Subscription Admin Role to your account in Azure, and then run the wizard again.
Hello Prajwal, I’m trying to install CMG but first i need configure Azure Services > Cloud Gestion. So i have an error with the app creation…Azure connexion failed (i’m Azure Administrator).
Do you have an idea ?
I had the same problem, I then actived the Global Administrator role with PIM. And it worked for me.
You can create a new user in Azure AD and provide Global admin privilege and login with that account. In my case it works perfectly
Hi Prajwal , Been following your videos for a long time . great work ,
How do you go about adding additional cloud management gateways in sccm . Can you please write a tutorial . thanks
Additional CMGs in a singe SCCM environment is not a thing. The CMG is a service in the cloud. You can add additional servers to the CMG service (provided you turned on Virtual machine scale set) to accommodate higher traffic volumes. Presumably you could provision those VMs in different geographical regions though I’ve never tried it. The way it would work in theory is you increase your number of VMs, then in Azure you select individual VMs and move them between regions. Work with your Azure SME to ensure you have correctly configured geographical load balancing and whatnot. Anyway, it would still be one CMG, just with multiple, possibly geographically diverse, servers that handle the traffic.
Hello,
Is there a way to tell internet computer that a CMG exist? We got computer outside of our network, unable to access our network (no VPN access) that we want to add to a CMG. SCCM already have the client configuration to use CMG, but the location is unknown because it didn’t exist at the time. Can we push a wmi entry or something (we can remote with skype in them)?
Thank you
Hi,
Firstly let me thank you for your excellent job, your guides are awesome.
Actually we are implementing CMG but I’ve some concerns about the “Import Web server CMG certificate on the Primary Site Server”. In this case you are creating a DNS for your domain but when you are importing the .pfx file to the CMG wizard it populates the services with yourname.cloudapp.net
Is required to create / match this DNS entry with the DNS created with de Azure Resource Group? In my company is required to create a CSR prior to create a CER file instead of using the common template issuing procedure.
Thanks in advance
Hi, first of all thank you for all of your guides. They are so what of helpful for someone like me that I call myself a Rookie. And exatly this is why I am asking a professional for help.
Please have in mind I have said I am a rookie and have linited know how in troubleshooting 🙁
Microsoft.ClassicCompute and Microsoft.Storage resource is registered
Under APP Registration/API Authorization I do have following entries for the SERVER APP
Microsoft Graph => Directory Read all => Administrator consent YES => granted for my enterprise
I do have a resource group in my case named CMG. But inside of this group there is no entry.
I did follow this guide to create a CMG and get below errors.
My guess is that the Server APP has not enough or the right permissions. But I can’t find any how to with the Azure portal view.
Thanks for any support.
Markus
Azure Monitor
List Storage Account KeysEreignis initiiert von
SCCM Server APP
Fehlercode
ResourceNotFound
Meldung
The Resource ‘Microsoft.Storage/storageAccounts/cmg’ under resource group ‘CMG’ was not found. For more details please go to https://aka.ms/ARMResourceNotFoundFix
(PLEASE do not point me to this link as I do not have any idea how to check on all points)
CloudMgr.log:
ERROR: Resource Manager – Failed to list keys for storage service cmg with status code NotFound. Check [Monitor/Activity log] on Azure Portal for more information SMS_CLOUD_SERVICES_MANAGER 19.06.2020 09:27:34 18748 (0x493C)
ERROR: Exception occured during monitoring of service cmg : Exception Hyak.Common.CloudException: Failed to start deployment slot~~ bei Microsoft.ConfigurationManager.AzureManagement.ResourceManager.GetStorageServiceKey(String resourceGroupName, String storageServiceName)~~ bei Microsoft.ConfigurationManager.CloudServicesManager.ServiceMonitorTask.MonitorCloudDistributionPoint() SMS_CLOUD_SERVICES_MANAGER 19.06.2020 09:27:34 18748 (0x493C)
STATMSG: ID=9429 SEV=E LEV=M SOURCE=”SMS Server” COMP=”SMS_CLOUD_SERVICES_MANAGER” SYS=SC1.xy.com SITE=MSW PID=13240 TID=18748 GMTDATE=Fr. Jun 19 07:27:34.622 2020 ISTR0=”cmg” ISTR1=”Failed to start deployment slot” ISTR2=”” ISTR3=”” ISTR4=”” ISTR5=”” ISTR6=”” ISTR7=”” ISTR8=”” ISTR9=”” NUMATTRS=1 AID0=404 AVAL0=”[“Display=\\cmg.xy.com\”]MSWNET:[“SMS_SITE=MSW”]\\cmg.xy.com\” SMS_CLOUD_SERVICES_MANAGER 19.06.2020 09:27:34 18748 (0x493C)
WARNING: Warning: Exception during cloud service monitoring task for service cmg SMS_CLOUD_SERVICES_MANAGER 19.06.2020 09:27:34 18748 (0x493C)
WARNING: Exception Hyak.Common.CloudException:Failed to start deployment slot SMS_CLOUD_SERVICES_MANAGER 19.06.2020 09:27:34 18748 (0x493C)
WARNING: Stack trace: bei Microsoft.ConfigurationManager.AzureManagement.ResourceManager.GetStorageServiceKey(String resourceGroupName, String storageServiceName)~~ bei Microsoft.ConfigurationManager.CloudServicesManager.ServiceMonitorTask.MonitorCloudDistributionPoint()~~ bei Microsoft.ConfigurationManager.CloudServicesManager.ServiceMonitorTask.Start(Object taskState) SMS_CLOUD_SERVICES_MANAGER 19.06.2020 09:27:34 18748 (0x493C)
HI
is my case no resolvable?
THX Markus
Hi Markus, Did u not get that resolved? I am having the same issue just now 🙁 . does anyone else knows how to resolve this issue?
Yes I could manage it to finalize the installation. It had to do with the cloud gateway service name. It has to be uniq. You can check this in Azure.
Hello. First off, thanks for this guide and all of the other post you do, it’s really a lot of good and detailed information in this big world that is Microsoft.
Now, I got a simple question that I’m unsure how to answer myself. Currently, I got these site and roles
Site server with Service connection point (used for WSfB sync)
SUS server connected to SCCM (all updates are managed through sccm, no WUFB)
DPs, 1 for VPN connected users with speed throttling
Database server
Remote Content Library servers
Reporting Server
Now, I’m planning CMG deployment. Per the guide and others I’ve found out, do I need new servers? My current SUS server allow only SSL Intranet connection and I don’t have the option to allow Internet Connection (maybe because I don’t manage any Internet Connected computer that the option is grayed out). Do I need to create a new one that the CMG SUS role will sync to? Doing so, I guess I should used shared database WSUSDB?
For the other connection, is it better to host it on a seperate server?
Thank you!
One question, If I have a global need, can I add more connection points globally? Say 1 in APAC, 1 in Austrailia for better response? Like a normal distribution point?
yes you can setup multiple CMG’s.
how to setup multiple CMG instance in sccm console and how to assign the machines based on site/etc?
Our CMG is up and running and successfully switching between Internet and Intranet. My question is what/how does it know to switch between internet and Intranet
Using the network connection domain suffix. If your domain is not in the domain suffix of any currently active network connection (IPCONFIG /all) then your are on the Internet. It checks every time a network connection is created.
Hello Prajwal,
some reason I try multiple time create CMG in our ConfigMgr 2002 keep fail with status error.
here ERROR: TaskManager: Task [AnalyticsCollectionTask: Service parklandcmg] has failed. Exception Hyak.Common.CloudException, Failed to start deployment slot.
Is there anything you could help?
We currently don’t have full PKI, but working towards it on our infrastructure. With that we went EHTTP on ConfigMgr 2002. How would you configure the MP in that scenario? We did use a PKI cert though on our CMG w/trusted root CA, and trying to use the new Bulk Token Registration, but we are failing to get the client installed. Also, in your guide above, I didn’t see any mention of configuring DNS. If full PKI, do you need to configure CNAME record on internal and public facing DNS, or just public facing?
Hello Shannon,
Hope CMG is working for you.
Could you please help me to know on where exactly we need to create CNAME record? Is it in public DNS & internal DNS or only public DNS.
Also what all entries we need to mentioned in Full DN & DNS field while importing CMG certificate.
Thank you for the post. really helpful. I just have a small hickup. All process completed but I am having the issue of the client not able to see the FQDN of the cloud DP in the configuration manager.
Can i configure CMG on non PKI infra. As we don’t have PKI setup and all are client Certificate is Self Signed Certificate.
The CMG must have a trusted certificate on its Internet facing side. It can talk internally to the MP without a full PKI because Azure AD will handle stuff on that side.
The cert does not have to be part of a full PKI, you could just go to a trusted authority such as DigiCert or GoDaddy to get one singular cert and apply it on your CMG. As I said, it must be trusted, so whichever authority you choose must either already be trusted by your clients or you will need to distribute a trusted root authority cert to them (usually done via GPO).
Thanks for the write up, was very helpful. I have the CMG up and running and serving content. One issue I am having is with VPN users. I created a boundary and group based on the VPN IP range. It works but not if someones home physical IP address overlaps with one of the other internal company network boundary ranges. It seems SCCM sees more than one IP address from the client, the VPN adapter address and the machines local home wireless network IP. I find that if that home wireless IP overlaps an internal boundary IP range assigned to an internal DP, then it ignores the VPN boundary. Anyone have any experience on this issue? For now I blocked VPN users from being able to access some of those internal DPs and set fallbacks to the CMG, It works but certainly not a perfect solution.
How do you create a trusted root certificate?
When i import the CMG certificate it says: “The certificate is not a valid root”
I keep getting this error on my trial environment:
{
“code”: “DeploymentFailed”,
“message”: “At least one resource deployment operation failed. Please list deployment operations for details. Please see https://aka.ms/DeployOperations for usage details.”,
“details”: [
{
“code”: “BadRequest”,
“message”: “{\r\n \”error\”: {\r\n \”code\”: \”OperationFailed\”,\r\n \”message\”: \”The operation ’62b5e2289f8a7231870fdcf54f64ee3a’ failed: ‘The requested VM tier is currently not available in Central US for this subscription. Please try another tier or deploy to a different location.’.\”\r\n }\r\n}”
}
]
}
I’ve tried several other regions like:
South Central
North Europe
East US
Have you find a solution for this one?
Microsoft have disabled the function on trial environments. You need to upgrade to pay as you go
I am experiencing same problem. I have tried every region and upgraded my Trial to Pay-As-You-go.
We run into the same problem. We tried multiple regions EU and US and they always fail with the same error message. When I try to deploy an A2_V2 VM manually then it deploys just fine. We have opened a support ticket at Microsoft about a week ago, but no solution yet. Anyone got this fixed?
What in your opinion or MS’s is the optimal Check in Frequency for a partial CMG Environment.
@Prajwal, would you have any topology for implementing this CMG + Azure + SCCM configuration?
How do you get past when you import the cert that the ‘Service Name’ is always the site server name. The cert has the correct details but SCCM (1910) won’t populate the ‘Service Name’ nor the ‘Deployment name’ with anything other than the site server name?
Doh! Fixed. Used the wrong template 🙁
I have followed these steps but always receive the error message “Failed to provision cloud service” error while setting up the SCCM Cloud Management Gateway (CMG) within my SCCM 1902 environment.
What steps can I take to determine what is causing this error so that I can fix it?
Which region did you select to deploy to ?
I would look at your Azure activity log
https://portal.azure.com/#blade/Microsoft_Azure_ActivityLog/ActivityLogBlade
This might give a clue, look at for the red errors.
Had the same issue looking at the Azure activity log it said that i was missing resource Microsoft.ClassicCompute.
I had to go to subscriptions > Resource providers > Find microsoft.classicCompute > Press register
I guess if you create a trial subscription it will not automatically register.
After this you will need to delete and recreate the CMG in the SCCM console
I have followed the instructions in this posting but when I get to the “Create Cloud Management Gateway Wizard” portion and import the certificate file I get a message that says “The service certificate has the following errors/warnings.
[Warning] The service certificate has a wildcard DNS name. Ensure you update the Service CName with the correct FQDN.”
How can I fix this?
How can I post a screenshot of this error message?
Here is a screenshot that shows the error I am receiving: https://imgur.com/6bqSpne
link dead
Hello I followed the step by step but when I tried to create the CMG I get this message.
“A valid Azure AD App is required. Please Deploy the Azure Service for Cloud Management First.”
Any ideas?
Same for me…
I had the same issue. I solved this by first adding the “Cloud Management” service in Azure Services.
Just a word of warning, make sure the CDP server name is NOT the same as your primary site name.
Add Site System Roles. option is greyed out when I try and add the role, I have run the console as admin and also tried the original installer account..
One thing that I have read is that the FQN of the server cannot be the same as the FQN of the CMG, and some suggest to remove the CMG and start again, however some people have said this will cause additonal issues 🙁
Rolled back server to previous VM snapshot, something odd happened to our SCCM during deployment of CMG.
InfoSec wants a layer of protection between the CMG and the on premise systems so what specific ports should we allow to build proper ACL’s?
I have covered that info under CMG ports section.
Between the instructions:
“In the Certificate Properties dialog box, under for Subject name, select Type as Full DN. Under Alternative name, select Type as DNS and enter the service name.”
AND
“Enter a public DNS name that you want to use with CMG. So I will enter *.prajwal.org here which allows me to use any subdomain for CMG.”
I think you forgot to insert a screenshot, I could use an illustration for each step as my CMG cert seems to continue to fail or prompt errors when using as described above.
We are having SCCM 1902 and configured CMG
So
Can we install sccm client in workgroup machines in CMG ?( machines which are not in Azure AD but connected to internet)
Sir
thanks for this documents with SCCM 1902
few questions related to Prerequisites
is it compulsory to have Azure AD (as we have Azure subscription but our machines are not registered in Azure AD)
we are implementing CMG to manage laptops (roaming user) which are in workgroup (not in domain and not in Azure AD)
so it is possible to manage workgroup machine in CMG ?
we are facing error while installing sccm client on workgoup Pc which is connected to internet
I am setting up CMG for the first time. I am getting the following error in the last part of connection analyzer and can’t figure it out.
Failed to get ConfigMgr token with Azure AD token. Status code is ‘500’ and status description is ‘CMGConnector_InternalServerError’. Google results don’t help too much with this error.
Make sure you bind the right web server certificate to IIS or make sure the correct root- and/or intermediate CA is added.
there is not proper documents in Microsoft website about using Wilcard domain name which is issued by public CA.
i have got wildcard certificate from public authority but am not able to authenticate from clients . the client requires Client authentication certificate which am struggling to find out
The wildcard cert should work in all cases. It worked even in my case.
HI Prajwal,
I have configure the things but its giving me a error during provisioning. error : Failed to start deployment slot …. in cloudmgr.log
Can i see the complete log file instead of just one line ?.
I have a question for you, we already have a PKI certificate setup for our Distribution Points and utilize Https internally. Do I need to setup another cert or can I use the existing one we are using already. I am asking as our main reason for using the gateway will be to patch machines that are domain joined but they are not using VPN often enough to get patched. Any guidance here would be appreciated.
If you already have PKI setup, it’s well and good. All you need to do is configure the CMG certificates that’s all.
Do you recommend using a Service Account with temp Global Admin privileges to setup the Azure AD link or does it require permanent global admin role?
Just curious if i need to use a global admin account just for setup then its done or to use the service account from SCCM with global admin?
use a global admin account while setting up CMG. It saves your time.
Thank you for your effort, I would like to ask something I have two MPs is it required to make them work over https both, or shall I create a new one dedicated for that and regarding to boundary group that will be used for CMG what is the boundary configured
Great………. got it working at last 🙂
Glad to hear that.
Great Post!! Thanks Prajwal!
Glad to hear that.
Great document! Setting this up and make it work isn’t too difficult if u got the certificates in order. The problem we are having is that our clients are not Azure AD joined so we use the certificate for authentication. However the client in the internet doesn’t report the status back of an installation, the status message query stays empty and the deployment keeps the status in progress. Microsoft has confirmed this to be a bug but it surprises me that I can’t find any document on the internet about this or that anyone has this problem. Anyone recognizes this?
Can you send me the link where Microsoft says this is a bug ?.