This post is a SCCM 1902 install guide using baseline media. The SCCM 1902 baseline media is now available for download in Microsoft evaluation center. Last week the SCCM 1902 update was made globally available to all customers.
Update 1902 for SCCM current branch was made available as an in-console update. The script to enable the first wave is no longer necessary now. Therefore you will not find that script now in Technet downloads.
About SCCM 1902
If you are running SCCM version 1802, 1806, or 1810, the SCCM 1902 update should appear in the SCCM console. Else go to Updates and Servicing node of SCCM console and check for updates.
Remember that you install update 1902 starting at the top-level site of your hierarchy. Start the installation from your central administration site or from your stand-alone primary site.
Using the SCCM 1902 baseline media, you can install a new site in a new hierarchy. And that’s what I am going to cover in this post. If you are installing SCCM 1902 for the first time in your setup this guide should help you.
Before you follow the SCCM 1902 install guide, ensure you have read the checklist once. It is always suggested that you invest few minutes in reading about the SCCM 1902 prerequisites. Planning is very important when you want to deploy SCCM in a big setup. If you are looking to perform SCCM 1902 upgrade from previous version, you can refer the following Upgrade Guide.
Step by Step SCCM 1902 Install Guide
The SCCM 1902 install guide is bit lengthy. I will cover several topics that are important while installing SCCM 1902 in the setup.
Step 1 – Setting up the lab
If you are asked to deploy SCCM 1902 in production, you may probably look to install it in a lab setup first. The lab setup is an isolated setup. The clients in lab setup shouldn’t talk to clients in production setup.
Setting up a lab prior to actual deployment will give you fair idea about the product and the errors that you might encounter either during configuration or installation.
So my lab setup is going to be really simple. I have got VMware as hypervisor. You may go with Hyper-V as well and that shouldn’t matter.
Since SCCM 1902 supports Windows Server 2019 for site system roles, I will be using Windows Server 2019 Datacenter as operating system for installing SCCM and other roles.
| Virtual Machine Name | Operating System | Roles | Specs |
| CORPAD.PRAJWAL.LOCAL | Windows Server 2019 Datacenter | Active Directory, DNS, DHCP | 2GB Memory, 60GB HDD |
| CORPSCCM.PRAJWAL.LOCAL | Windows Server 2019 Datacenter | Primary Site Server | 12GB Memory, 120GB HDD for OS, 250GB HDD for SCCM Content |
| CORPWIN7.PRAJWAL.LOCAL | Windows 7 SP1 Enterprise x64 | Client | 2GB Memory, 60GB HDD |
| CORPWIN10.PRAJWAL.LOCAL | Windows 10 1809 Enterprise x64 | Client | 2GB Memory, 60GB HDD |
| CORPWIN101.PRAJWAL.LOCAL | Windows 10 1809 Enterprise x64 | Client | 2GB Memory, 60GB HDD |
| CORPWIN102.PRAJWAL.LOCAL | Windows 10 1809 Professional x64 | Client | 2GB Memory, 60GB HDD |
That’s pretty much about my lab setup. I will have some more windows clients added soon. After you install the OS, activate the OS and perform windows update. On the severs install the roles such as AD, DNS and ensure your domain controller is setup and ready.
Step 2 – SCCM 1902 Prerequisites / Checklist
As I mentioned earlier, it is important to know about SCCM 1902 prerequisiteṣ. Microsoft actually lists all the prerequisites for every product they release. However here are some points that you need to keep in mind before installing SCCM 1902.
- For site and site system prerequisites for Configuration Manager, read this article.
- Supported operating systems for Configuration Manager site system servers – Read this article.
- I always recommend to install the latest version of Windows 10 ADK. At the time of writing this post, the latest version of Windows ADK available is 1903.
- A minimum version of SQL Server 2012 Native Client which includes support for TLS 1.2 must be installed. Starting in version 1810, the minimum version is SQL 2012 SP4 (11.*.7001.0). Otherwise you might get this warning.
- In my lab setup, I will install latest version of SQL Server 2017 – Enterprise edition. I love SQL 2017 because of performance improvements over previous versions.
- Install all applicable critical Windows updates on your machines. Restart the machines prior to installing SCCM 1902.
Step 3 – Creating the System Management Container
If you have read the Step 2, it’s time to configure some basic things before we install SCCM. After we have a domain controller configured in our setup, the next step is to create a system management container.
Remember that you create system management container one time in each domain that has a primary or secondary site. This will be used to publish data to Active Directory.
To create system management container
- On the domain controller launch ADSI Edit.
- Right click ADSI Edit and click Connect to.
- On the Connection Settings window, the naming context should be Default naming context. Click OK.
- Expand Default Naming Context. Right click CN=System. Click New and create an Object.
Select the class as container and click on Next.
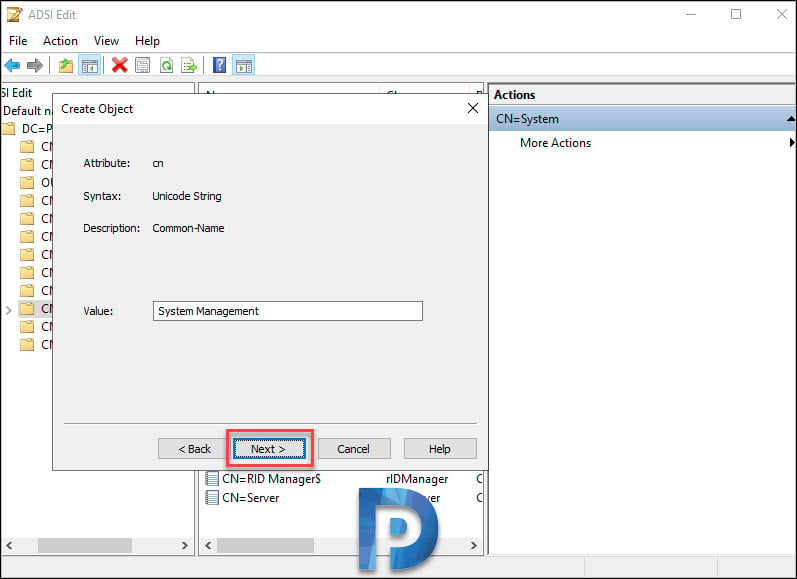
Name it as System Management. Click Next and click Finish to close the wizard.
Step 4 – Grant SCCM Server Permissions on System Management Container
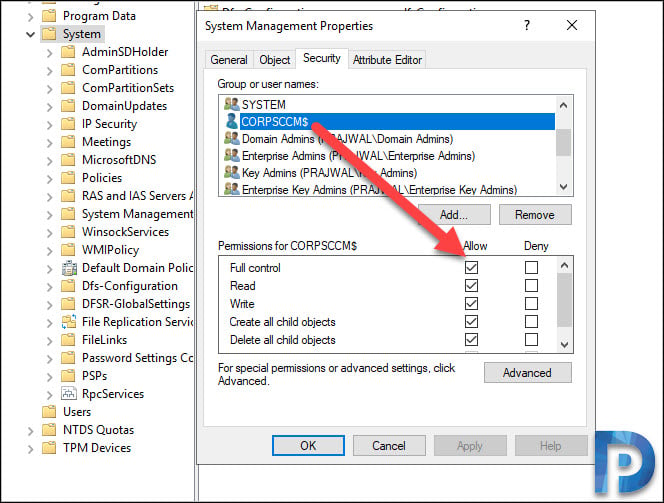
After you create System Management container, you must delegate SCCM server full permissions on System Management container. To do so follow the below steps.
- Launch Active Directory Users and Computers.
- Click View and click Advanced Features.
- Expand System, right click System Management and click Delegate Control.
- Click Add. On select users, computers or groups window click on Object Types and check for Computers as object types. Click OK.
- Type the name of the primary site server computer account and click OK.
- Add primary site server computer account and Click Next.
- On the Tasks to Delegate page, click Create a custom task to delegate. Click Next.
- Select This folder, existing objects in this folder and creation of new objects in this folder. Click Next.
- Select General, Property Specific and Creation/deletion of specific child objects.
- Under permissions, click Full Control. When you check the box Full Control, all the other permissions gets checked automatically.
- Click Next and click Finish to close the wizard.
Step 5 – Extending Active Directory Schema
To extend Schema, use an account that is a member of the Schema Admins security group. Be signed in to the schema master domain controller.
- Locate the extadsch which can be found in SMSSETUP\BIN\X64 of the configuration manager setup DVD.
- Hold the shift key on your keyboard and right click extadsch and click on Copy as Path.
- Launch the command prompt. Right click and click paste and hit enter.
- You should see the line Successfully extended the Active Directory Schema.
- Open the log file extadsch.log located in the root of the system drive. You should see the line Successfully extended the Active Directory Schema.
Step 6 – Install Web Server IIS (Prerequisites)
To enable Web server role and other features, login to SCCM server. Launch Server Manager and click Manage > Add Roles and Features. Select Web Server (IIS) server role and click Next.
Enable/Install the following features :-
- .Net Framework 3.5 Features [Install all sub features]
- .Net Framework 4.5 Features [Install all sub features]
- BITS
- Remote Differential Compression
Enable/Install the following Roles Services :-
- Common HTTP Features – Default Document, Static Content.
- Application Development – .NET Extensibility 3.5 and 4.5. Select ASP.NET 3.5, ISAPI extensions, ASP.NET 4.5.
- Security – Windows Authentication.
- IIS 6 Management Compatibility – IIS Management Console, IIS 6 Metabase Compatibility, WMI Compatibility and IIS Management Scripts and Tools.
Complete the installation of all the features and role services and close the wizard.
Step 7 – Installing Windows ADK 1903
First of all download the Windows ADK 1903. Note that you have to download both ADK and Win PE addon. For the list of Windows ADK version and downloads, refer Windows ADK versions for Windows 10.
- Download the Windows ADK for Windows 10, version 1903
- Download the Windows PE add-on for the ADK
First install Windows ADK version 1903. Run the ADK setup and select the following features.
- Deployment Tools
- User State Migration Tool
Click Next and complete the remaining steps.
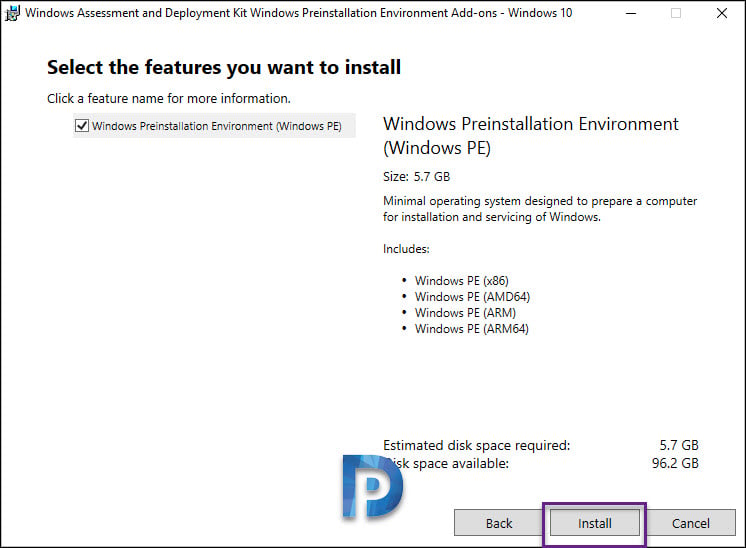
Now run the adkwinpesetup. By default the feature Windows Preinstallation environment (Windows PE) is selected. Click Install. Close the wizard.
Step 8 – Supported SQL Server for SCCM 1902
The following versions of SQL server are supported by SCCM 1902. Hope this table helps you decide install the right SQL server version for SCCM 1902.
| SQL Server | Edition | Min Cumulative Update |
| SQL Server 2017 | Standard, Enterprise | CU2 |
| SQL Server 2016 SP1, SP2 | Standard, Enterprise | Not CU Required |
| SQL Server 2016 | Standard, Enterprise | Not CU Required |
| SQL Server 2014 SP1,SP2,SP3 | Standard, Enterprise | No CU Required |
I will be installing SQL Server 2017 Enterprise edition in my setup. The SQL and SCCM will be installed on same server. I will later patch it with cumulative update 2 or latest available CU.
Note – Configuration Manager requires a 64-bit version of SQL Server to host the site database.
Step 9 – Install SQL Server 2017
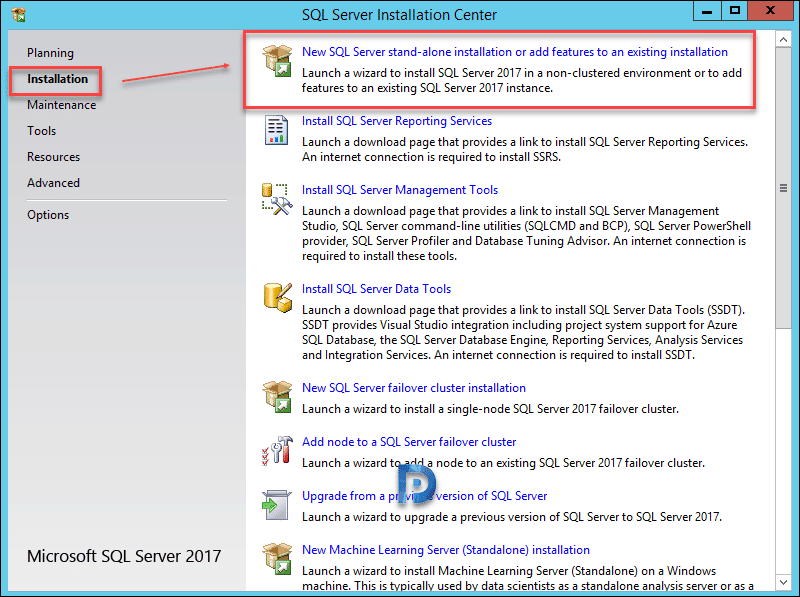
Mount the SQL server ISO. Launch the SQL server setup (run as administrator). On the installation window, click Installation and then click New SQL server stand-alone installation.
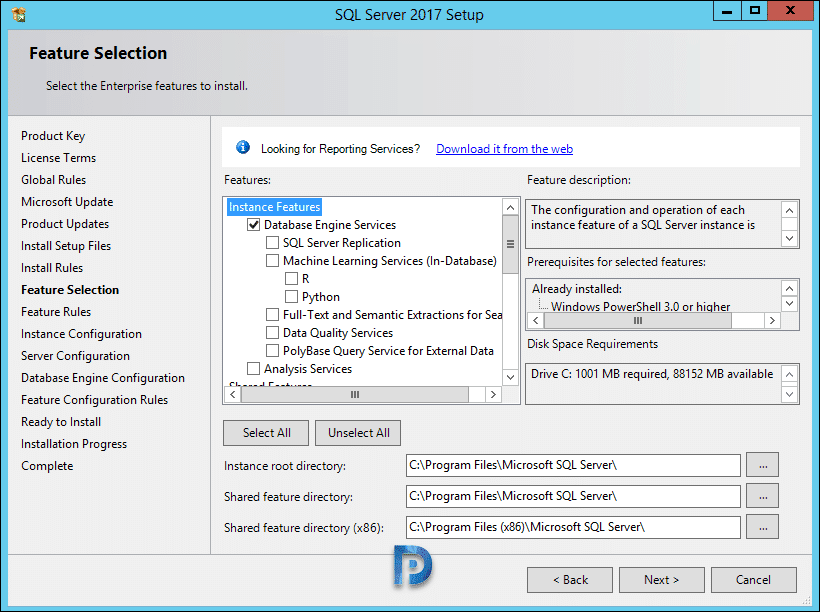
Feature Selection – Select Database Engine Services and click Next.
Instance Configuration – Select Default Instance. Click Next.
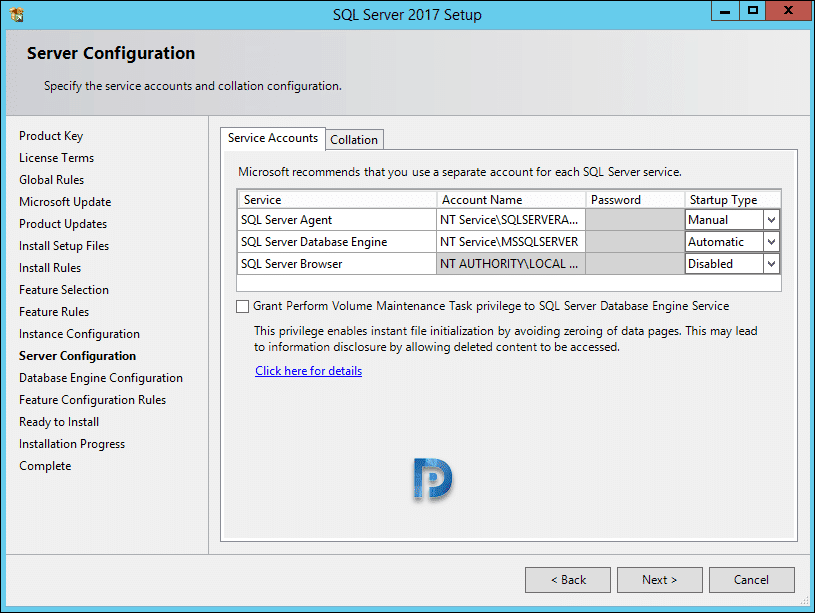
Specify the service accounts. Note the you must use a separate account for each SQL server service.
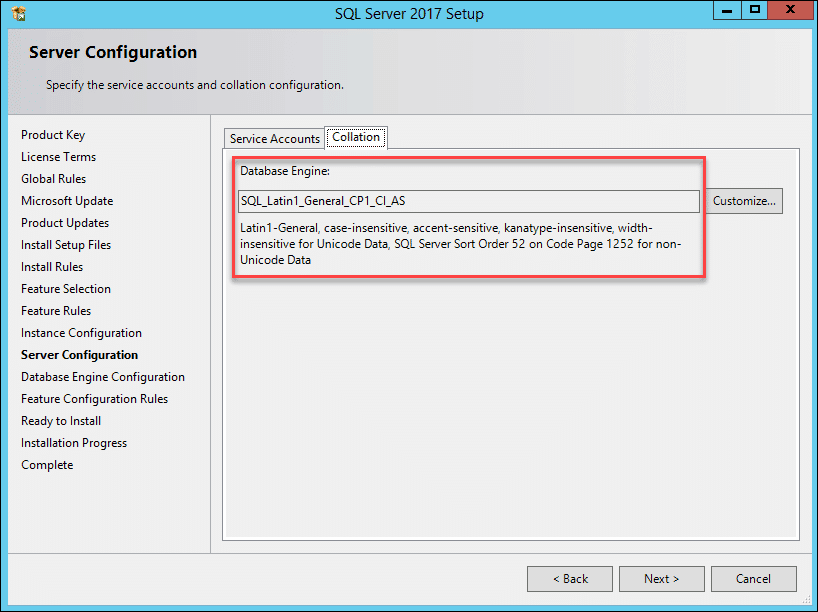
Click Collation tab. Ensure that collation is SQL_Latin1_General_CP1_CI_AS.
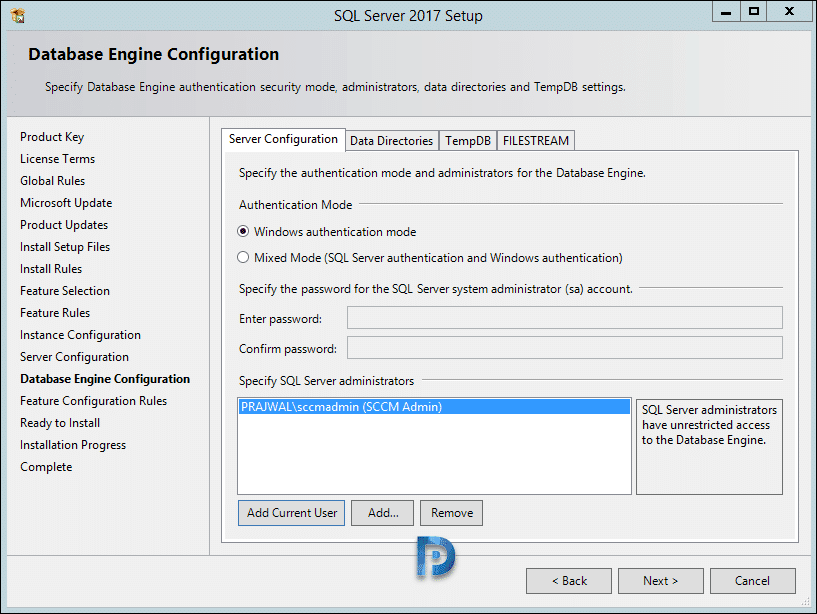
Click Add Current User to add the account to SQL server administrators. Click Next. Complete the remaining steps. Close the setup wizard and finally reboot the server once.
After the SQL installation, install the cumulative update 2. If you see a higher version of cumulative update, you can install it.
Step 10 – Installing SQL Server Management Studio
In this step we will download and install SQL Server Management Studio on primary site server. Download the latest version of SSMS and run the SSMS executable as administrator.
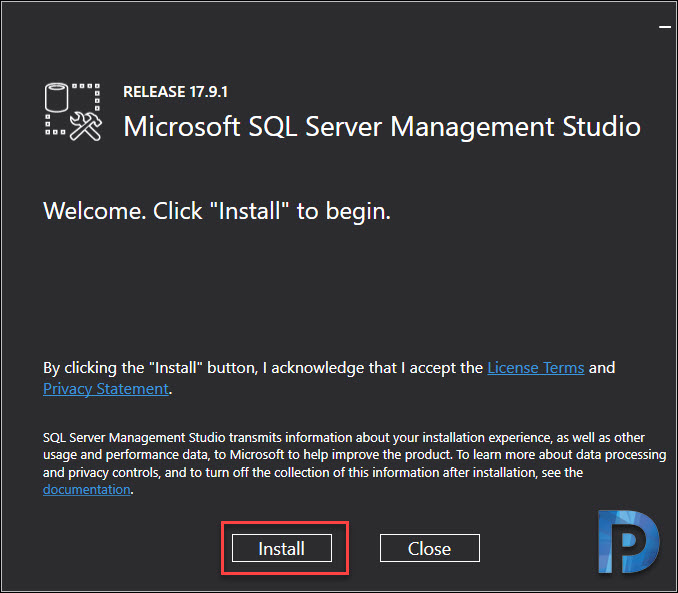
The Installation is simple, just click Install and wait for installation to complete. A reboot is required after installation.
Step 11 – Install WSUS Role
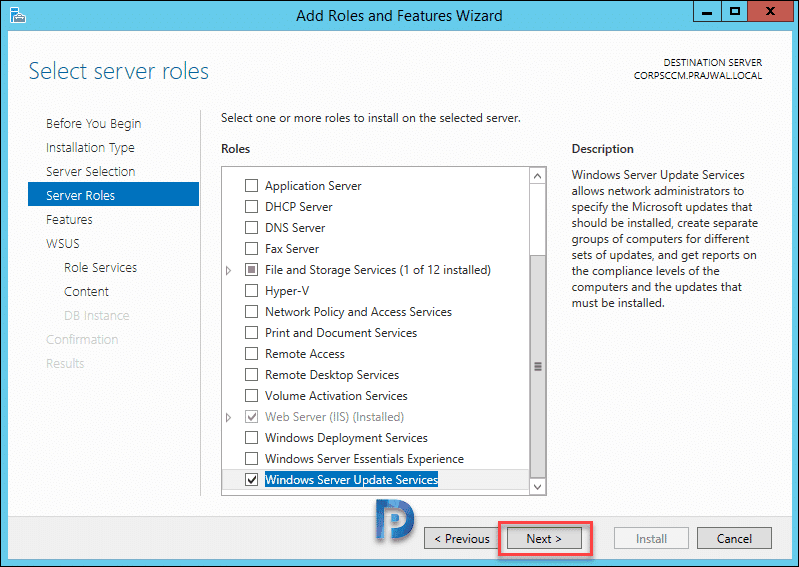
If you are planning to deploy updates using SCCM, then WSUS is required. To install WSUS on Windows Server 2012 R2, launch Server Manager. Click Manage, click Add Roles and Features. Select Windows Server Update Services and click Next.
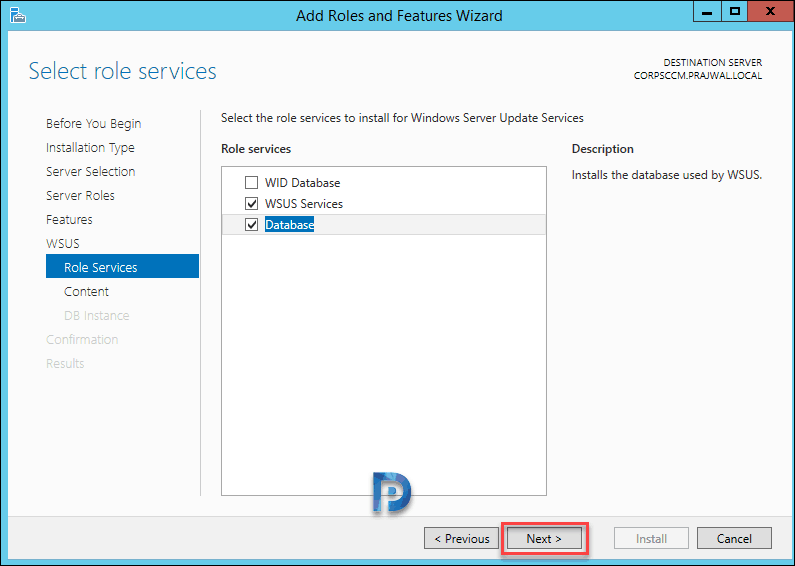
Select WSUS Services and Database as these are the ones that are actually required. Do not select WID Database here. Click Next.
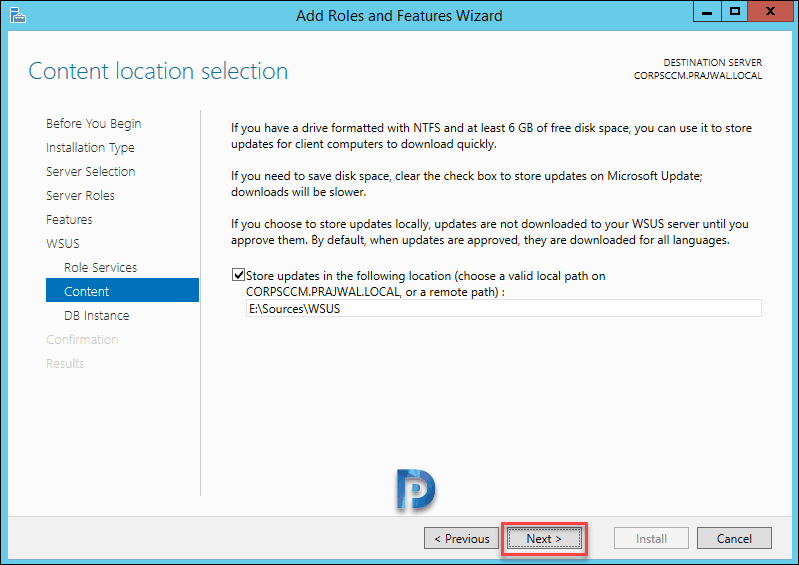
Specify a folder to store updates. Click Next.
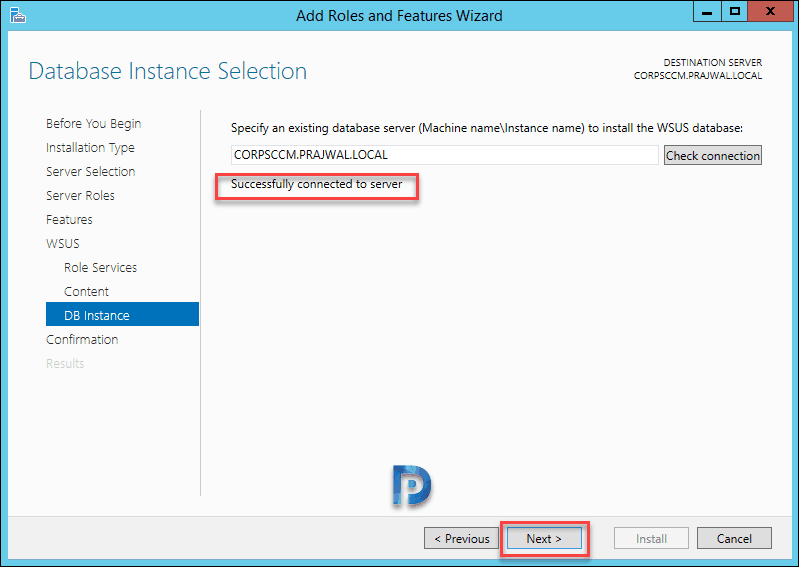
Specify the database server where you want to store the WSUS database. Enter the server name and click Check connection.
You must see the message Successfully connected to server. Click on Next. Complete the remaining steps and wait for installation to complete.
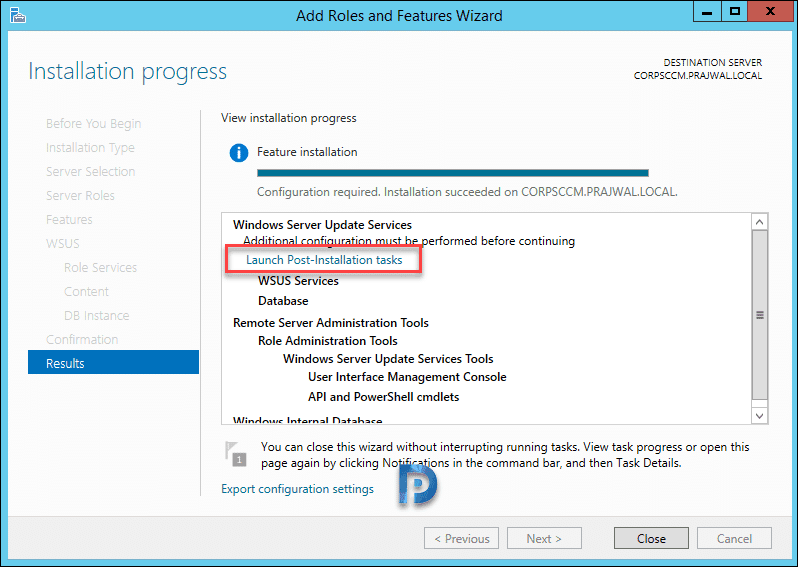
The next step is to complete post installation tasks. To do so click Launch Post-Installation tasks.
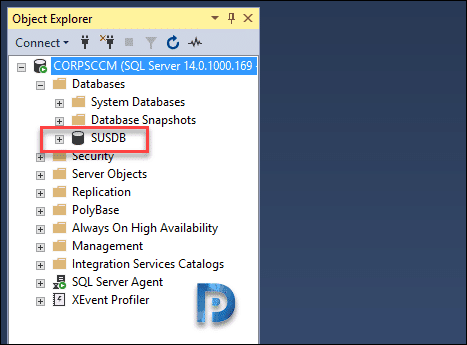
After the post installation tasks are complete, login to SQL server management studio. Expand Databases and you should see WSUS Database SUSDB entry. Close the management studio.
Step 12 – Installing Reporting Services
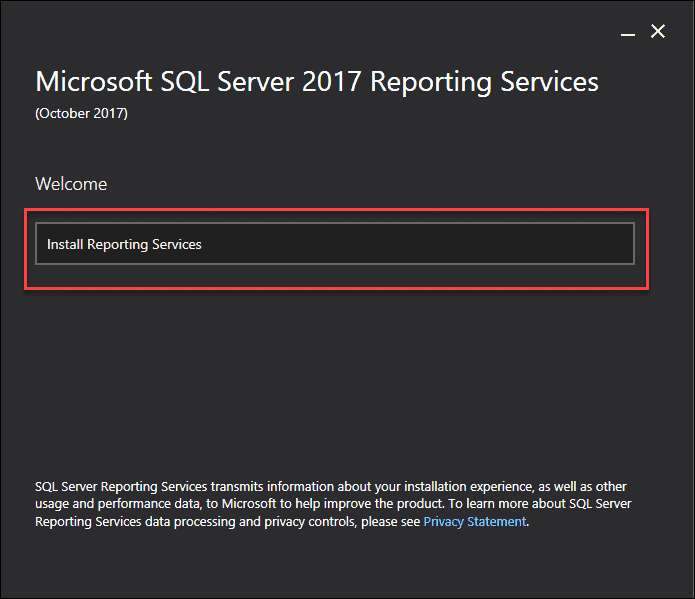
When you install SQL server 2017, it doesn’t include reporting services. You have to download and install it separately. Download SQL server reporting services 2017 from here.
Run the setup and click Install Reporting Services.
Select Install Reporting Services only and click Next.
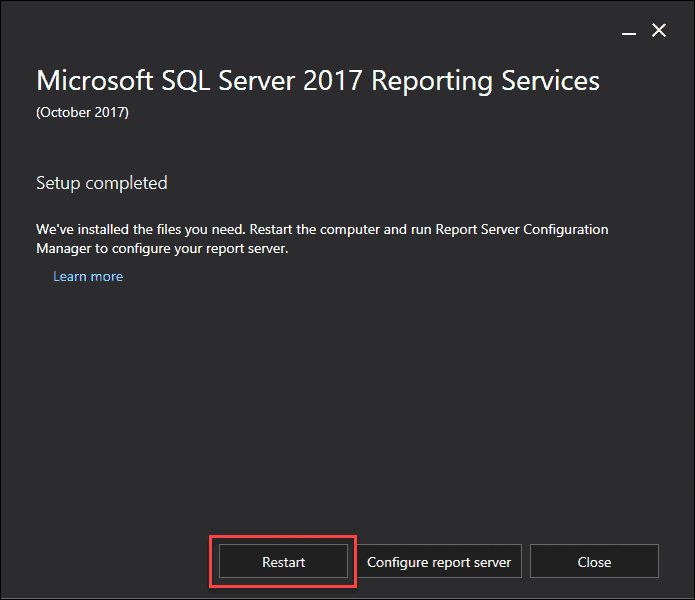
Restart the server to complete the SQL Server 2017 reporting services installation. We will configure the report server later.
Step 13 – Configure Firewall Settings for SCCM 1902
Before we install SCCM 1902, the firewall has to be configured properly so that you don’t face issues while deploying client agents. If there is a firewall between the site system servers and the client computer, confirm whether the firewall permits traffic for the ports that are required for the client installation.
- File and Printer Sharing.
- Windows Management Instrumentation (WMI).
You also need to create a group policy to open TCP ports 1433 and 4022. Refer the following post to configure firewall settings for SCCM 1902.
Step 14 – Download SCCM 1902 Baseline Media
The version 1902 baseline media will be made available for VLSC and MSDN customers soon. However you can download SCCM 1902 from Microsoft EvalCenter.
If you already have the SCCM product key, you can download eval copy and activate the product. Download SC_Configmgr_SCEP_1902.exe. You can either double-click this file or manually extract it to a folder using winrar or 7zip.
Step 15 – Install SCCM 1902 using Baseline Media
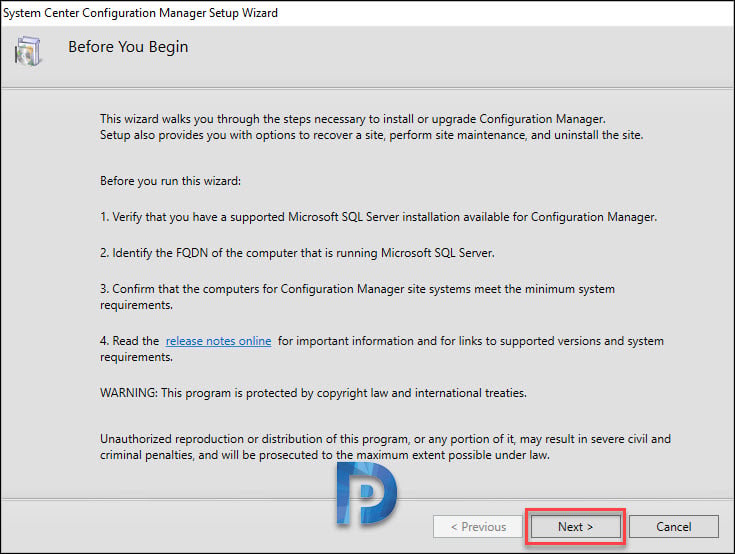
It’s time to install SCCM 1902 using baseline media now. Run the Splash HTML application from the setup folder. This brings up the System Center Configuration Manager install wizard.
Now click Install.
Click Next.
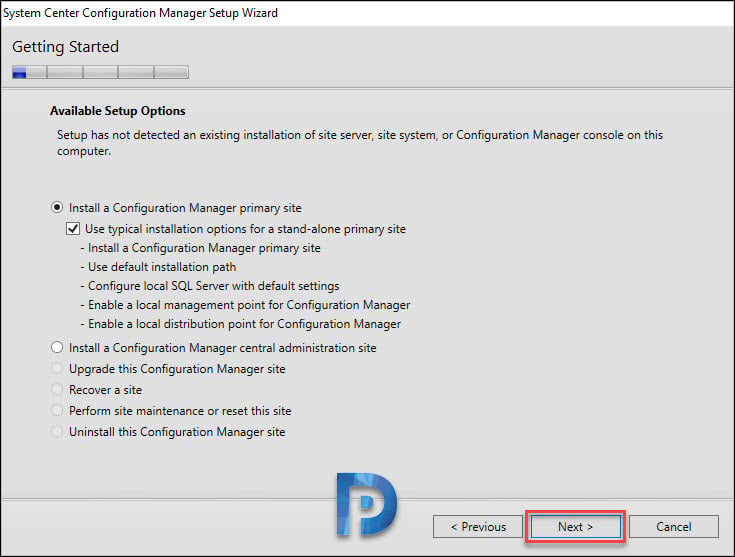
Select Install a Configuration Manager primary site. Check the box “Install a Configuration Manager Primary site“. Click Next.
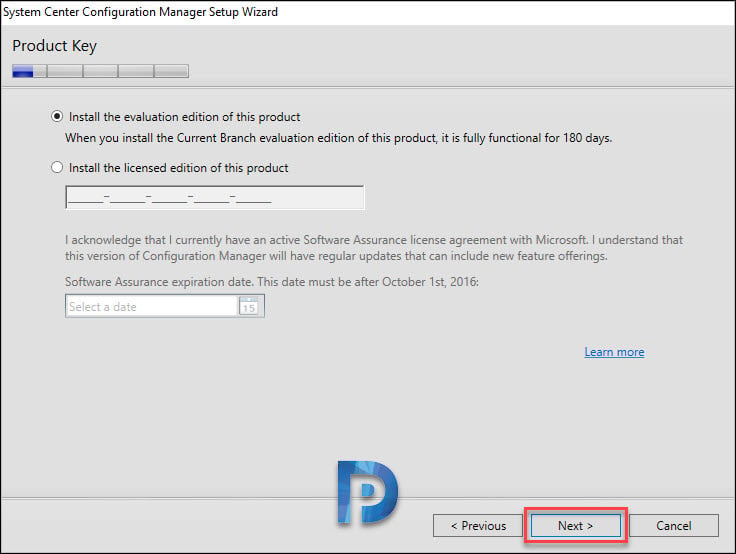
If you have the SCCM product key, enter it else install the evaluation edition and click Next. You can later get the product key and activate SCCM using this guide. Click Next.
Accept the license terms. Click Next.
The Configuration Manager setup requires some prerequisite files. You can either download them now or if you have previously downloaded it, provide the path. Click Next.
Specify the Site code, Site name. Click Next.
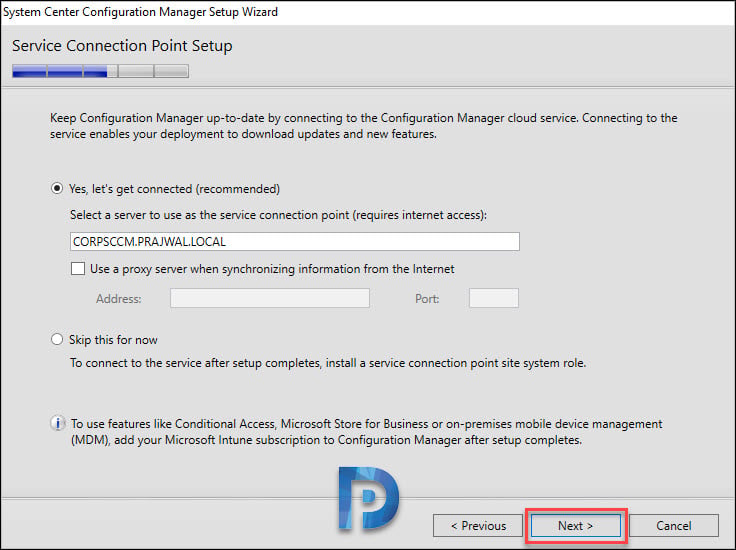
Click Next.
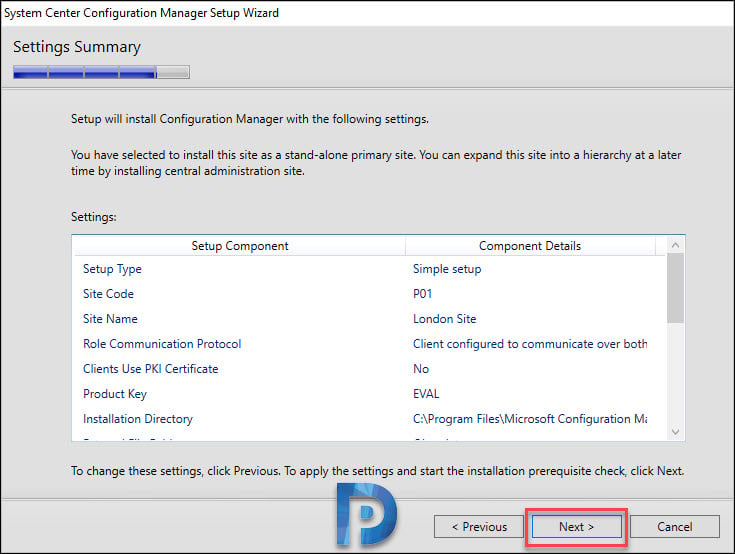
On the Settings Summary page, verify all the settings and click Next.
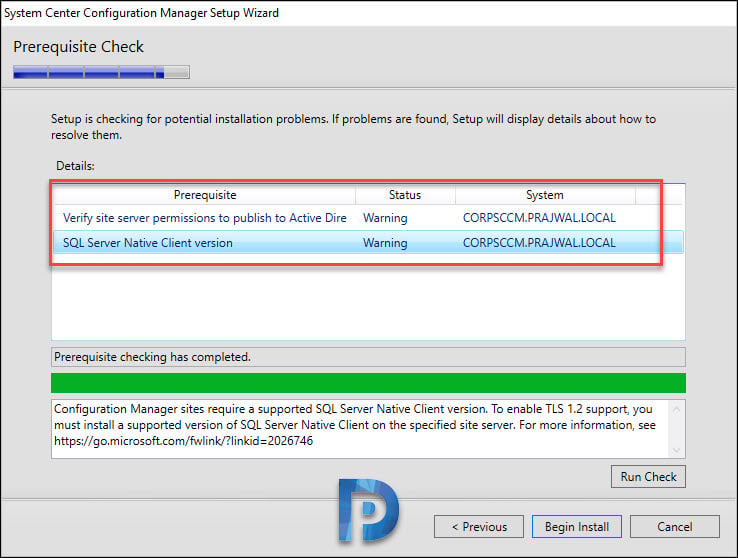
During the SCCM 1902 prerequisite check, I got 2 warnings.
- Verify site server permissions to publish to Active Directory – You get this warning when the permissions for AD Container are not assigned direct to the CM computer account. In my case i am sure that permissions are correct. Hence i will ignore this warning.
- SQL Server Native client version – To fix this warning, refer this post.
I fixed the SQL server native client version warning. I will skip the the AD related warning and click Begin Install.
To monitor the SCCM 1902 installation, open ConfigMgrSetup.log file using CMTrace tool.
The SCCM 1902 installation is complete. Click Close.
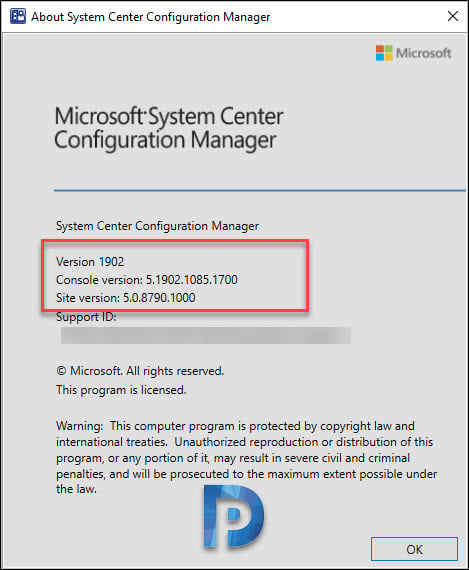
Launch the Configuration Manager console. At top left corner of the console, click that down arrow and click About Configuration Manager.
- Version – 1902
- Console Version – 5.1902.1085.1700
- Site Version – 5.0.8790.1000















Is it possible to push Semi-Annual Enterprise Channel: Version 2208 (Build 15601.20706) version for Microsoft 365 Apps for enterprise via configuration manger?
Thank you for the detailed installation steps.
I am stuck at adding the WSUS role on the SCCM server and hoping someone can help.
Setup is as follows: 2K19 SCCM server, 2K19 SQL server with 2017 SQL installed. I am trying to add WSUS role on the SCCM server, and at the ‘DB Instance’ step, I am getting ‘Failed to connect the SQL server’ and the details say that ‘Login failed for user’. I am using the correct username as I can connect to the database using the same username. I am not sure what I am doing wrong.
Hopefully someone can help me out.
Thanks.
The logon account for the SQL Server service cannot be a local user account, NT SERVICE\ or LOCAL SERVICE. You must configure the SQL Server service to use a valid domain account, NETWORK SERVICE, or LOCAL SYSTEM.
Hi Yasir,
change the logon account from your SQL Server service from NT or Local Service to local system account!
Thats all 🙂
Hello, this is the first time I am installing SCCM, I have given a Windows Srv 2019 machine and another Machine with Sql Server 2019, I am stuck at the SCCM 2019 installation, it gives me error Failed to connect to
Similar queries and resolutions are addressed in forums. Check once.
Hi Prajwal Desai
First I want thanks for this information.
I want contact you by email to support me i have problem during deploy capture image
Hi prajwaldesai,
It is show the following log, Pls help me.
[1, PID:7656][07/01/2021 11:20:45] :Microsoft.ConfigurationManagement.ManagementProvider.SmsConnectionException\r\nThe SMS Provider reported an error.\r\n at Microsoft.ConfigurationManagement.AdminConsole.SmsSiteConnectionNode.GetConnectionManagerInstance(String connectionManagerInstance)
at Microsoft.ConfigurationManagement.AdminConsole.SmsSiteConnectionNode.CreateConnectionManagerInstance(String connectionManagerInstance, IConsoleConfig settings)\r\nThe SMS Provider reported an error.
\r\nMicrosoft.ConfigurationManagement.ManagementProvider.WqlQueryEngine.WqlQueryException\r\nThe SMS Provider reported an error.\r\n at Microsoft.ConfigurationManagement.ManagementProvider.WqlQueryEngine.WqlConnectionManager.Connect(String configMgrServerPath)
at Microsoft.ConfigurationManagement.AdminConsole.SmsSiteConnectionNode.GetConnectionManagerInstance(String connectionManagerInstance)\r\nInvalid namespace
\r\nSystem.Management.ManagementException\r\nInvalid namespace \r\n at System.Management.ThreadDispatch.Start()
at System.Management.ManagementScope.Initialize()
at System.Management.ManagementObjectSearcher.Initialize()
at System.Management.ManagementObjectSearcher.Get()
at Microsoft.ConfigurationManagement.ManagementProvider.WqlQueryEngine.WqlConnectionManager.Connect(String configMgrServerPath)\r\nManagementException details:
________________________________________________________________________________________________
The Configuration Manager console cannot connect to the Configuration Manager site database. Verify the following:
• This computer has network connectivity to the SMS Provider computer.
• Your user account has Remote Activation permission on the Configuration Manager site server and the SMS Provider computer.
• The Configuration Manager console version is supported by the site server.
• You are assigned to at least one role-based administration security role.
• You have the following WMI permissions to the Root\SMS and Root\SMS\site_ namespaces: Execute Methods, Provider Write, Enable Account, and Remote Enable.
‘Failed to create SQL server certificate, configuration manager installation cannot be completed”
This error showing while installing SCCM setup on SCCM machine.
Please suggest
Thanks in advance
Thanks for this awesome guide. This is the gold standard whenever I install SCCM.
I am installing offline, so I downloaded the files and placed them in a local folder. When I run the install, I get an error so I checked the Config.Mgr.Setup log and I get message that the configmgr.manifest.cab could not be found.
I noticed it was indeed missing, so when I unzipped the download file, I saw that configmgr.manifest.cab, did indeed exist. This time I ran setup with the folder open and observed that the file gets deleted and as expected the install failed.
So I changed the file permissions to “read only” on configmgr.manifest.cab and the install failed with the error message in the config.mgr.setup stating that is could not delete the configmgr.manifest.cab.
I have installed SCCM 1902 successfully on three other networks in my org with out any issues. UGH!
The cab file shouldn’t get deleted. I have never seen the cab file getting deleted. Is the anti-virus software deleting it ?.
Thanks for getting back to me. Here is the line from the ConfigMgrSetup log:
ERROR: Failed to delete Manifest E:\prereqs\ConfigMgr.Manifest.cab (0x80070005)
this happens right after I put the path in “Download Required Files” or “Use Previously Downloaded Files” and hit next.
This is after I have changed the file permissions to “read only.”
I thought the package may be corrupted, so I downloaded the files again and uploaded them to the network and now the set up is running. PHEW!
Thank you Prajwal for the clear guide. We currently have sccm 2012. I am planning a clean install of current branch on a new server. How to best deal with the old clients?
You can simply push the new agent to the client machines. While using client push select uninstall the existing configmgr client version.
I have Question here,
Yes you can install SQL server on a separate VM and install ConfigMgr on another VM. However the performance is good when you install both on same server.
Great post, great information.
thank you so much for taking the time to do this. well done!!!
Glad to hear that.
Hi Prajwal,
The installation completed successfully after following the steps provided by you. Can you, please share the link to configure SCCM 1902 and deploy a .exe file to all the client systems. Unable to find any good guide online, other than yours.
Deploying EXE is supported by ConfigMgr however you need to first find the appropriate install switches. I have covered a lot of application deployments in my blog and you can pick any of them for reference.
SQP Reporting Services cannot be installed on a domain controller, can you explain how you installed it ?
I have not installed in on domain controller. Install it on a separate server.
Great as article as usual. Would you be able to explain on what basis one chooses Windows Server Datacenter over Windows Server Standard OS for installing SCCM CB on client environment. Our end devices happens to be servers.
There is no compulsion. The standard version of windows server OS is perfectly ok for installing Configuration Manager. Since i setup my SCCM in lab, i prefer to use datacenter over standard.
Great article…this got me through, but I was curious if there were additional information needed to configure the report server manually?
I got your question. You can follow this link – https://www.prajwaldesai.com/sccm-sql-server-upgrade/#Step_9_%E2%80%93_Configure_the_SQL_Reporting_Services
This is a great step by step tutorial, worked great. I got everything installed, but where can I find the next steps like adding clients and distribution points?
You will find that in separate post. Let me know what exactly are you looking for.
Hoping for the basic configuration guide after the install. How do I make it scan for the clients, do I need to set up my distribution points first. Do I need to push the client software first? Just not sure what are the first steps of configuring SCCM.
Hi, all those basic configurations are covered here in parts – https://www.prajwaldesai.com/sccm-2012-r2-step-by-step-guide/
If you need any further help, let me know.
Hello,
ERROR: Setting up the SQL database server
CSql Error: Cannot find data for connection type: TEST_ROLE_ACCESS, cannot get a connection. $$
Thank you
I have no idea about this error. Is the connectivity between SQL and SCCM working ?.
Hello Prajwal Desai Thanks for sharing this information step by step. Is it possible to share me the licence cost and calculation for sccm?
Thanks in advance!!
You need to refer Microsoft Licensing for that – https://docs.microsoft.com/en-us/mem/configmgr/core/understand/product-and-licensing-faq
I do what as you saw in this tutorial to install sccm but I’m going to install sccm every step pass but the last step is installation step beginning installation find but after appear “setting up SQL server database” this after this install stuck hear how to fix this Please help to fix this issue
It doesn’t get stuck rather it is a very time consuming step. So you need to wait until the setup throws error.
How much time goes to install SCCM Endpoint Protection current branch 1902
30 minutes
It can take atleast 30 minutes to 2 hours. The installation time depends on lot of things.
you say before don’t install sccm on domain and you are on the domain you say on this post
from Oliver
do I use a different account for SQL Server
because you can use that on a domain
from Oliver
A very Thanks to you Bro I have Successfully Installed SCCM 1902
Glad to hear that.
I had to uninstall SCCM to re-install according to your guide. Thing is that when it comes to point that runs the prereq checks, it gives me database errors. What I see is that it will not use the standalone SQL server 2014 but it tries to create I believe a sql express database. This happens all the time and it seems that I cannot point it to my sql15 server. Is there any workaround for this?
Thank you.
Try deselecting “Use Typical installation options for a standalone primary site” on the “Getting Started” page you will then be able to specify the instance running on the SQL server.
Question on this statement. “Specify the service accounts. Note the you must use a separate account for each SQL server service.”
Services:
SQL Server Agent
SQL Server DB Engine
SQL Full-text Filter…..
SQL Server Browser
1. I am trying to find the AD groups needed for each of the service accounts for each SQL server service. (Domain admins, etc)
2. What permission do each of the service accounts need on the SQL side? (SA, Etc)
Thanks,
Will
I have a problem installing the sccm in the prerequisite test that failed because that. I put the domain admin account in the logon tab of this services and the error gone. I think we have to put domain accounts here with something level to make happen, but this guide doesn’t mention nothing.
Very nice step by step guide so far.
However a bit unsure about the Role services for WSUS.
I’m using Server 2016 which i assume is why it’s different.
My role services options:
WID Connectivity
WSUS Services
SQL Server Connectivity
Should i just go with SQL Server connectivity and WSUS services?
Thanks in advance
Yes select SQL Server connectivity and WSUS services.
Hello serve all friends
The question is put into a classroom of 15 computers under the domain name wsus. All systems are updating from the server, but when logging into wsus, only 10 of the Windows systems are reported. Why?
from Control Pannel go to Configuration Manager and Run the Hardware inventory and all software Inventories
I followed your exactly step-by-step installation instructions for SCCM.
After installation I wanted to check under Software Update Point Component Properties the option for windows 10, but this was not possible because of missing Windows 10 options.
What should I do to get the option for Windows 10?
OS:Windows Server 2019
SQL: SQL Server 2019 CU15
SCCM: 2019 (1902)
Did you run the software updates sync ?.
Hi,
WSUS seems to be not compatible with SQL 2019
Error log :
Install type is: UnsupportedFuture
DB is a higher version than the config scripts
Erreur irr‚cup‚rableÿ: La version du sch‚ma de la base de donn‚es provient d’une version de WSUS
I Prajwal, Thanks for posted and i have installed sccm 1902. now i am facing one issue, i have created on application and deploy on client but it is showing software update on client machine but not instilled.
its showing like application public and user take the approval for installation. i want to install application automatically.
Please suggest.
Hi Pradeep, can you post this question in forums and attach the screenshots.
Hi Prajwal,
Thanks. I have upload the issue with snapshot on forum.
Hi Prajwal,
It’s a good article, I could intall SCCM in my domain.
But I had an issue when I deployed a Management Point (Software update point and Distribution Point included).
In Site Status I have the next description
STATUS SITE SYSTEM SITE SYSTEM ROLE TOTAL
Critical \\NameServer Management Point 0 Bytes
I have been looking for an error in the logs But I have no clue what could be wrong. Did it happened to you before?
Resolved 🙂
Hi Jose..
How its Resolved. Can you please help on this issue.
Please could you help me with the resolution steps!
How this resolved? i m struggling with same issue since last couple of days
Firstly thanks for the article – very useful end-to-end guide without being to complicated.
Step 14 – Your instructions state you need to download SC_Configmgr_SCEP_1902.exe but then do not mention it again. Are we meant to do anything with this download?
Very good article. Congrats.
I am a user of SCCM but installed once in a production environment. Now I do have the task to install two SCCM’s in two distinct Active Directory domains that I would like to manage centrally. Is that possible to set SCCM in this case without having domain trust? Could you please show me the article if possible?
Thank you.
you must have Active directory 2 way trust to achieve your ask.