


This post covers the steps to upgrade your SQL server installed for SCCM. I will show you how to upgrade the SQL server 2014 to 2017 on the SCCM server.
This will be an in-place upgrade of SQL server 2014 to the version 2017 on SCCM server. The same steps can help you with upgrading SQL server to any other supported version as well.
Lab Setup – In my test setup, I am running Configuration Manager version 1910. The site database is hosted on SQL server 2014 enterprise edition. I know I am running an older version of SQL server on my SCCM server and therefore I am upgrading it.

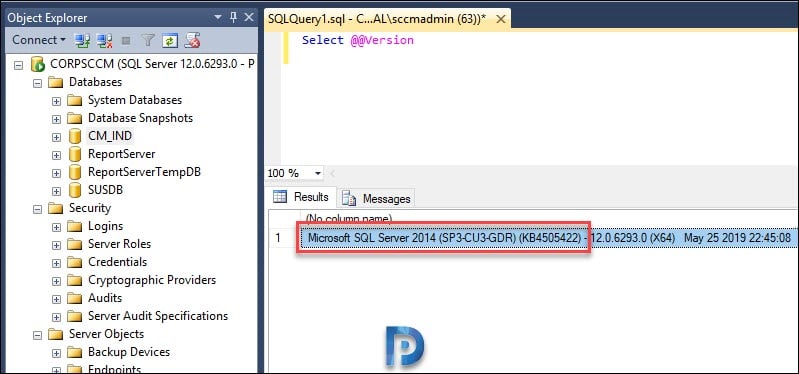
To find out the SQL Server version you can run the query – Select @@Version. This should show you the SQL Server version and the latest CU installed. To know different ways to find the SQL Server version, read this post.
SCCM SQL Server Upgrade from 2014 to 2017
The high level steps for upgrading the SQL Server include
- Before you Upgrade
- Uninstall Reporting Services Point role
- Uninstall SQL Reporting services
- Delete Report server Database and Log files
- Stop Configuration Manager Services
- Upgrade SQL 2014 to 2017
- Re-Install the SQL Reporting Services
- Configure the SQL Reporting Services
- Re-install Reporting Services Point role
- Start SCCM services.
Step 1 – Before you upgrade your SQL Server
- First of all before upgrading the SQL server in your production environment, it is advised that you test the upgrade on a test environment.
- Make sure you backup your CM database and your SSRS database before you begin this process. Ensure you also backup your custom reports.
- Before upgrading from one edition of SQL Server to another, verify that the functionality you are currently using is supported in the edition to which you are moving. For example, I am upgrading SQL server 2014 to 2017 which is supported by Configuration Manager 1910. Where as SQL Server 2019 is not supported by ConfigMgr 1910 yet.
- The operating system should be compatible on which you are performing an SQL upgrade. Verify the hardware and software requirements before installing SQL Server 2017.
- Note that SQL Server 2017 is only available for 64-bit platforms. Hence cross-version instances of SQL Server 2017 are not supported.
- Before you Upgrade SQL Server 2014 to 2017, enable Windows Authentication for SQL Server Agent.
- If you are running evaluation edition of SQL server then upgrade to SQL 2017 is not possible.
Step 2 – Uninstall Reporting Services Point role
To uninstall Reporting Service Point role from Configuration Manager
- Open the Configuration Manager console.
- Go to Administration > Site Configuration > Servers and Site System Roles.
- Select the server that has the Reporting services point role. Right click and choose Remove Role.

Open the srsrpsetup.log file and wait until the role is uninstalled.
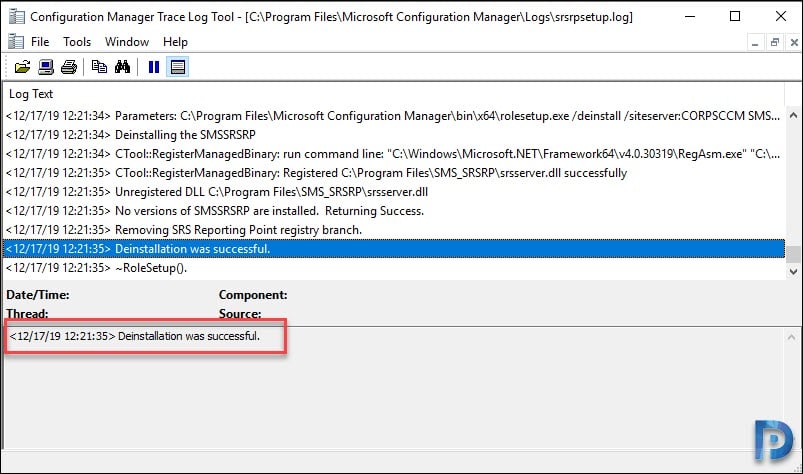 Here is what your log file should look like post removing reporting services point role.
SMSSRSRP Setup Started....
Parameters: C:\Program Files\Microsoft Configuration Manager\bin\x64\rolesetup.exe /deinstall /siteserver:CORPSCCM SMSSRSRP 0
Deinstalling the SMSSRSRP
CTool::RegisterManagedBinary: run command line: "C:\Windows\Microsoft.NET\Framework64\v4.0.30319\RegAsm.exe" "C:\Program Files\SMS_SRSRP\srsserver.dll" /unregister
CTool::RegisterManagedBinary: Registered C:\Program Files\SMS_SRSRP\srsserver.dll successfully
Unregistered DLL C:\Program Files\SMS_SRSRP\srsserver.dll
No versions of SMSSRSRP are installed.  Returning Success.
Removing SRS Reporting Point registry branch.
Deinstallation was successful.
~RoleSetup().
Step 3 – Uninstall SQL Reporting services
In this step, we will uninstall the SQL Reporting services. This procedure is also covered in one of my post here.
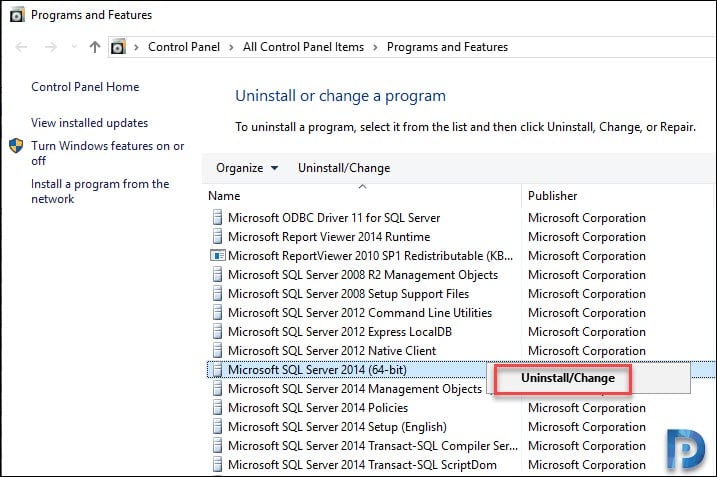
- On Server with the SQL Reporting Services installed, open the Control Panel.
- Navigate to Programs and Features. Select Microsoft SQL Server 2014 (64-bit).
- Click the Uninstall/Change option.
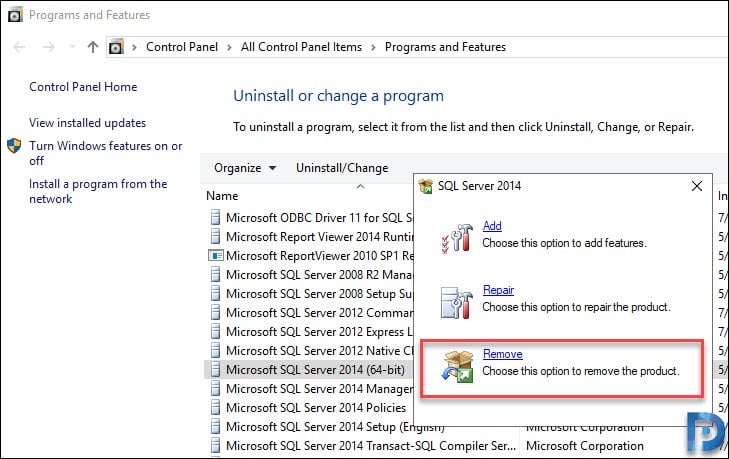
From the list of options, click Remove.
Click Next.
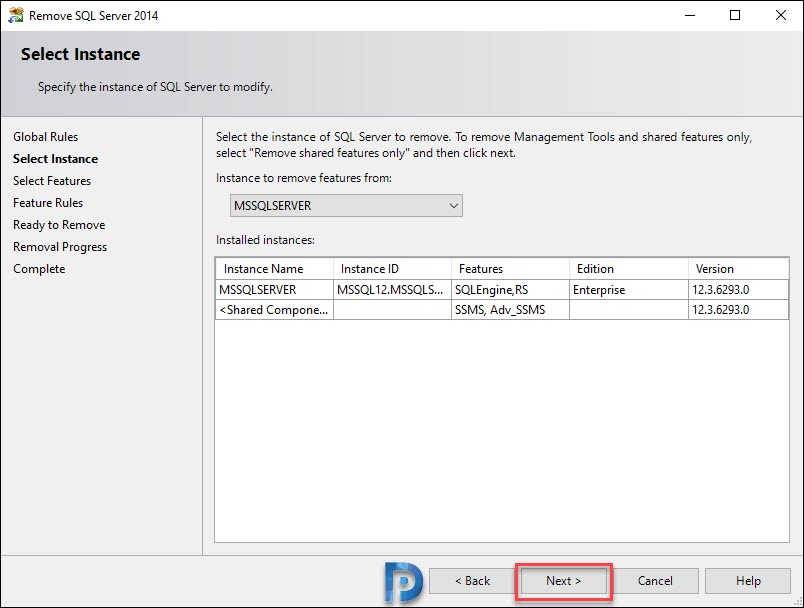
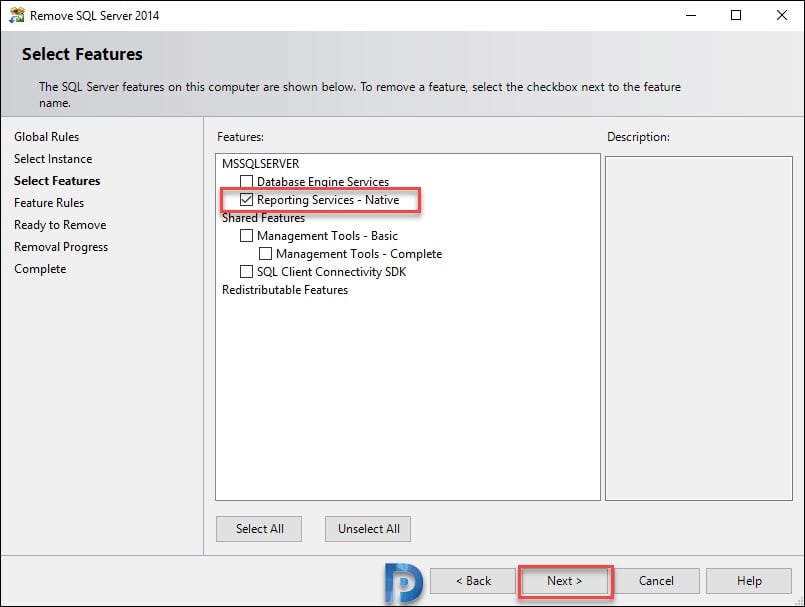
From the list of features, select Reporting Services – Native. Click Next.
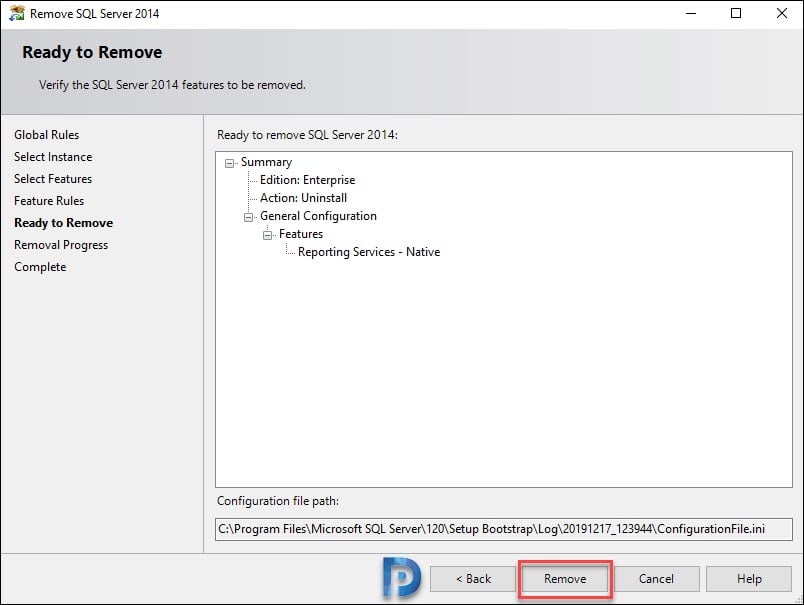
On the Ready to Remove page, click Remove.
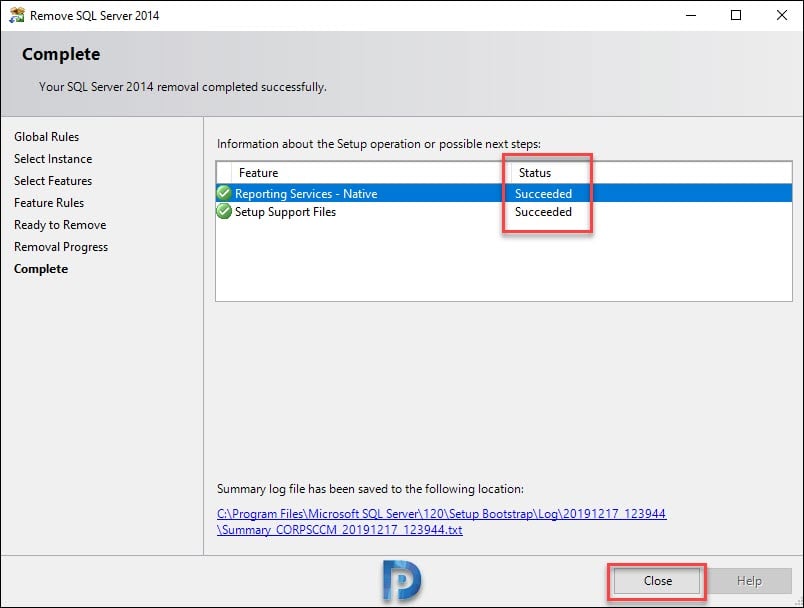
The SQL Server 2014 reporting services uninstallation is complete. Click Close.
Step 4 – Delete Report Server Database and Log files
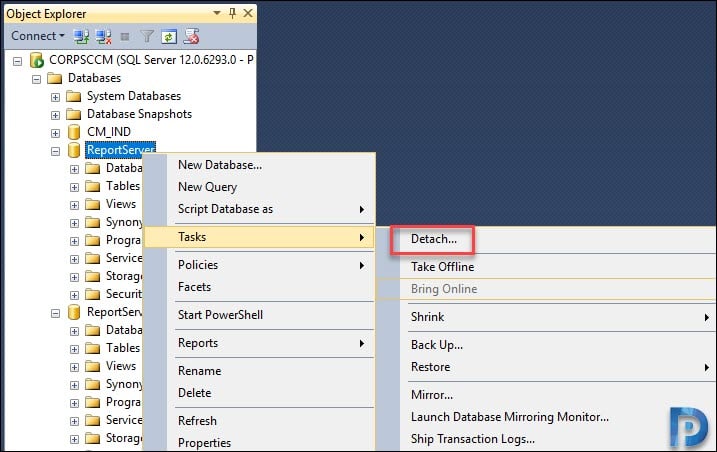
Connect to the SQL server using SQL Server Management Studio. You will find two databases that you need to delete – ReportServer and ReportServerTempDB.
Right click ReportServer and click Tasks > Detach.
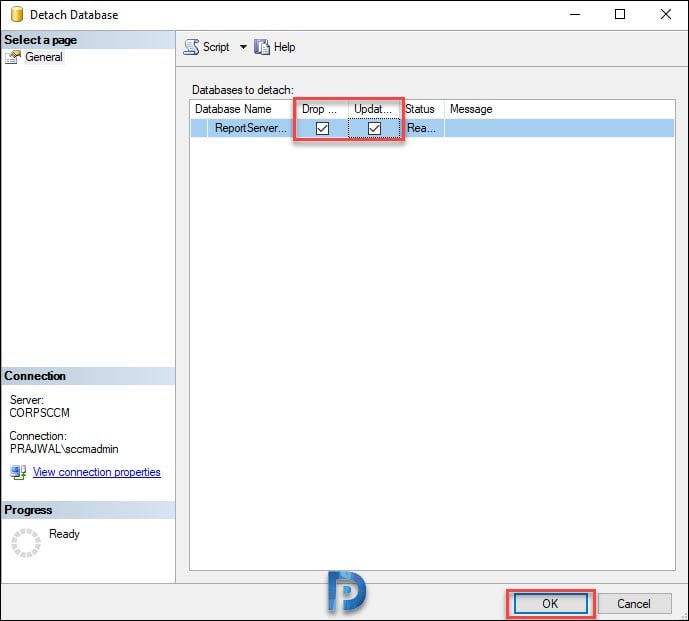
On the Detach Database window, check the box for Drop Connections and Update Statistics. Click OK.
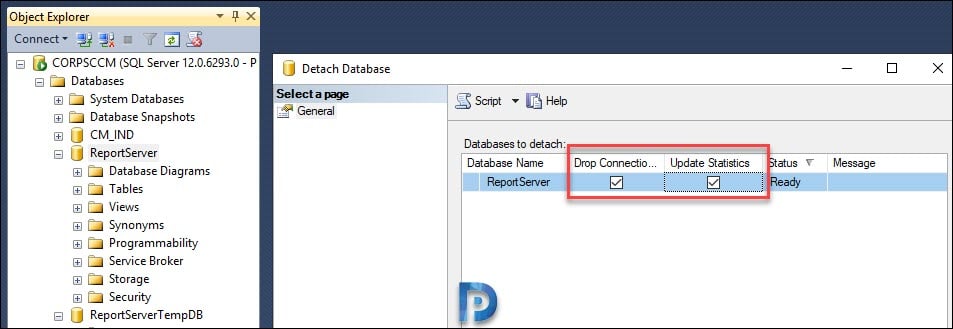
Next, detach the ReportServerTempDB using the same steps as above.

Select Drop Connections and Update Statistics. Click OK. Close the SQL management studio.
 After performing the above steps, you must delete ReportServer and ReportServerTempDB DB files and log files.
To do that go to C:\Program Files\Microsoft SQL Server\MSSQL12.MSSQLSERVER\MSSQL\DATA. Select ReportServer or ReportServerTempDB files and log files, delete them.

Step 5 – Stop Configuration Manager Services
Before you upgrade the SQL server, you must stop the Configuration Manager services. Go to Services console and stop the below services.

Step 6 – Upgrade SQL Server 2014 to 2017
To upgrade or perform in-place upgrade of SQL Server 2014 to SQL Server 2017.
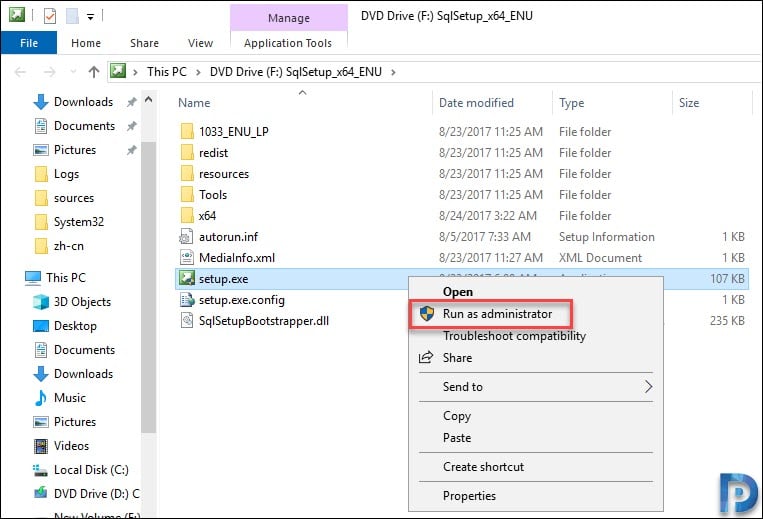
- Copy over the SQL Server 2017 media to the server.
- You can either mount the media or extract the SQL 2017 setup files to a folder.
- Right click Setup.exe and Run as administrator.
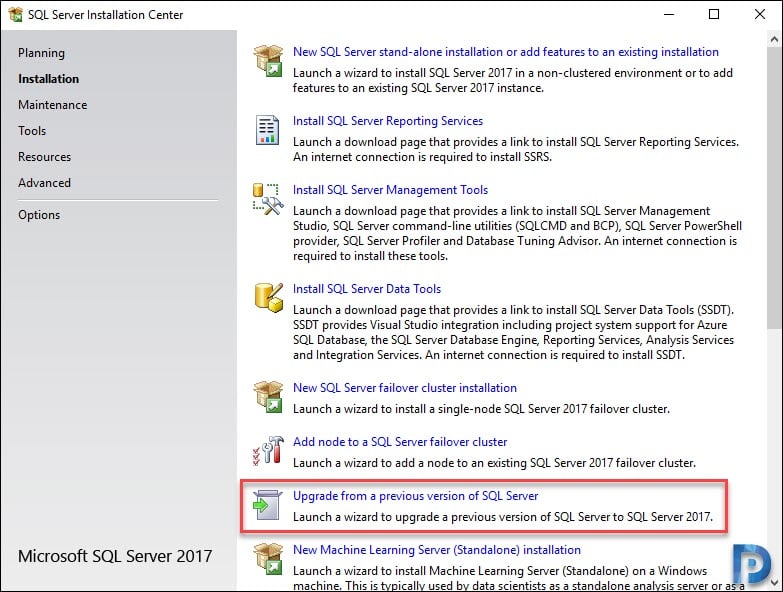
On the SQL Server Installation Center, click Installation. From the right pane, select Upgrade from a previous version of SQL Server.
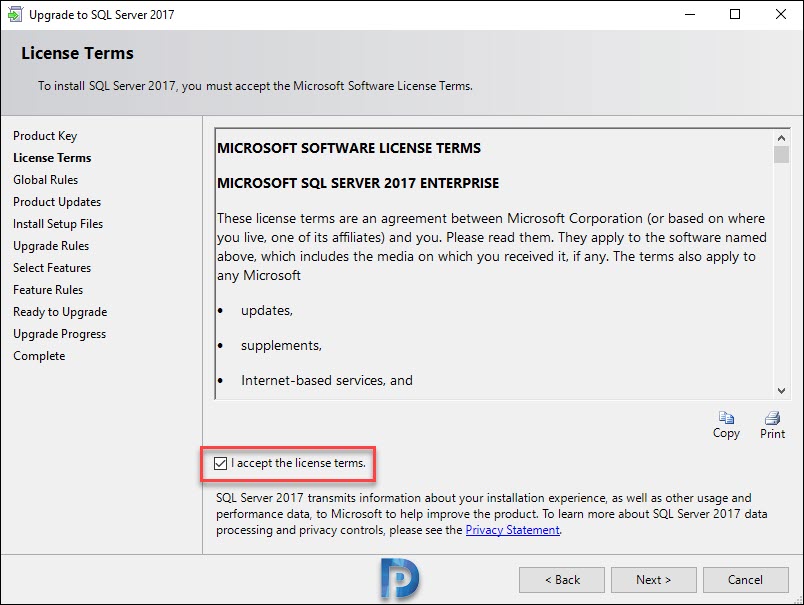
Accept the license terms and click Next.
One of the Rule failed here because a Server restarted is required. If you see this, restart your Server.

After the server restart, stop all the Configuration Manager Services because these services would be running post a server restart.
Back to SQL server 2017 upgrade, the global rules check completed successfully. On the Select Instance page, click Next.

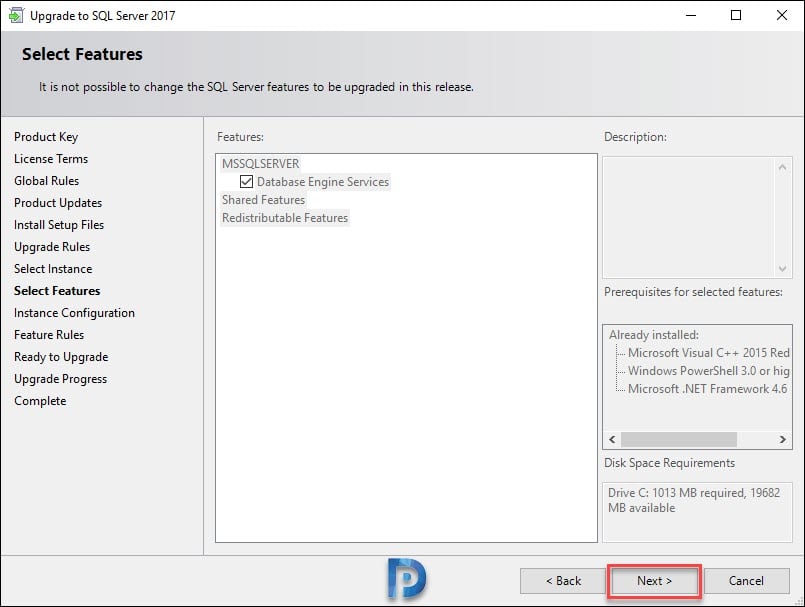
Select the SQL features to upgrade and click Next.
Click Next.

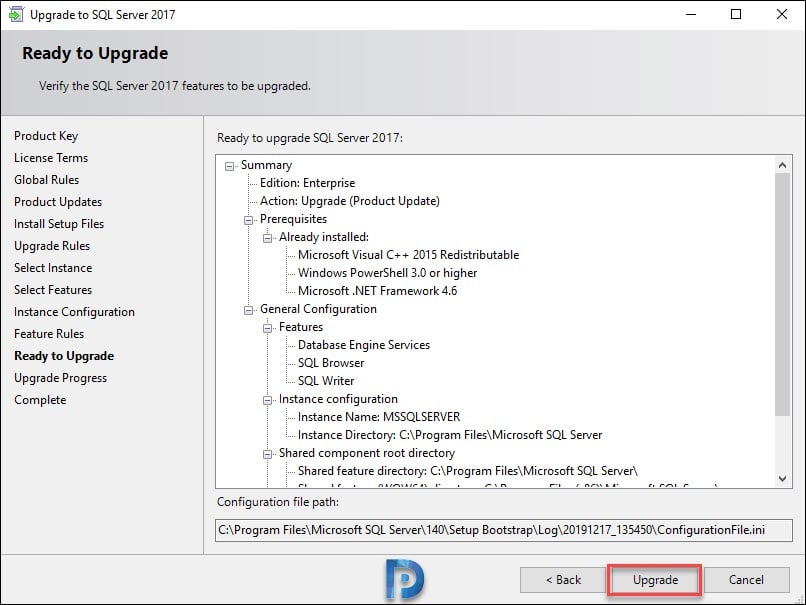
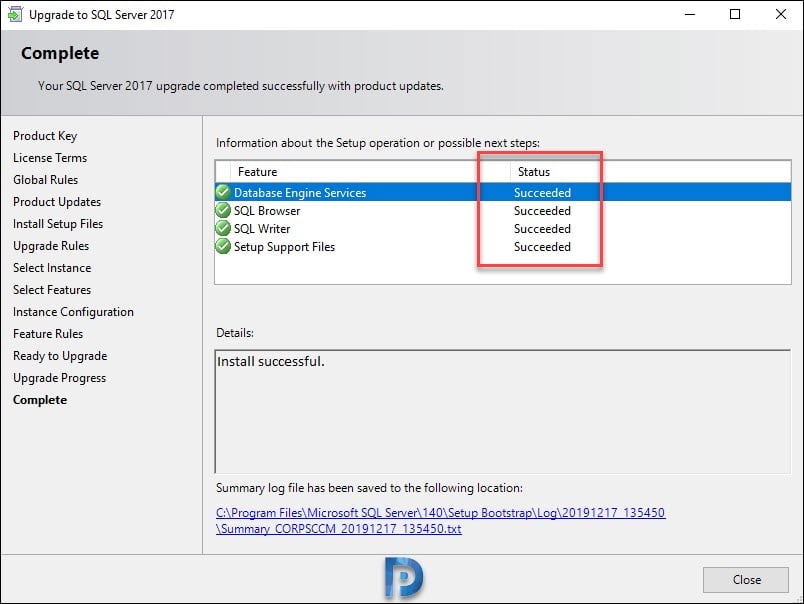
On the Ready to Upgrade page, click Upgrade.
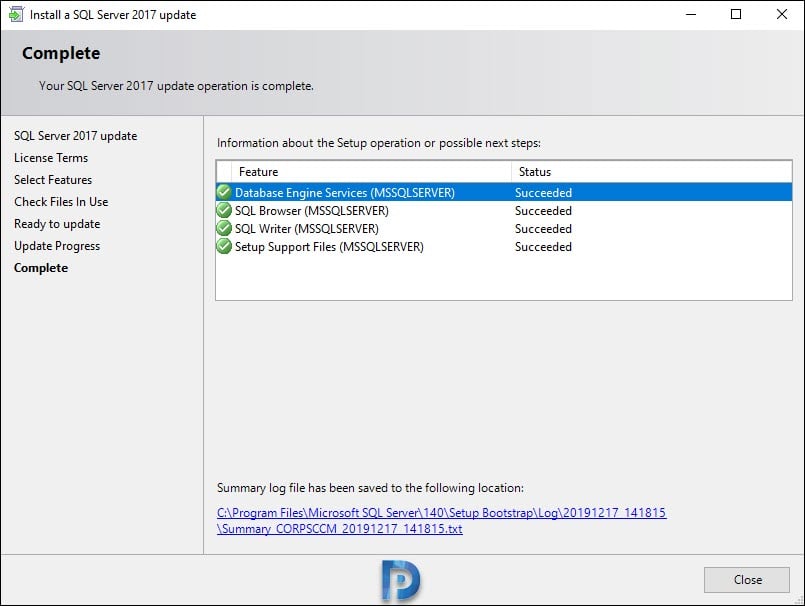
The SQL server upgrade is complete. We have successfully upgraded SQL Server 2014 to version 2017. Click Close.
Step 7- Install SQL Server 2017 Cumulative Update
If you read the supported SQL server versions for ConfigMgr 1910, it clearly states that you can use SQL Server 2017 version with cumulative update version 2 or higher. So do not forget to install the cumulative update when you upgrade to SQL 2017.
You can find the latest cumulative updates for SQL Server 2017 here. While writing this post, the cumulative update 18 KB4527377 for SQL Server 2017 is the latest one.
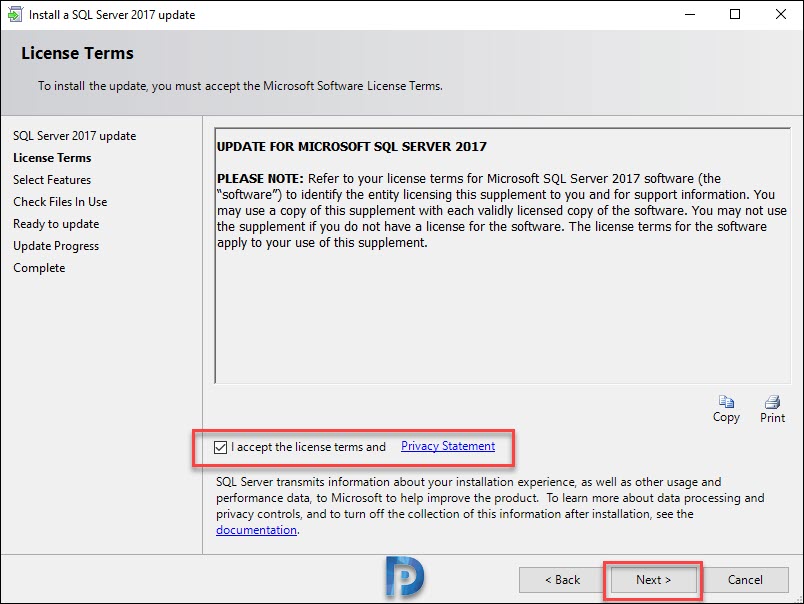
Download the cumulative update on the SQL server. Right click the update and click Run as administrator.
Accept the license terms and click Next.
On the Select Features page, Click Next.
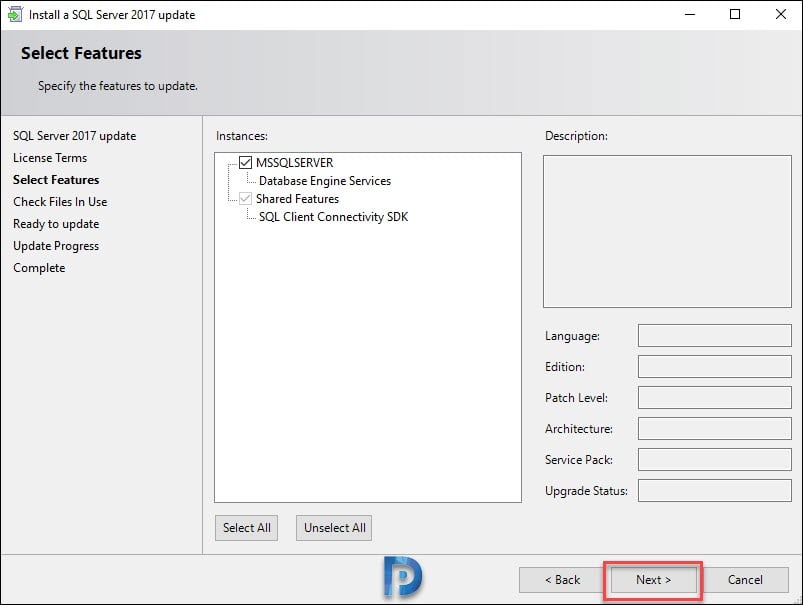
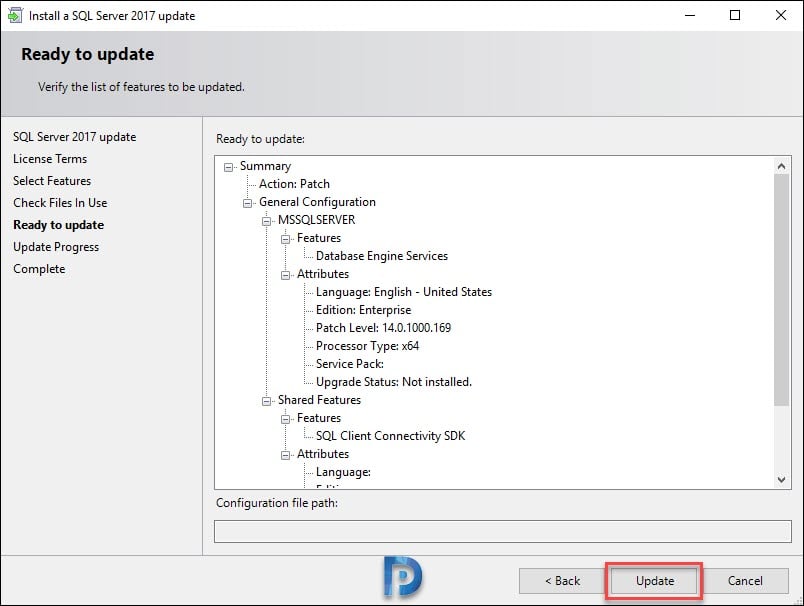
Click Update.
The SQL Server 2017 cumulative update 18 KB4527377 installation is complete. Click Close.
Step 8 – Re-Install the SQL Reporting Services
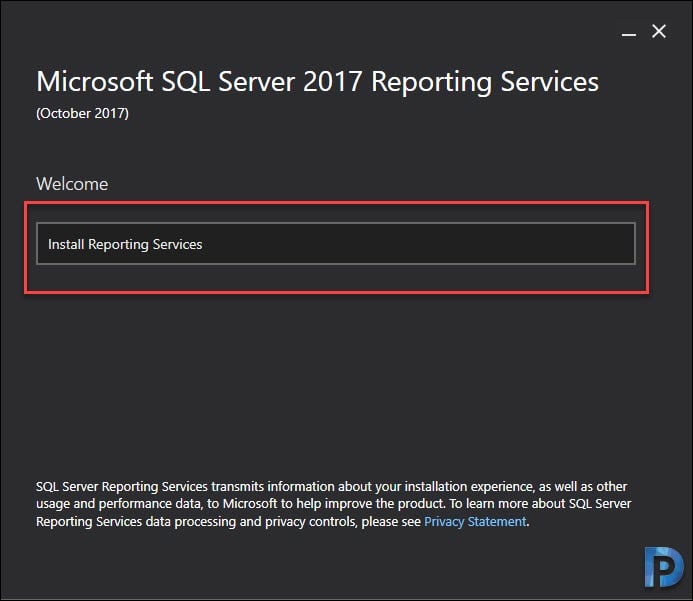
Download the latest version of Microsoft SQL Server 2017 Reporting Services from here. Run the Reporting Services and on the welcome screen click Install Reporting Services.
Accept the license terms and click Next.

Click Next.
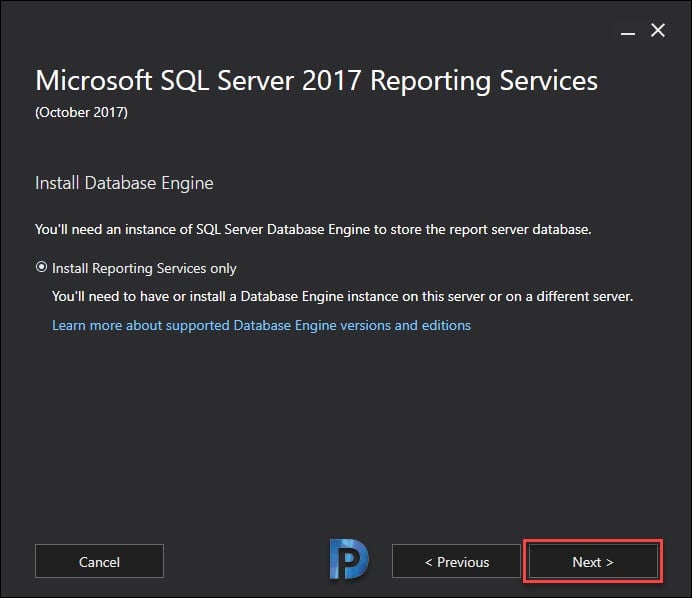
Don’t change anything here, click Install.

Step 9 – Configure the SQL Reporting Services
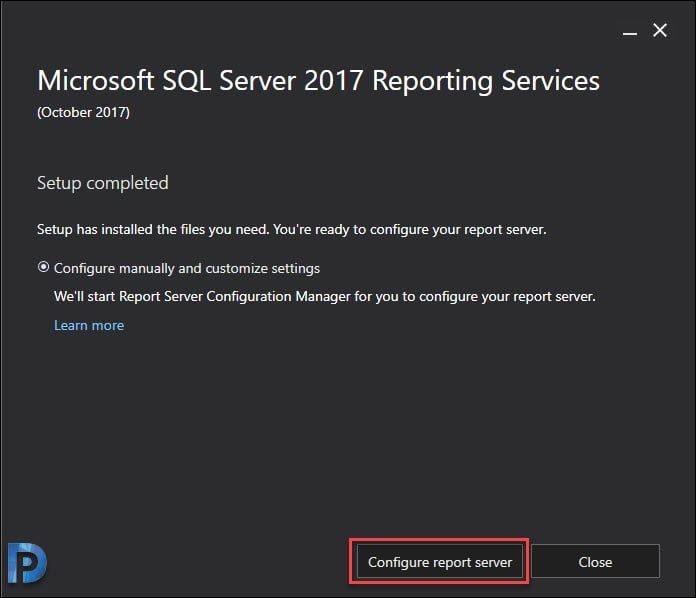
The Reporting Services installation is complete. However it is not configured yet, so click Configure Report Server.
Connect to the Report server instance by clicking Connect.

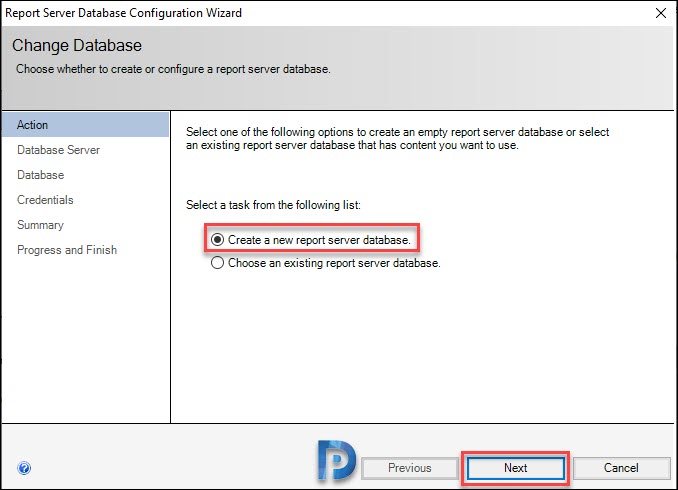
Click Database and under Current Report Server Database, click Change Database.

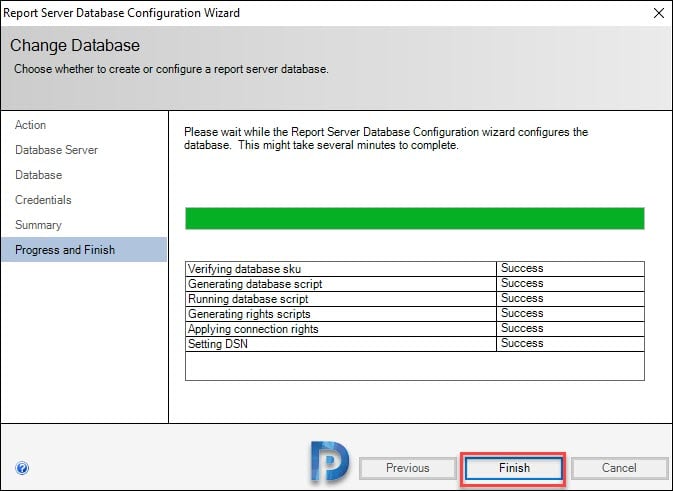
Since we have removed the reporting services database earlier, let’s create a new report server database. Select Create a new report server database and click Next.
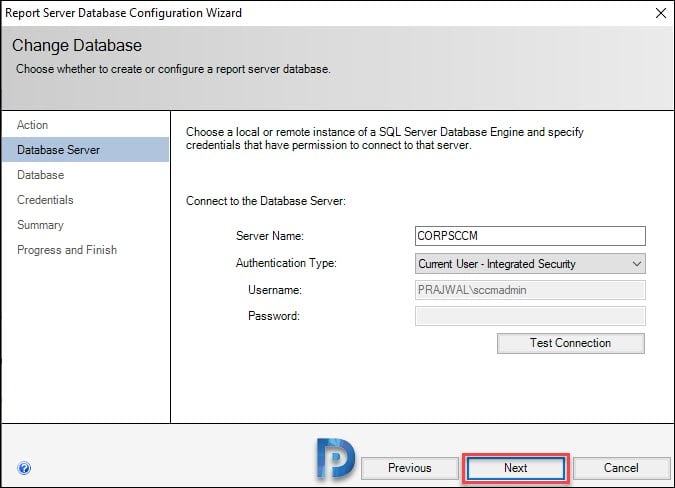
Specify the credentials to connect to the database server. Click Next.
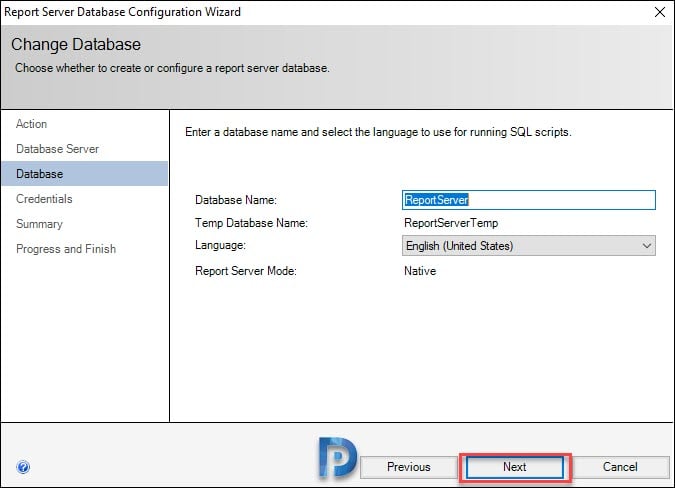
Leave the settings to default here and click Next.
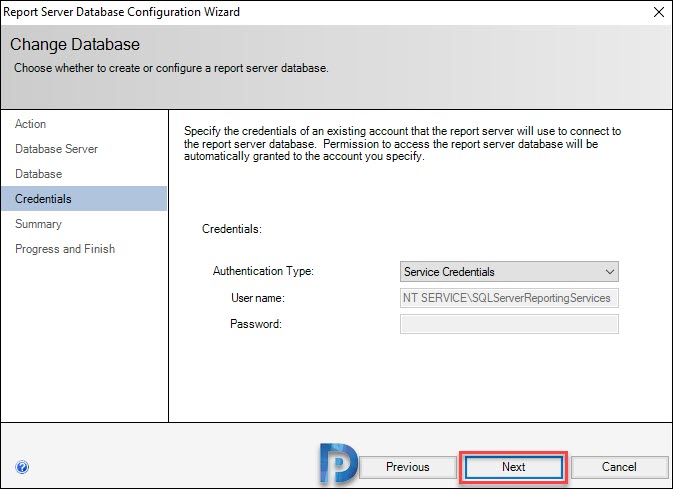
Specify the credentials that report server will use it to connect to report server database. Click Next.
Ensure all the steps show as Success. Click Finish.
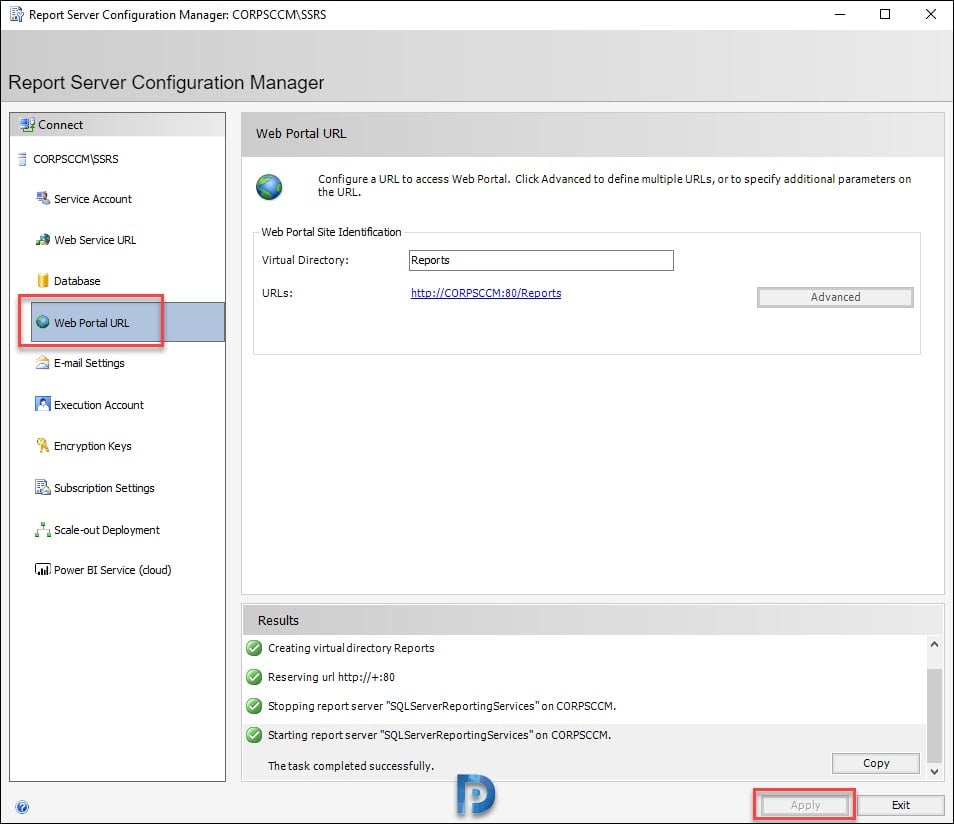
Select Web Service URL and click Apply.

Click Web Portal URL and click Apply.
Step 10 – Re-install Reporting Services Point role
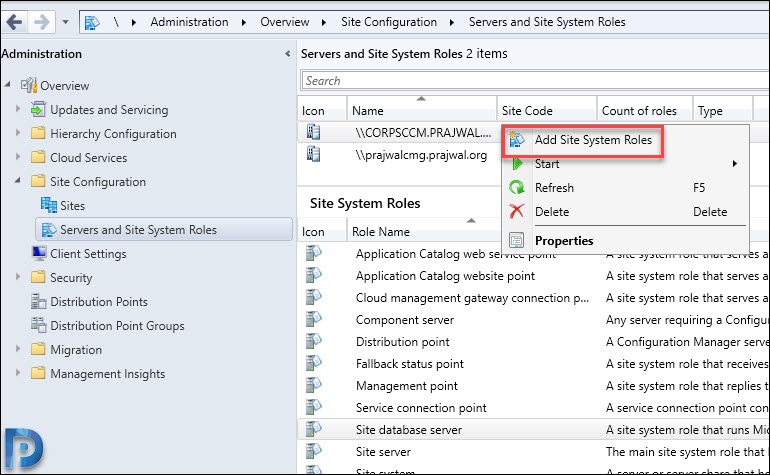
To re-install the Reporting Service Point role, open the SCCM console. Go to Administration > Overview > Site Configuration > Servers and Site System Roles.
Select the server on which you want to install Reporting services point role. Right click and choose Add Site System Roles.
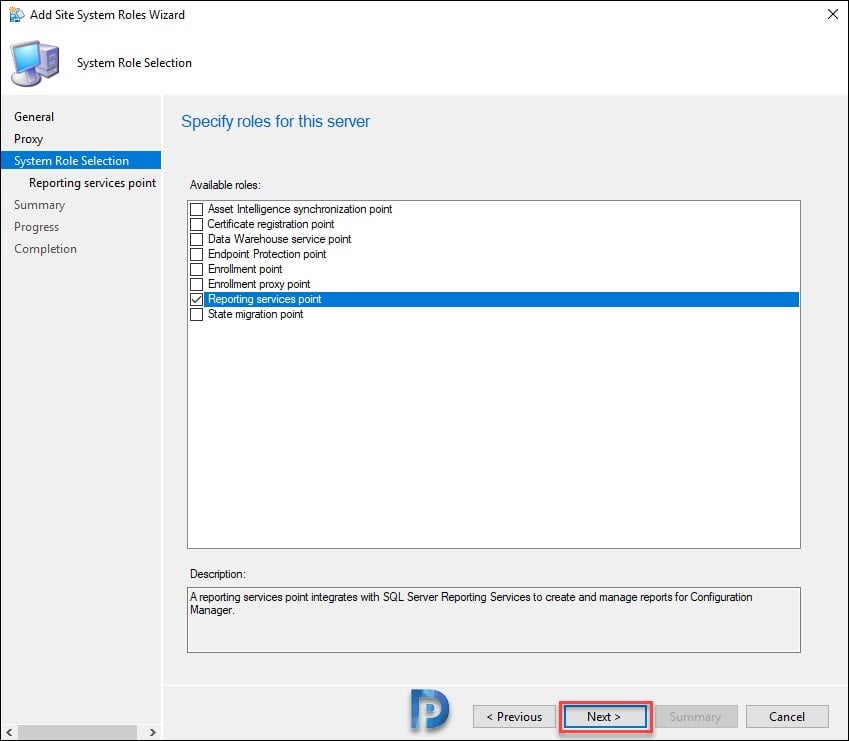
On the System Role Selection page, select Reporting Services Point. Click Next.
Specify the credentials using which SQL Reporting Services will connect to Configuration Manager site database. Click Verify and ensure you see Successfully verified message. Click Next.
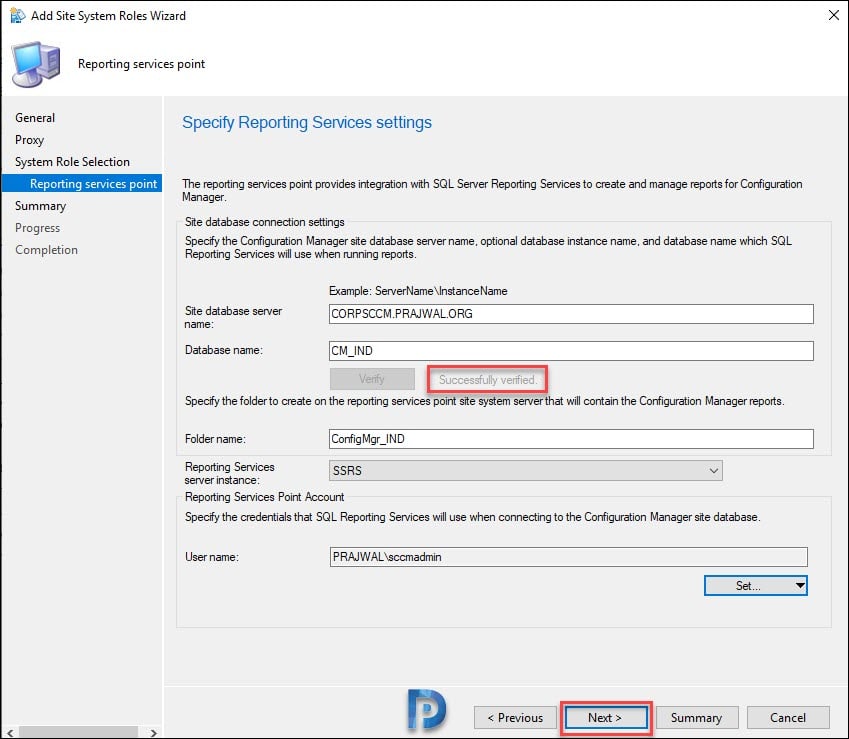
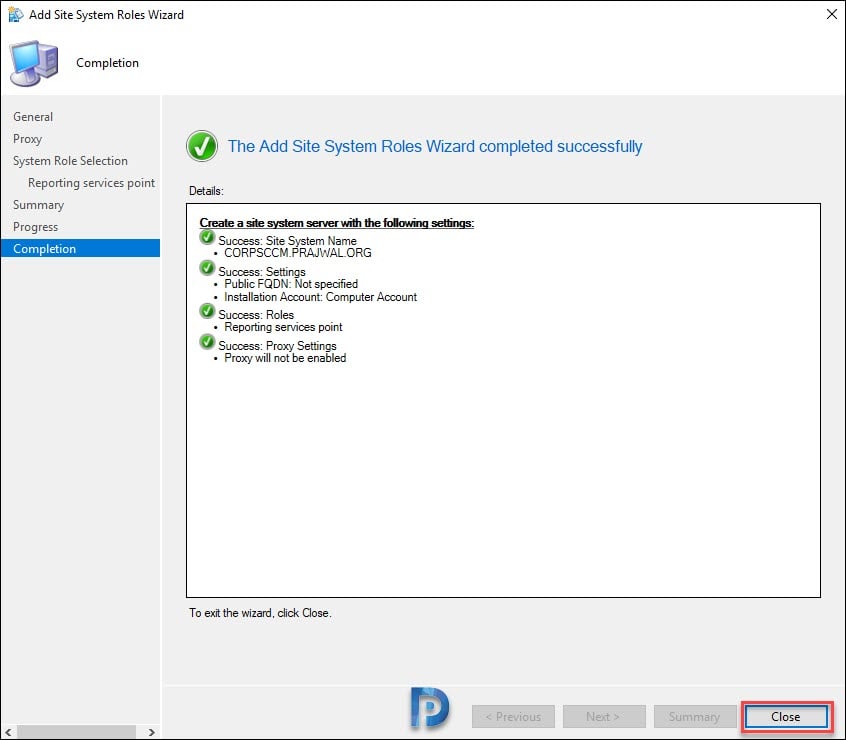
On the Completion page, click Close.
Step 11 – Start Configuration Manager Services
In the Step 5 we had stopped the Configuration Manager services. Now that we have completed the SQL server upgrade, you can start the services. Alternatively, you can restart the server once.
Open the browser and make sure you can access the reports.


Hi Prajwal, thank you for the guide. I’ve always wondered about how, during the SQL server upgrade, you’ve handled the SUSDB that is shown in your screenshots.
This is an awesome Blog, Step by Step without any issues. I upgraded from SQL 2012 to 2019.
Glad to hear that. Keep visiting the blog for more awesome posts.
Used your procedure to get from SQL 2012 SP4 right to SQL2019 CU14 on SCCM 1710. Worked flawlessly! Thanks. 🙂
Hello,
Do we need a key for the new Reporting Services, or can we use the Developer version?
After the Upgrade, I saw SQL Server Integration Service 12.0 Stopped and cannot be enabled, and raised the red flag on Server Dashboard. Do we need to uninstall SSIS 12.0, and what is the best practice in this case?
HI Prajwal, Can I Use the same process to 2019?
sccm sql server upgrade from 2014 to 2019
In your exercise, you removed the Reporting Services DB and Reporting Service TempDB. Can those DBs be upgraded when you upgrade from SQL 2014 to 2017 instead? Is there a particular reason why they needed to be removed?
I had the same question…
Thanks for the wonderful explanation. This is really helpful.
I have scenario where I need to perform edition downgrade from SQL server enterprise to standard edition for cost efficiency purpose.
But that server have reporting services also which I am failing to reconfigure after performing edition downgrade.
Will the same process(which you followed in your upgrade) for SSRS reconfigure works while edition downgrade or some different approach is required?
Can you please help me providing your expertise.
Thanks in advance
Hi, I have this scenario:
CAS and reporting with sql 2012
6 primary sites with sql 2012 version.
Is possible migrate the CAS SQL database and reporting database to sql 2017 keeping the 6 primary sites with sql 2012?
what about replication?
Thanks
Is it still necessary to remove Reporting Services and SSRS? The MS documentation doesn’t mention it.
https://docs.microsoft.com/en-us/mem/configmgr/core/servers/manage/upgrade-on-premises-infrastructure
Prajwal,
I just wanted to say “Thank you,” for all the help you’ve given me over the years. Your site is always the first site I go to, when I have SCCM questions…
Hi Prajwal,
Please confirm if old reportserver and reportservertempdb, also need to restore on upgraded database server to sql 2017.
Also confirm if encryption key backup also need to restore otherwise how reports will available without Db and encryption backup restoration
Thx for the guide, a walk in the park.
Are steps 10 and 11 flipped? Can you install a site role while the services are all stopped?
Hi,
I have upgraded my SCCM to 1910 today but my sql is still on 2012 version.
Above procedure applicable for upgrading sql 2012 to 2017 as well?
Yes you can use the same procedure to upgrade SQL server. Just ensure the upgrade path is supported.
For the SSRS Removal we will need to backup and reimport our Custom SSRS Reports. Then change the datasource on each report ?
Yes that’s right. If the report throws an error, you need to change the datasource on each report.