This guide will walk you through the steps to install Windows app using Intune. The new Windows App replaces the apps for Azure Virtual Desktop and Windows 365, simplifying the way to get to the Windows experience you know and love.
You can use the Windows App on various platforms and form factors, including desktops and laptops, tablets, smartphones, and through a web browser. When using a web browser on a desktop or laptop, you can connect without having to download and install any software.
Until now, you had to use separate apps to connect to your devices hosted in the Microsoft Cloud. Microsoft devised an excellent solution and released a single app known as the Windows app to securely connect to Windows devices and apps on your preferred device, including:
- Azure Virtual Desktop
- Windows 365
- Microsoft Dev Box
- Remote Desktop Services
- Remote PC
Note: The Windows app is currently in preview. The app undergoes multiple changes in preview versions. You can wait for the app to be made generally available for customers and then plan to deploy it using Intune.
Download Windows App
The Windows App is available for Windows, macOS, iOS, iPadOS, and web browsers. On your Windows 10/11 PC, you can get the new Windows app directly from the Microsoft Store. Ensure you enroll your Windows devices in Intune before performing the app deployment.
MacOS and iPadOS users can download and install the Windows App for macOS by going to Windows App in TestFlight. Prior to deployment, you must enroll your Macs in Intune.
If you are going to deploy Windows app on enterprise devices using Intune, the best option is to install it using the Microsoft Store app (new) method. All you need to do is add the Windows app from the Microsoft Store to Intune, configure the app information, and assign it to your user groups.
Features of Windows App
In terms of new features, there are many features that the Windows app provides to enhance your remote experience, which include:
- Multiple monitor support for your VM’s and Cloud PCs.
- Custom display resolutions.
- Dynamic display resolutions and scaling.
- Device redirection, such as webcams, audio, storage devices, and printers.
- Microsoft Teams optimizations.
- Pin your favorites to the taskbar.
- Switch between multiple accounts.
You can learn more about the Windows App by reading the documentation on the overview of the Windows App.
Install Windows App using Intune
Let’s see how to deploy Windows app using Microsoft Intune.
- Sign in to the Microsoft Intune Admin Center.
- Go to Apps > All Apps > Add.

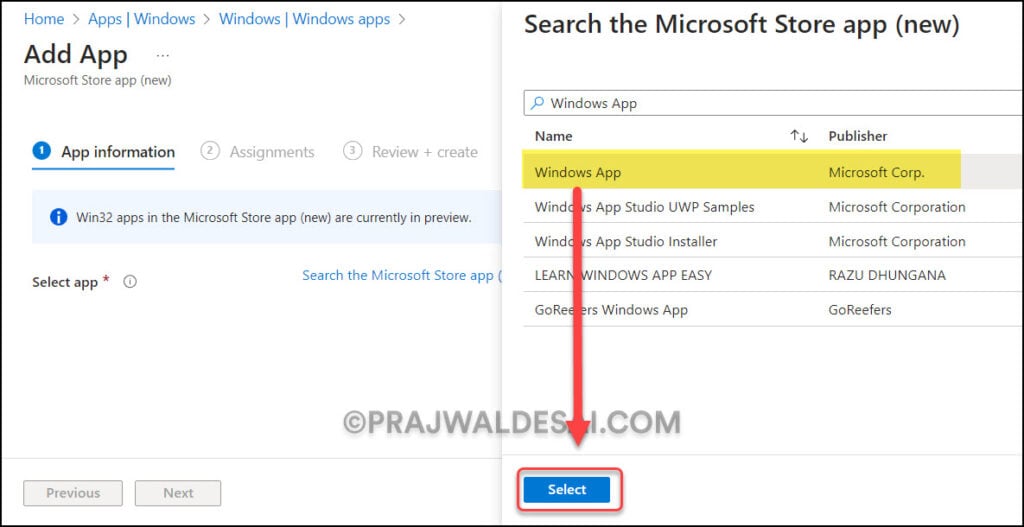
In the Select app type pane, select Microsoft Store app (new) under the Store app section. Choose Select at the bottom of the page to add an app from the Microsoft Store.

Before you add the Windows app to Intune, open the Microsoft Store app on your PC and use the search feature to find your app. This is to verify if the app exists in the Microsoft Store before you decide to add it to Microsoft Intune. Not all apps are available in all regions.
In the search box, type “Windows App,” and from the search results, select the Windows App.

On the app information tab of Intune, you can configure the details of a Windows app before deploying it with Intune. The best thing about the Windows UWP Store app is that most of the details are already filled in from the app, so there’s not much you need to change. Microsoft has already set the app’s name, description, and publisher information, for instance.
You can include a logo for Windows app and the icon will appear for users upon launching the company portal app. Notice that the installation behavior for the Windows app is set to User by Intune. We’ll leave this to default and assign the app to user groups. Once you have configured the app details, click Next.

You can choose how you want to assign Windows apps to users and devices, and there are three options:
- Required: The Windows app is installed on devices in the selected groups.
- Available for enrolled devices: Users install the app from the Company Portal app.
- Uninstall: The Windows app is uninstalled from devices in the selected groups.
In the below example, we have assigned the Windows app as “Required” to a user group. Once you have finalized the assignments, click Next.

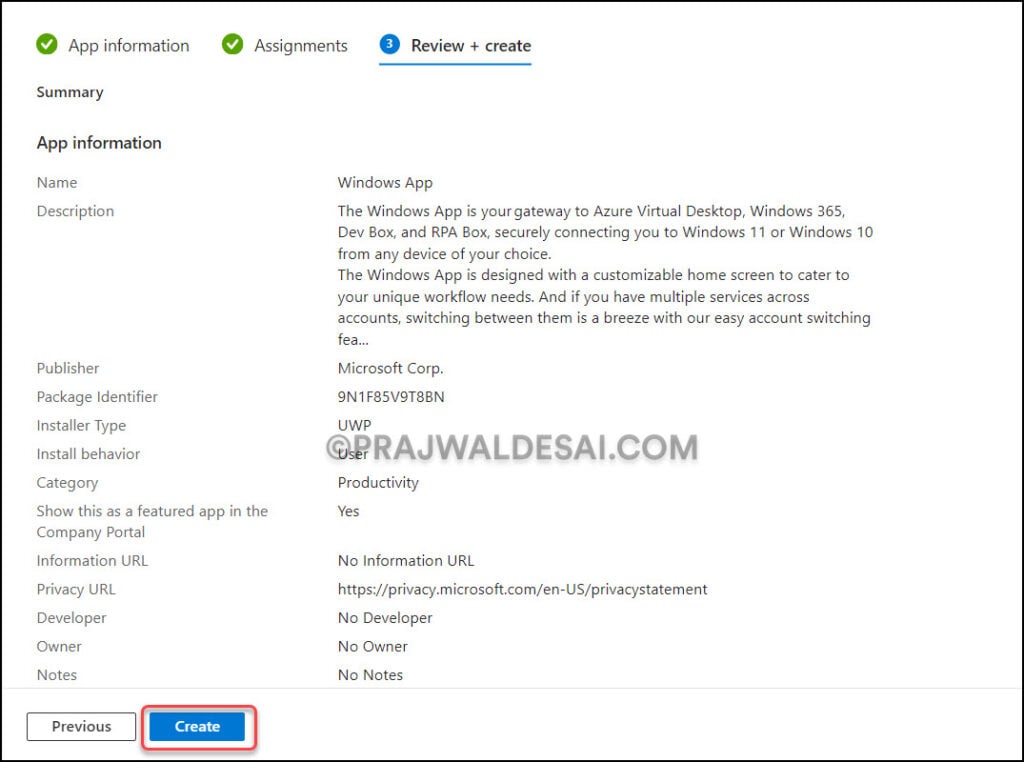
Review the configuration for the Windows app deployment. When you are done, click Create. You’ll see a notification confirming the “Windows app” application has been created successfully in Intune.

Trigger Intune Policy Sync Manually
After you have assigned the Windows app to specific groups, you must wait for the deployment to take effect. The devices will get the app when they check in with the Intune service. You can also force sync Intune policies on your computers in case you don’t find the Windows apps installed on the devices or listed in the company portal for users.
See also how to resolve Intune Company Portal issues if you encounter issues with the company portal app.
Monitor Windows App deployment in Intune
In the Intune admin center, you can monitor the app deployment to find out how many users or devices had successful installations of apps and how many failed or were not installed. It is important to ensure the deployments are successful. From the list of apps, select the Windows app, and on the Overview blade, you can monitor how many users or devices have successfully installed the newly deployed Microsoft Store app.
In the screenshot below, on most of our Windows devices, the Windows app has been installed successfully. In case the Windows app deployment fails on devices, you’ll need to troubleshoot it by reviewing the Intune logs on Windows devices.

End User Experience
Once the Windows UWP app is installed on your Intune-managed Windows device, users can launch the app by clicking on Start and selecting Windows App.


