

In this article, we’ll cover the steps to deploy ManageEngine Endpoint Central agent using Intune. Endpoint Central Agent can be packaged and deployed as a Win32 app via Microsoft Intune on Windows 10 and 11 devices.
Endpoint Central by ManageEngine is a unified endpoint management solution that helps manage servers, laptops, desktops, smartphones, and tablets from a central location. You can automate regular endpoint management activities, standardize OS and application configurations across your network, and secure endpoints from a wide range of threats.
This Endpoint Central agent is also known as a desktop central agent or a ManageEngine UEMS agent. Endpoint Central was formerly known as Desktop Central. For Endpoint Central to manage remote Windows devices, the Endpoint Central agent needs to be installed.

We have covered numerous guides about setting up and configuring Desktop Central on this site. Because the desktop central product has been renamed Endpoint Central, we will go over the most recent procedure for deploying agents via Microsoft Intune.
Ways to Install Endpoint Central agent
Endpoint Central is a client-server model that manages all the endpoints in an enterprise from a centralized location. These are the various agent installation methods available for desktop management.
Broadly, there are four ways to install Endpoint Central Agent on Windows devices:
- Use the Web console to install agents remotely on remote office computers by adding the domain details.
- Use Group Policy (GPO) to run a start-up script and install the agent.
- Endpoint Central agent deployment using SCCM (Configuration Manager)
- Use Microsoft Intune to deploy ManageEngine Endpoint Central Agents
Out of all the methods listed above, we will use Intune to package and deploy the Endpoint Central Agent to Windows devices.
Deploy ManageEngine Endpoint Central Agent using Intune
The Endpoint Central agent deployment involves numerous configurations, and hence we have split the entire deployment into steps. This will make it easier for Intune administrators to package and deploy the Endpoint Central Agent to Windows devices.
Step 1: Download ManageEngine Endpoint Central Agent
The first step is to download the ManageEngine Endpoint Central Agent for packaging. You can download the agent from the Endpoint Central web console.
- Sign in to the Endpoint Central console.
- On the top bar, select Agent.
- Under Deployment, select the SoM Policy tab and click on Download Agent.

On the Download Agent pop-up, select the following:
- Remote Office: Choose the office name to download the agent
- Install: Agent
- Platform: Choose Windows.
Click on the Download Agent button. The browser now downloads the LocalOffice_Agent.exe file, which is nothing but the Endpoint Central Agent installer. It is an executable file that you can use Intune or SCCM to deploy.

Step 2: Create EndpointCentralAgent.intunewin file for deployment
In this step, we will use the Microsoft Win32 content prep tool to repackage the Endpoint Agent installer (LocalOffice_Agent.exe) to an EndpointCentralAgent.intunewin file. After you repackage the LocalOffice_Agent.exe to the .intunewin file, you can distribute it as a Win32 app using Microsoft Intune.
If you’re new to Win32 apps in Intune, we recommend going through the following guide that explains the process of deploying Win32 apps using Microsoft Intune.
Download the Microsoft Win32 content prep tool from Microsoft GitHub in case you haven’t done it already. Extract the Microsoft-Win32-Content-Prep-Tool-master.zip to a folder using WinRAR or a zip extractor. The extracted folder contains IntuneWinAppUtil.exe and license terms for the Win32 content prep tool.
To begin with, we have placed the LocalOffice_Agent installer and UninstallEndpointCentralAgent.ps1 in a folder on the server. There is also a PowerShell script that will help us remove the endpoint central agent. Although it is not required, this script can be used if an organization wishes to remove the agent. Both files will be repackaged by the Win32 content prep tool as EndpointCentralAgent.intunewin in the next step.

You can create a text document and paste the below code to uninstall the endpoint central agents. Save this file as UninstallEndpointCentralAgent.ps1.
$app = Get-WmiObject Win32_Product | where { $_.name -eq "ManageEngine UEMS - Agent" }
$app.Uninstall()

Launch the command prompt as an administrator and initiate the IntuneWinAppUtil. To create the EndpointCentralAgent.intunewin file, we have specified the following details:
- Please specify the source folder: E:\Sources\Applications\EndpointCentralAgent
- Please specify the setup file: LocalOffice_Agent.exe
- Please specify the output folder: E:\Sources\Applications
- Do you want to specify catalog folder (Y/N)?: Type N

The Win32 content prep tool now repackages the LocalOffice_Agent.exe to LocalOffice_Agent.intunewin. We have renamed the LocalOffice_Agent.intunewin file to EndpointCentralAgent.intunewin to make it easier for deployment.

Step 3: Create Win32 App for Endpoint Central Agent deployment
In this step, we will create a Win32 app for Endpoint Central Agent deployment in the Intune admin center. Use the following steps to upload EndpointCentralAgent.intunewin as a Win32 app to Intune:
- Sign in to the Microsoft Intune admin center
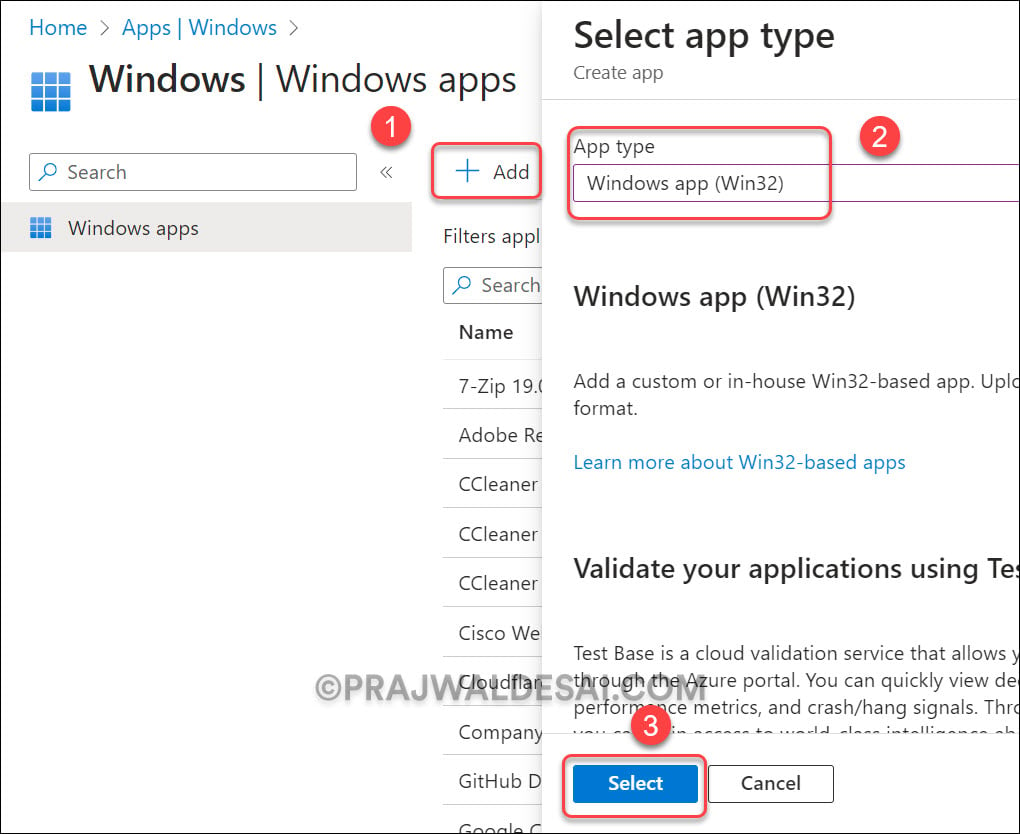
- Select Apps > Windows > Windows Apps.
- Click +Add and select the app type as a Windows app (Win32).
On the Add app pane, click Select app package file. On the app package file pane, select the browse button. Then, select the EndpointCentralAgent.intunewin file. The app details appear on the screen populated by Intune. When you’re finished, select OK.

Step 4: Configure App Information
In this step, we’ll configure the app information, which includes providing basic details about the Win32 app. Specify the app name as “ManageEngine Endpoint Central Agent.” Add a brief description, such as “Install Endpoint Central Agent on Windows devices.”
Specify the publisher name, which is ManageEngine in our case. Next, you can specify the App version, app category, etc. You may choose to display this as a featured app in the company portal by turning that slider to Yes.
Scroll down until you find the option to specify the application logo. This logo icon is displayed with the Endpoint Central Agent when users browse through the company portal. We recommend specifying the logo here because it makes it easy for users to identify the applications via the logo. Click Next.

Step 5: Configure Program Details
In the Program tab, you specify the installation command, uninstall command and device restart behavior for the ManageEngine desktop central agent. These are important details that you must supply before you deploy Win32 apps with Intune. Win32 apps will experience error 0x80070002 if the installation or uninstall command is entered incorrectly.
- Install Command: .\LocalOffice_Agent.exe /silent
- Uninstall Command: powershell.exe -ExecutionPolicy Bypass -File .\UninstallEndpointCentralAgent.ps1
- Installation time required (mins): 60 minutes
- Allow available uninstall: Yes
- Install Behavior: System
- Device Restart Behavior: No specific action
Click Next to continue.

Step 6: Requirements
On the Requirements tab, specify the requirements that Windows devices must meet before the Endpoint Central Agent is installed. In the screenshot below, the following requirements are specified:
- Operating system architecture: 64-bit
- Minimum operating system: Windows 10 20H2
Click Next to continue.

Step 7: Detection Rules for Endpoint Central Agent
When you install the Endpoint Central agent using Intune, the detection rules are critical. You can choose to either manually configure the detection rules or use a custom script to detect the presence of the app. You must select at least one detection rule, and this is compulsory.
To specify a detection rule, you must know the location where the application is installed. When you manually install the UEMS agent, the agent installation files are located in the C:\Program Files (x86)\ManageEngine\UEMS_Agent folder. For the detection method, you can either use a folder or a file to specify whether the application is installed or not.
In the screenshot below, we will use the dcagent.dll file in the agent detection rule. You may use any other file or folder, but make sure you select the proper one.

We have defined the following detection rule to detect the presence of an endpoint central agent on Windows devices:
- Rule Type: File
- Path: C:\Program Files (x86)\ManageEngine\UEMS_Agent
- File or Folder: dcagent.dll
- Detection method: A file or folder exists
- Associate with a 32-bit app on 64-bit clients: Yes
Select OK and click Next.

Step 8: Dependencies
You can specify app dependencies for the applications that must be installed before the desktop central agent installs. Any Win32 app dependency needs to also be a Win32 app. It doesn’t support depending on other app types, such as single MSI LOB apps or Microsoft Store apps.
In the screenshot below, we haven’t specified any app dependencies. Click Next.

Step 9: Supersedence
When you supersede an application, you can specify which Win32 app will be updated or replaced. We are not going to configure Supersedence for this app. Click Next.

Step 10: Assignments
On the Assignments tab, you can select the Required, Available for enrolled devices, or Uninstall group assignments for the app. Click on the +Add group and specify the Entra ID groups to target the endpoint central agent deployment. Click Next.

Step 11: Review + Create
On the Review+Create tab, go through the values and settings that you entered for the ManageEngine Endpoint Central Agent. Verify that you configured the app information correctly. Select Create to add the Endpoint Central Agent to Intune.
Keep an eye on the notifications, as these are essential. Look for the final notification that says, “Application upload finished.” This confirms that the Endpoint Central agent application was successfully created in Intune.

Sync Intune Policies on devices
When you assign a policy or app through Intune, it takes some time to apply it to the devices within the targeted groups. You can wait for the policy settings to apply, or to accelerate the sync, you can manually sync Intune policies on your Windows computers to sync with Intune. You can also use PowerShell to sync the Intune policies on Windows devices.
Monitor Endpoint Central Agent Deployment
After you have deployed the ManageEngine Endpoint Central Agent to Windows devices, you can monitor the overall status in the Intune admin center. To monitor the configuration profile deployment, select the “ManageEngine Endpoint Central Agent” app, and the overview tab shows the Windows devices on which the agent has been successfully installed.
On the same screen, you will also learn about the devices on which Win32 app deployment failed, as well as the specific error code. Additionally, whenever you encounter failures for Endpoint central agent installation, we recommend reviewing Intune logs on Windows devices for troubleshooting.
In the below screenshot, we see that three of our Windows devices have successfully installed the ManageEngine Endpoint Central Agent. There were no app installation failures that we encountered.

Verify the Agent Installation
Let’s check if Intune was successful in installing the Endpoint central agent on our Windows devices. To confirm the agent installation, sign in to a Windows PC and launch the control panel. To view the list of installed programs, select Programs and Features. From the list of programs, we see the ManageEngine UEMS – Agent has been installed.This demonstrates that endpoint central agent deployment via Intune was accomplished successfully.

Uninstall Endpoint Central Agent using Intune
After you have successfully rolled out the Endpoint Central agent to your Windows devices using Intune, let’s test the agent uninstallation. In case your organization decides to remove the endpoint central agents, it can be done easily with Microsoft Intune
Remember that in Step 2 of this article, we created the EndpointCentralAgent.intunewin file, which included UninstallEndpointCentralAgent.ps1 as well. This script removes the ManageEngine UEMS agent from Windows devices.
Use the following steps to remove ManageEngine Endpoint Central Agents using Intune:
- Sign in to the Microsoft Intune admin center.
- Go to Apps > Windows Apps. From the list of apps, select ManageEngine Endpoint Central Agent.
- Go to Properties and edit the Assignments.
- Under the “Uninstall” section, select +Add Group and include the device groups to uninstall the endpoint central agent.
After you make the above changes, click on Review+Save.

Once the Windows devices sync with Microsoft Intune, the Endpoint Central agent uninstallation begins. In the screenshot below, out of four devices that had the endpoint central agent installed, on two of the devices, the agent was uninstalled.


Hi PD,
Is the uninstall script mandatory to be added with agent win32 app?
Hi Prajwal, awesome guide. Do the clients need a reboot upon the agent installation?