This article will provide you with instructions on how you can boot Windows 11 into Safe Mode. You can boot into safe mode on Windows 11 PC using different methods.
If you’re having trouble starting your Windows 11 PC, booting it into safe mode will help. Safe mode can help you troubleshoot problems on your PC. Windows 11 safe mode temporarily disables drivers and features to make your PC more stable.
With Windows 7 and earlier operating systems, you boot into the safe mode by pressing F8 key during the startup. This functionality is now removed in Windows 11. Instead, Windows 11 will boot into safe mode automatically when it detects issues with installed operating system.
For example, you have installed an application or set of drivers that was incompatible with Windows 11 and led to BSOD. In such situations, Windows 11 will boot into safe mode automatically on next reboot.
Methods to Boot into Windows 11 Safe Mode
On a Windows 11 PC, you can boot into safe mode using 2 methods:
- Restart Windows 11 PC from Start menu and enter safe mode.
- Using the Settings app in Windows 11 to enter the safe mode.
If you have installed Windows 11 on a VM, booting a Windows guest operating system VM into Safe Mode is effortless. You restart the virtual machine and when the computer starts, you press and hold F8.
Tip: To know more about the safe mode, read the following article.
How to Boot Windows 11 into Safe Mode
The steps to boot your Windows 11 PC into safe mode are as follows. Click Start on Windows 11 and then select Settings.

Select System > Recovery.

Under Recovery options, next to Advanced startup, select Restart now. Your Windows 11 PC will now restart to allow you to change startup settings, including starting from a disc or USB drive.

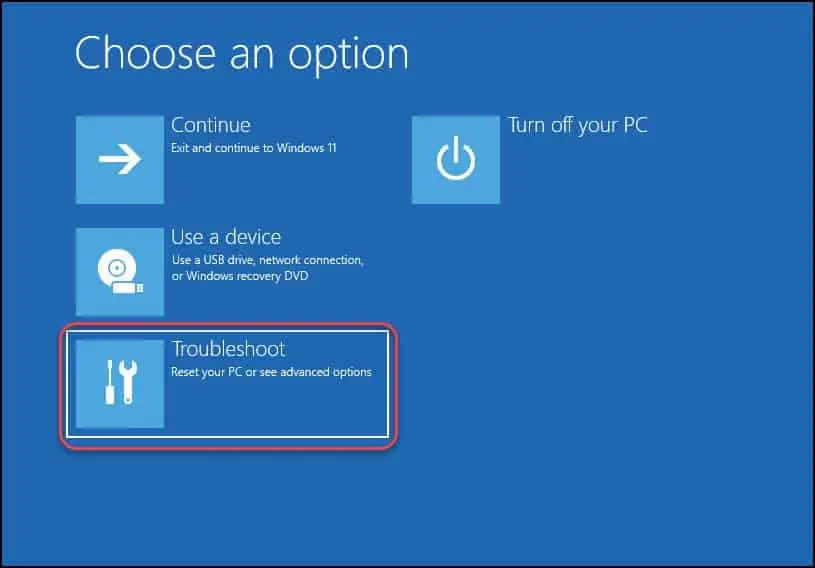
Windows 11 will now shut down and restart into a blue colored screen listing options such as:
- Exit and continue to Windows 11
- Use a Device
- Troubleshoot
- Turn off your PC
From the list of options, select Troubleshoot.

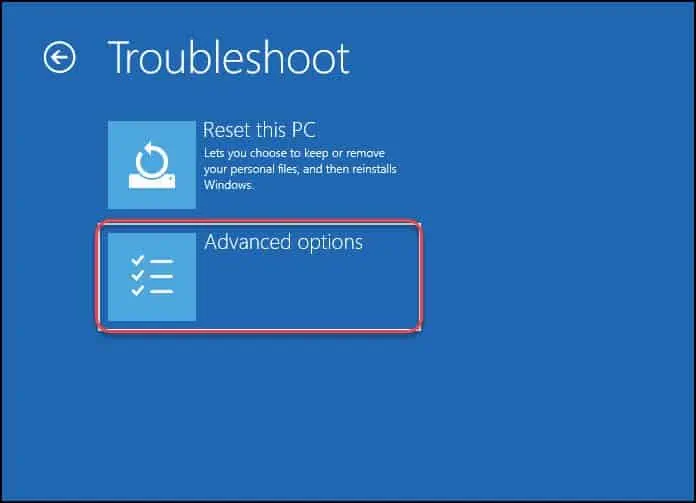
On the Troubleshoot screen, you can either choose Reset this PC option to reset Windows 11 PC or select Advanced options. The Windows 11 safe mode options are included in Advanced Options, so select this option.

On the Advanced options screen, you will find many useful options to troubleshoot Windows 11 issues:
- Startup Repair
- Startup Settings
- Command Prompt
- Uninstall Updates
- UEFI Firmware Settings
- System Restore
From the list of options, select Startup Settings.

On the Startup Settings screen, you see a list of Windows options that are made available when you click Restart. The Enable Safe Mode option is included among the startup settings. Click Restart.

All the Startup Settings are now enabled, and you can choose each option with a number associated. For example, to Enable Safe Mode, you can type “4” on your keyboard which will boot Windows 11 into Safe Mode.
The option 5 is for Enable Safe Mode with Networking and option 6 is for Enable Safe Mode with Command Prompt.
Generally, you’ll want to press 4 or 5 here, but option 6 can be useful for advanced troubleshooting if you’re good with the Windows command line.

After you have made the selection, the Windows 11 will now boot into safe mode. Your display will be at a lower resolution, and Windows will replace your desktop image with a black background that shows “Safe Mode” in the corners.
You can now start troubleshooting Windows 11 issues being in safe mode. Once you finish your troubleshooting, restart the PC and next time, your Windows 11 PC will start in normal mode.


