


In this article, you’ll learn how to enable Windows 11 administrator account. You can enable or disable administrator account in Windows 11 using multiple methods.
When you install Windows 11, by default, the built-in administrator account is disabled. You don’t know what Windows 11 administrator password is.
Windows 11 is the latest operating system by Microsoft and if you are upgrading from Windows 10, wait until you are notified through Windows Update that the upgrade is ready for your PC.

Note: Before installing, please refer to the PC Health Check app to confirm your device meets the minimum system requirements for Windows 11. Also check the Windows release information status for known issues that may affect your device.
This article covers multiple methods to enable administrator account in Windows 11. The same methods will also work if you want to enable administrator account on Windows 10.
Read: Multiple methods to upgrade to Windows 11
Why is the Windows 11 administrator account disabled?
The built-in administrator account on Windows 11 is disabled because it is not required and enabling it could impose a security risk.
Many organizations disable administrator account via group policy to secure their infrastructure. However, advanced users such as system administrators and network administrators may sometimes need the account to troubleshoot problems and manage system settings.
Even when you install Windows 11 on your laptop or home PC, the administrator account is disabled. You are required to create a new user account to log in to Windows 11. This user account is automatically added to local administrators group and gives you Windows 11 administrator permission.
Learn: How to Add User or Groups to Local Admin in Intune
Whether you have Windows 11 Pro, Enterprise or Home edition, you can use any of the methods covered in this guide to enable Windows 11 Administrator account.
Enable Administrator Account in Windows 11 using Command Prompt
The easiest method to enable the Windows 11 administrator account is by using the Command Prompt. Here are the steps:
1. Type Command Prompt on the Windows search box, select Run as Administrator.

2. On the CMD prompt window, enter the command net user administrator to check the status of Administrator account.
The Account Active = No confirms that the administrator account is disabled. Proceed to next step to enable the account.

3. Now enter the command net user administrator /active:yes. This command enables the administrator account on Windows 11 PC. The command completed successfully.

4. Now let’s check the status of Administrator account by running the command net user administrator. The Account Active = Yes means the Administrator account is now enabled on Windows 11 PC.

5. You have successfully enabled an Administrator account, but you don’t know that password for this account. To reset the Administrator account password, run the following command:
net user administrator *
The above command resets the administrator account password. You have to enter the new password twice, and you are done. That was easy, isn’t it?

Tip: In case you want to disable the built-in Administrator account run the command net user “Administrator” /active:no.
Enable administrator account in Windows 11 using Local Users and Groups
Windows Administrative Tools provides numerous options that can only be accessed by the administrator. Using the Local Users and Groups, you can enable administrator account in Windows 11:
1. On your Windows 11 PC, run the command lusrmgr.msc. This is a shortcut command to launch Local Users and Groups.
2. In the Local users and groups console, click Users folder. On the right-hand side, you will find a list of all users present on your Windows 11 PC.
3. Right-click Administrator account and select Properties.

4. On the Administrator Properties window, select the General tab and uncheck the option “Account is disabled“. This will enable the Administrator account on Windows 11 PC.

After you enable the local administrator account, you can now reset Windows 11 administrator account password. Right-click Administrator account and click Set Password.

On Set Password for Administrator window, enter the new password for the account and click OK. Log off from your current account, and you can now sign in with Administrator account.

Enable Windows 11 Administrator account using PowerShell
To enable the Administrator account with PowerShell on Windows 11 Pro or Home, use these steps:
- On Windows 11 PC, click Start and search Windows PowerShell.
- Launch the PowerShell with Run as Administrator.
- Run the following command to enable the built-in Windows 11 Administrator account.
- Get-LocalUser -Name “Administrator” | Enable-LocalUser
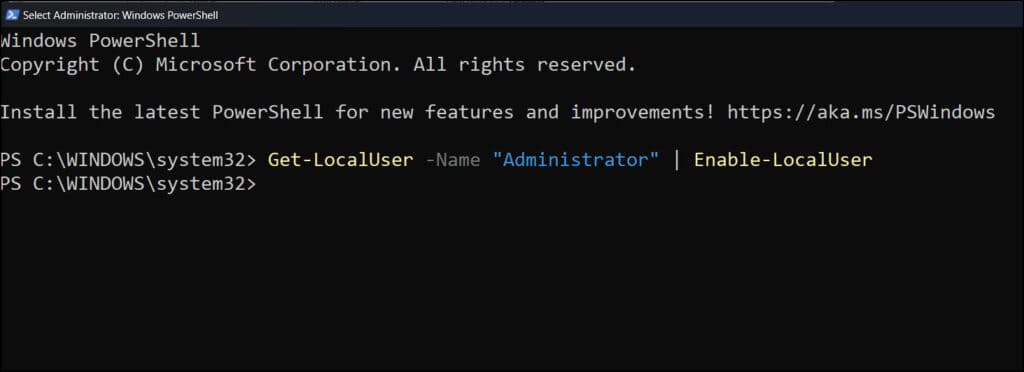
After you complete the above steps, the default Administrator account will be enabled, and available from the Windows 11 Sign-in screen.
Tip: If you want to disable the administrator account using PowerShell, run the command Get-LocalUser -Name “Administrator” | Disable-LocalUser.
Enable Administrator Account in Windows 11 Using Group Policy Editor
You can use the Group policy editor to enable an Administrator account in Windows 11.
- On Windows 11 PC, Press Windows+R to open the Run Command box.
- Type gpedit.msc and hit the enter key to open the Group Policy Editor.
- Navigate to the following path: Computer Configuration > Windows Settings > Security Settings > Local Policies > Security Options.
- Right-click Accounts: Administrator account status policy setting and select Enabled.

Once you complete the steps, log off from your computer. The built-in Administrator local account on Windows 11 will be available from the Sign-in screen.

Hi – did you ever find a solution to this? Dealing with the same thing.
I’m unable to open Administrator access from a standard user. I tried netplwiz, user control settings, and local group user policy, I also tried to open device manager but all they need administrator access first. Please give me some solutions.
Hi – did you ever find a solution to this? Dealing with the same thing.
I’ve tried every thing you suggested and got either kicked out to a blank screen or in the Administrator Command Prompt got kicked out. In the non-Admin Command screen, I got a red message saying the suggested entry was not recognized. What is going on? This is typical of on line “help”. Do you know how to fix this? The reply to Manuar Alam didn’t come up. Thanks
Same issue if your problem solve then plz guide me…
When you see my reply plz contact me on Instagram : harshal_m_daundkar
I second that sentiment…
I would rate this as 10/10. Even as a 30-year software engineer I’m not used to seeing such detailed and clear information.