


In this article, you’ll learn how to restore Windows 365 Cloud PC to its previous state using Point-in-time restore. You can restore a Cloud PC to a state it was at an earlier time with restore option.
Microsoft launched a new feature for Windows 365 Cloud PC known as Point-in-time restore. Using Point-in-time restore feature, you can restore your Cloud PC to previous state and get your Cloud PC renewed.
If you are new to Cloud PC, a Cloud PC is a highly available, optimized, and scalable virtual machine providing end users with a rich Windows desktop experience. It’s hosted in the Windows 365 service and is accessible from anywhere, on any device.

Windows 365 is fully integrated into the Microsoft Endpoint Manager admin center. This makes the life of admins easier by allowing Windows 365 management within MEM portal.
If you are just getting started with Cloud PC in Windows 365, use these guides as reference:
- How to Assign Windows 365 License to Cloud PC User
- How to Access Windows 365 Cloud PC Easily
- Quickly Reprovision a Cloud PC in Windows 365
What happens when you restore a cloud PC?
In simple terms, a cloud PC restore process does many things. You must know the risks and results of restoring a cloud PC:
- When you restore a Cloud PC, all changes made to the Cloud PC between the saved restore point and when the restore is started will be lost.
- During the Cloud PC restore process, the following data is deleted:
- Your Data, files or Documents.
- All the Installed applications, configurations, downloads, and other changes.
- External data stored in cloud services, like OneDrive, won’t be lost.
- Various applications, agents and tools also use rolling passwords, secrets, certificates, and keys. If any of these credentials are updated between the current time and the restore point, the associated service or application will be impacted.
The Cloud PC restore is pretty much similar to that of Windows PC restore. Although this feature looks cool, you must be cautious before you perform the Cloud PC restore. Backup all your data to either external storage or OneDrive so that your critical data isn’t lost.
Read: How to Factory Reset a Windows 11 PC
Ways to Restore a Cloud PC in Windows 365
There are two ways to restore a Cloud PC in Windows 365
- Restore a Single Cloud PC: You can use the Microsoft Endpoint Manager admin center to restore a Cloud PC to a previous state.
- Restore Multiple Cloud PCs: You can use the Microsoft Endpoint Manager admin center to bulk restore multiple Cloud PCs.
Configure Point-in-time Restore Settings for Cloud PC
Before you restore a Cloud PC, you must configure point-in-time restore settings. The restore settings that you define allow the users in a group to use the point-in-time restore feature.
Here are the steps to add user settings to configure point-in-time restore settings for a cloud PC:
- Sign in to the Microsoft Endpoint Manager admin center.
- Go to Devices > Windows 365 > User Settings.
- Here, you can add new settings, or edit an existing user setting.
- Click Add button to create a new point-in-time restore settings.

On the Settings tab of the Add user setting, specify the name of the setting. There are other options on this page which are as follows:
- Enable Local Admin: If you want the users in this setting to have local admin rights, select Enable Local admin. This is optional, and I have enabled this for my tenant.
- Allow user to initiate restore service: Enable this setting if you want end users to have permissions to restore their own Cloud PCs.
- Frequency of restore-point service: Choose an interval to specify how often restore points will be created. For Cloud PCs there’s a limit of 10 restore points that you can create. So, a shorter frequency results in a shorter overall history of restore points.
Note: In the below example, I have selected the frequency of restore-point service to 4 hours. This means my Cloud PC will have 10 restore points spread out every four hours over the last 40 hours. As time passes and a new restore point is added, the oldest restore point is removed.
Tip: Microsoft recommends choosing a restore point that is as close as possible to the current time.
Click Next to continue.

On the Assignments tab, select the groups that you want to have this setting applied. Click Next.

On the Review+Create tab, you see a summary of settings that you have configured so far. Click Create.

Shortly, you should see a notification – Successfully added a new user setting. This confirms the point in time restore settings has been created.
Users in the groups assigned to this user setting will now be able to use the point-in-time restore feature for Cloud PC.

The User Settings tab of Windows 365 Devices shows all the configured point-in-time restore settings for users.

Restore Windows 365 Cloud PC using Point-in-time Restore
Let’s look at the steps to restore a Cloud PC using the Point-in-time restore feature. The below example shows the process of restoring a single Cloud PC to its previous state.
- Sign in to the Microsoft Endpoint Manager admin center.
- Go to Devices > Windows 365 > All Cloud PCs.
- From the list of Cloud PCs, choose the Cloud PC to restore.

Select Restore option under Select restore point. You should now see the list of restore points created for the selected Cloud PC. The restore points are listed along with date and time of creation.

Select a restore point and click Select. You should see the following information displayed on the screen:
Restore this Cloud PC to the selected point? – Any data saved between the selected restore point and now will be lost. To proceed with restoring the Cloud PC, click Yes.

You should see a new notification confirming the Cloud PC restore has been initiated.

Monitor the Windows 365 Cloud PC Restore
When you initiate a restore of a Cloud PC, on the “All Cloud PCs” page, the status of the device will change to Restoring until it’s complete.

If you go to Windows 365 > Devices and select the Cloud PC machine, the status is shown as Restore Pending.

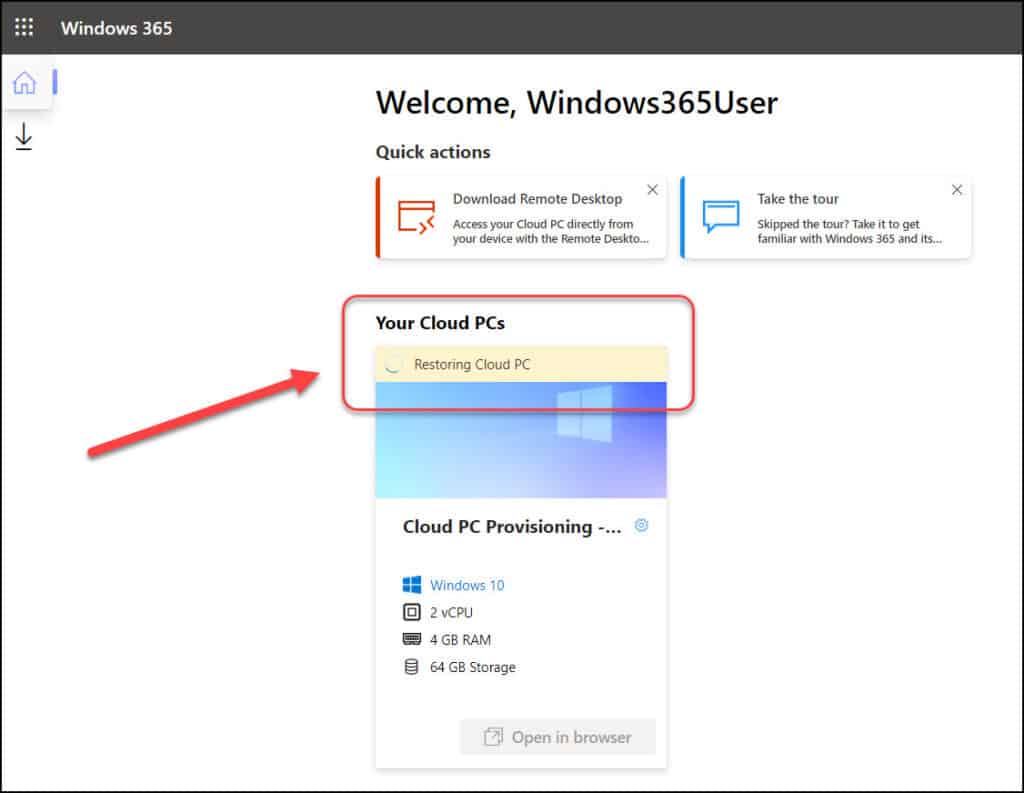
On the user’s windows365.microsoft.com page, the Cloud PC will show as restoring until it’s complete. In the below screenshot, we see the Restoring Cloud PC status on user’s windows365.microsoft.com page.
Once the Cloud PC restore process is complete, the status of the Cloud PC changes from Restoring to Provisioned. This confirms the restore process is successfully completed on the selected Cloud PC.

Restore multiple Windows 365 Cloud PCs in bulk
Use these steps to bulk restore multiple Cloud PCs from Microsoft Endpoint Manager admin center:
- Sign in to the Microsoft Endpoint Manager admin center.
- Navigate to Devices > All devices > Bulk Device Actions.

On the Bulk device action – Basics tab, configure the following settings:
- OS: Select Windows
- Device action: Restore (preview)
- Specify date and time: Choose a date and time. This setting defines the time that you’d like to restore the Cloud PCs to.
- Select restore point time range: Choose one of the following options:
- Before specified date and time: If you choose this option, the Cloud PCs will be restored to the closest restore point before the date and time you specified.
- After specified date and time: If you pick this option, the Cloud PCs will be restored to the closest restore point after the date and time you specified.
- Whichever is closest (before or after specified date and time): If you select this option, the Cloud PCs will be restored to the closest restore point to the date and time you specified.
Click Next to continue.

On the Devices page, select the Cloud PCs that you want to restore and click Next.

On the Review + Create page, confirm your choices and click Create. The status of each device will change to Restoring until each is complete.

Conclusion
I hope this article helped you to understand about the Cloud PC restore process, the steps to configure point-in-time restore settings and restore Windows 365 Cloud PC to its previous state. It’s effortless to restore a Cloud PC however you must know the risks associated with using this feature.
Restoring a single Cloud PC is easy, and even you can restore multiple Cloud PCs at once from the MEM portal. If you have any suggestions or questions, let me know them in the comments section below.
