In this post, we will see how to disable Bing Search in Windows 11. If you don’t like Bing giving opinions in Windows 11 searches on Start, you can easily disable it.
Most of the Windows 11 users use the search tool to find the installed softwares and files on the PC. However, in most cases you see more of Bing web searches which is annoying.
When you launch an application that is installed on your Windows 11 PC, you may find more of Bing web searches in the results.
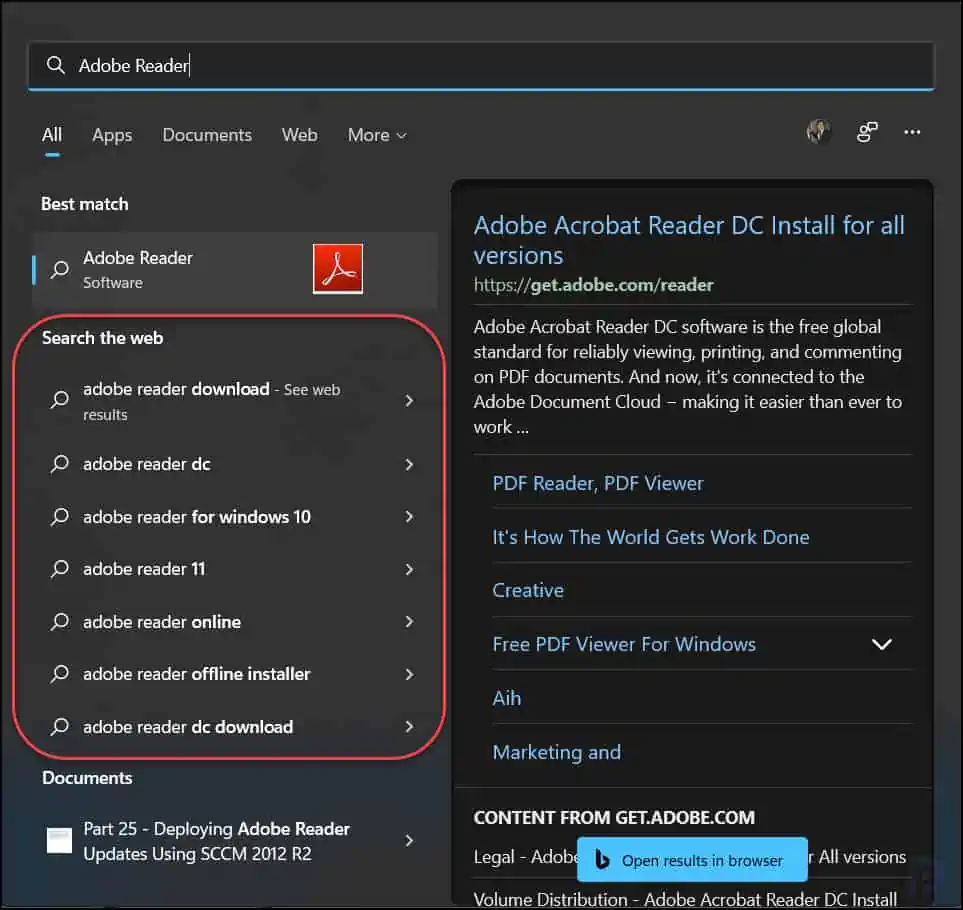
Let me show you an example of how the Bing web searches appear on Windows 11 PC. Click Start button on Windows 11 and type the name of application in search box. You will see the application entries along with Search the web section.
This Search the web section includes the Bing web search links that are actually not required to users. Clicking these links will launch the browser and use the Bing search to find the items. Your file searches actually get mixed up with Bing web search suggestions.

The Bing web search suggestions were also present in Windows 10, and they have been carried over to Windows 11. By tweaking the registry, you can disable Bing web search in Windows 11.
How to Disable Bing Search in Windows 11
Windows 11 doesn’t have any built-in option Settings or Control Panel option with which you can disable Bing web searches. Microsoft makes it difficult to disable the Bing web search suggestions leaving registry as the only option.
However, you can still disable those Bing web search suggestions by adding a DisableSearchBoxSuggestions DWORD to the registry on Windows 11 PC.
Before you edit the registry on Windows 11 and make changes, ensure you back up the registry. This will help you to revert the changes that you made in case something goes wrong.
Let’s look at the steps to disable Bing search in Windows 11. First, right-click start and select the Run option. In the run box, type the command regedit and press OK. This launches registry editor on Windows 11 PC.
In the Registry Editor, navigate to the following path – Computer\HKEY_CURRENT_USER\Software\Policies\Microsoft\Windows.
You can copy the above path and paste it into the registry editor directly.
Right-click Windows key and select New > Key.

Enter the name of the key as Explorer. The Explorer key should be now visible under the Windows key.

Right-click Explorer key and select New > DWORD (32-Bit) Value.

Enter the DWORD value name as DisableSearchBoxSuggestions. Right-click the DisableSearchBoxSuggestions and select Modify.

Input 1 in the Value data box for the DisableSearchBoxSuggestions DWORD and click OK.

To apply the above registry tweak, restart Windows 11 PC. Log in to Windows 11 PC and now type the application name in search box, this time notice that the Bing web searches are disabled in start menu. Only the files related to the search term are displayed.

With Bing web searches disabled, you can utilize Windows 11 search tool only for finding files or software on your PC. No longer will your file searches get mixed up with Bing web search suggestions.


