


In this article, I will demonstrate how to troubleshoot Cloud PC connection errors. Use the troubleshooting steps if you’re having trouble connecting to Cloud PC or getting access to it.
Most of these Cloud PC errors occur when you attempt to access a Cloud PC from windows365.microsoft.com or Remote Desktop.
Whenever you cannot access a Cloud PC, there could be many reasons behind it. With the combination of Cloud PC log files and some basic troubleshooting steps, you can fix most of the Cloud PC connection errors.

There are two ways to access a Cloud PC in Windows 365:
- Users can navigate to Windows365.microsoft.com to access their Cloud PCs.
- Access Cloud PCs using the Microsoft Remote Desktop.
Both the above methods are covered in detail, and you can refer to how to access Windows 365 Cloud PC.
If you are new to the concept of Cloud PCs, here are some guides you can use to start learning about Windows 365:
- How to Assign Windows 365 License to Cloud PC User
- How to Access Windows 365 Cloud PC Easily
- Quickly Reprovision a Cloud PC and Restore Windows 365 Cloud PC
- Create a Provisioning Policy in Windows 365 for Cloud PC
- Delete provisioning policies from Cloud PCs
- Cloud PC Remote Actions in Windows 365
- How To End Grace Period for Cloud PCs in Windows 365
Troubleshoot Cloud PC Connection Errors
This article discusses Cloud PC connection errors and the actions you can take to fix them. The goal of these troubleshooting steps is to ensure the Cloud PC connection errors are resolved and users can access the Cloud PC. The article will be frequently updated to guarantee that all Cloud PC related issues are covered, and a suitable fix is offered.
Issue 1: Can’t Connect to Cloud PC
When accessing a Cloud PC using the Microsoft Edge browser, I encountered the error “Can’t Connect to Cloud PC“. The below screenshot illustrates the Can’t connect to Cloud PC error.
Whenever the Cloud PC fails to connect using a browser, Microsoft helps you to resolve the issue by capturing the error logs. These Cloud PC error logs can be sent to support team which can help the admins identify the issue and resolve it.

Click on Capture logs and this will generate the error log for the Cloud PC. The browser downloads a text file named Windows 365 Web Client Logs.txt. You can open this log file with CMTrace tool or Notepad application.
In the below example, the log file shows “no native wasm support detected”. This error is specific to the browser and if the browser isn’t updated since long time, you may encounter this error.
no native wasm support detected
loadScript, url=,/static/js/officebrowserfeedback_floodgate.js?v=0.1.02032.954
The initial troubleshooting step that you can perform here is to update the browser version. Be it Chrome, Firefox or Microsoft Edge, ensure it is running on the latest version.

After updating the browser to the latest version, navigate to Windows365.microsoft.com to access the Cloud PC and Can’t Connect to Cloud PC error should be resolved.
Issue 2: Resolve Cloud PC Azure Network Connection Health Checks
When you encounter a Cloud PC connection error, one of the reasons for its inaccessibility could be due to failed Azure Network Connection (ANC) health checks. A unique feature of Windows 365 is the Azure network connection (ANC) health checks. The health checks are periodically run to make sure that:
- Cloud PC provisioning is successful.
- End-user Cloud PC experiences are optimal.
Every failed ANC or success with warning error state includes the technical details behind the failure. Select the View details link for each failed check to view more information on the failure. After you’ve resolved the underlying issue, Retry the health check to rerun the tests.
You cannot access a Cloud PC if one or more ANC checks are in a failed state. If an ANC is in a failed state, it cannot be used; instead, you must resolve the underlying problem and retry the health checks.
This status helps you determine if new Cloud PCs can be expected to provision successfully, and that existing end-users are having an optimal Cloud PC experience.
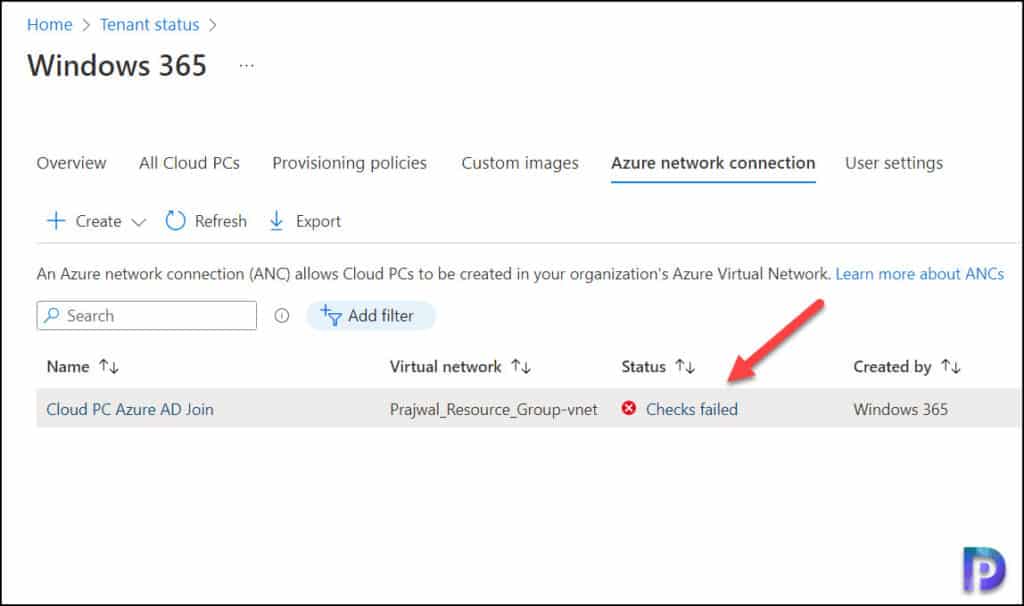
In the Azure network connection tab, every ANC created displays a status. The status of Azure network connection is something that you check.
If the ANC status shows as “Checks Successful“, it means the ANC checks are healthy and Cloud PC experiences are optimal. Whereas if the ANC status shows “Checks Failed“, it means either all or some of the checks require your attention.
To view the errors for ANC checks, click on Check Failed status.
The ANC health check window displays all the Azure Network Connection checks along with status to ensure the end-user Cloud PC experiences are optimal.
Except for two checks, all of the ANC checks in the screenshot below have errors, which is very worrying. In these situations, users won’t be able to connect to Cloud PC, which has negative effects.
As an Windows 365 admin managing Cloud PCs, if you see multiple ANC health check errors, you have to troubleshoot each error by looking further into the error details.

Issue 3: Fix Azure Virtual Network Issues for Cloud PCs
From the list of ANC errors, I will pick one error as an example, which is Azure virtual network readiness. This check will ensure the Azure virtual network is ready for use. In this case, we see the selected Azure virtual network is invalid.
When the Azure virtual network is invalid, users will not be able to access Cloud PC. This issue has to be addressed by Windows 365 Admin + Azure admin because this is mostly related to Virtual Networks which falls in the scope of Azure management.
The Azure subnet IP address usage and Endpoint connectivity ANC checks have failed resulting in no access to Cloud PC for users. The error details include the selected Azure virtual network is invalid. Make sure the virtual network is available and healthy. Alternatively, update this Azure network connection with another virtual network.

Whenever you encounter the Azure Virtual Network issues for Cloud PCs, you have to check if the virtual network is properly configured in Azure. Sometimes if the Virtual network associated with Cloud PCs is accidentally deleted, users may be unable to connect to Cloud PC.
To troubleshoot the Cloud PC Virtual network related issues, you may delete the existing virtual network or simply create another virtual network in Azure and update the ANC for all the Cloud PCs.
In the Intune Portal, go to Devices > Windows 365 > Azure Network Connection and click on network connection. In this example, I have the Cloud PC Azure AD join connection and click the Properties tab and select Edit.

On the Network Details tab, ensure a valid Virtual Network is selected. If the drop-down for Virtual network is empty, it means the virtual network has been deleted from Azure.
If you have multiple virtual networks configured, you may select another network and update the existing Azure Network Connection. This should resolve the Azure network readiness check and mark it as successful.

After you’ve addressed the underlying issue, Retry the health check to rerun the tests. You should see the results in the form of a notification.
In the below example, we see the error “Failed to retry the health checks on the Azure Network connection as the specified virtual network is invalid. Please provide a different virtual network and try again“.

Whenever you encounter the virtual network error for Cloud PC, you have two options to resolve this.
- Edit the existing ANC and update it with a correct virtual network.
- Delete the Azure network connection, add a new virtual network in Azure and recreate a new ANC.
I will show you the second method as the first method of updating the existing ANC is covered in the above step already.
To delete the Azure network connection, navigate to Devices > Windows 365 > Azure Network Connection. Click the three horizontal dots (…) and select Delete.
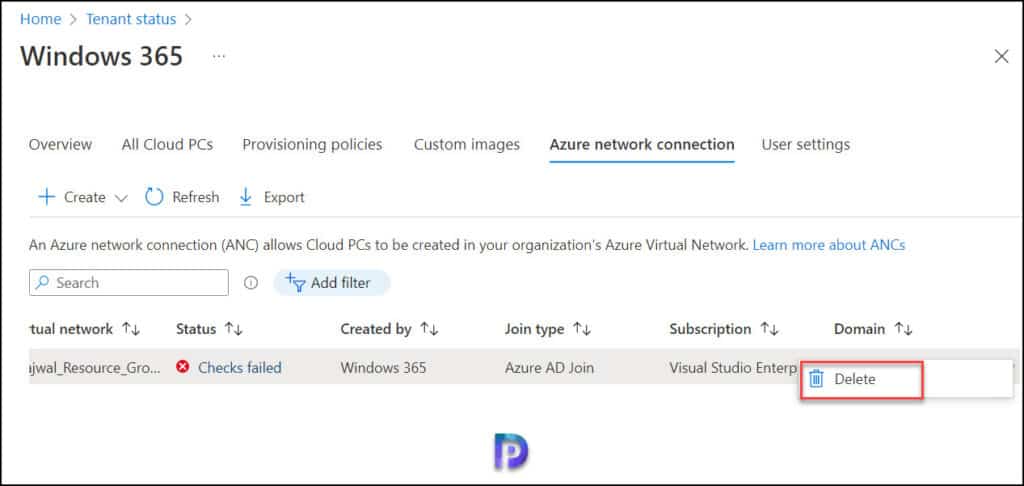
On the confirmation box asking for deletion of Azure network connection, click Yes. With this step, you have successfully deleted the Azure network connection.

In this section, I will show you how to create a new virtual network for your Azure Resource group.
To create an Azure Virtual Network using the Azure Portal:
- Navigate and sign in to the Azure portal.
- Select Create a resource on the Azure Portal homepage.
- On the Create a resource page, search the marketplace for virtual network and select it from the results.
- On the Virtual Network page, select Create.
- You will now be presented with create virtual network option.
On the Basics tab of the create virtual network window, enter the Project details such as subscription, Resource group. Under the Instance details, specify the name of the virtual network for Cloud PCs and the region.
Click Next.

On the IP Addresses tab, enter the IPv4 address space. The default subnet in my case is 10.0.0.0/24. I am going to the default subnet. Click Next.

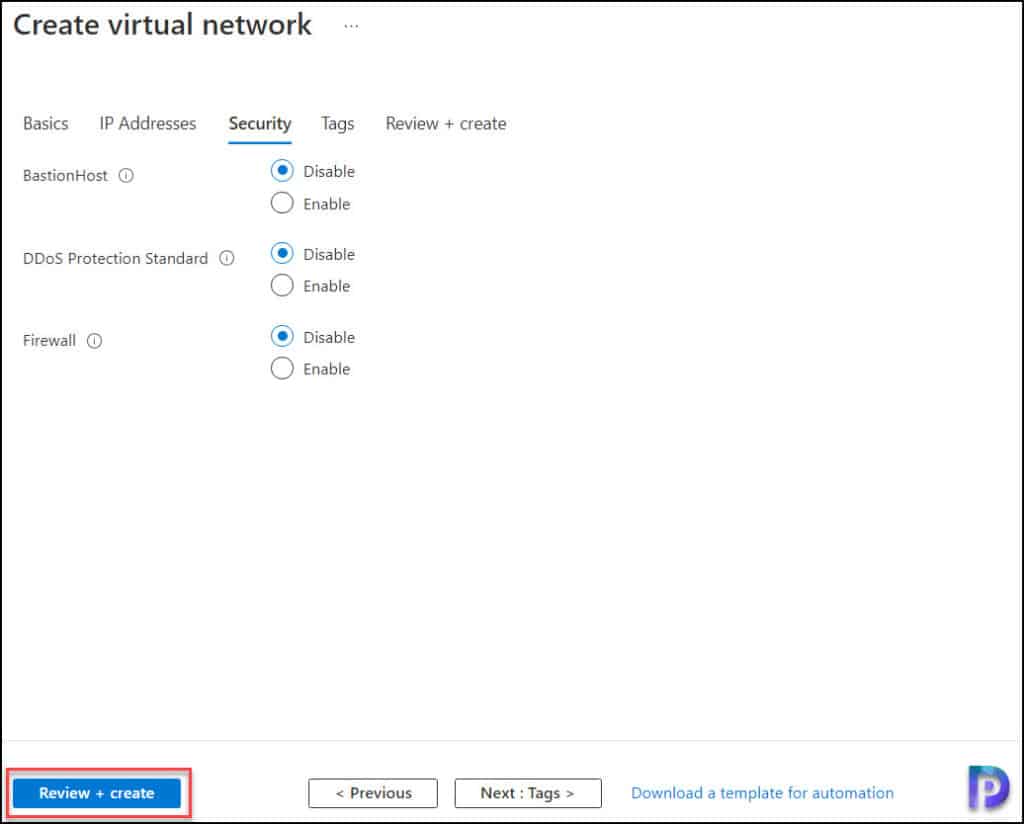
The Security tab allows you to configure security options for the virtual network. I am going to leave them with default options as they can be configured later. Click Review+Create.
Finally, on the Review+Create tab, review all the settings that you have configured for the Azure virtual network and click Create. This completes the steps to create Azure network connection for Cloud PCs.

After you have created the virtual network for Cloud PCs in Azure, get back to the Microsoft Endpoint Manager admin center, and we will now create a new ANC for Cloud PCs.
In the Intune portal, navigate to Devices > Windows 365 > Azure Network Connection. Click Create to create a new connection for Cloud PCs. You see two options: Azure AD Join and Hybrid Azure AD Join. Select Azure AD Join.

On Create an Azure AD join connection, specify the network details such as Name, Subscription, Resource group. Most important, click the drop-down for Virtual network and select the new virtual network that you created in the previous section. Select a valid subnet and click Next.

Review the settings for Azure AD join connection for Cloud PCs and click Review+Create.

Run the Azure Network Connection Health Checks
After you have created a new Azure network connection for Cloud PCs with a valid virtual network and subnet assign, let’s check the status of ANC.
On the Azure network connection tab, we see the ANC checks are running in the background. The status that we see here is Running Checks. You must wait until all the checks are complete.

Now we see the ANC checks are successful and this is a good news.

Click the Azure network connection and the overview tab shows a list of Checks. We see all the checks are passed. This also indicates that users should now be able to access the Cloud PCs without any errors.

Issue 4: We couldn’t connect to Cloud PC because there are currently no available resources
For some users, while accessing the Cloud PC, an error pops up “We couldn’t connect to Cloud PC because there are currently no available resources“. This error appears because of a resource issue on your Cloud PC.
To resolve this issue, sign in to windows365.microsoft.com > select the cog icon next to the Cloud PC > Restart.

Issue 5: Fix Cloud PC Gateway Connection Errors
While accessing a Cloud PC, you may encounter error “We couldn’t connect to the gateway because of an error. If this keeps happening, ask your admin or tech support for help“.
This error can be caused by network configuration settings, like:
- Custom DNS Settings
- Network Virtual Appliance blocking
- Network Security group configuration
- Resource Locks
- Blocks on required endpoints
To fix the gateway connection errors for Cloud PCs, review the above settings one by one and confirm that they aren’t interfering with connections.
Issue 6: The remote PC ended your session. Cloud PC Error code: 0x3
If you are connected to a Cloud PC, the session may abruptly end with error code: 0x3. The Cloud PC error code: 0x3 translates to Cloud PC’s processor being over-utilized. Refer to the following guide that shows how to resolve Cloud PC session disconnect error code 0x3.
For example, if your Cloud PC is assigned 8 GB memory and if your applications are utilizing more than 8 GB of memory, the session with Cloud PC is terminated and will result in error code 0x3.
As per Microsoft, to resolve the Error code: 0x3, sign in to windows365.microsoft.com > select the cog icon next to the Cloud PC > Restart.
Another possible solution is to contact the Windows 365 admin and request to upgrade Cloud PCs hardware configuration.
Access Cloud PC
After performing all the troubleshooting steps to address the Cloud PC connection errors, let’s try to access a Cloud PC.
As mentioned earlier, you can access a Cloud PC using your browser or Remote desktop connection software. Connect to the Cloud PC and notice that all the connection errors are now resolved. On the In session settings window, select the devices or features your Cloud PC can use and click Connect.

Enter your credentials to access the Windows 365 cloud PC and that’s it.


is there a way we can check these from powershell?