


In this post I will cover the steps to upgrade to SCOM 2019. I will cover all the SCOM pre-upgrade tasks and SCOM post-upgrade tasks in this post.
We will then look at Operations Manager 2019 upgrade process. You can upgrade to SCOM 2019 from versions 2016, 1801 or 1807.
Upgrade Paths for SCOM 2019
Most of all it is important that you know if your SCOM version is eligible to upgrade to version 2019. I have covered the SCOM 2019 upgrade paths in this post.

If you are planning to install SCOM 2019 in your setup, read this post.
If you are running SCOM 2016, 1801 or 1807, yes you can directly perform SCOM 2019 upgrade. And if you are using SCOM 2012 you must first upgrade to either SCOM 2016 or SCOM 1801. You can then upgrade to Operations Manager 2019.
System Requirements for SCOM 2019 Upgrade
You must always go through the system requirements of a product before you perform SCOM 2019 upgrade. Even though you are running a SCOM version that is eligible for upgrade, you must also read the system requirements.
If you are planning for a SCOM 2019 upgrade, here is an article from Microsoft that lists all the below requirements.
- Capacity limits for Operations Manager
- Hardware requirements
- Software requirements for Operations Manager components
- Supported Client operating systems
SCOM 2019 Upgrade Options
As per Microsoft there are several options for upgrade depending upon how you have installed SCOM.
- If you have got a single-server management group, you only need to run the upgrade once since all features are installed on a single server.
- If you have got a distributed management group, you must upgrade features in the below order.
- Management servers
- Gateways
- Operations Consoles
- Finally the SCOM agents.
- Next, you can upgrade any remaining features, such as the web console, reporting and Audit Collection Services (ACS).
- In case you want to maintain your earlier version of SCOM, you can install SCOM 2019 in parallel, upgrade your agents and multi-home them between both management groups.
SCOM 2019 Pre-Upgrade tasks
To ensure smooth SCOM 2019 upgrade, Microsoft recommends you to perform pre-upgrade tasks and the list of tasks are described below.
- Review the Operations Manager Event Logs
- Clean up the Database (ETL Table)
- Configure agents to fail-over between multiple gateway servers
- Remove Agents from Pending Management
- Disable Notification Subscriptions
- Disable any connectors
- Stop the Microsoft Monitoring Agent, System Center Data Access Service, System Center Configuration Management, and Microsoft Monitoring Agent services on all management servers except the one being upgraded
- Verify that the Operational Database Has More Than 50 Percent Free Space
- Back up the Operations Manager Databases
- Update the agent’s health service cache size temporarily to prevent loss of data while Management, and Gateway servers are upgraded.
- Stop the application pool of Operations Manager and MonitoringViews in IIS server.
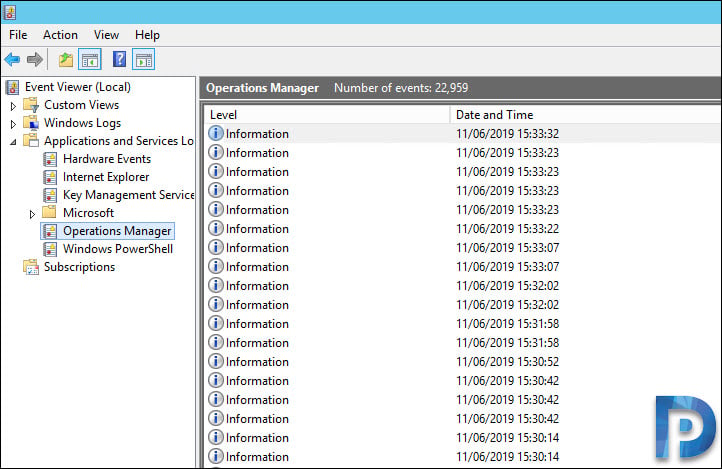
Review the Operations Manager Event Logs
First of all you must review the SCOM event logs and check if there are any errors or warnings. You must review them because a recurring critical error might cause issues while you perform upgrade.
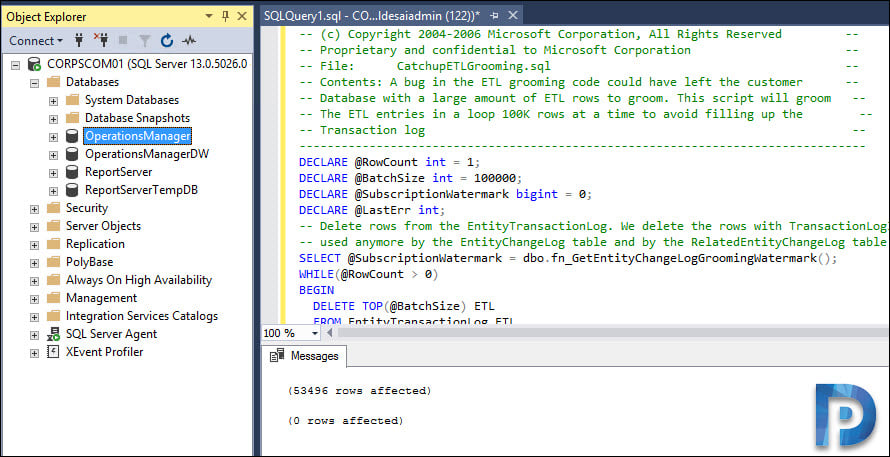
Clean up the Database (ETL Table)
Microsoft provides a script to cleanup ETL tables. You can copy and run the below script against the Operations Manager database. This script is provided by Microsoft.
-- (c) Copyright 2004-2006 Microsoft Corporation, All Rights Reserved         --
-- Proprietary and confidential to Microsoft Corporation                      --
-- File:      CatchupETLGrooming.sql                                          --
-- Contents: A bug in the ETL grooming code could have left the customer      --
-- Database with a large amount of ETL rows to groom. This script will groom   --
-- The ETL entries in a loop 100K rows at a time to avoid filling up the        --
-- Transaction log                                                             --
---------------------------------------------------------------------------------
DECLARE @RowCount int = 1;
DECLARE @BatchSize int = 100000;
DECLARE @SubscriptionWatermark bigint = 0;
DECLARE @LastErr int;
-- Delete rows from the EntityTransactionLog. We delete the rows with TransactionLogId that aren't being
-- used anymore by the EntityChangeLog table and by the RelatedEntityChangeLog table.
SELECT @SubscriptionWatermark = dbo.fn_GetEntityChangeLogGroomingWatermark();
WHILE(@RowCount > 0)
BEGIN
  DELETE TOP(@BatchSize) ETL
  FROM EntityTransactionLog ETL
  WHERE NOT EXISTS (SELECT 1 FROM EntityChangeLog ECL WHERE ECL.EntityTransactionLogId = ETL.EntityTransactionLogId) AND NOT EXISTS (SELECT 1 FROM RelatedEntityChangeLog RECL
  WHERE RECL.EntityTransactionLogId = ETL.EntityTransactionLogId)
  AND ETL.EntityTransactionLogId < @SubscriptionWatermark;
  SELECT @LastErr = @@ERROR, @RowCount = @@ROWCOUNT;
END
To run this script, launch the SQL server management studio. Connect to the database engine. Expand Databases. Right click OperationsManager DB and click New Query.
In the query window, paste the above query and click Execute.
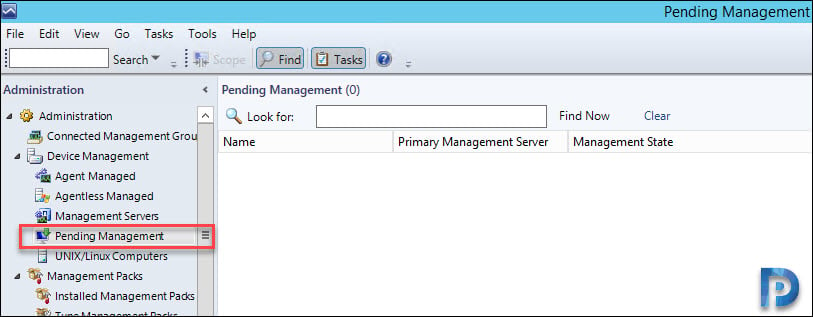
Remove Agents from pending management
If you upgrading a management server, ensure that you remove any agents that are in Pending Management.
- Open the SCOM console.
- In the Administration pane, expand Device Management, and then click Pending Management.
- If you notice any agent entries, right-click each agent, and then click Approve or Reject.
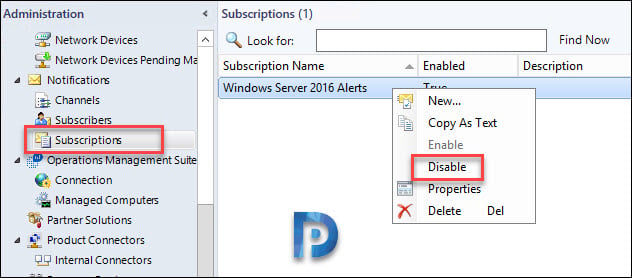
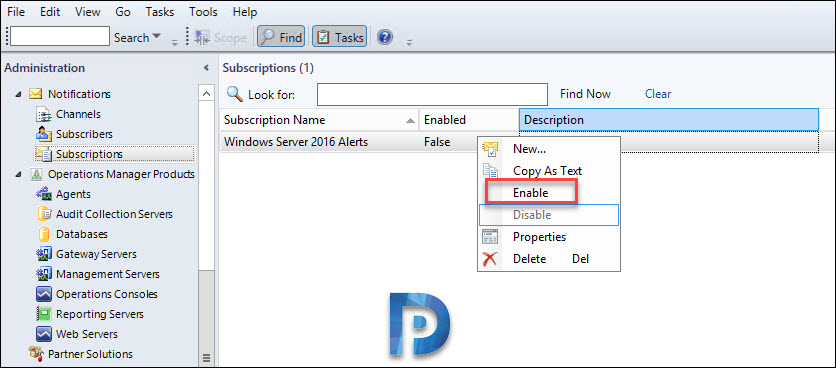
Disable SCOM Notification Subscriptions
You must disable notification subscription before you upgrade the management group to ensure that notifications are not sent during the upgrade process.
- Launch the Operations console.
- Select the Administration. Expand the Notifications container, and then click Subscriptions.
- Select each subscription, and right-click Disable each subscription.
Disable connectors
To stop a service for a Connector launch Services.msc. Right-click the Connector that you want to control, and then click Stop.
Operations Manager database should have more than 50 percent free space
Before you perform upgrade to SCOM 2019, check if the SCOM database has got more than 50% free space
- On the computer that hosts the operational database, launch SQL Server Management Studio.
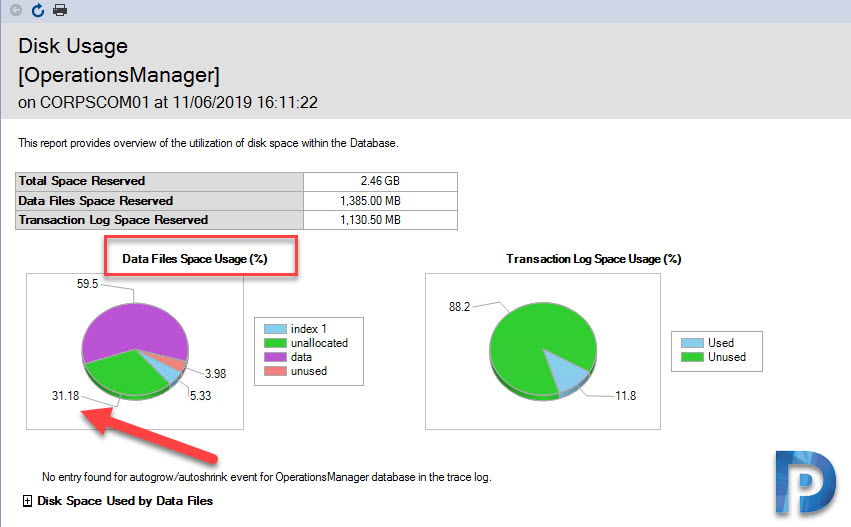
- Expand Databases. Right-click the Operations Manager database > Reports > Standard Reports, and then click Disk Usage.
- View the Disk Usage report to determine the percentage of free space
In my case the disk usage reported showed only 31.18% of free space. Don’t panic if you see values less than 50%. We can increase the free space.
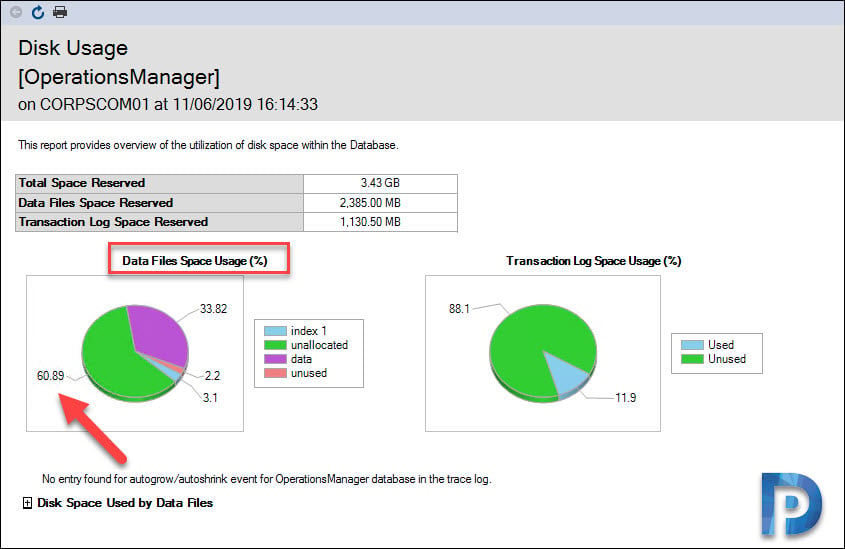
To increase the free space, right click OperationsManager database and click Properties. In the Database Properties dialog box, under Select a page, click Files. In the results pane, increase the Initial Size value for the MOM_DATA database by 50 percent.
Notice that my total space reserved value changed from 2.46 GB to 3.43 GB. I now see 60.89% of free space which is good.
Back up the Operations Manager databases
Backing up the databases is one of the pre-upgrade tasks. You must backup the operational database and data warehouse database before you upgrade SCOM. You should also create backups of databases for optional features, such as the Reporting and the Audit Collection Services database before you upgrade them.
If you already have a tool that backs up the databases you may skip this step.
To back up the OperationsManager database
Right click OperationsManager database and click Tasks > Backup.

The database backup will be on a disk. If you need to add alternate backup location, click Add button. Specify the folder path and click OK.
The backup operations now begins. Once the backup operation is complete you will see a message box that says The backup of database ‘OperationsManager’ completed successfully.
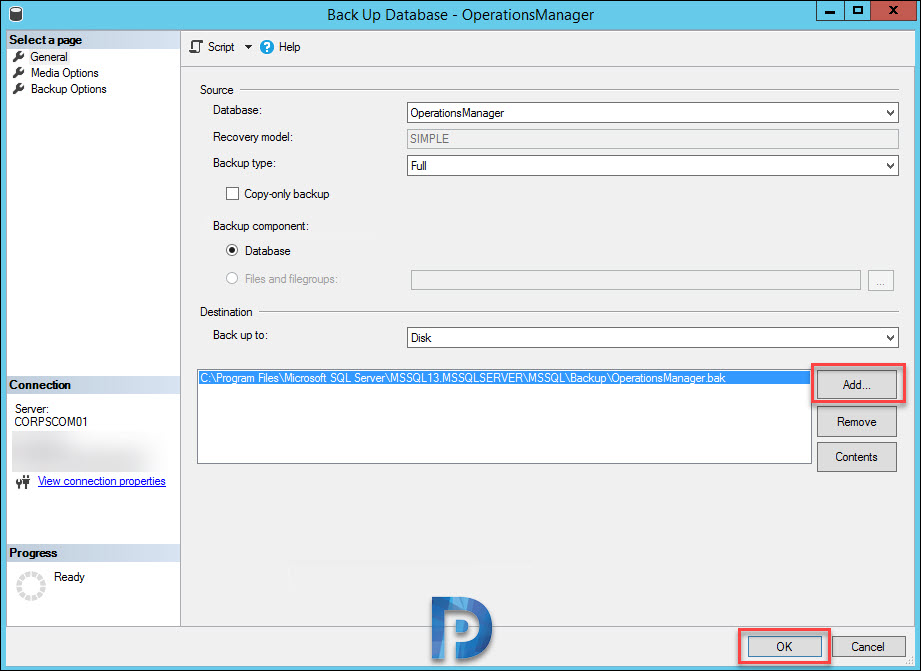
Repeat the same steps to backup OperationsManagerDW database.
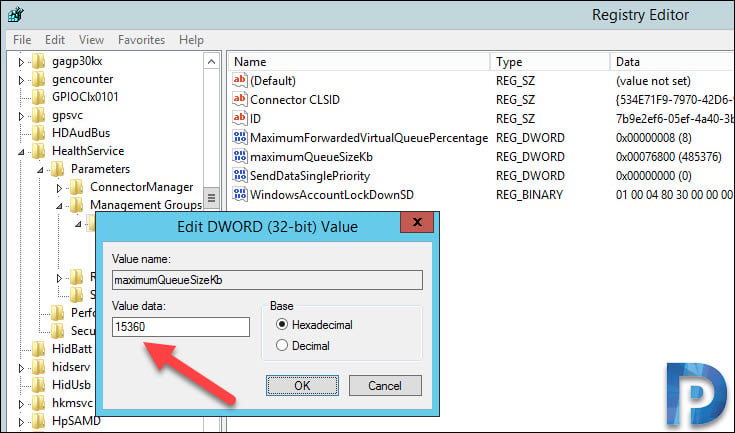
Increase agent HealthService cache size
In this step we will increase agent HealthService cache size. This is done to ensure the agents can queue data during the upgrade.
Open Regedit (Registry Editor) and go to the below key
HKEY_LOCAL_MACHINE\SYSTEM\CurrentControlsSet\Services\HealthService\Parameters\Management Groups<ManagementGroupName>\maximumQueueSizeKb
The default decimal value of DWORD type is 15360 (15 MB) and the recommended value to change it to is 76800 (75 MB). Click OK and close the registry editor.

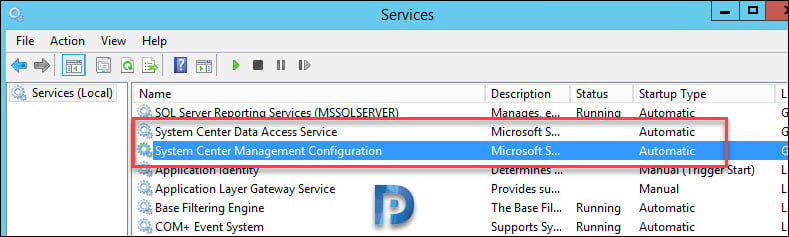
Stop Operations Manager services on Management servers
Before upgrading the first management server in your management group, it is recommended to stop the Operations Manager services :-
- System Center Data Access
- System Center Configuration
- Microsoft Monitoring Agent on all other management servers
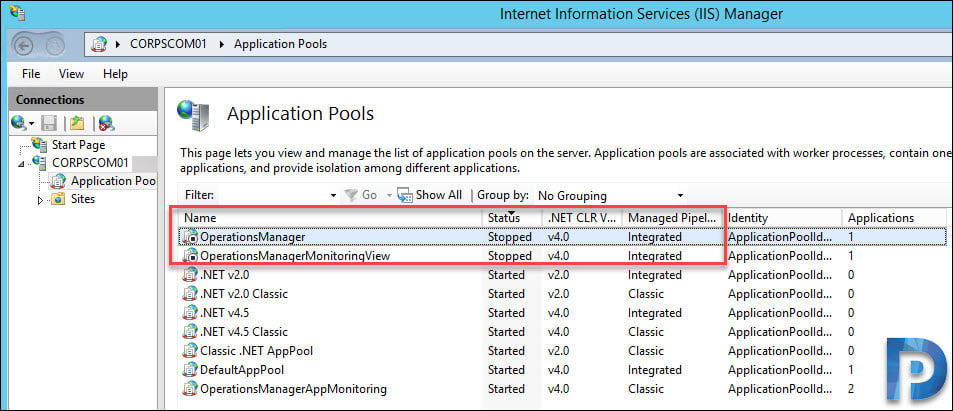
Stop the application pool of Operations Manager and MonitoringViews in IIS server
This is the final step before you begin the SCOM 2019 upgrade. You must stop the OperationsManager and MonitoringViews application pools in Internet Information Services (IIS) Manager.
On the SCOM management server open the Internet Information Services (IIS) Manager and click Application Pools. Now on the right pane, right click OperationsManager and click Stop. Right click OperationsManagerMonitoringView and click Stop.
You should now see both OperationsManager and OperationsManagerMonitoringView status as Stopped.
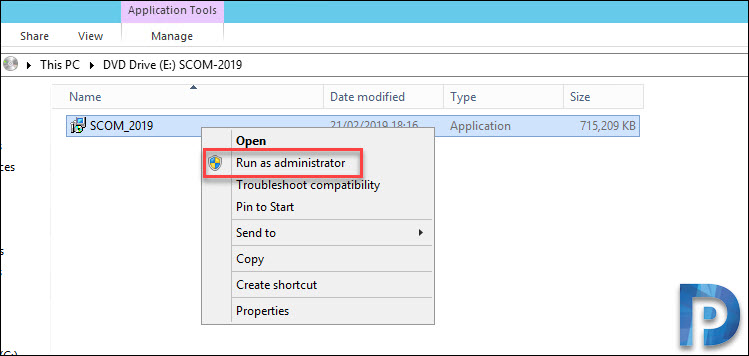
Download SCOM 2019 and Extract the Setup
After you complete all the SCOM pre-upgrade tasks, it’s time to download the SCOM 2019. After you download the SCOM 2019, you must first extract the SCOM setup files to a folder. Only then you get the setup file using which you can install SCOM 2019.
Mount the SCOM 2019 ISO file and right click SCOM_2019 application. Click Run as administrator.
Click Next.

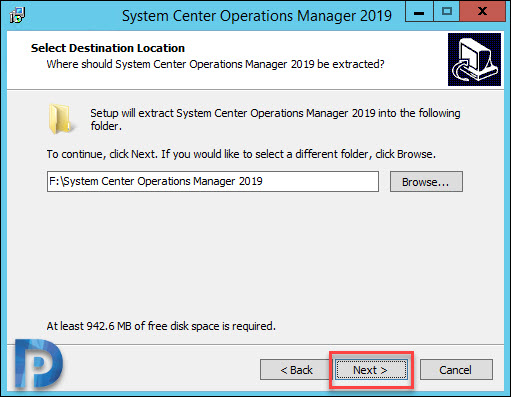
Choose the folder where you want to extract the setup files. Click Next.
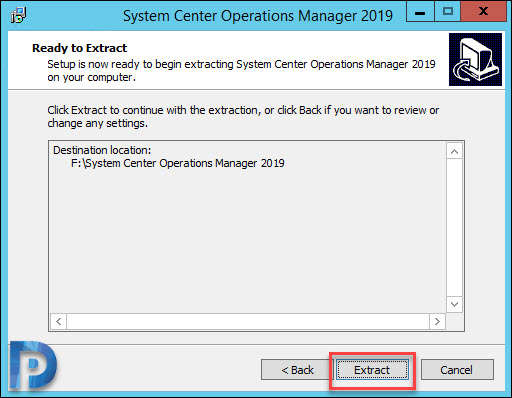
Click Extract.
Close the wizard.
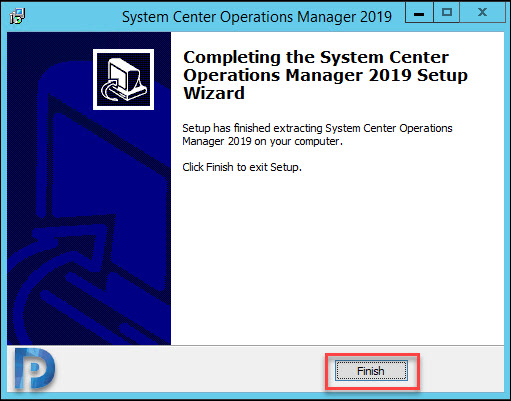
Go to the folder where you extracted SCOM 2019 install files. Run the SCOM setup as administrator.

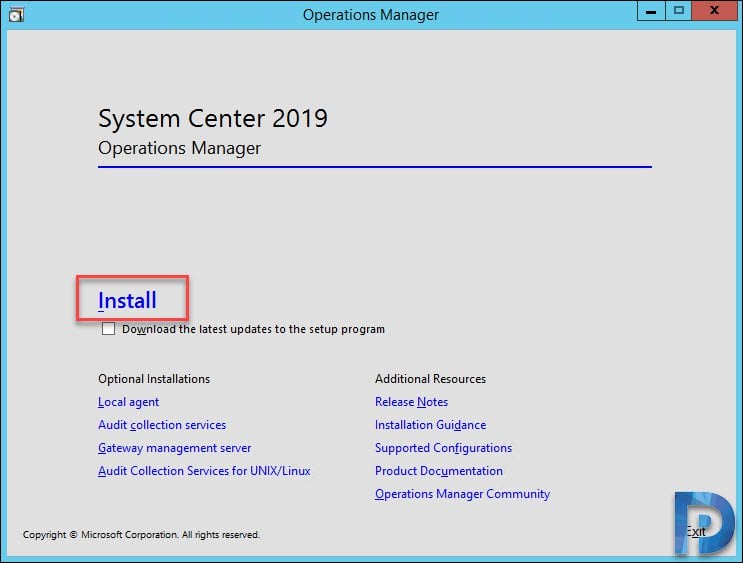
Begin SCOM 2019 Upgrade
Let’s begin the SCOM 2019 upgrade using Operations Manager setup wizard. On the SCOM 2019 setup screen, click Install.
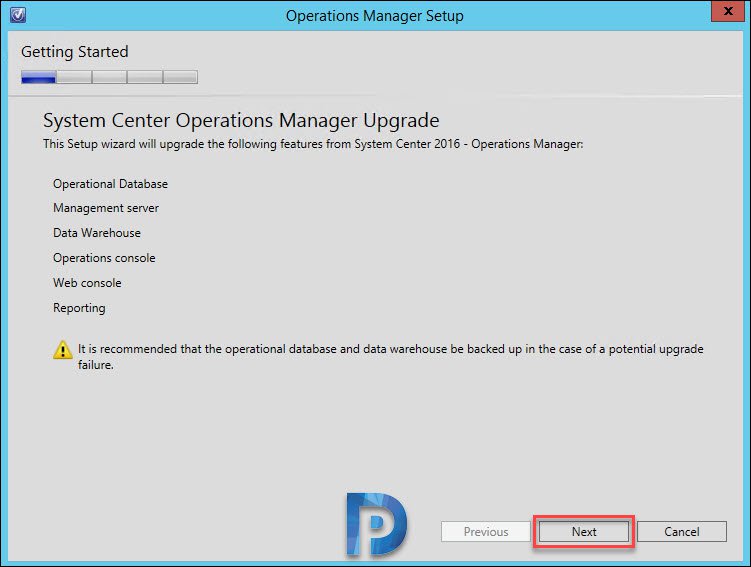
On the system center operations manager upgrade page, click Next.
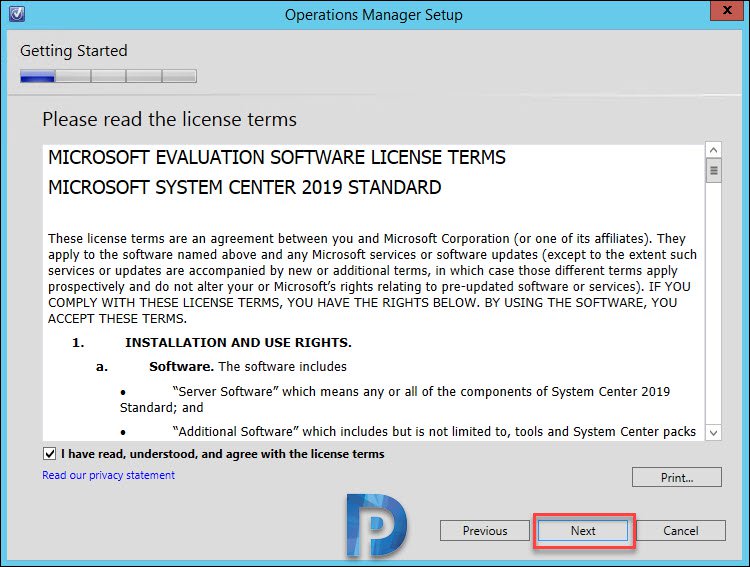
Accept the license terms and click Next.
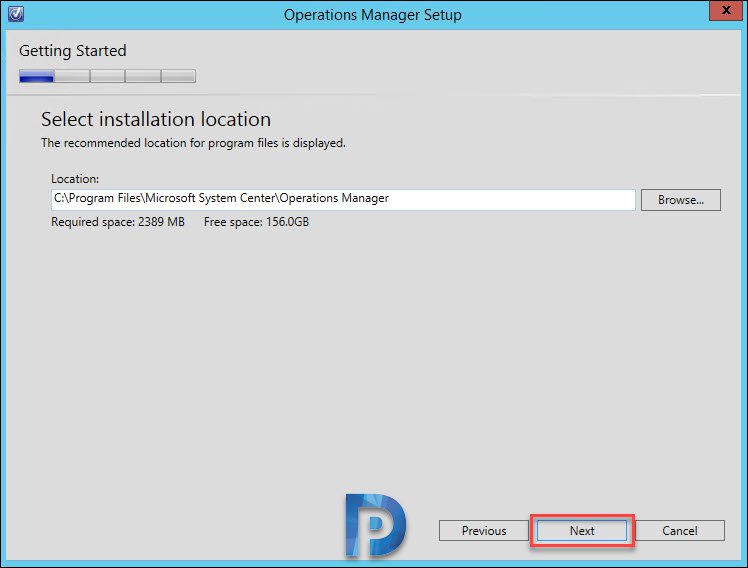
I will not change the location here. Click Next.
As per the prerequisite check, i must restart the management server. Seems like some windows updates were installed and a restart was required. So let me restart the server and run the setup again.
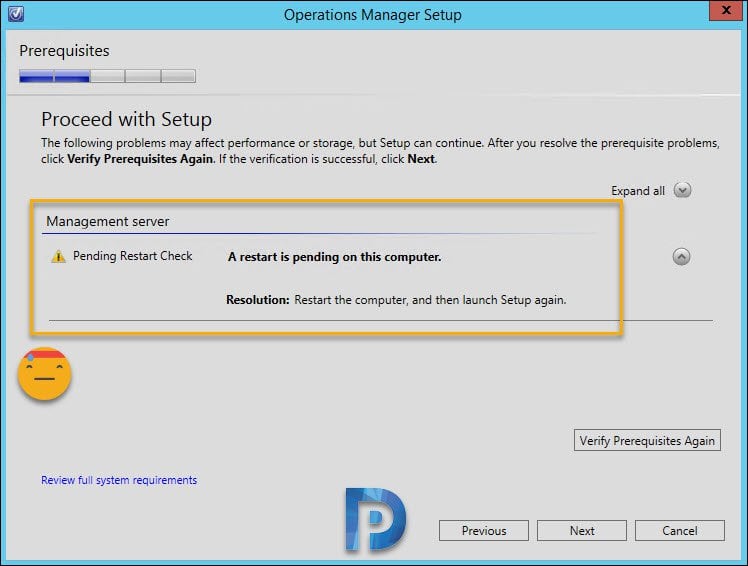
After the reboot all prerequisite checks have passed. Click Next.

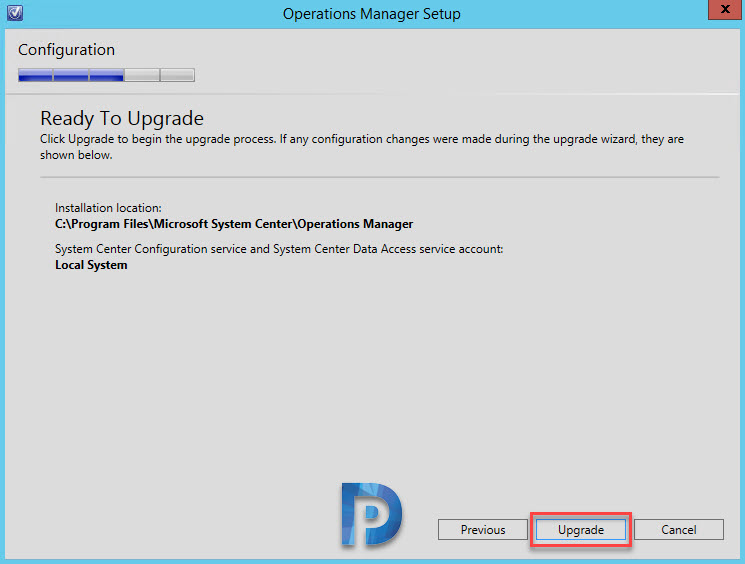
Click Upgrade. This begins the SCOM 2019 upgrade.
While the upgrade process runs, you can monitor the process by opening the OpsMgrSetupWizard.log file. This file is located under C:\Users\<username>\AppData\Local\SCOM\LOGS. To know more about SCOM log files, description – read this post.

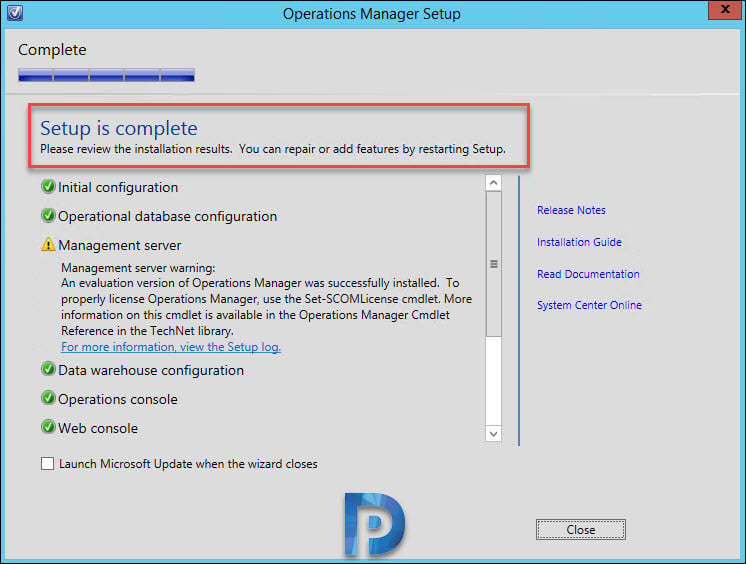
The SCOM 2019 upgrade completed successfully. In the next steps we will perform post SCOM upgrade tasks. Click Close to close the Operations Manager setup wizard.
SCOM 2019 Post-upgrade tasks
In the beginning of this post I covered the SCOM 2019 pre-upgrade tasks. After you install SCOM, you must perform the following tasks :-
- Re-enable the Notification Subscriptions
- Restart or re-enable the Connector Services (if needed)
- Re-enable Audit Collection Services (ACS) on agents that were upgraded
- Reset agent HealthService Cache size
- Verify the upgrade was successful
Re-enable the Notification Subscriptions
Post the SCOM upgrade you must re-enable notification subscription.
- Launch the Operations console.
- Select the Administration. Expand the Notifications container, and then click Subscriptions.
- Select each subscription, right-click each subscription and click Enable.
Re-Enable / Restart Connectors
To restart a service for a Connector launch Services.msc. Right-click the Connector that you want to re-enable, and then click Restart.
Reset agent HealthService cache size
Restore the default setting for the agent HealthService cache size by updating the following registry setting.
HKEY_LOCAL_MACHINE\SYSTEM\CurrentControlsSet\Services\HealthService\Parameters\Management Groups\maximumQueueSizeKb
The default decimal value of DWORD type is 15360 (15 MB).
Start the application pool of Operations Manager and MonitoringViews in IIS server
You must start the OperationsManager and MonitoringViews application pools in Internet Information Services (IIS) Manager.
On the SCOM management server open the Internet Information Services (IIS) Manager and click Application Pools. Now on the right pane, right click OperationsManager and click Start. Right click OperationsManagerMonitoringView and click Start.
You should now see both OperationsManager and OperationsManagerMonitoringView status as Started.

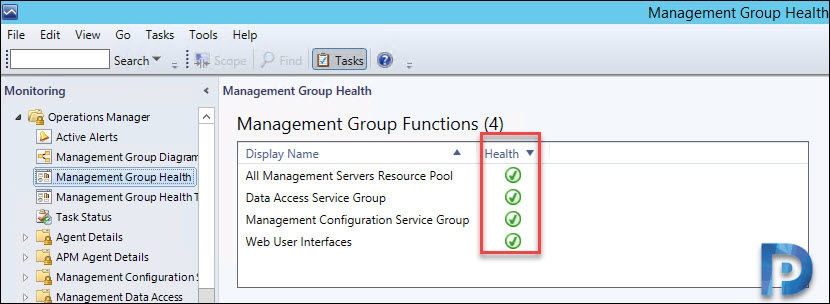
SCOM 2019 Health Check
Verify that the upgrade was successful, you must first check the health state of the management and gateway servers. In addition to that check health of agents in the Health Service Watcher state view.
Go to Administration workspace of the Operations console, ensure that the management and gateway servers, and agents are healthy. In the Monitoring workspace, check if there are any alerts related to the management group health.
Next review the event logs of all the management servers for any new errors. If there are no critical errors then no need to worry.
Check SCOM 2019 version
After the SCOM 2019 upgrade, let’s check the SCOM version. In the SCOM console, click Help > About. The window should show following info.
- Server version – 10.19.10050.0
- SCOM version – System Center 2019 Operations Manager

To activate the SCOM 2019, click Activate button. Enter the product key and you should be good to continue using SCOM 2019. I hope this guide helps.
Install SCOM 2019 Console
If you wish to install Operations Manager 2019 console on another machine, you can follow the steps mentioned in this post.

Hi Prajwal…Very useful article.
I am running with scom2019(with windows os 2016 and MSSQL 2016). Can i upgrade the OS and SQL versions to 2019. If yes, what is the upgrade order i can follow. Please suggest.
Hi Prajwal,
I have a single management server and all other components are installed on the same server.
I have SCOM 2016 and I am trying to upgrade it to SCOM 2019.
However, while running the upgrade I am getting SQL reporting server error.
As in “SQL Reporting Server Could not be contacted” while checking the prerequisites during the installation.
Kindly assist.
Regards,
Shubhi Agarwal
Disable SCOM notification subscriptions – All at once
Get-SCOMNotificationSubscription | where-object{$_.Enabled} | Disable-SCOMNotificationSubscription
Hello Prajwal,
Your blogs have been helping me a lot. Thank you for sharing your vast knowledge.
I have SCOM 1801, I need to upgrade it to the latest which I presume is 2019.
I want to know where I can download 2019 ISO file. On Microsoft I see a set of .exe and .bin.. let me know how I can prepare the media.
If you are an MSDN subscriber or have access to VLSC portal, you should see the download option for SCOM 2019. You can also download the System Center Operations Manager 2019 from Microsoft evaluation center.
Hello Prajwal,
Thank you for the informative guide. I do have a question regarding the change to the registry entry. In the graphics shown, Hex is selected vs. Decimal. It appears that the values you specify are decimal, but will be interpreted as hex by the registry editor.
So, should the graphics be changed to show the decimal radio button selected or am I misinterpreting the text of the post?
Hi,
I guess there is a downtime to SCOM if you do an in-place upgrade? How long is the downtime? How long does the upgrade run? We have 4 management servers as it is right now but i’m considering a side by side since we really dont want to stay blind on the monitoring side.
Hello Prajwal,
I am running SCOM 2012 on a DataCenter and I have to migrate SCOM server on a different DC (Hardware).
I have 2 MGMT server and 2 SQL DB servers.
What would be the process.
Regards,
Nadim Shaikh
You can try this :-
1) Install windows Server 2016, SQL Server 2016 and SCOM 2016 in a new server
2) Install a new gateway server
3) using side-by-side migration to new SCOM 2016 environment
You can try this.
1) Install windows Server, SQL Server and SCOM on a new server
2) Install a new gateway server
3) using side-by-side migration to new SCOM environment
These same steps must be followed for each SCOM server, right?