

This post is a step-by-step Windows Autopilot setup guide. If you are new to Windows Autopilot, this setup guide should help you in setting up Windows Autopilot in Microsoft Intune from scratch.
I always wanted to publish a Windows Autopilot setup guide for beginners. With this guide anyone who wants to test Autopilot can start off and all this can be done in your lab. If you have a physical device like laptop, yes you can use it for testing otherwise a VM would be sufficient.
Windows Autopilot is reliable way to deploy Windows and is being currently used by many large organizations. We also see Microsoft improving Autopilot by adding more improvements to it. Windows AutoPilot can help you deploy Windows 10 faster and save your time and money.

In this post, I will cover about the Windows Autopilot basics, process overview, Autopilot prerequisites, and then I will show you how to set up and configure Windows Autopilot in Microsoft Intune. You can also use this guide to getting started with Windows Autopilot Deployment.
What is Windows Autopilot ?
According to Microsoft, Windows Autopilot is a collection of technologies used to set up and pre-configure new devices, getting them ready for productive use. Autopilot (Microsoft Autopilot) can be used to reset, repurpose, and recover devices. The Autopilot solution enables an IT department to achieve the above with little to no infrastructure to manage, with a process that’s easy and simple.
Windows Autopilot Setup Process Overview
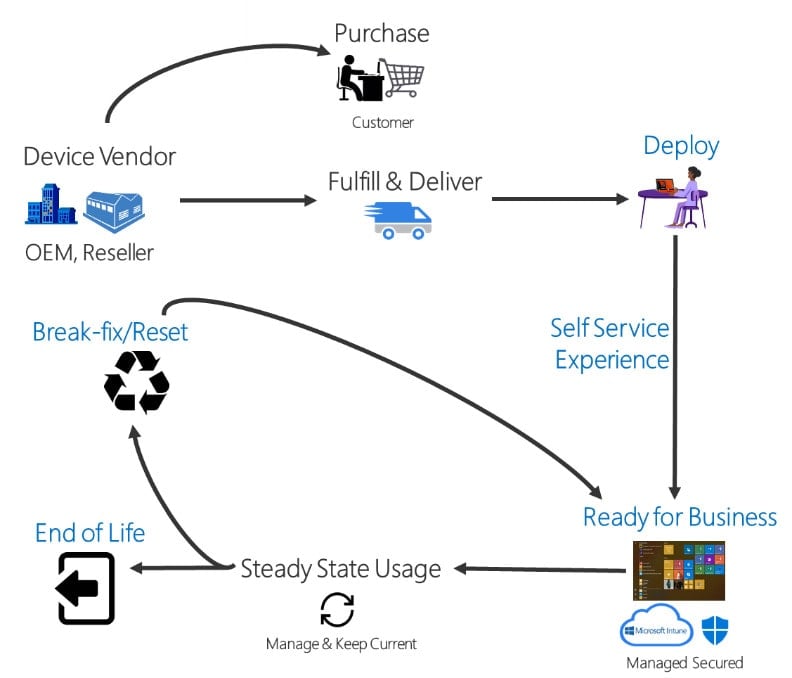
Let’s understand about the Windows Autopilot process and how it actually works. In any organization the most time consuming task for IT is configuring Windows OS on laptops. You just don’t deploy operating system, you deploy Windows Updates, branding etc. Re-imaging devices is done too often in some organizations and the IT has to spend lot of time doing it.
Windows Autopilot uses the OEM-optimized version of Windows 10. This version is preinstalled on the device, so you don’t have to maintain custom images and drivers for every device model. Instead of re-imaging a device, your existing Windows 10 installation can be transformed into a business-ready state that can do the following.
- Apply settings and policies.
- Install Company Applications.
- Change the edition of Windows 10 (for example, from Windows 10 Pro to Windows 10 Enterprise) to support advanced features.
After the deployment is complete, you can use either Intune, Configuration Manager or other tools to manage these devices. So, in short, Windows Autopilot can be used to customize the existing Windows OS and not deploy an entirely new operating system.
Advantages of Using Windows Autopilot
Windows Autopilot offers several advantages and enables you to:
- Automatically join devices to Azure Active Directory (Azure AD) or Active Directory (via Hybrid Azure AD Join).
- Auto-enroll devices into MDM services, such as Microsoft Intune (Requires an Azure AD Premium subscription for configuration).
- Restrict the Administrator account creation.
- Create and auto-assign devices to configuration groups based on a device’s profile.
- Customize OOBE content specific to the organization.
- Allows you to perform Windows Autopilot Reset. The Reset feature is useful in break/fix scenarios to quickly bring a device back to a business-ready state.
Windows Autopilot Windows 10 Requirements
The following Windows 10 editions are supported for Windows Autopilot.
- Windows 10 Pro
- Windows 10 Pro Education
- Windows 10 Pro for Workstations
- Windows 10 Enterprise
- Windows 10 Education
- Windows 10 Enterprise 2019 LTSC
Windows Autopilot Licensing Requirements
This is the important section as it covers the licensing requirements for Windows Autopilot. Windows Autopilot depends on specific capabilities available in Windows 10 and Azure Active Directory. It also requires an MDM service such as Microsoft Intune. For Windows Autopilot, one of the following subscriptions is required.
- Microsoft 365 Business Premium subscription
- Microsoft 365 F1 or F3 subscription
- Microsoft 365 Academic A1, A3, or A5 subscription
- Microsoft 365 Enterprise E3 or E5 subscription, which include all Windows 10, Microsoft 365, and EM+S features (Azure AD and Intune).
- Enterprise Mobility + Security E3 or E5 subscription, which include all needed Azure AD and Intune features.
- Intune for Education subscription, which include all needed Azure AD and Intune features.
- Azure Active Directory Premium P1 or P2 and Microsoft Intune subscription (or an alternative MDM service).
Windows Autopilot Networking Requirements and Configuration
Windows Autopilot depends on a variety of internet-based services. Access to these services must be provided for Autopilot to function properly. Please read the official Microsoft documentation on Windows Autopilot network requirements for this.
Create a Windows VM for Autopilot
To get started with Windows Autopilot, you can try it out with a virtual machine (VM) or you can use a physical device that will be wiped and then have a fresh install of Windows 10 or Windows 11.
You can either enable Hyper-V feature on your computer or if you have got VMware workstation, you can directly create a virtual machine and install Windows 10/11.
If you have decided to enable Hyper-V, you can use the below command. After you run the command you must restart your computer to enable Hyper-V feature.
Enable-WindowsOptionalFeature -Online -FeatureName Microsoft-Hyper-V -All
In my case I am using VMware workstation and I have installed Windows 10 Pro on this VM. The machine is not joined to any domain and can communicate to internet.
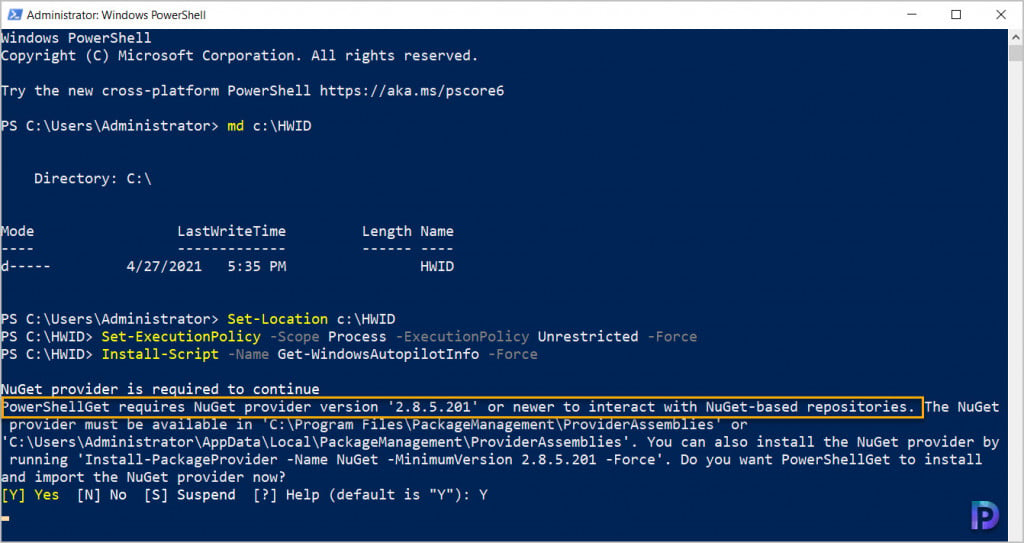
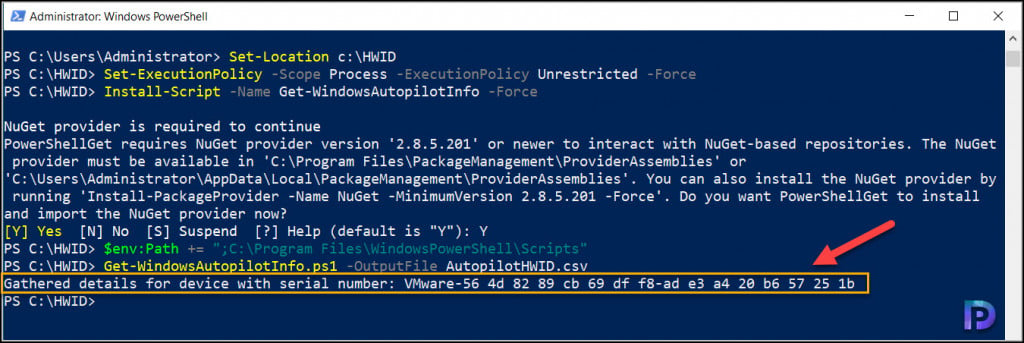
Capture the Hardware ID
In this step we will capture the hardware ID of Windows 10 VM. This will be later uploaded in Intune portal. On the client VM open an elevated Windows PowerShell prompt and run the following commands.
md c:\HWID
Set-Location c:\HWID
Set-ExecutionPolicy -Scope Process -ExecutionPolicy Unrestricted -Force
Install-Script -Name Get-WindowsAutopilotInfo -Force
$env:Path += ";C:\Program Files\WindowsPowerShell\Scripts"
Get-WindowsAutopilotInfo.ps1 -OutputFile AutopilotHWID.csv
When you are prompted to install the NuGet package, choose Yes.
After you run the commands you will see Gathered details for device with serial number: VMware-56 4d 82 89 cb 69 df f8-ad e3 a4 20 b6 57 25 1b.
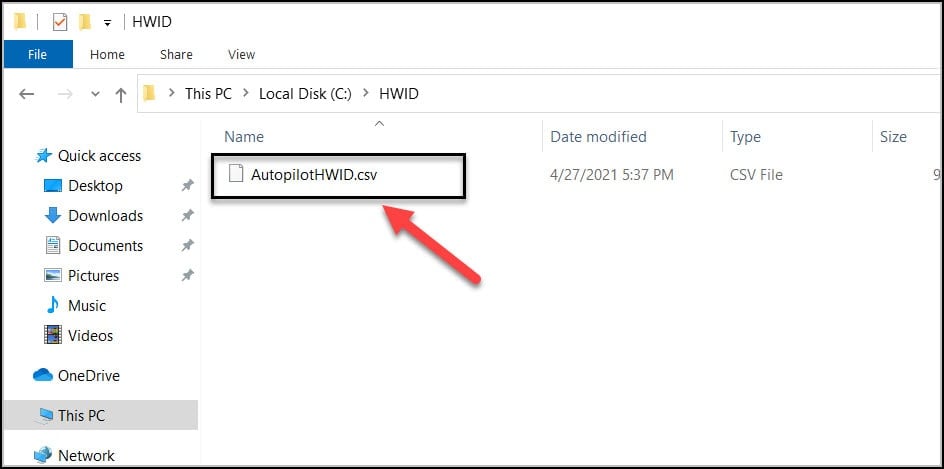
Finally we have the AutopilotHWID.csv file in the C:\HWID directory that is about 8 KB in size. This file contains the complete 4K HH.
Generate your own CSV file for Autopilot
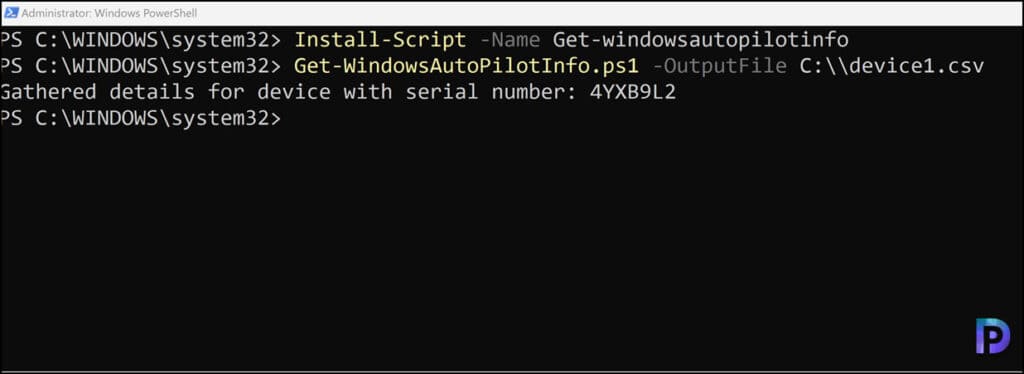
If the OEM partner does not provide a CSV file, you can generate a device-specific file by obtaining and running the Get-WindowsAutopilotInfo.ps1 Windows PowerShell script. You can install the script by running the following cmdlet:
Install-Script -Name Get-WindowsAutopilotInfo
After installing the script, you can generate device specific information and save it to the D:\Devices\Device1.csv file by running the following cmdlet:
Get-WindowsAutopilotInfo.ps1 –OutputFile D:\Devices\Device1.csv
In the next step, we will upload this data into Intune to register your device for Autopilot. If you are using a physical device instead of a VM, you can copy the file to a USB stick. If you’re using a VM, you can right-click the AutopilotHWID.csv file and copy it, then right-click and paste the file to your desktop (outside the VM).
Reset the Windows VM back to Out-Of-Box-Experience (OOBE)
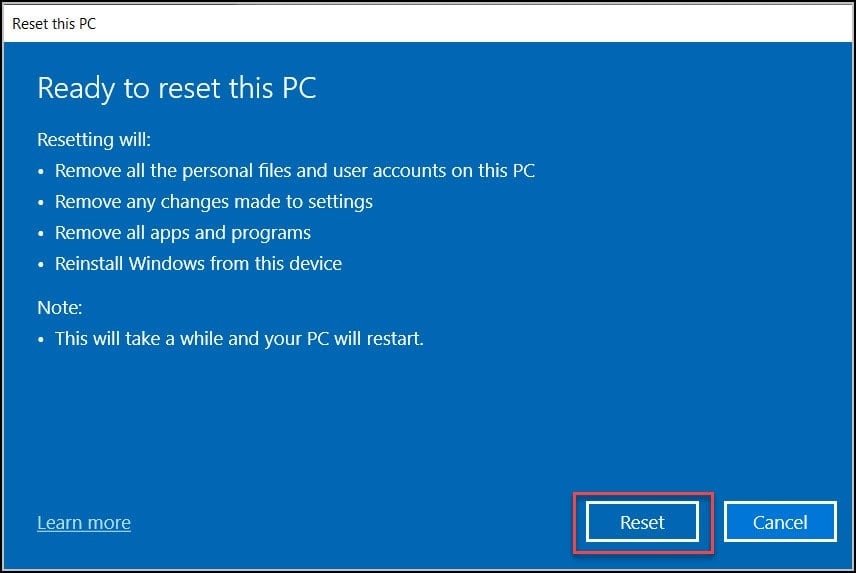
This is an important step where with the hardware ID captured in a file, we will prepare our Virtual Machine for Windows Autopilot deployment by resetting it back to OOBE.
On the Windows 10 Virtual Machine, go to Settings > Update & Security > Recovery and click on Get started under Reset this PC. Select Remove everything and Just remove my files.
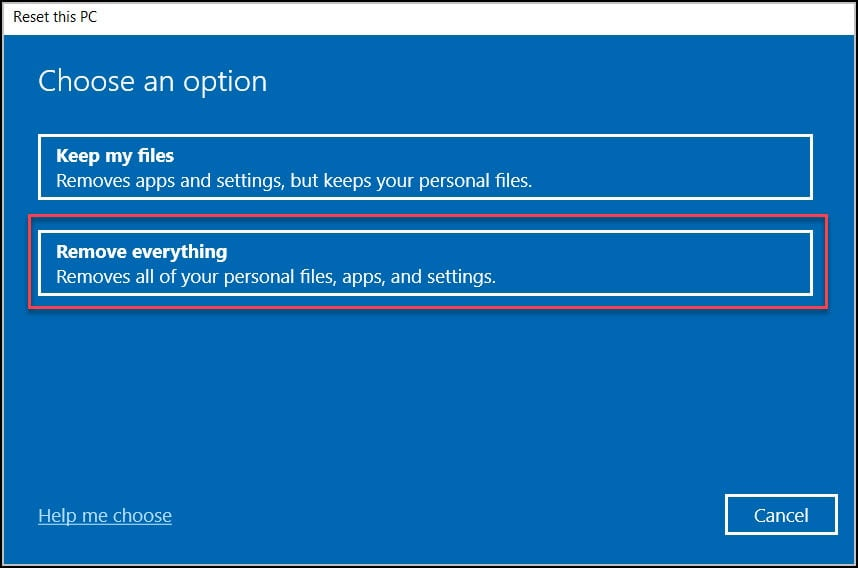
If you are asked How would you like to reinstall Windows, select Local reinstall.
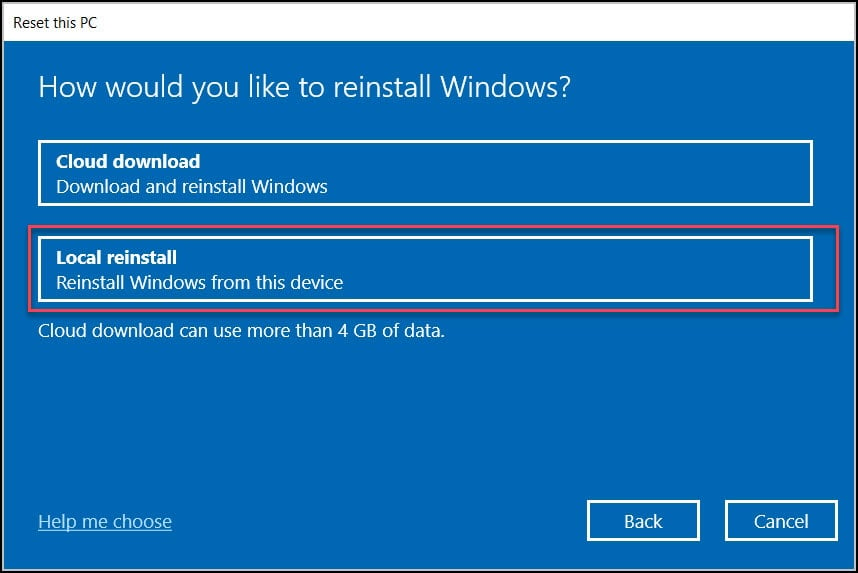
Finally, click on Reset.
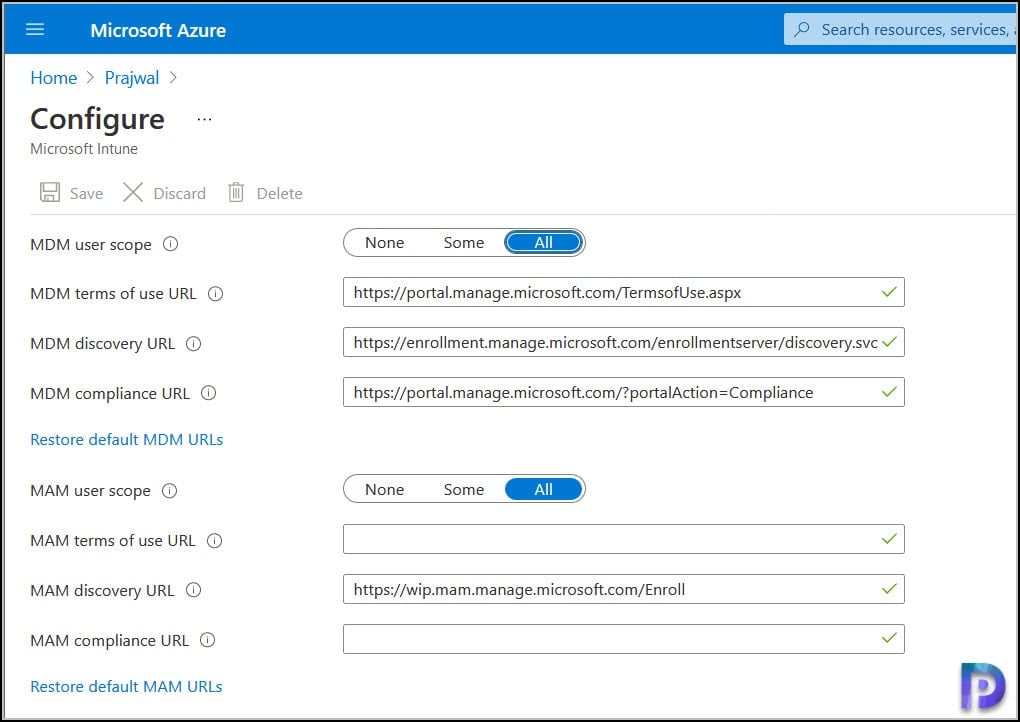
Verify AAD Premium Subscription
For this lab, you need an AAD Premium subscription. You can know if you have a Premium subscription by navigating to the MDM enrollment configuration blade. Go to Azure Active Directory > Mobility (MDM and MAM) > Microsoft Intune.
If the configuration blade appears like the one below, it’s likely that you have a Premium subscription. Note that Auto-enrollment is a feature only available in AAD Premium.
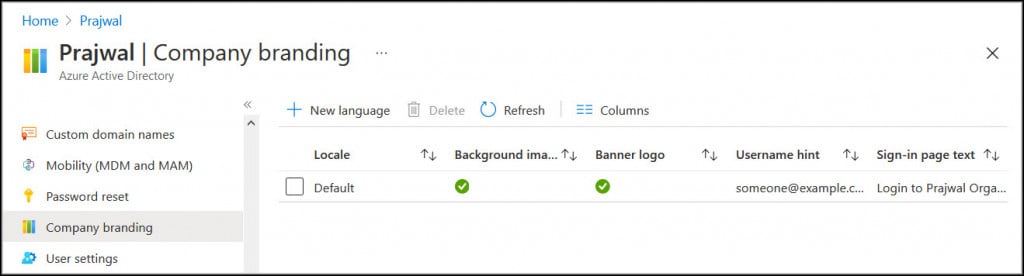
Configure Company Branding in Azure Portal
If you have already configured the company branding, you can skip to next step. To configure company branding in Azure Portal, make sure to sign-in with a Global Administrator account. Navigate to Company branding in Azure Active Directory, click on Configure and configure any type of company branding you’d like to see during the OOBE.
Once you finish the company branding, click Save.
Configure Microsoft Intune auto-enrollment
If you already have MDM auto-enrollment configured in Azure Active Directory, you can skip this step. Open Mobility (MDM and MAM) in Azure Active Directory and select Microsoft Intune. If you do not see Microsoft Intune, click Add application and choose Intune. For the purposes of this demo, select All under the MDM user scope and click Save.
Register your Device for Autopilot
There are two ways to register your VM – via Intune or Microsoft Store for Business (MSfB). Microsoft recommends using Intune and we will use Intune in this post.
Autopilot Registration using Intune
In this step we will register our Windows 10 VM using Intune for Windows Autopilot.
- Login to the Microsoft Endpoint Manager admin center.
- Choose Devices > Device enrollment | Enroll devices.
- Select Windows enrollment > Windows Autopilot Deployment Program | Devices.
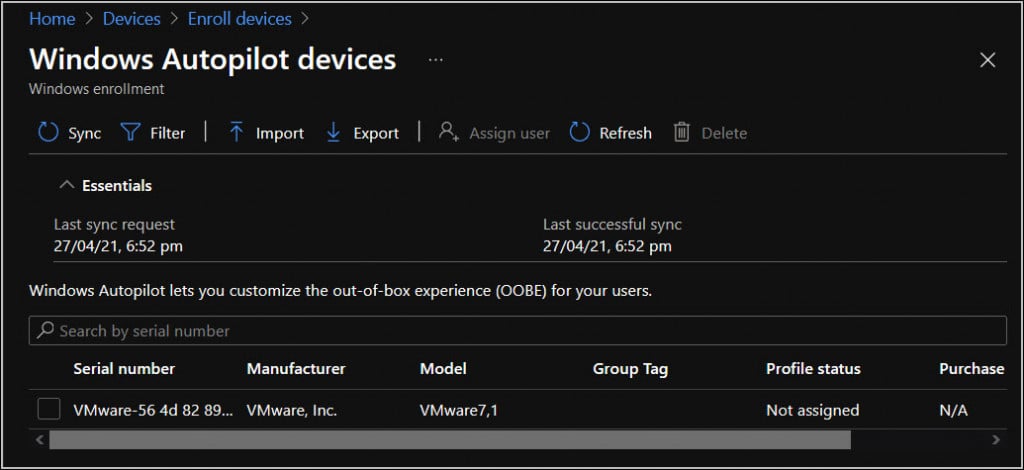
- On the Windows Autopilot devices page, choose Import.
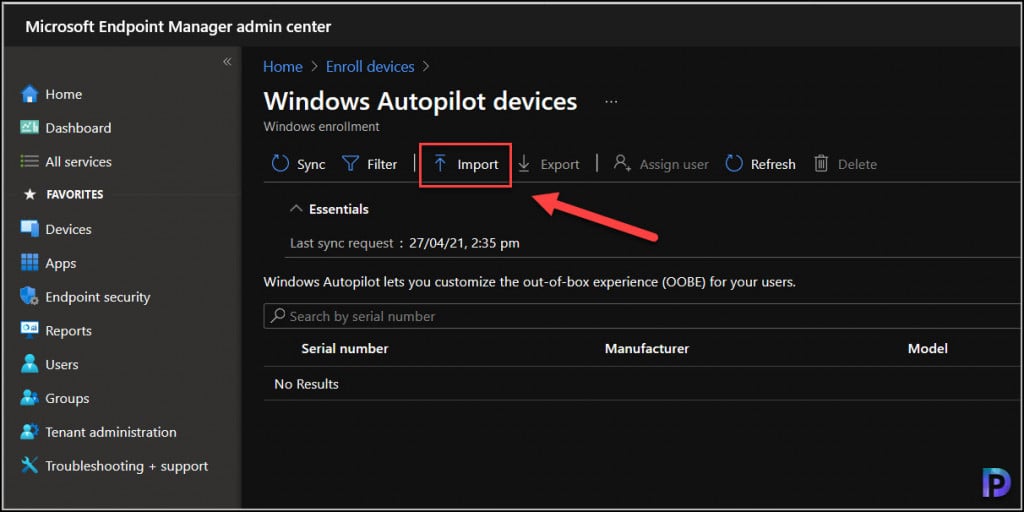
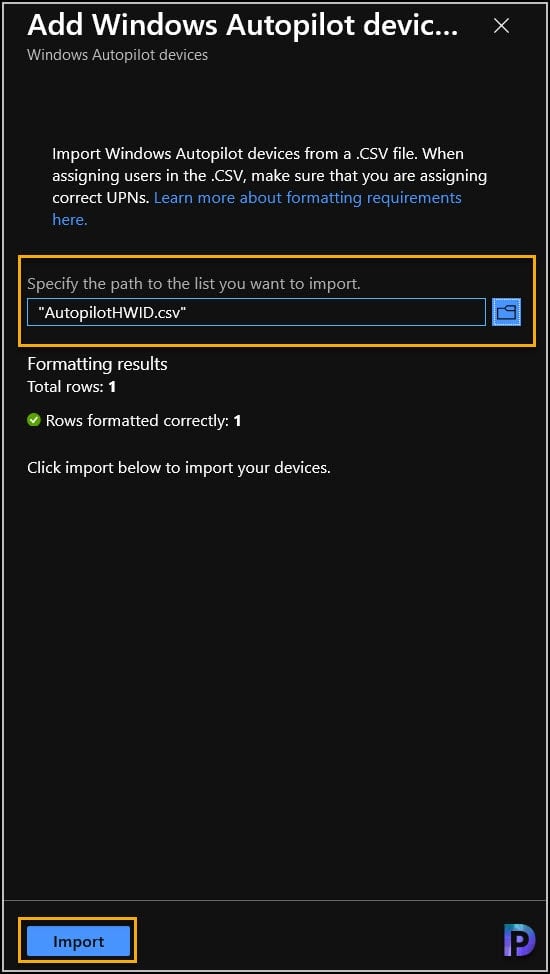
Under Add Windows Autopilot devices, click the folder icon and browse to the AutopilotHWID.csv file you previously copied to your local computer. The file should contain the serial number and 4K HH of your VM (or device). Click Import.
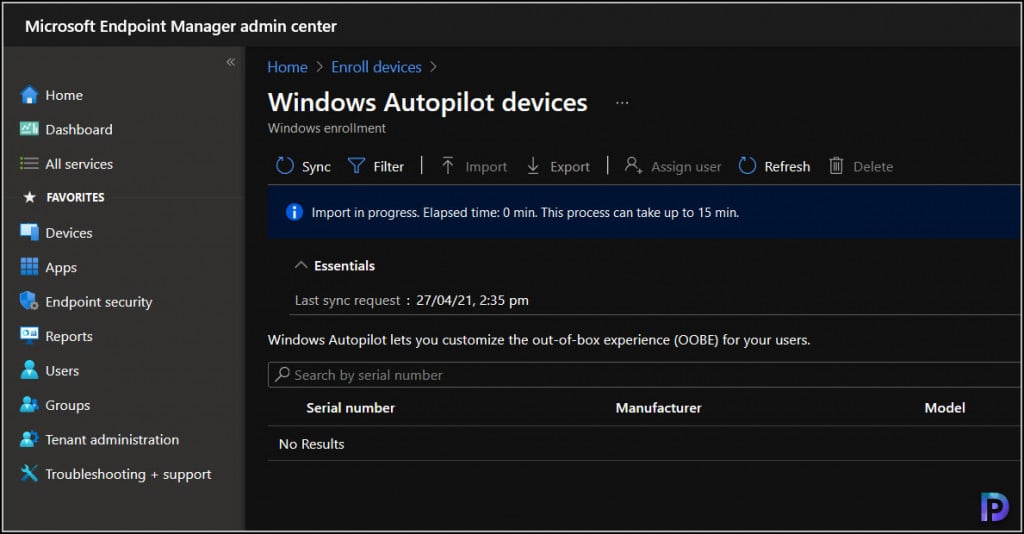
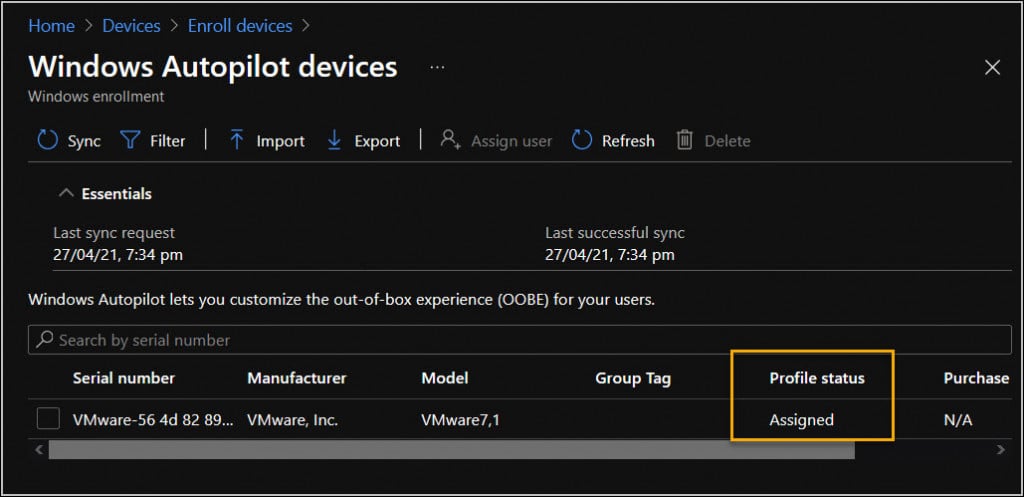
When you click Import, the process to import a device may take up to 15 minutes. You may click Refresh to verify your VM or device has been added.
After few minutes, we see the device that we imported but the profile status shows as Updating.
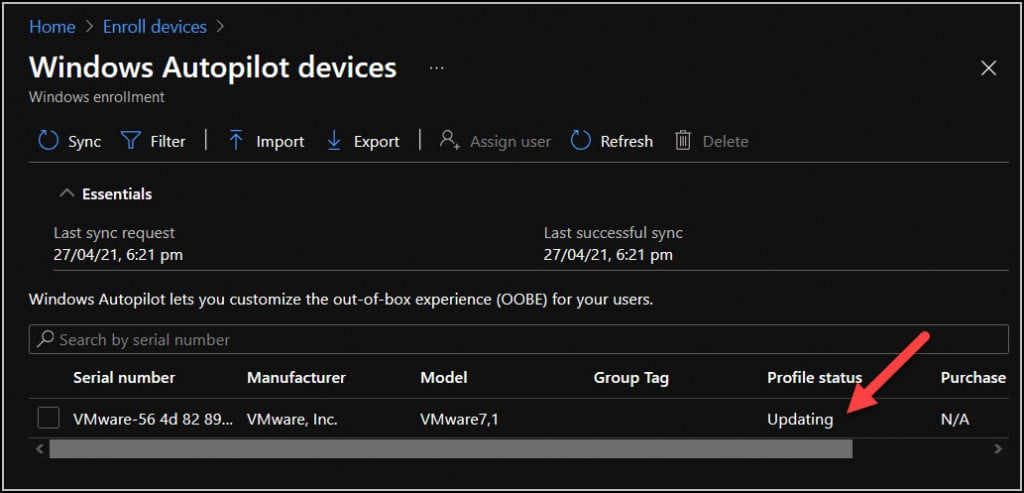
You must wait for few more minutes here until you see the profile status as Not Assigned. In addition, you can also hit the sync button and confirm if the sync is successful or not.
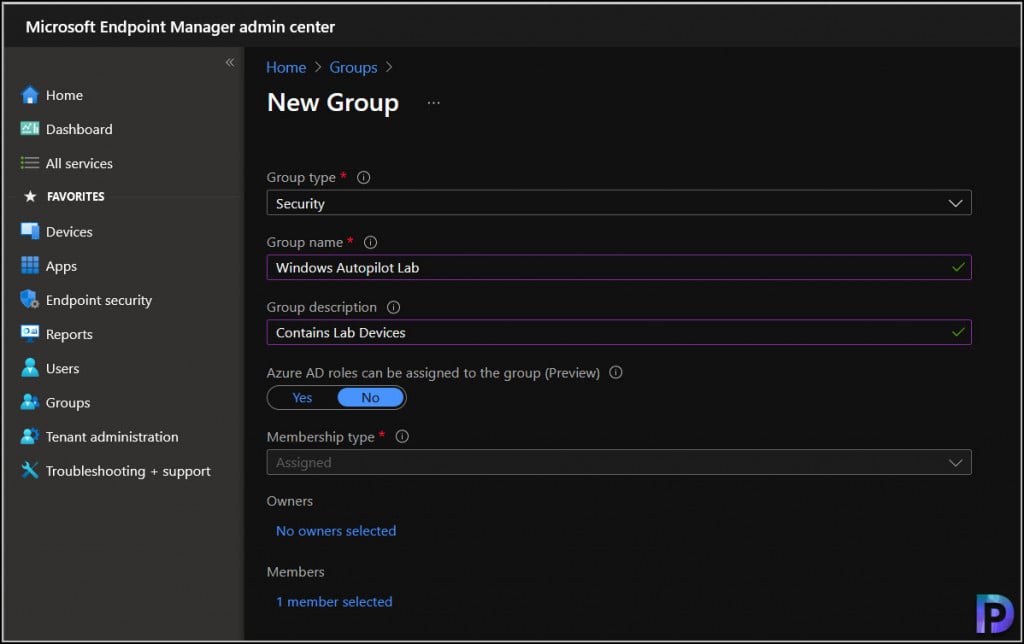
Create a device group for Windows Autopilot
When you create a Autopilot deployment profile it requires a device group and we will create it now.
- In the Microsoft Endpoint Manager admin center, choose Groups > New group.
- For Group type, choose Security.
- Type a Group name and Group description (ex: Windows Autopilot Lab).
- Azure AD roles can be assigned to the group: No
- For Membership type, choose Assigned.
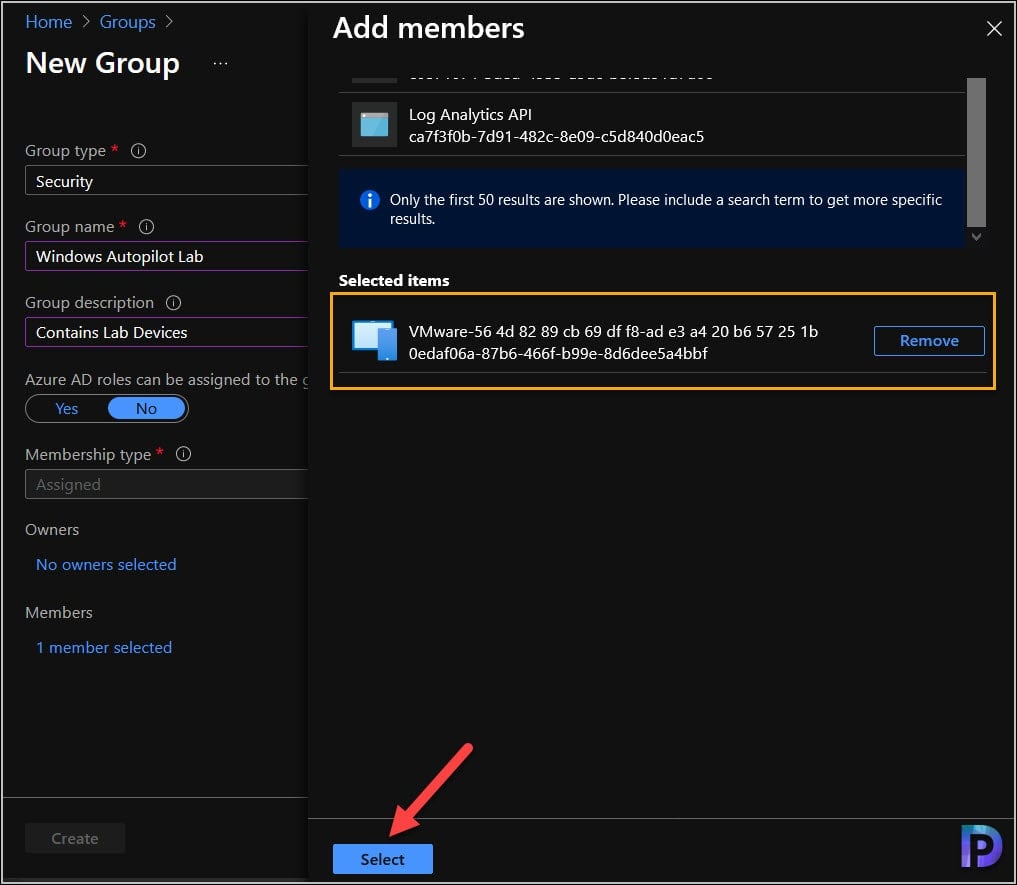
Click Members and add the Autopilot VM to the group. Hit Select and then create the group.
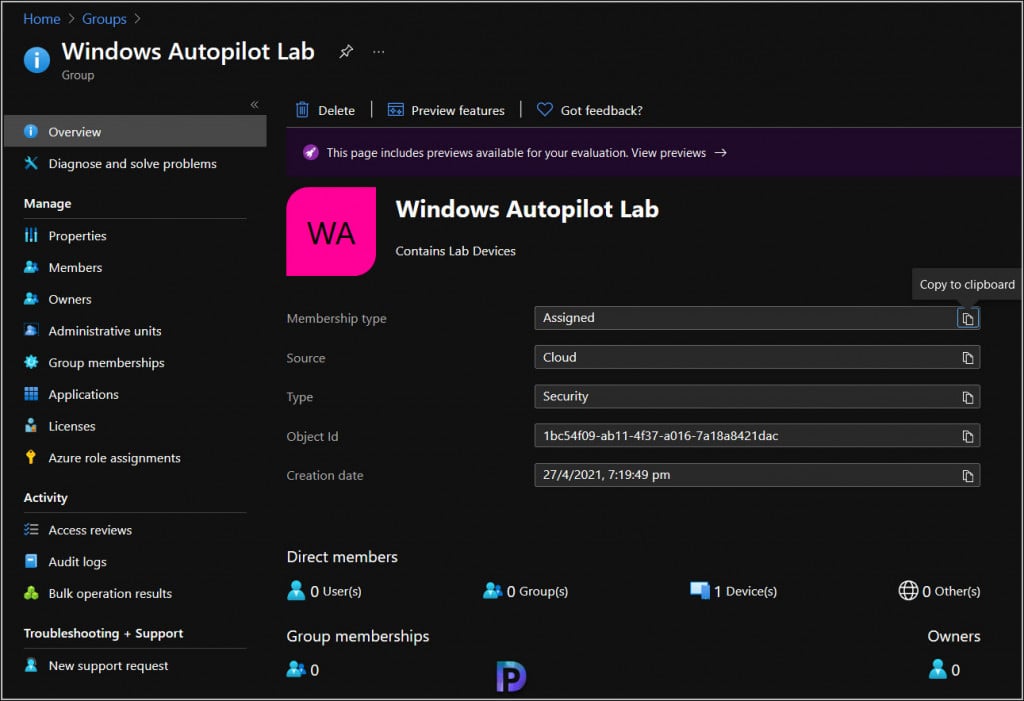
Here is the Autopilot device group that we created which contains our VM as it’s member.
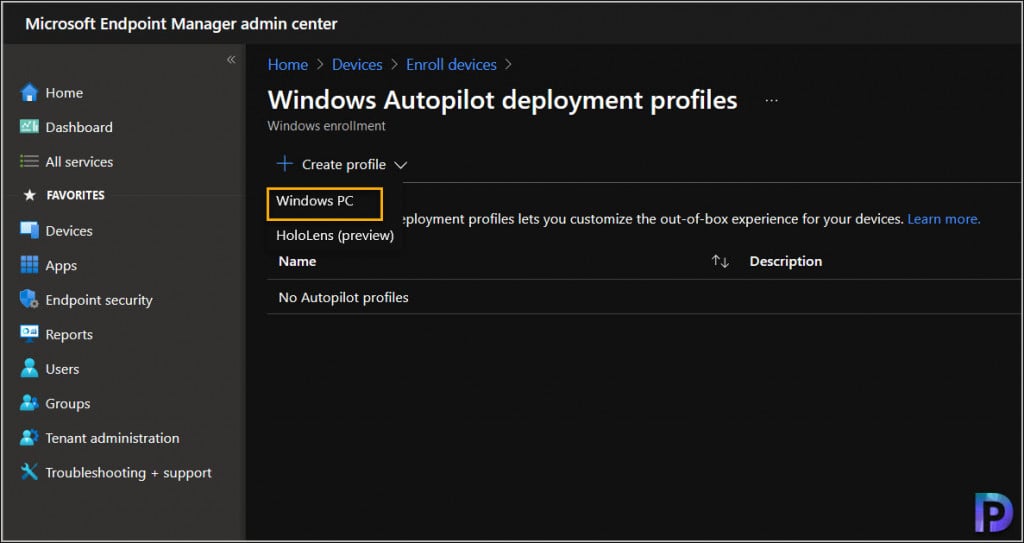
Create the Windows Autopilot Deployment Profile
Let’s create a new Windows Autopilot deployment profile.
- In the Microsoft Endpoint Manager admin center, click Devices.
- Then under Enroll devices | Windows enrollment select Deployment Profiles.
- Click on Create profile and then select Windows PC.
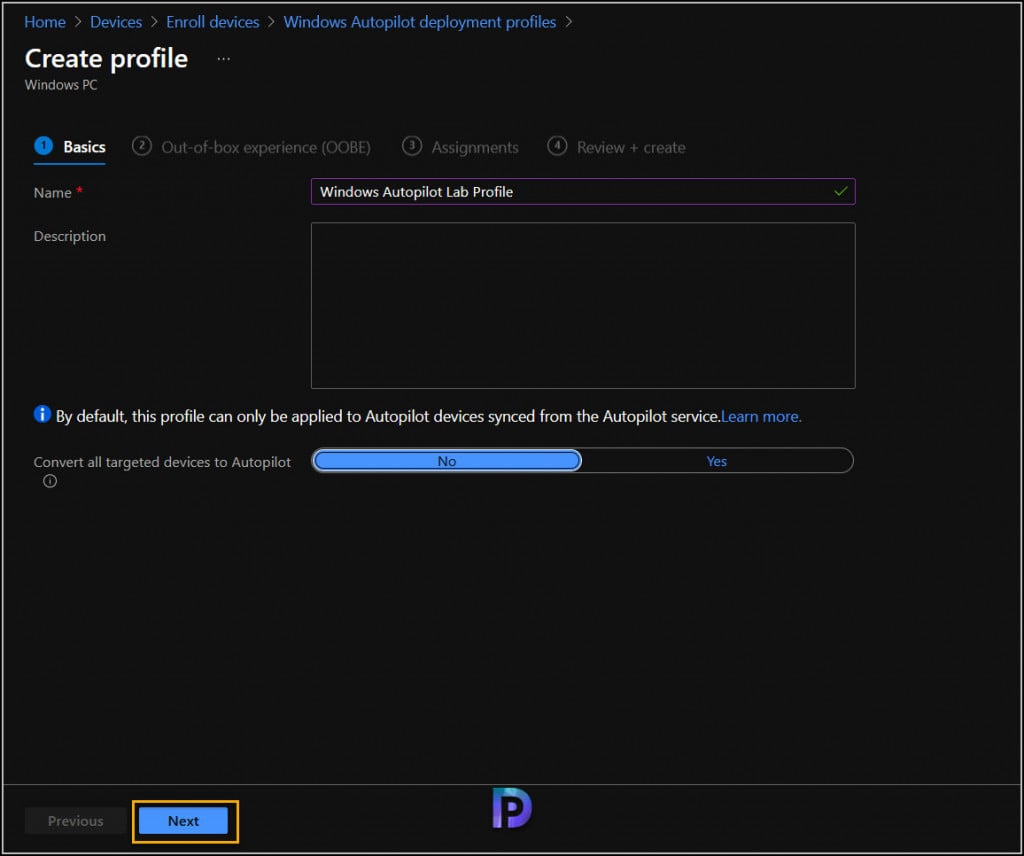
on the Create profile page, specify the name for the Autopilot profile. Let convert all targeted devices to Autopilot be set to No. Click Next.
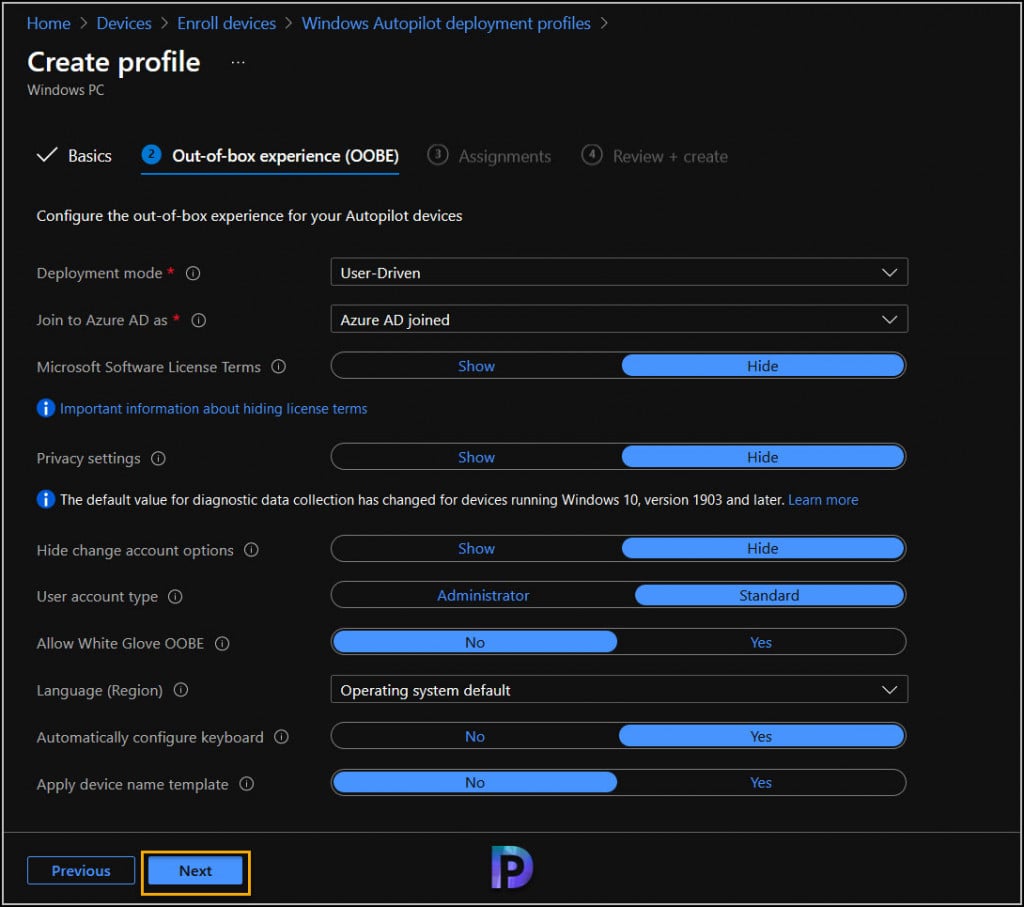
On the Out of box experience (OOBE) page there are lot of settings that you can specify. To keep it simple I am not going to change any values here and go with following default values.
- Deployment Mode – User Driven
- Join to Azure AD as – Azure AD joined
- Microsoft Software License Terms – Hide
- Privacy Settings – Hide
- Hide change account options – Hide
- User Account type – Standard
- Allow White Glove OOBE – No
- Language (Region) – Operating System default
- Automatically Configure keyboard – Yes
- Apply device name template – Yes
Click Next.
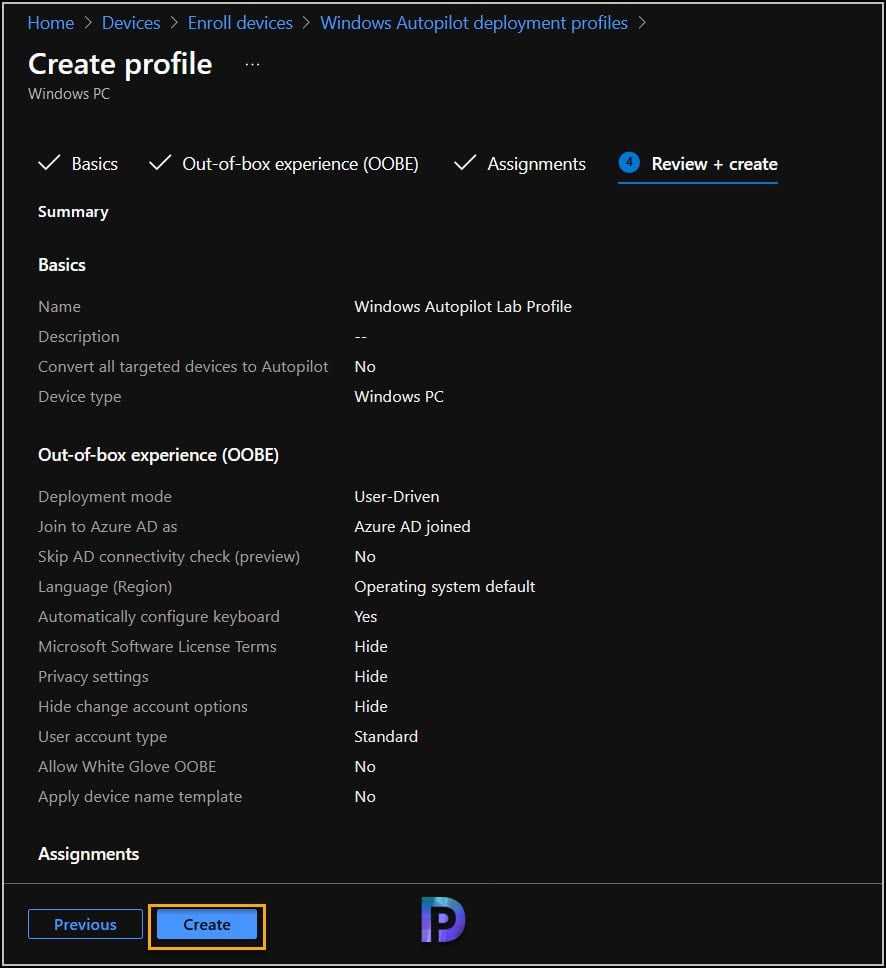
On the Assignments page, Select groups to include. Click the Windows Autopilot Lab group, and then click Select. Click Next to continue.

Click Create to create a Autopilot deployment profile.
After you create a deployment profile, go back to devices > enroll devices and take a look at the status of your Windows 10 VM. The status updates from Updating to Assigned. If you see the status as Assigned, proceed with next step.
Windows Autopilot Setup Process
Alright it’s time to visit our Windows 10 VM and check the Windows Autopilot setup in action. Before you proceed ensure the following prerequisites are met.
- The Windows 10 VM must have an internet connection. So check the adapter settings and ensure it can communicate to internet.
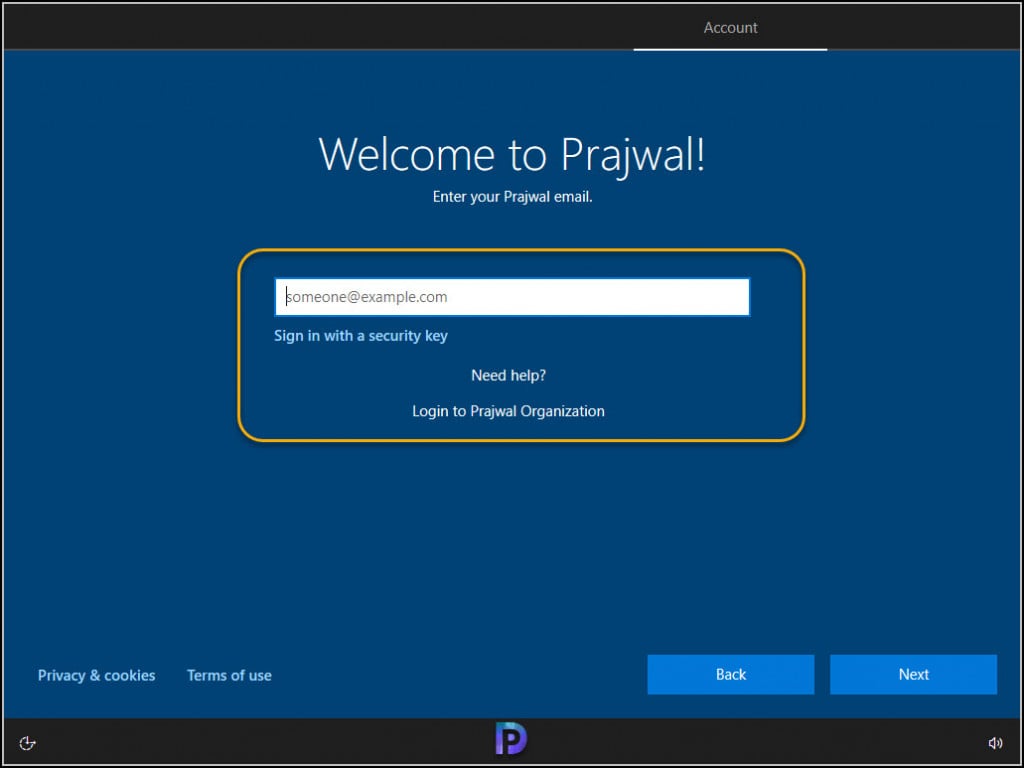
- Turn on the device and verify that the appropriate OOBE screens (with appropriate Company Branding) appear. You should see the region selection screen, the keyboard selection screen, and the second keyboard selection screen (which you can skip).
On the Welcome screen, enter Azure Active Directory credentials and on the next screen enter the password for the account.
In the next screen, you see Setting up your device for work. There are three main steps here.
Step 1 – Device Preparation
- Securing your hardware
- Joining your organizations network
- Registering your device for mobile management
- Preparing your device for mobile management
Step 2 – Device Setup
Configures the Windows 10 device.
Step 3 – Account Setup
Configures your account.

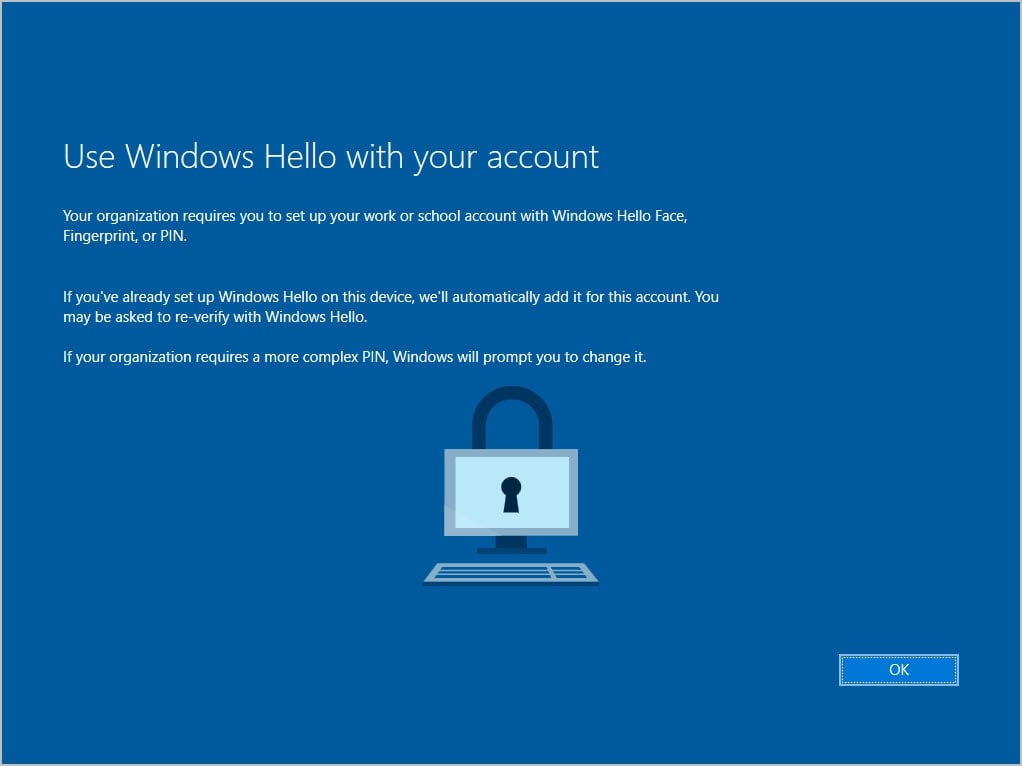
Click OK to use Windows Hello with your account.
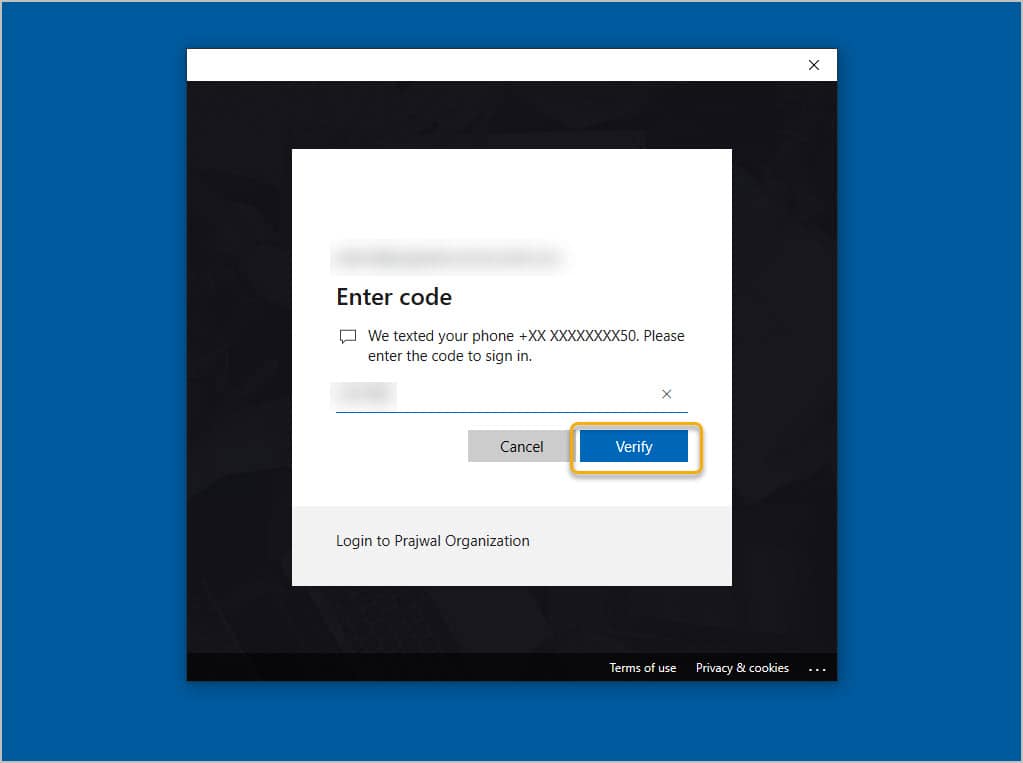
Enter the code that appears on your phone and click Verify.
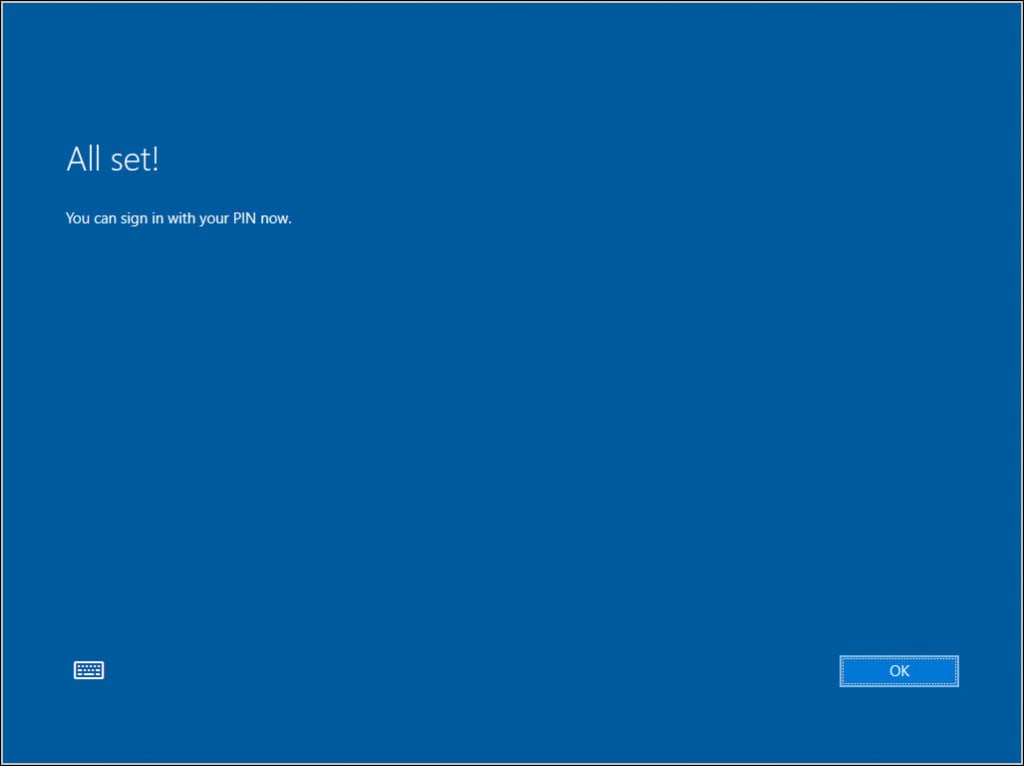
In order to secure this device, setup a PIN. The PIN that you specify here must be 6 characters long. Click OK.
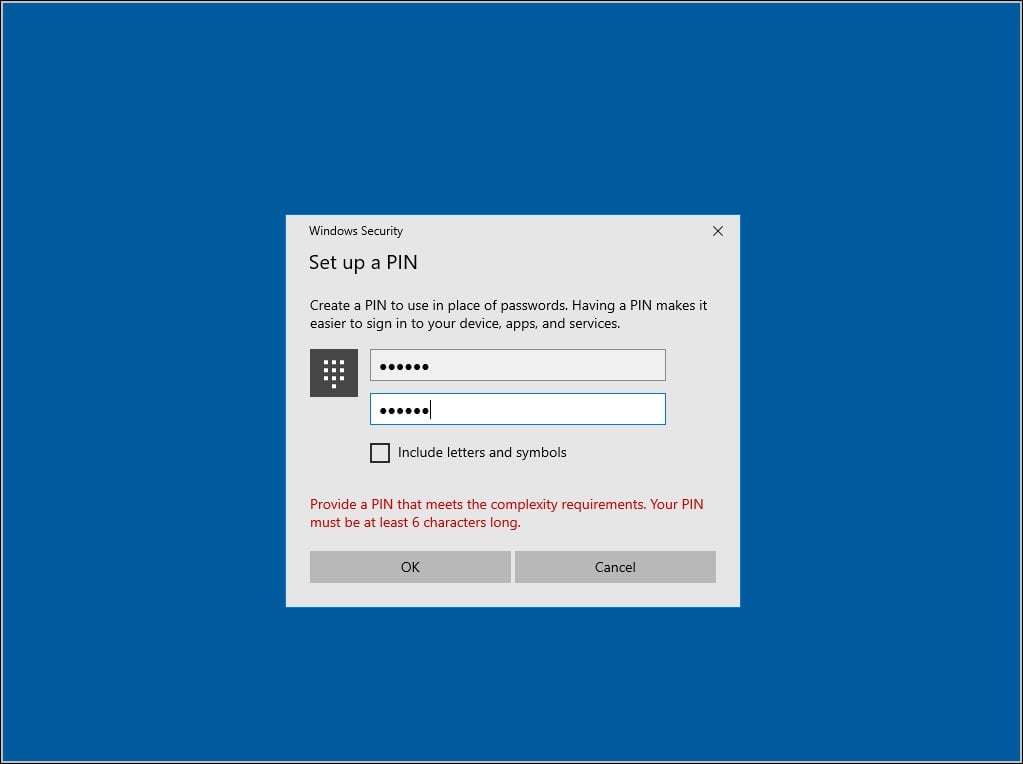
You have successfully set the PIN now. Click OK and this completes the Windows Autopilot Setup.
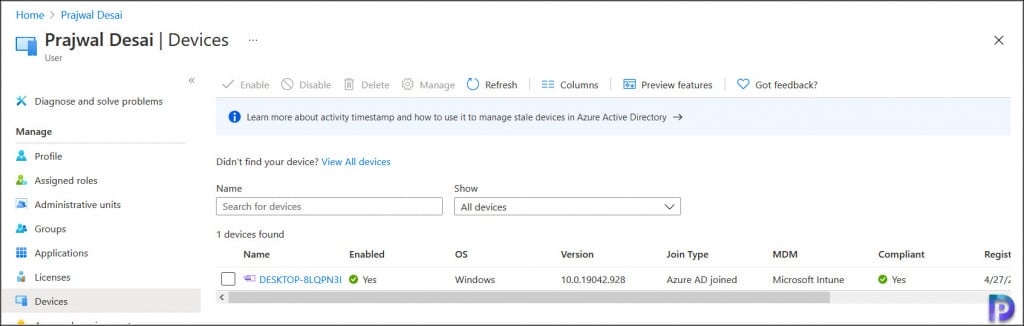
The device should show up in Intune as an enabled Autopilot device. The icon for this device is bit different from rest. Go into the Intune Azure portal, and select Devices > All devices. Select the device and you will see a banner This device is a Windows Autopilot device.

Hi Prajwal,
Great Document really helps.
I have done my setup with the help of the document but after OOBE to my VM i cant login to that VM with assigned User. So in short after OOBE i am stuck what could be the reason and troubleshooting for this ?
Do you have a guide on how to use Global Secure Access for AD join for hybrid environment?
Setting a naming template in deployment profile seems to cause a rebbot and user needs to sign in again before ESP continues. Is this normal? Really slows things down.
Hallo Prajwal,
thanks for the Guide and all Others before.
I have a question to Autopilot and ESP when Ready.
Is there an indicator that i can read with a script that device is currently in Autopilot/ESP phase.
I am searching for a solution to run a script only in Autopilot/ESP phase.
Thanks
Andreas
HELLO EVERYONE,
How to add my bootable USB hardware id for Intune. when i give the command
md c:\HWID
Set-Location c:\HWID
Set-ExecutionPolicy -Scope Process -ExecutionPolicy Unrestricted -Force
Install-Script -Name Get-WindowsAutopilotInfo -Force
$env:Path += “;C:\Program Files\WindowsPowerShell\Scripts”
Get-WindowsAutopilotInfo.ps1 -OutputFile AutopilotHWID.csv
it shows only my internal laptop hardware id details how to get my bootable usb hardware id details
Any way we can tell what order the device/user profiles are being installed in? Do all assigned profiles get assigned before getting brought to the home screen, or do some only install after the first time login?
Thanks for revising it and keeping it upto date.
Hi Prajwal,
Thank you for the guide. I have a question about the user profile.
What is the best solution? Local or in the cloud?
Great Article, however when I import the CSV file into Intune it fails after 15mins with “The sync operation could not be completed. 1 Windows Autopilot device upload(s) timed out.”
I haven’t experienced this issue before. Can you upload the screenshots and log a thread in the community forums please?.
We have created Hybrid AD join profile like Domain join police, Intune AD connected, OU and required permission, Sync on AD with Azure AD but once Autopilot done unable to login device with domain id or Azure id it’s say “make your device connect corporate networks”
So what I do this if are anything pending in our configuration please suggest me.
Thank you so, much for this information. A step by step, program to follow through. and it is working perfectly.
Here I cant see how the end point will understand that it is autopilot device it should speak to an MDM rather than going for self build. In case of Apple ADE/DEP there is a step named setup assistant where Apple device speak to ABM if its SN is registered in ABM, if yes then it will again do a query to get MDM to speak to, if its SN is not found in ABM based on its query then it will go for self build. I think something goes in Windows 10/11 also to do a query to check if it is autopilot. May I know what is that step?
Hi Prajwal
What a great article, easy to follow, and worked perfect.
Thanks a lot for sharing
-Jørn Laursen
Hi Prajwal,
Thank you for the great article! You mentioned that the LTSC 2019 version is supported for Windows Autopilot; did you find a offical statement from Microsoft regarding this? If I look on their website i only see SAC & GA versions listed.
Regards
Jonas
Thanks for this excellent information about Microsoft autopilot
Hi Prajwal,
I read another excellent blog of yours. Very nice explanation.
Can you share the Troubleshooting blog for Autopilot and monitoring method for Autopilot deployment in Intune.
Thanks
Narayanan
Hi Prajwal,
Thanks like always for this blog. I have a question for companies they have many devices do they have to create the “AutoPilotHWD.csv” file for each device and uploaded to MEM or they is another way for many devices enrolment?
Hi,
Have you ever had it where the autopilot devices profile is being ignored and is adding the user as a local admin to the device?
Thanks
Lewis
Hello Prajwal, i love your blog. i would like to know, how long do you have to wait to enroll a computer, since the computer is been assigned an autopilot profile. We are facing that we have to wait 24h to be sure that the computer recieve everyconfiguration correct. If we enroll the computer, p.e. 1h after the profile was assigned there are configurations that will not synced. p.e. the computer name change.
Thanks for this detailed article. I will be needing to visit this page again as I will be setting one up soon.
Great Article and explanation. Have you considered updating the document to include Windows 11 and the new Intune requirements with screen prints.
Can we create unattend.xml file for Windows Autopilot? basically our customer wants to do the below:
1. Remove “I don’t have internet ” option from “Let’s connect you to a Network”
2. Hide reset option ( should be available to Admin )
As per my understanding OOBE does not contain network settings and hide reset option as well.
Great stuff. Question, we are getting error code 80070002 after login in with corporate address but are getting it from within the company network too. We have it set up as Hybrid AD join. Any ideas what could our error be?
Thanks
meant to say corporate email address
Hello,
I created an SCCM OSD Deployment task sequence to deploy a plain vanilla Windows 10 OS then use the “Prepare Windows for Capture” at the end of the task sequence and enabled the option for “Shutdown the computer after running this action” but for some reason machine restarts back to OOBE.
My intention is once it completes the OOBE then shutdown the machine and we can send it out to the end-users.
Any ideas on how can I make the machine shutdown properly at the end of the task sequence?
Thank you, Bob
Having the issue where it fails during MDM enrollment – with error 0x80180014
Looking at Endpoint Manager center at devices and auto pilot devices, everything looks normal and looks like it should have worked.
Hi Andrew, most likely it is because of not meeting minimum CPU criteria for Autopilot. Please add 4CPU to the VM instead of 1, this will fix this problem.
Hi,
Is Autopilot possible using a Intune Device License for those devices that will only ever be setup for one user (Tills, Kiosks, media players for example)?
Thanks
Hi, great documentation… I have followed it to the letter but on my Hyper-V machine I still get the failed to complete the device preparation section – 0x800705b4. People seem to suggest that its because the process is not set to user driven. However it is, and I have TPM enabled in the Hyper-V.. any suggestions would be greatly appreciated. Thanks
Check your in Azure AD admin center -> Devices -> Device settings witch users may join Azure AD. I had the same error.
Hi,
is it possible to skip the windows hello registration?
Regards, Peter
Hi Prajwal,
We’ve discovered a loophole. If the user enters their email address wrong into the first login screen after resetting the laptop (after the machine has been through autopilot setup once and has been joined to the domain), Windows gives them an option to set up a local account.
Is there any way to suppress the option to create a local account?
I followed the guide and its appearing in my tenant as Assigned. Yet the OOBE will not come up. Rebooted it several times. Any ideas why that wouldn’t come up.
How to stop user to choose the region and Keyboard language on below steps;
————————————————
Turn on the device and verify that the appropriate OOBE screens (with appropriate Company Branding) appear. You should see the region selection screen, the keyboard selection screen, and the second keyboard selection screen (which you can skip).
————————————————
This is brilliant, thanks
Hi Prajwal,
Is there any document or guide in where you explain the hybrid config of autopilot? I mean about the setup of the AD connector. In our org we’re interested in hybrid azure join.
Thanks!
I have created a test autopilot but it is asking for a windows 10 product key after logging in.
where can I obtain a windows 10 Education product key?
We have SCCM, Intune and Office 365.
Many thanks,
Jason
Great article and easy to follow! Thank you!
Is there a way to automate the capture and import of the Hardware ID to intune using SCCM ?
Hi Simon,
Did you ever get a resolution for this?? About to ask the same question. 50 Devices to collect and import HID is not an easy task.
If they are in domain you can do it with remote powershell and upload the output to some shared folder. Also you can install some snmp software on one computer and push the agent to others via network, then you can send a powershell script to all of them.
Great Article! How have you overcome companies custom naming conventions? How can I convince management that a device name is no longer important, as it is tied to a user….