


This guide takes you through the steps to integrate Microsoft Store for Business with Intune. Once you enable and configure Microsoft store for business, you can deploy the Microsoft Store for business apps to Intune users.
This documentation assumes that the Intune environment is already configured, and that you are already capable of assigning and deploying applications from within Intune.
In short this guide will show you how to :-

- Enable and Configure Microsoft Store for Business (Integrate Microsoft Store for Business with Intune).
- Specify/Purchase Applications to Deploy
• Sync the applications from MSFB & Intune
• Assign MSFB applications from within Intune - The End User Experience of App installation on Windows 10 device
Integrate Microsoft Store for Business with Intune
Let’s look at the steps to integrate Microsoft Store for Business with Intune. The first thing you need to do, in order to be able to assign and deploy Microsoft Store for Business (MSfB) applications via Intune to users (and devices)* is to setup Microsoft Store for Business. To do this, visit the Microsoft Endpoint Management (MEM) console at https://devicemanagement.microsoft.com and sign in using an account with Admin permissions to the portal.
From the left-hand menu, click on Tenant Administration and select Connectors and Tokens. Microsoft Store for Business should be the default option when you open Connectors and Tokens.
If the Store is not yet linked to Intune, you will see the status as Not Set Up, and you will be given 3 steps to follow, to enable the connection between the two.

Follow the on screen prompts by opening the Business Store. (https://www.microsoft.com/business-store), if required, sign in at the top using credentials with admin rights to the MEM portal.
When setting up the store for the first time, a wizard will be displayed and you will need to follow the on screen prompts.

Once you have completed the wizard, you should be logged in to the store. On the top ribbon, click Manage, and scroll down to Settings > Distribution Settings (from the main box) or Distribute (from the Settings tab).

Within the Distribute tab you can set the store name, which is displayed in the ribbon across the top of the store. Usually you would name this after the customer, to something relevant to or specified by the customer.
More importantly, at the bottom of the Distribute settings page, you will see the heading Management Tools. Microsoft Intune/Microsoft Intune Enrollment may already exist in this list, however, if they do not, you can click Add Management Tool and search for Microsoft Intune – most importantly – Activate Microsoft Intune.

Once Microsoft Intune has been activated as a connector within the Store settings, browse back to your MEM Portal, specifically Tenant Administration and Connectors and Tokens. You should now see the status is Active, with a green tick.
Choose the language in which apps from the Microsoft Store for Business will be displayed in the Intune console.
Synchronizing the Store with Intune
After you have done that, all that’s left to do is click the Sync button. This will pull through any applications that have been made available in the private store, and they will be visible within Intune Apps for deployment (if setting up for the first time it is unlikely any apps will exist – yet).
With Intune and the Business Store connected to one another, you can now set about publishing apps from the Store, for deployment via Intune, to do this.
Browse to the Business Store, click on Shop for my group. Use the search box in the upper right, to find the application(s) you wish to publish, and click Get the app. You will receive a notification confirming your “purchase”. (This guide focuses on Free applications, you will need to configure payment details if you are publishing paid for applications. You will also need to purchase and assign licenses to paid apps before they can be assigned).

Intune then needs to synchronise with the Windows Store. This is done by clicking the Sync button from inside the MEM Portal, specifically Tenant Administration and Connectors and Tokens.

After the Synchronization occurs, the application you have purchased from the Store, should be visible within the Apps section of the MEM portal. From here, it can be assigned/deployed as you would any other application.
To do this, from the MEM Portal homepage, click on Apps from the left menu, and then All Apps. If there are a lot of Apps, it may be beneficial to filter the list by Platform. Specifically, in this instance Windows.
Find the Microsoft Store for Business application that you wish to deploy.

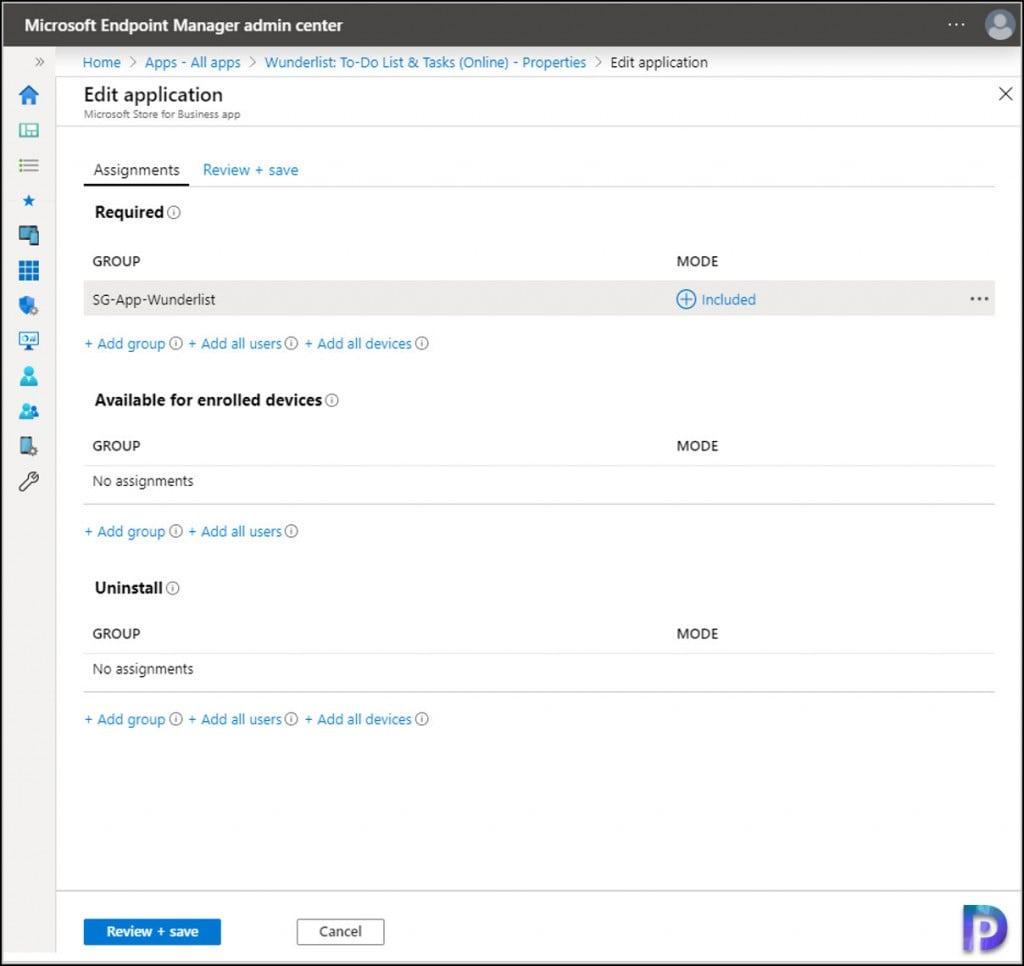
Select the application, and from the Application Overview page that opens up select Properties and scroll to the bottom of the page. You will see Assignments (Required, Available for enrolled devices and Uninstall). Next to Assignments, you should see the option to Edit. Click Edit.
From here you can select the groups that you wish to deploy this application to. It is very important to understand, that Windows Store for Business applications can ONLY be deployed to users. This means that you Security Groups must contain users, not devices.
In the example below, you can see SG-App-Wunderlist is assigned, as an Inclusion. This was achieved by clicking Add Group, searching for the Security Group and selecting Save. You can change the Included to Excluded, by simply clicking on the current Mode.
Once happy with assignments, select Review & Save. Allow Intune & the Users/Devices to sync (~30 minutes) and you should see the application appear automatically, on the users device (within the Start Menu).

If Company Portal is also present on the device, this application assignment should also be visible through the portal app.


Hi
Is there a way to reverse this process?
The disable option is greyed out.
how do we update ms store for business (online) app via intune ?
since we only have available intent so will the update be doing automatically or will be showing under company portal app if CP is deployed and if not then portal.manage.microsoft.com ?