

In this article, I will explain how to deploy software updates using SCCM (ConfigMgr). Use this guide to deploy the software updates to enterprise computers and patch them with the latest updates.
This SCCM patch management step-by-step guide covers all the steps required to deploy the updates to production machines. To stay protected against cyber-attacks and malicious threats, you must keep the computers patched with latest software updates.
The software updates are released by major software vendors to address security vulnerabilities in their existing products. With Configuration Manager, you can also deploy third-party software updates, which is really an advantage.

Software Updates in SCCM
When it comes to deploying updates, SCCM is the best tool to do it. You must understand that deploying updates is a complex task. SCCM make it easy not only to deploy updates but to gather the deployment reports as well.
Software updates in SCCM provide a set of tools and resources that can help manage the complex task of tracking and applying software updates to client computers in the enterprise.
To deploy software updates, you can use any of the below methods.
- Automatic Deployment
- Manual Deployment
- Phased Deployment
Deploying third-party updates using SCCM
Starting with SCCM 1806, you can deploy third-party updates easily. You can add third-party Software Update Catalogs node in the Configuration Manager console.
You can subscribe to third-party catalogs, publish their updates to your software update point (SUP), and then deploy them to clients. For more info, read this post.
To summarize this post, we are going to perform the following.
- Install and configure Software Update point role
- Create a software update group.
- Add the updates to a software update group
- Distribute the update content to distribution points
- Deploy the update group to clients
Download Software Updates in Configuration Manager
There are several methods available to you for downloading software updates in Configuration Manager. The easiest method is to create an automatic deployment rule (ADR) which downloads the software updates to the content library on the site server.
Another way to download Software Updates is via Manual method. In this method, you select only the essential software updates from the Configuration Manager console and download it to a location on site server.
After the Software Updates are downloaded, they are copied to the content library on the distribution points that are associated with the configured deployment package. You can select multiple distribution points and send the updates to each DP.
If you want to download the software updates before you deploy them, you can use the Download Updates Wizard. Doing this will enable you to verify that the software updates are available on distribution points before you deploy the software updates to client computers.
Deploy Software Updates Using SCCM
There are three ways to deploy software updates using SCCM:
- Manual deployment: In Manual software updates deployment, a set of software updates is selected in the SCCM console and these updates are deployed to the target collection.
- Automatic deployment: Automatic software updates deployment is configured by using automatic deployment rules. This method is used for deploying monthly software updates and for managing definition updates.
- Phased deployment: In SCCM you can create phased deployments for software updates. Phased deployments allow you to orchestrate a coordinated, sequenced rollout of software based on customizable criteria and groups.
The best method for deploying software updates for enterprises is Automatic Deployment, which is listed among the methods above. ADR is the method of choice for the majority of organizations because it is simple and practical. When the ADR rule runs, the software updates that meet specified criteria are added to a software update group. The content files for the software updates are downloaded and copied to distribution points.
If you are looking to create an ADR and deploy software updates using SCCM, take a look at a detailed guide on how to create an Automatic Deployment Rule in SCCM.
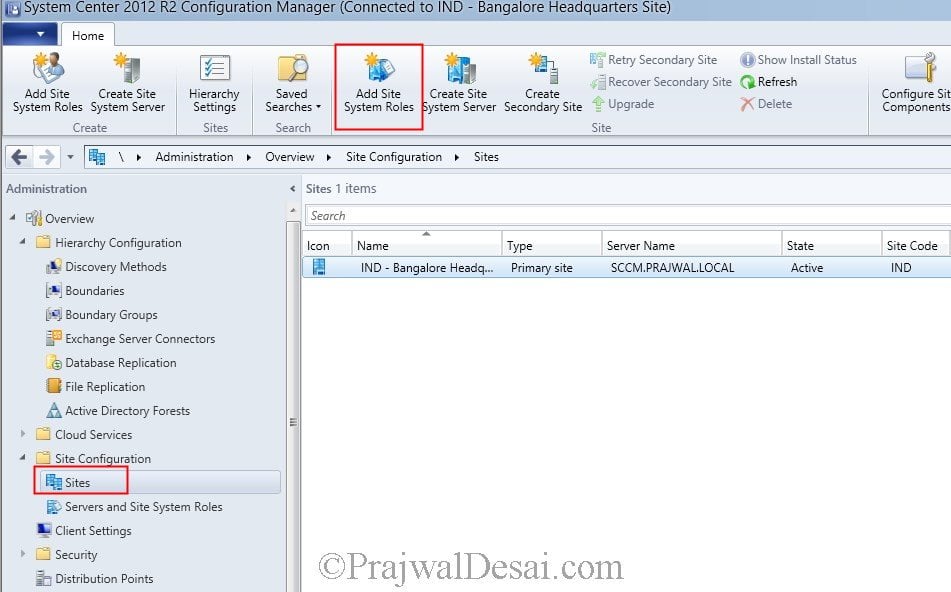
Install Software Update Point Role using SCCM Console
To install software update point role:
- Launch the SCCM console.
- Click Administration > Site Configuration > Sites.
- At the top ribbon click on Add Site System Roles.
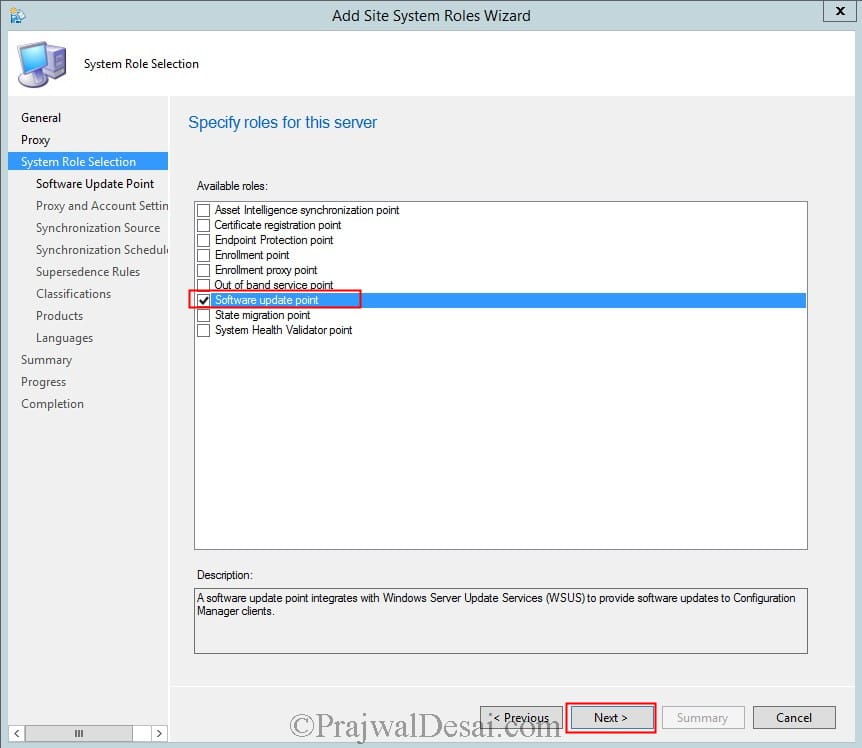
From the Add Site System Roles Wizard, select Software Update Point and click Next.
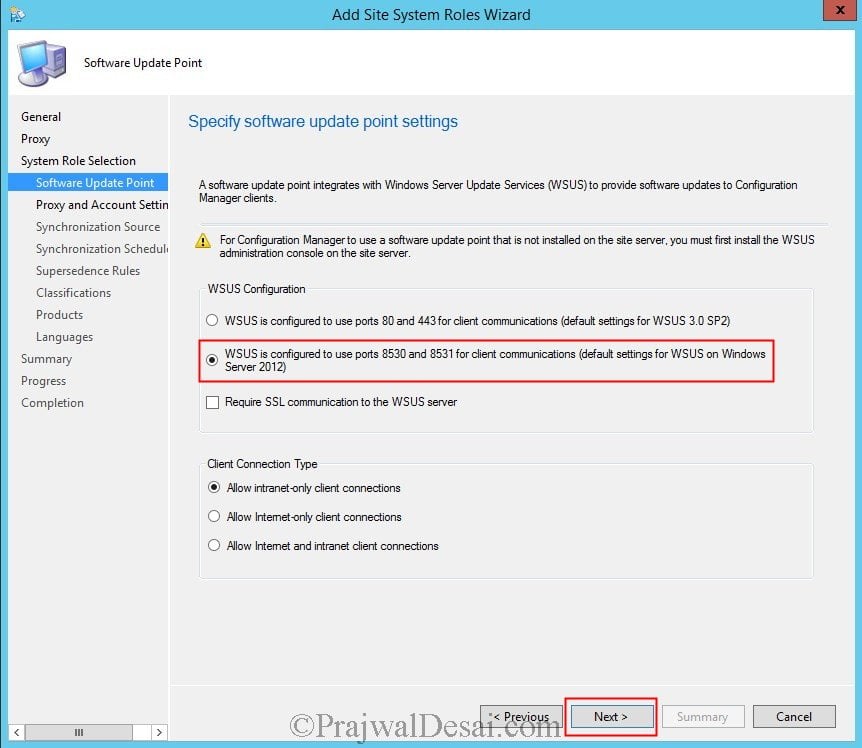
For WSUS Configuration, select WSUS is configured to use ports 8530 and 8531 for client communications and click Next.
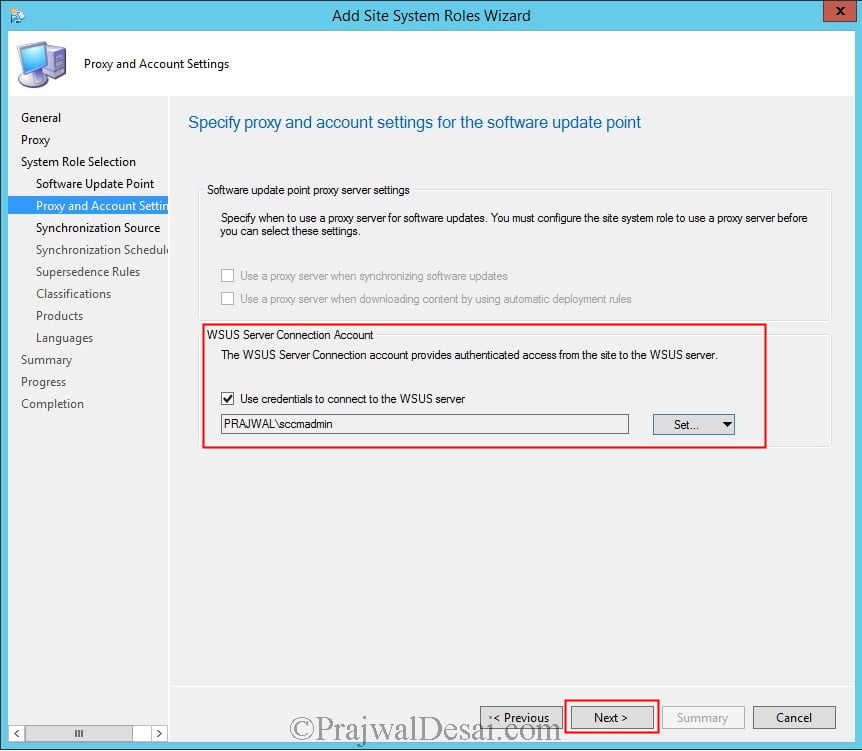
Select an account that can connect to WSUS server. Click Next.
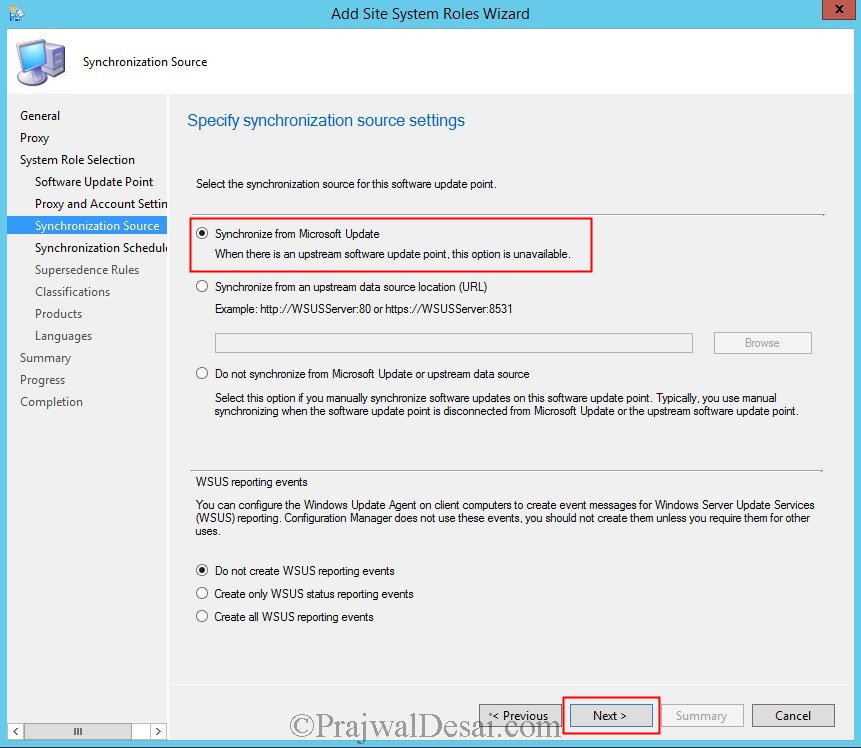
Select Synchronize from Microsoft Update and click Next.
Click Enable synchronization on a schedule. Select Simple schedule. You may also click Alert when sync fails on any site in hierarchy. Click Next.

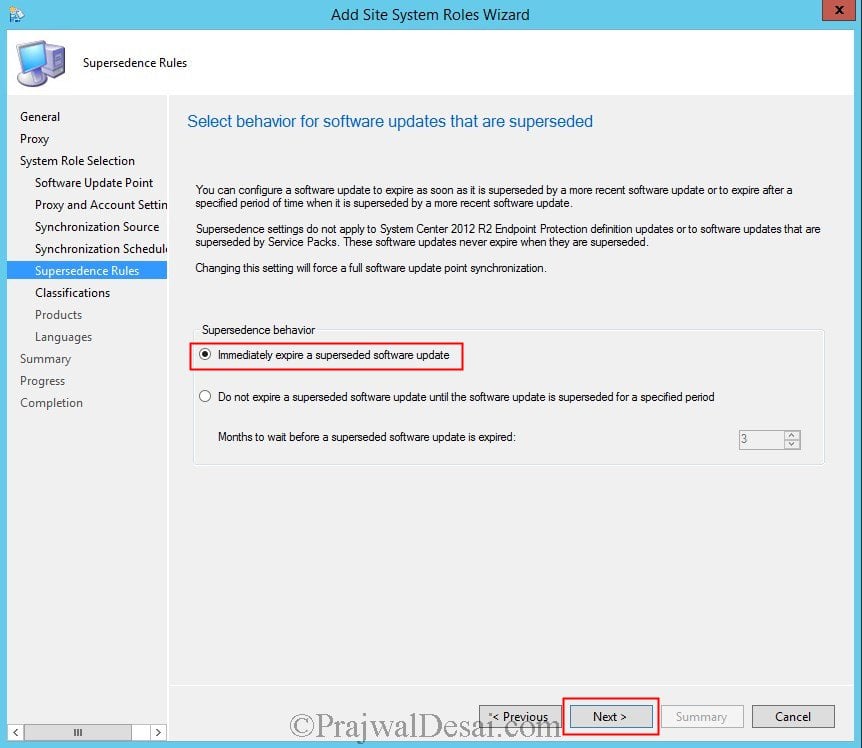
For Supersedence behavior, select Immediately expire a superseded software update. Click Next.
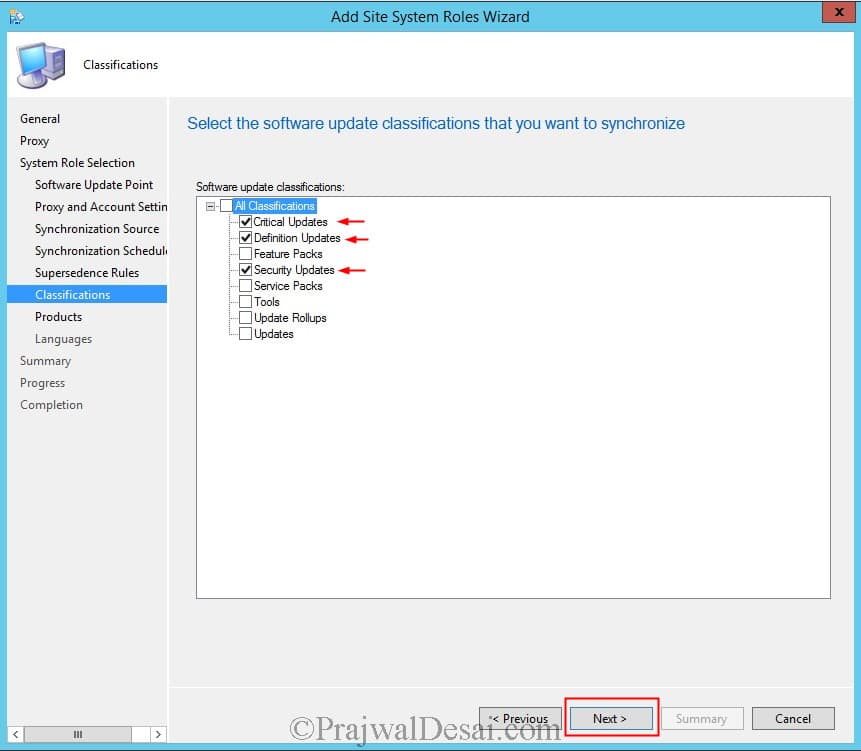
 Software Update Classifications
When you want to deploy updates, selecting the classifications (types of updates) is an important step. According to what I have observed, the majority of organizations only deploy Critical and Security updates.
However, if your requirement is to deploy other updates in addition to critical and security updates, select them. Select Critical Updates, Definition Updates and Security Updates. Note that you can do this after installation of SUP as well. Click Next.
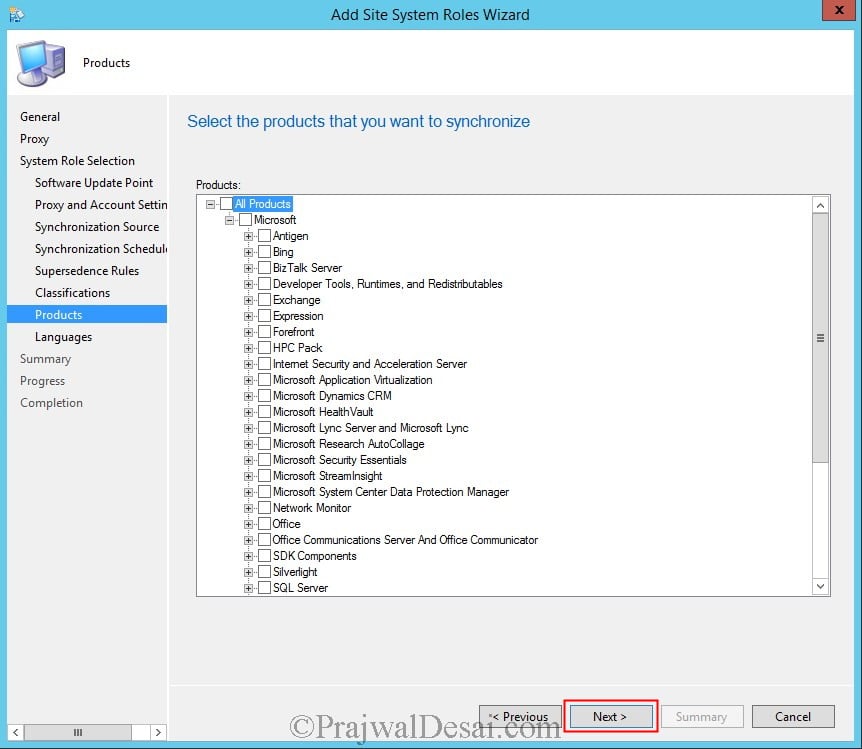
Choose the products that you want to synchronize, in this step I have selected Windows 7, Forefront Endpoint Protection 2010. Click Next.
Choose the desired language, click Next.

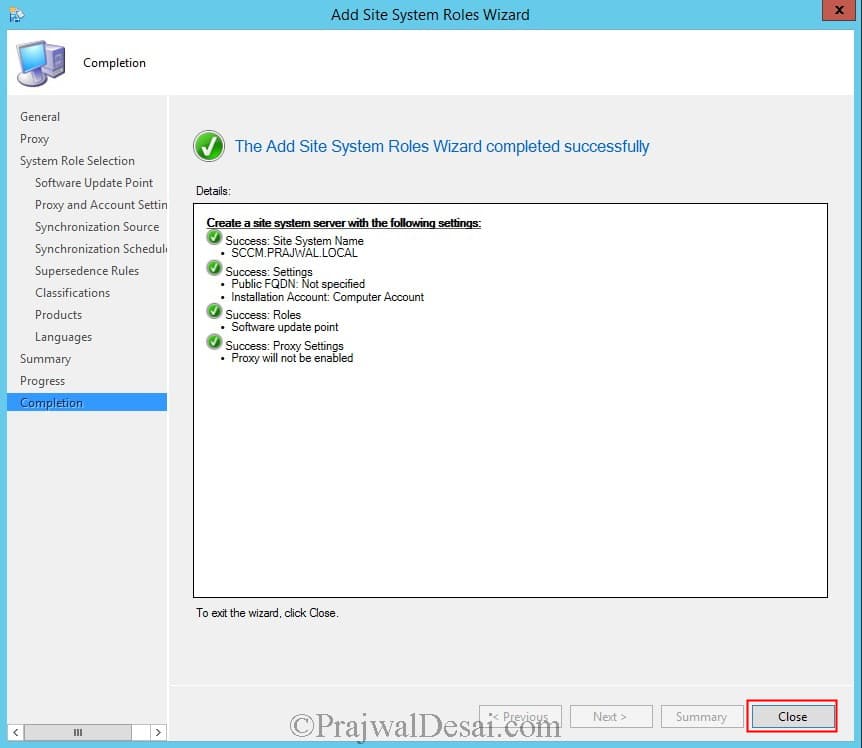
The Software Update Point role has been installed. Click Close.
Synchronize Software Updates
After installing the software update point role, we must run an initial software updates synchronization.
- In the SCCM console, click Software Library > Overview > Software Updates.
- Now click All Software Updates. On the top ribbon click Synchronize Software Updates.

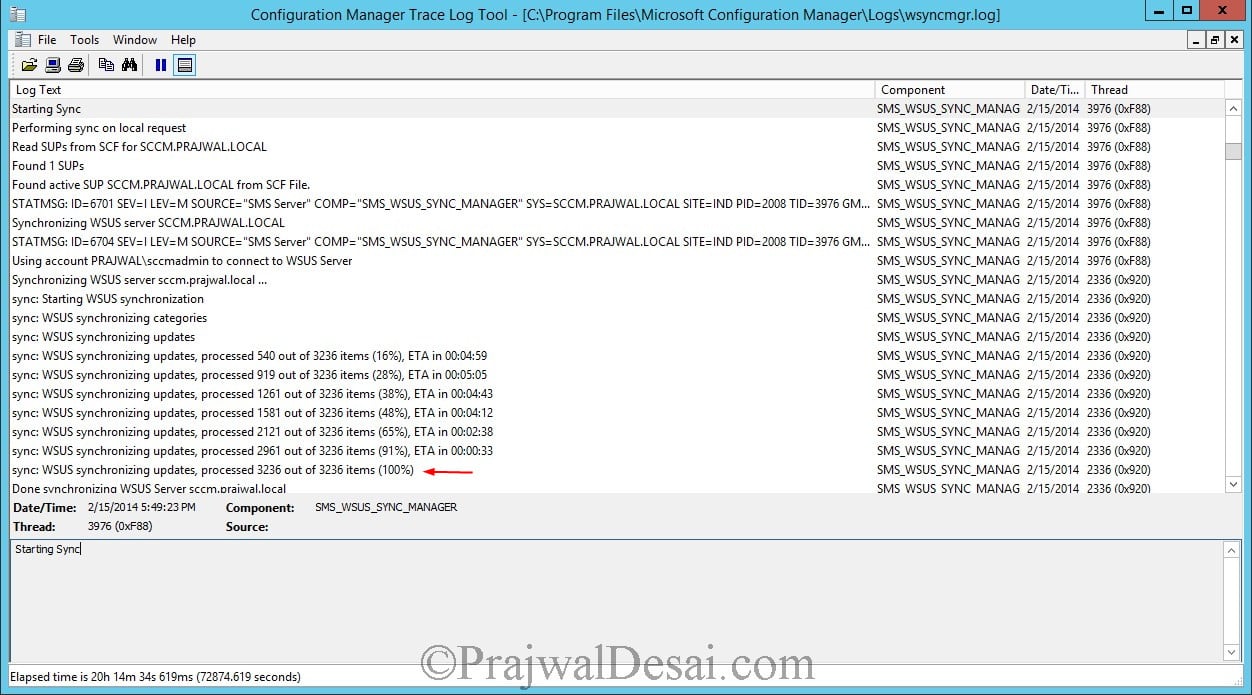
To monitor software updates sync, open wsyncmgr.log and WCM.log file.
Below is the screenshot of the wsyncmgr.log file, and we can see that the WSUS is synchronizing the categories and updates.
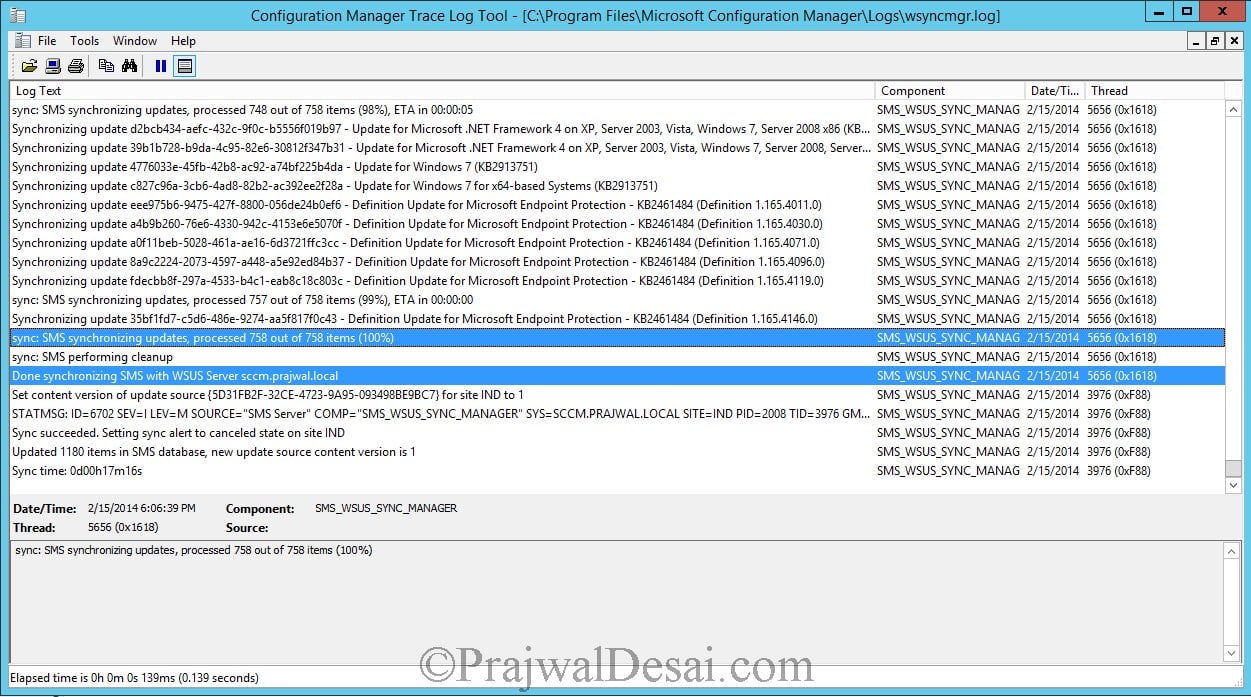
The synchronization is complete. The software updates can now be seen when you click All Software Updates option in CM Console.
Create Software Update Group
In the console we have got several updates. Deploying all the updates is up to your choice. When you want to target updates to a specific product, you can do so.
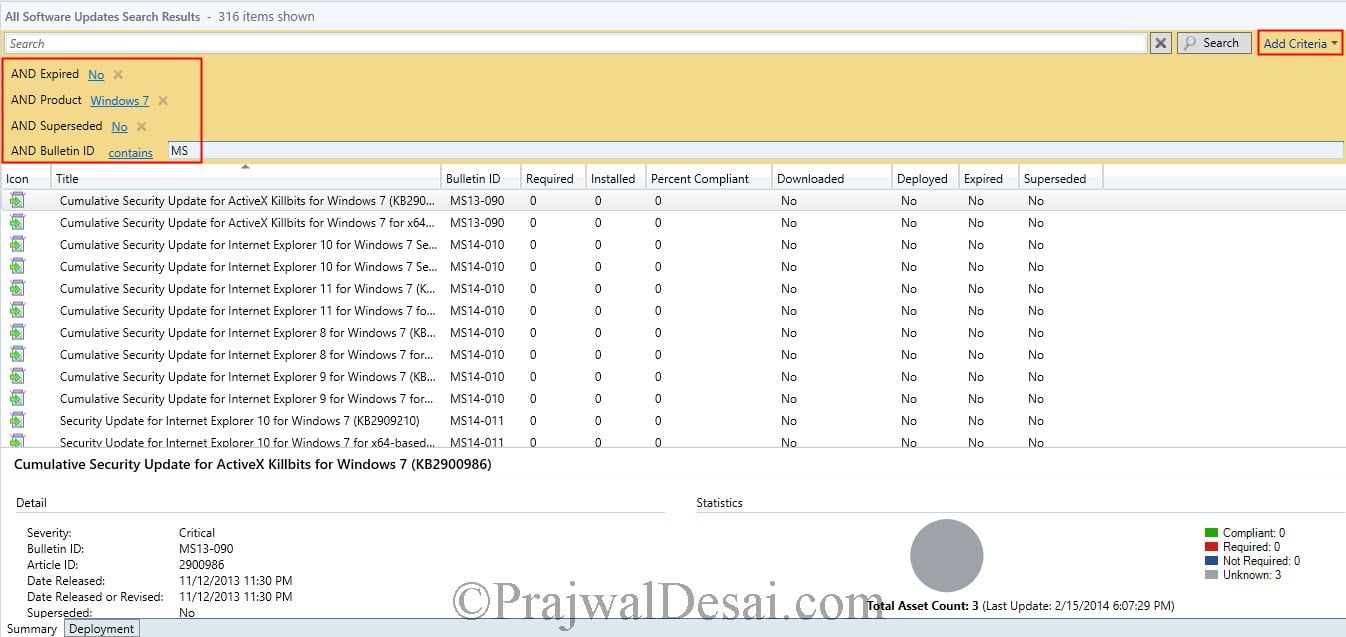
Using the search criteria, we can filter the updates and deploy only the ones that are important. Most of all you can select all that are applicable for specific product.
Click Add criteria.
Select Expired, Product, Superseded, Bulletin ID. Click Add.
Choose the product as Windows 7, Bulletin ID as MS, Expired as NO, Superseded as NO.
When you specify the above criteria and click Search, the updates are shown based on your criteria.
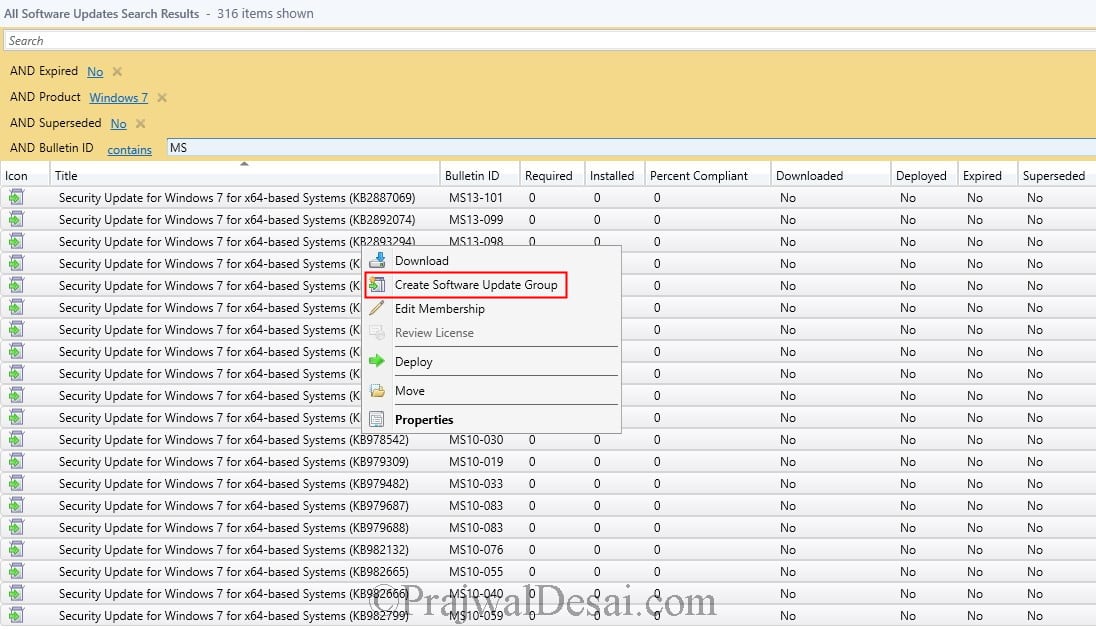
Now select all the updates (hold Shift+page Down), right click on the updates and click Create Software Update Group.
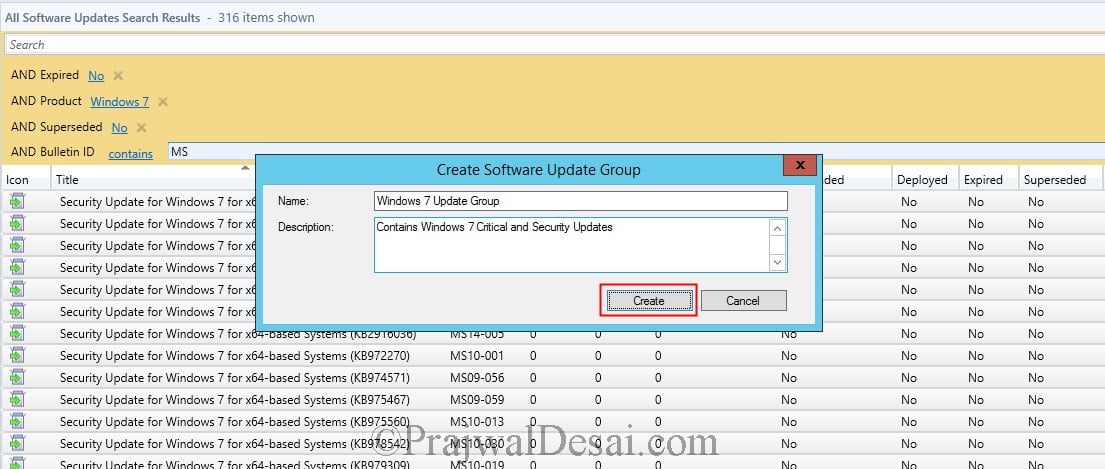
Specify software update group name such as Windows 7 Update group. Click Create.
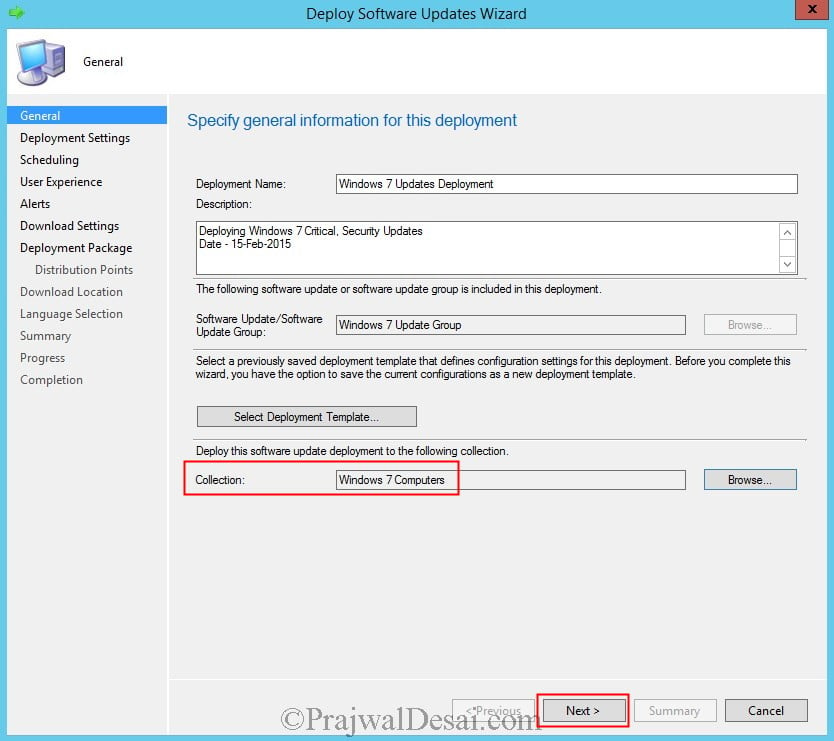
Deploy Software Updates Wizard
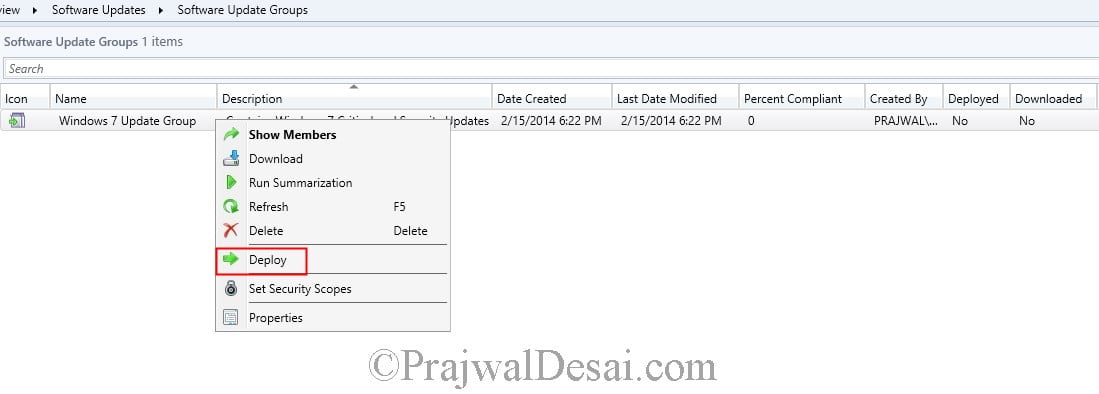
When you have the software update group ready, proceed to deploying the updates.
Select the Software Update Group the you created in the previous step. Right click the Windows 7 Update Group and click Deploy.
On the Deploy Software Updates Wizard, provide a Deployment Name, description and choose the collection for which this software update deployment must be deployed. Click Next.
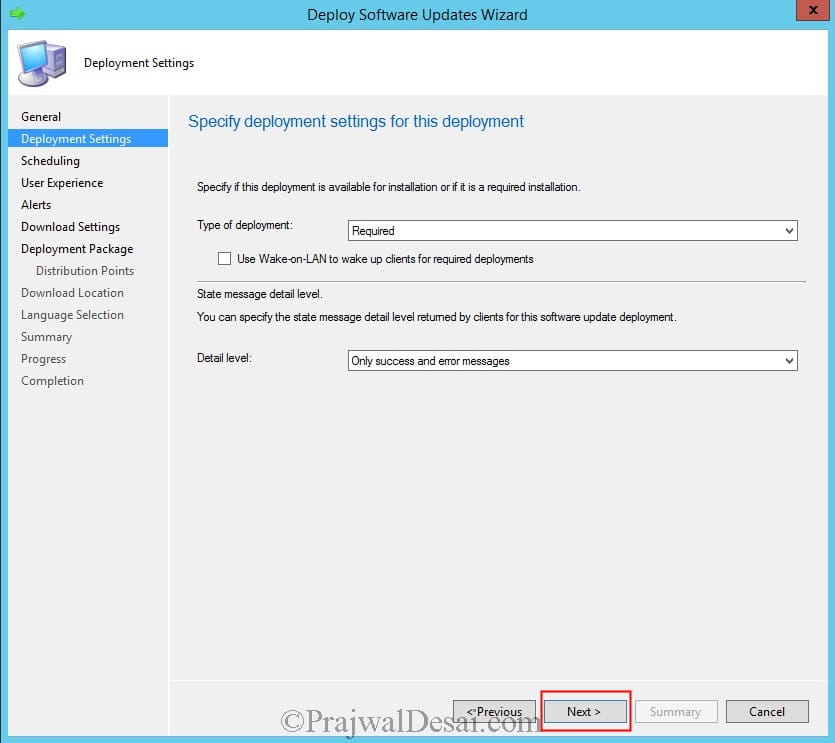
Set the Type of deployment as Required and detail level can be set to Only success and error messages. Click Next.
If you select the deployment as Available, the software updates will be available in software center for installation.
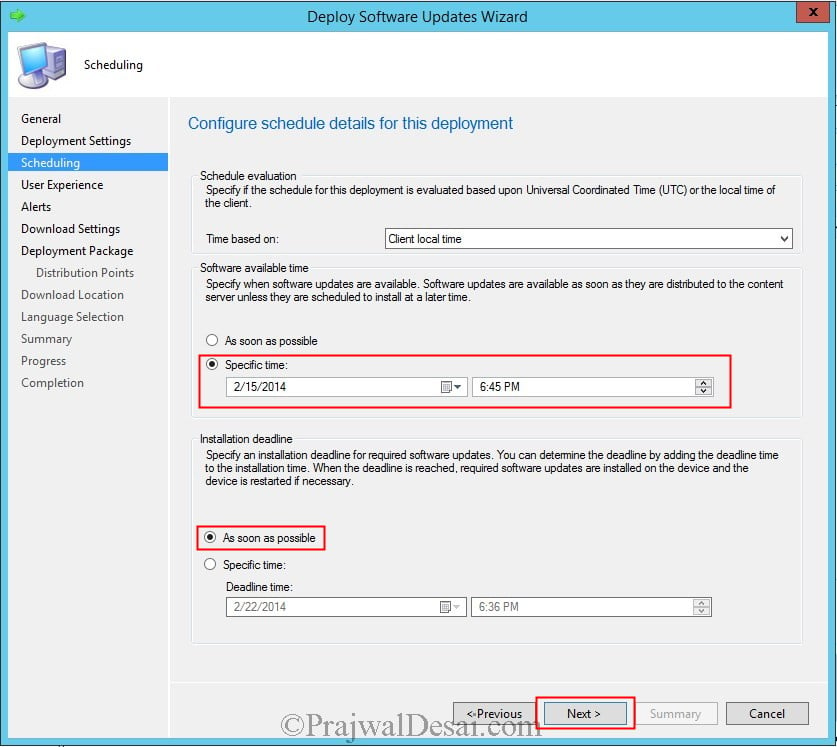
In this step you can schedule the deployment. Configure the schedule for this deployment, set the Time based on to Client local time.
Choose Software available time to specific time and set the Installation deadline to as soon as possible. Click Next.
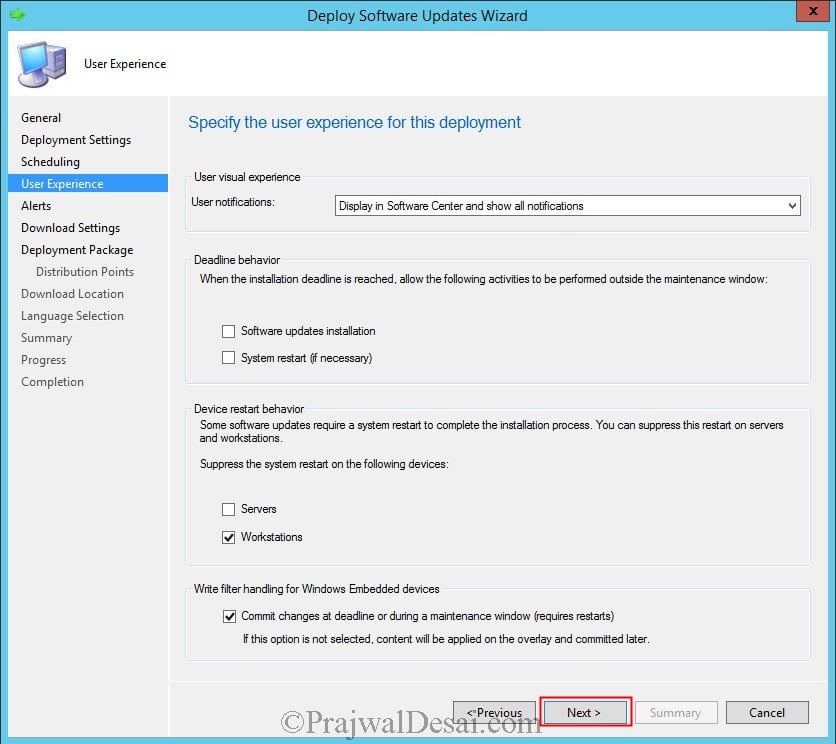
On the User Experience page, you can choose to suppress the restart for Server or Workstations. Click Next.
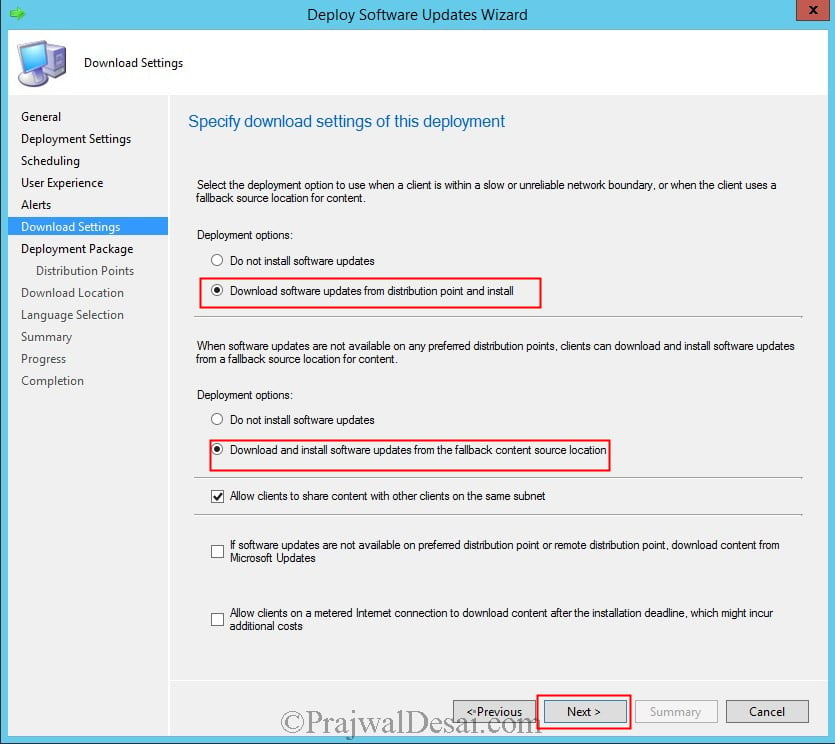
For Deployment options, if a client is within a slow or unreliable network boundary then select Download software updates from distribution point and install.
If the updates are not available with preferred DPs then select Download and install software updates from the fallback content source location. Click Next.
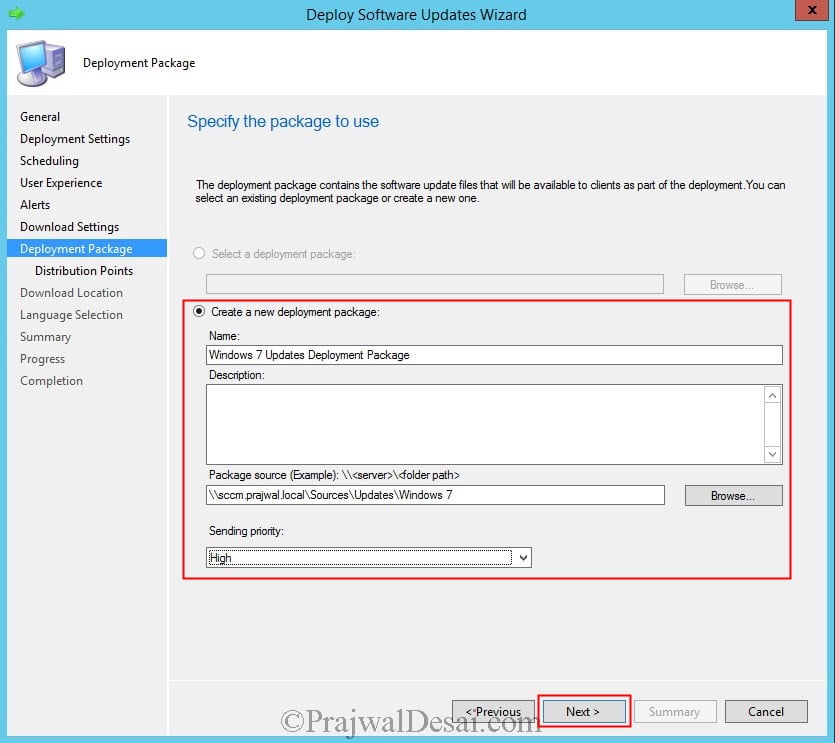
Create a new deployment package by providing a name, location for the Package source and Sending priority. Click Next.
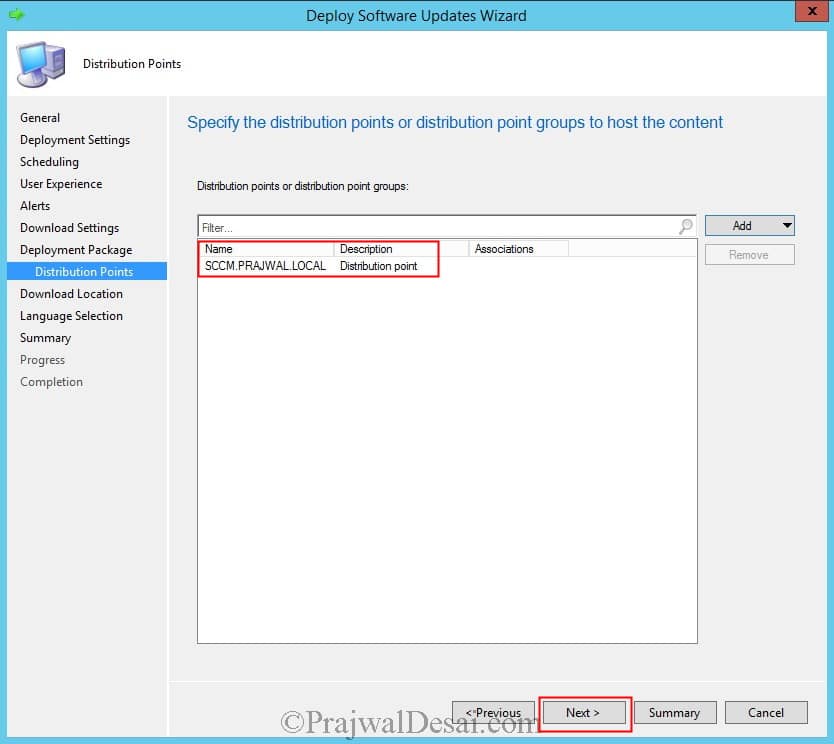
Add the Distribution Point and click Next.
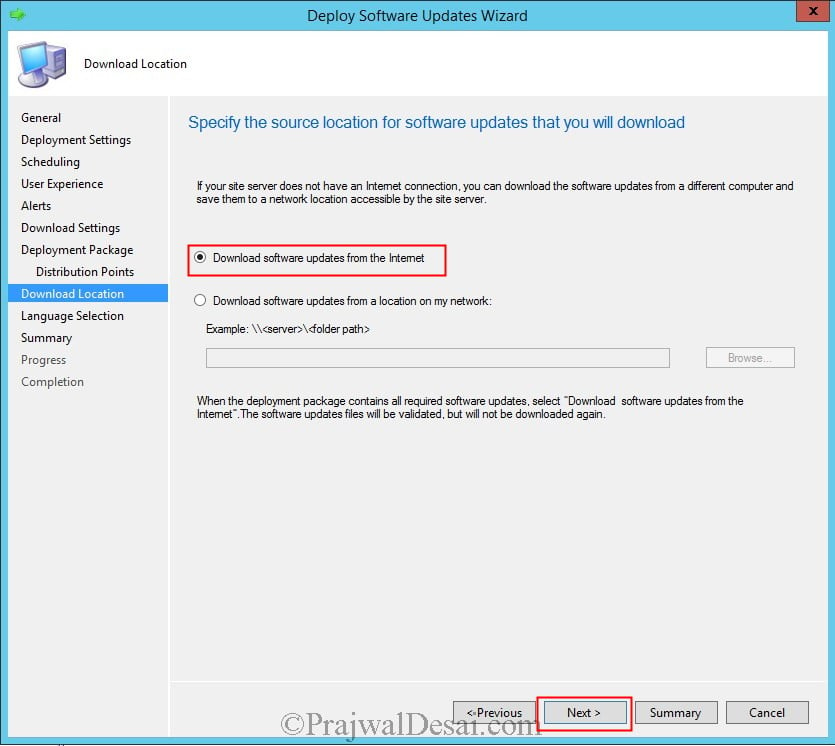
Select Download software updates from the Internet. Click Next.
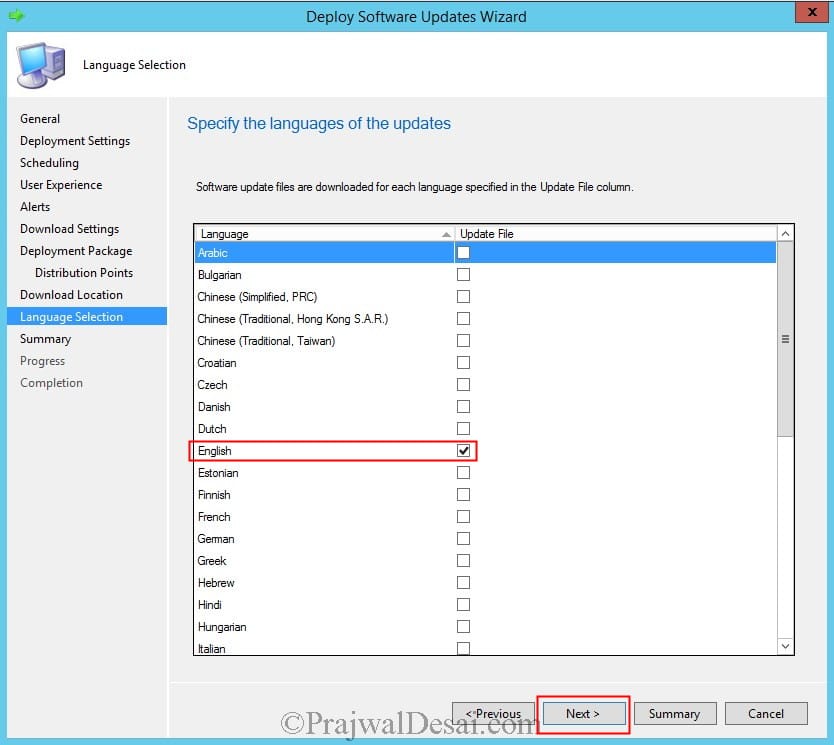
Choose the language and click Next. The wizard will now download the updates and deploy them to the collection as per the schedule defined. Click Close.
After few minutes we see that the updates are installed on one the client machines in the collection.
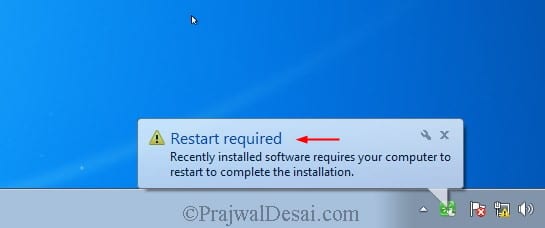
You can choose to restart the computer by choosing Restart now or you can choose Snooze and remind me again in hours.


Hi,
can I set 2 separate servers: 1st for SUP role, 2nd for WSUS role and WSUS Content ?
Or should I keep SUP and WSUS on 1 server ?
Hi,
I tried the step with “Deploy Software Updates Wizard”. Everyhting works fine but i am not able to distribute the content to other DPs. Can u tell me why? The Software Update works also fine for the Clients but not for the Clients that are bounded to an other DP it is not…
Kind Regards
The Option Distriobution Points is missing
You should be able to add additional Distribution Points by right klicking the update package and select “Distribute Content” the Distribute Content Wizard should open.
There, in the “Content Destination”, you could add additional Distribution Points
To add, you can add it to Automatically Distribute the content to DPs, I have defined this in the ADR Rule to Automatically Distribute Content to DPs to take the headache of manually distributing the content and missing out later. You will have to add this on the Software Package with differential changes to avoid excessive bandwidth usage between DPs.
Hi,
I deploy my patches through SCCM and when I check my log, it says patches are installed by “NT AUTHORITY\SYSTEM” could you explain why I am seeing this? Also, how can I check this configuration?
Hi Prajwal Desai,
I have a question about cleaning up after ADR created Software Update Groups.
We having monthly updates and i already have 7 Software Updates Groups from the last seven months.
How do i clean up these Software Updates Groups and there deployments?
Best Regards,
Marco
The old updates will be automatically cleaned up by Configuration Manager. Also, enable WSUS maintenance options in ConfigMgr.
Hi Prajwal,
That is correct and WSUS maitenance is also configured.
But i’m seeing this under Monitoring and Deployment:
ADR – OS Core Updates 2021-10-
ADR – OS Core Updates 2021-11-
ADR – OS Core Updates 2021-12-
ADR – OS Core Updates 2022-01-
ADR – OS Core Updates 2022-02-
ADR – OS Core Updates 2022-03-
ADR – OS Core Updates 2022-04-
ADR – OS Core Updates 2022-05-
But i can’t delete them.
Under Software Library -> Software Updates -> Software Update Groups i see the same:
ADR – OS Core Updates 2021-10-
ADR – OS Core Updates 2021-11-
ADR – OS Core Updates 2021-12-
ADR – OS Core Updates 2022-01-
ADR – OS Core Updates 2022-02-
ADR – OS Core Updates 2022-03-
ADR – OS Core Updates 2022-04-
ADR – OS Core Updates 2022-05-
And when i click one of them and click my right mouse button, there is a delete option.
If i deleted one of theme here will the deployment also be gone?
Yes, the deployment on each Software Update Group will be gone once the SUG is deleted. In my environment I have been doing these manually but I have thought of creating a PS which deletes any old SUG of more than 5-6months as I have set my Software Update Point (WSUS) to clean and expire updates after 6months.
Hi,
thank you for your instruction. it helps me a lot.
do we need to install WSUS role from Add server features and roles, or we just need to install SUP.
i have SCCM server with SUP and WSUS role enabled on same box. and update deployment seams not work.
You have to install the WSUS role from Server Manager.
thank,
any specific configuration on WSUS or all set up will come from sccm? we have existing gpo which set wsus on clients. and when i check for update on clients, they show error can not contact to update service or show different update patches, not like patches from sccm deployment.
If you have decided to manage Windows Updates using SCCM, that WSUS GPO should be disabled. Ideally you want computers to contact the SCCM for downloading the updates.
thank for your reply.
i have disabled the WSUS GPO but computer client still have wsus setting in registry. i have to remove it manually. is there any way to do it from DC or automatically.
and how i can see update status on my clients? using wsus or on sccm report?
thank for for your reply!
i have disabled wsus gpo, but computer clients still have setting on registry. i have to remove it manually on each server. is there any way to do it automatically?
and how i can measure the update status on clients? wsus report or sccm report? i can’t have big picture for that, i don’t know what server is missing patches or which patches are needed.
please help to answer those question.
Hi ,
I have below issue ,
One of my synaptic audio drivers says All software updates -> Required count = 73 and installed = 0 . But when I connect to one of the client and try to run the driver using install.bat it says driver already installed . Could any one help me with some hint ?
I would guess (and I could be wrong) that “Required” here means that the system has the hardware (physical or otherwise) that would require the driver (so 73 systems in your environment would require the driver), while “installed” here means devices on which the driver was installed BY SCCM.
In other words, if the driver was already installed on the device before SCCM had a chance to install it (it could have piggy-backed in on another package. There may be a manufacturer’s app on the device that applies OEM-specific updates that SCCM can’t be aware of. It may even have been shipped already installed!), or before SCCM scanned the device, or before SCCM even knew about the driver, SCCM would list it as being a “required” package, and would skip installation (and therefore wouldn’t increment the “installed” count).
Whilst the reporting is less than ideally constructed, leaving you (and potentially many others) terminally confused, I would suspect that this behavior is by design (albeit a pretty stupid design!)
If you want to clean up the report, just manually remove that driver package from the Software Updates Group. My recommendation, however, would be to simply ignore this one…
Just want to say first of all thank you. You’re brilliant man and your instructions are so easy to follow.
Thank you.
Need clarification on publishing update through Update Group.
If we publish third party updates using the update group will it be pushed as an windows update?
Need clarification on publishing update through Update Group.
If we publish updates using the update group will it be pushed as an windows update?
Group policy settings were overwritten by a higher authority (Domain Controller) to Server
showing this error message i think it is related to gpo SO PLEASE HELP ME pRAJWAL HOW TO SOLVE IT.
help me
Remove the WSUS GPO that you have deployed and that will fix the issue.
Hi,
Can anyone help me. How to install windows patches for windows server using SCCM.
There are multiple ways to do that. You can manually deploy the updates or use a automatic deployment rule to patch servers.
Hello, I have configured several DPs and I am currently deploying updates and by the way I have distributed the content to the DPs, but how can I know if the computers are being updated by one of the DPs in that location, and not that those teams are communicating with the main SCCM server?
Hi Prajwal,
If I create multiple deployments from a SUG, will the deployments automatically run every time there are new patches in the SUG? Or do I need to create new deployments? For example, we deploy patches every month and I don’t want to create a new deployment each month. I just want the same deployment to push updates.
I already, created the ADR, which then creates the SUG. The ADR runs every day, but I have a maintenance window (one night a month) on the device collections I have updates pushed to.
Thanks!
Hi Prajwal,
Can we still manage patches from SCCM 2012. If yes, is it feasible to install SCCM 2012 client to server OS.
Hi Prajwal
I wanted to stop the update sync as I had selected all the windows updates starting from windows server 2003 unknowingly. Please reply regarding the steps to stop the update sync as its taking a lot of time for updates synchronization.
Hi Prajwal
I found out that to do this you need to the remove software update services site role installed in SCCM and select the WSUS cleanup ie, put a check mark for the option on the role removal window. And then later again add this role. This will delete the old updates after a span of couple of hours and when again the site role in added you can select only the required updates of Microsoft.
Anyways thanks for these very helpful blogs about SCCM. It has helped me gain in depth knowledge about SCCM.
In a patch deployment can we only download patches and not install the patches for a specific collection. Kindly let me know the way
Of course. You do that in the deployment. You can disable it or change the scheduled deployment. This can be done in the Automatic DEployment Rues or by clicking right on your deployment
Hi Prajawal,
Thank you for this tutorial, really insightful. I have followed the process and deployed windows server update to some servers. on the monitoring, it shows the deployment is successful but it is not installing and on the system, it say click to install. the compliance on SCCM is 0.0%. Please how do I make in install using SCCM.
Thanks.
Check if the server having maintenance windows, select the deployment, right click, in the deployment setting>user experience check the box system restart.
check logs if you are getting errors
Hi Prajawal,
I followed this tutorial exactly as described but the updates aren’t showing in client machine. Do i need to update anything, let’s say in ” Specify intranet Microsoft update service location” in group policy?
No you need not Specify intranet Microsoft update service location in group policy. Ensure the updates are properly distributed to distribution points. Go to Monitoring node and check the status of deployment.
Also check the correct site server with correct SUP is assigned to the relevant boundary
Hi Prajwal,
I was trying to deploy updates in Available mode instead of Required mode, but it never got deployed, any suggestions to fix it.
While i had seen logs and had found that all the updates were getting synced, and were reaching to the MPs also.
Go to Monitoring and check the status of deployment.
Go to Administration -> Hierarchy Configuration -> Boundaries -> Locate your boundary and the Boundary Groups -> Locate the Boundary Group where your IP range sits, now here make sure under references you have your SUP Server listed as Site System Servers.
Suppose we have initiated a OS upgrade using Task sequence and with time window. let say 5 pm on Wed.
Can we change the installation time, will it affect to the initiated Task Sequence.
Yes you can always make the updates available at specific time and specify the installation deadline as well.
Prajwal
I am still a beginner and have a long way to go before I have somewhat mastered SCCM. I just wanted to say your guides are detailed and thorough and have been absolutely invaluable in my journey to learn it. Thank you!
That’s correct. I followed his guides and finished my updates deployment project. Got appreciation from my manager 🙂
Hi Prajwal,
congratulations for your guide I want to ask you I have this architecture I have only one server sccm 2016 1902 and another windows server 2016 with wsus role installed and working. Since I want to use sccm as a software update point can I use it connecting it to the existing wsus without installing a second sccm?
Thanks in advance
Emiliano
Unless your environment is very large I would suggest putting WSUS on the SCCM server and getting it configured, then decommissioning your standalone WSUS server. SCCM also may not like to play nicely with an already configured SCCM server.
Just my 2 cents worth.
Hi Prajwal,
We have been doing some server upgrades from Windows 2008>2012>2016. The Severs seem to run well after the upgrade to 2016, but are not showing as requiring any patches. We have new freshly installed 2016 Systems that the updates work fine on. I was wondering if anyone had seen issues with updating Windows 2016 systems that had been upgraded. Its like the systems are a little confused.
Thanks in advance.
Paul
Hi Prajwal,
I need to distribute the software updates for windows server 2016 using SCCM 2012 R2. It is possible?
Thanks in advance.
how to get complete status of scan cycle of all client machine
All i can say is love your work. You the best
Thank you Rakesh
Hi Prajwal, last week we started deploying Windows Server 2016 in our environment. I am able to see patches for Windows server 2016 in WSUS however they all do not show up in Configuration Manager Console except for KB4462917. I heard people saying this is known issue while others say, Windows Server 2016 all patches supercede previous ones. My environment is System Center Config Manager 2012 v1702 5.00.8498.1711. I would appreciate your kind suggestion. Thanks in advance.
Updates are superseded if they are the monthly cumulative ones. If you go to your SCCM console > Administration > Sites > Configure Site Components > Software Update Point, you can see if you are removing superseded updates immediately or after a specified time.
Hi What are the implications of removing and reinstalling existing SUP? The IIS is not showing sms or cms in application pools like the other SUP. We have 2 SUP. I’m getting wsus error messages from sccm 2012 console.
It is fine to remove SUP and install SUP. There should be no issues.
Do we actually need wsus to download the patch as well or will the SCCM take care of it as long as wsus service is on?
SCCM uses WSUS in the background to download and deploy updates. So yes, WSUS is required.
I have a question about the “Install Software Updates” task in a Task Sequence. There are two options which you can select in the task, namely “Required for installation – Mandatory software updates only” and “Available for installation – All software updates”. What do these options mean? Does the first option mean that all the required updates for the concerning OS will be installed? And does the second option mean it will only install the updates deployed to a collection?
Hi Prajwal,
there is setting in SUP as below
“months to wait before a superseded software update is expired”. in my environment , currently its set to 1 months however client want to change it to 3 months. can you help us to know what can be the impact of this by changing this from 1 to 3 months?
Hi Prajwal,
I have configured software update as per your your blog but its not showing in system center on client computers and client is not getting updates from sccm. Please help on this
I am using SCCM2012 Build no.8325
Hi Prajwal,
I am using SCCM 1702. There are 2 ADRs – one for deploying Windows Defender Definition Updates and one for deploying Windows Server 2016 Updates. Both ADRs are deployed to the same collection containing 19 server members.
Today I have noticed that during the weekend Windows Defender Definitions were updated only on one server while on other servers definitions are 3 days old. Having taken a look at updatesdeployment.log on “healthy” server and on other servers one line caught my eye:
Evaluation initiated for (2) assignments – on “healthy” server
Evaluation initiated for (1) assignments – on other servers
It looks like all of a sudden 18 servers are not aware of ADR for Windows Defender Definition Updates deployed to collection they are member of. How to troubleshoot this?
Thx in advance.
Hi Prajwal , I Need Your Support Please Because After I Downloaded Windows Update And Deployed It Successfully One Of My Team Removed the Downloaded Updates from It’s Sources And when I tried To Install Windows Update Again It Fail Because I think Its already Downloaded and Took Content Id Number And Status is Downloaded so How I re download windows update again from Microsoft Updates again ??
Hi Prajwal..Could you please help me with any best trainer information or can you give any training for SCCM
thank you in advance
Hi Prajwal, I have just installed SCCM 2012R2 and upgraded to 1710 version. So, I installed WSUS and Update Point and I tested the deployment successfully. My two clients, Win 7 and Win 10, are compliant with 100%. I found, on the clients, all the required updates using Control Panel and History. The strange thing is that no updates are shown on client Software Center. All the tabs are empty. is this normal?
Hi Prajwal,
I have followed your steps, but the clients dont recieve any updates. I dont even have a windowsupdate.log on the clients. I am syncing updates fine from wsus to sccm, but I cant get updates to move from sccm to clients. I am at a loss of what is my issue here. Any help would be greatly appreciated.
Hi Prajwal,
Question, do you have guide on how to package Dell Firmware/BIOS updates using SCCM
Hi Prajwal,
Great write up! I have a queation. When adding the updates role to the sccm server… Windows 10, Exchange 2013 and other more recent technologies are not listed in the options for updating… how do I get these to appear?
Did you run the initial sync ?. That updates the products and classifications.
Prajwal… no I had not. I’ve done that now and we are in business!
Sorry.how can i do that?
Hi Everyone,
What is the best practices between the test environment and production environment for the update software push. I mean how many days waiting after my test to push in production?
The guidance you have posted has been great. Do you have anything for offline networks? I have a wsus server internet connected, did the export/import into the disconnected SCCM/WSUS. Synchronized the SCCM. When I try to setup the deployments I am having issues with the Deploy Software Updates Wizard – where should the download location point to? Should I point to the location of the WSUSContent (import) or the SCCMContentLib?
I’d like echo Moe’s comments as well. Prajawal, you save a lot of us Noobies headaches with your blog. Very clear and simple to follow.
I’m also one of your biggest fans
Sir,
I just want to thank you. Your Blog is my definitive GoTo when I want to understand how things work or need to be configured in SCCM. You explain things simply and have pictures as well.
You and all your effort is appreciated by me …Just a Humble SCCM N00b and a big FAN of yours!
Thank you so much 🙂 Happy to read such comments.
I have the same issue..tried deploying updates and it says on the configuration that the deployment was succesful, and on the “Title” list where the deployed update was listed under the “Downloaded” and “Deployed” tab there was a “YES” statement. My problem is that no notification from “System Center” on the client machine. I think I missed steps on how to install System Center on the client. How can I see System Center on my client and is there any way that I can do to verify and check if the updates are really deployed on my client machine?
Thanks and more power!
Please post it in community forums, it’s very difficult to analyse the log files in the comments.
Hi Prajwal,
Please see logs from UpdateDeployment.logs
——-
I still waiting for your feedback on this. Hope you resolve my issue. Thanks
C:windowsCCMLogs
May i know what’s the name of the specific file? 🙂
Hi Prajwal,
Good Day, Thank you for the manual i did follow all steps. But i have a question, I don’t have an idea where to find the error logs after i run my software updates to my client. My creating and deploying of software update was successful but not showing on the software Center of the client. Hope you solve my problem. Thanks
Estoy realizando despliegue de Updates a equipos Windows 7 y Windows 10, desde el monitor de sccm pasan equipos como completado compliant pero cuando voy al equipo cliente no hay actividad del deployment ejecutado.saben que podría ser? Y desde la herramienta monitoring deployment indica resultados satisfactorios.
Check the folder and share permissions on the location where you selected to download the patches to. Both the share and the folder need to be open to write access by SCCM.
Every time I try to download any update from SCCM, I get the error. Failed to download content id 16839922. Please help.
Use ADR
Attached SCCM client Image
Hi ,
SCCM Keep waiting user approval “Install All” and it is deployed as a Required. How to deploy Updates automatically without enduser interruption
Thanks
How can we know if client updated or not after deploying software updates
First I love your guides! The time you have put in for the community is beyond appreciated! I am trying to learn SCCM as I follow your guides step by step. Here is what I am getting, and any help is beyond appreciated.
How is it possible to make the package install before on some deployment group to validate theres is no regression ?
Also, we starting on this, and we are afraid there are a lot of udpates needed on our client systems, that will annoy users with 12348 reboots until all KB have been installed??
My WSUS sync isn’t work after a restore. Here are the following logs. I was able to remove Adobe by unchecking it and resyncing but I can’t get rid of the Java JRE Client. Please help. WCM Log
Subscription contains categories unknown to WSUS.~ $$
Failed to set Subscriptions on the WSUS Server. Error:(-2147467259)Unspecified error~ $$
..
Successfully connected to server: server, port: 8530, useSSL: False $$
Category Company:94d731de-22a6-4458-dc4d-b5267de026fc (Adobe Systems, Inc.) not found on WSUS $$
Category Product:b1d1a5ca-37c4-5805-b271-367467ef10f5 (Java JRE Client) not found on WSUS $$
Starting WSUS category sync from upstream… $$Microsoft.SystemsManagementServer.WSUS.WSUSMSPException: WSUS sync failed with UssNotFound: ~~ at Microsoft.SystemsManagementServer.WSUS.WSUSServer.IsSyncRunning() $$
Failed to set Subscriptions on the WSUS Server. Error:(-2146233088)Unknown error 0x80131500~ $$
under Software Update Component properties, deselect all Products and Classifications which are enabled. Next run the Software Update Synchronization. Once it is complete, enable the required Products and Classifications that were disabled previously, and run the synchronization again. Let me know if that works.
Thanks. So I was able to get that to work. Now when I synced SCCM to WSUS I only see windows 7 updates. I looked in WSUS & I have multiple types of updates not just Windows 7. I noticed the WSUS content folder only had a few folders. I’m not sure what else to do. This is all after a restore. I think I failed to install SCCM on the correct drive. I also don’t see my \servernamesourcefolder. Is it possible to uninstall WSUS without any issues?
Thanks. I was able to get that to work. Now when I synced SCCM to WSUS I only see Windows 7 updates. I looked in WSUS and have multiple categories and products as far as software updates. I noticed that my WSUS content folder only contained a few folders. I’m not sure what else to do. This is all after a restore. I think I failed to install SCCM on the correct drive during the restore. I also don’t see my \servernamesorcefolder . Should I just start the restore over? Is it difficult to uninstall WSUS?
I got that fixed thanks. I did notice that my content folders are empty after the restore. I had a lot drivers etc I wanted to bring over. Do I have to manually copy that information?
Hey Prajwal,
I never get prompted to create a deployment package? What am I missing?
Hi Prajwal,
I want to change the maximum run time (minutes) for software updates by default is 10 min and want to change it for 30 min.
I know I can do it for every update manually. But how can I change it so that i don’t have to do it every month for the update. By default it should be set for 30 min.
Regards,
Sunil Kaushik.
Please will like to know if you have come across this issue on security update deployment on windows server 2012 r2
i deployed security update via sccm and it recorded complaint for all the windows servers 2012 rs but when i log in to the servers the updates are not recorded on the add and remove programs.
why does SCCM behave that way for windows server 2012r2 because windows server 2012 and 2008 r2 shows the update deployed via sccm.
Dear Prajwal,
Sorry to bother you, I have a critical issue in my SCCM 2012 R2, I try to troubleshoot and find the root cause but no luck, could you mind check my attachment file and take a look. Please advise me how can fix this issue, thx.
Regards
Boris
Thank you for your great how to steps Prajwal!! Is WSUS required for SCCM to manage updates? Since you can point SCCM directly to the Microsoft update servers couldn’t you do this without WSUS running? I have an environment with 100 systems I need to manage so I’m trying to do this as simple as I can. I have no need for secondary sites since everyone can hit my primary site. Thanks again!!
Hi Prajwal – Thank you for sharing this post, I’ve found it very helpful 🙂
I think I’m clear on all the steps except for the package source.
According to technet, I need to manually create The shared folder for the deployment package source files
Deployment package source: Specifies the location of the software update source files. When the deployment is generated, the source files are compressed
and copied to the distribution points that are associated with the deployment package. The source location must be entered as a network path (for example, \serversharenamepath), or the Browse button can be used to find the network location. The shared folder for the deployment package source files must be
manually created before proceeding to the next page.
Do I just need to right click in the Updates directory and create the new folder then reference it in the Package Source location in SCCM?
TIA,
Brandy
Software Update Point for Internet-Based Client Connections – This basically allows you to manage Configuration Manager clients when they are not connected to your company network but have a standard Internet connection.
Hi Prajwal,
Can u define the term “Internet-Based Software Update Point” please, Thanks in advance
Rahul Srivastav
Hi Prajwal
I have configured SCCM for updates but got errors.
Attachment has the scenario.. WCM and wsyncmgr log files..
Any Solution please ??
Could you post this question along with screenshots in forums please.
The above issue is solved.
My Internet Traffic was passing through a firewall and by allowing the ports 8530 and 8531 on my firewall, the updates started downloading.
Thanks
Glad to hear that..
I am just starting to wade into the SCCM pool, and have a question about applying Monthly Windows updates. I believe that my problem lies with the Scan Agent and getting Updates to be detected as required etc. After the process runs I everything comes back as Not Required. I have manually installed at least one of the problematic patches successfully, so they are needed. Going through the ScanAgent.log on the clients I see a lot of:
Did not find CategoryID for Update:786656d5-cf9b-443c-a1bc-744b4ff6d3e7 ScanAgent 7/28/2016 8:51:22 AM 4472 (0x1178)
CScanAgent::ScanByUpdates – Did not find UpdateClassification for Update:786656d5-cf9b-443c-a1bc-744b4ff6d3e7 ScanAgent 7/28/2016 8:51:22 AM 4472 (0x1178)
Did not find CategoryID for Update:75efbd8b-6d39-437b-928f-af03ea750034 ScanAgent 7/28/2016 8:51:22 AM 4472 (0x1178)
CScanAgent::ScanByUpdates – Did not find UpdateClassification for Update:75efbd8b-6d39-437b-928f-af03ea750034 ScanAgent 7/28/2016 8:51:22 AM 4472 (0x1178)
Unable to find any Categories for at least one Update. Will not do a Category Based Scan. ScanAgent 7/28/2016 8:51:22 AM 4472 (0x1178)
Sources are current and valid. TTLs are also valid. ScanAgent 7/28/2016 8:51:22 AM 4472 (0x1178)
CScanJobManager::Scan – SKIPPING SCAN and using cached results… ScanAgent 7/28/2016 8:51:22 AM 4472 (0x1178)
CScanJobManager::Scan – Reporting Scan request complete to clients… ScanAgent 7/28/2016 8:51:22 AM 4472 (0x1178)
Is this why my updates all show as Not Required? Is there something that i have missed in defining the Deployment package? Or the Baseline? Why do my updates not appear as needed?
Hi,
I have 2 separate servers, one for WSUS and one for SCCM. I will like to use SCCM to get the updates from this WSUS server.
Do i add site system role or create site system server? or both?
Thanks
Hi Prajwal,
I am new to sccm, and learning how to deploy updates. After creating the software update group and then going to deploy, during following the steps i am not prompted to create the deployment package. Am I doing something wrong or missed a step?
Did you get any info on this? I have same issue. The ‘deployment package’ process is not even in the wizard.
Prajwal.
When I create the collection, within a few days I receive an error on the distribution site that there is a file missing from the folder and then the deployments fail. I created a patch distribution for Adobe Products and it worked this past Friday, but today when I came in, the deployment package that I created was displaying an error and it failed. It fails for the same reason in that there is a file missing from the folder. I am not sure why this is happening as I am not doing anything to these folders once I create them. I am using SCCM 2012 R2 and following your steps. I have 3 update packages that are now failing on a regular basis. Am I causing the issue by adding additional selected patches from the “All Software Updates” section and “rick click” and “Update Membership”? I am having to re-create these almost now on a weekly basis and am not sure what I may be doing wrong. If you would, let me know what further logs or information you may need to help point me in the right direction.
Hi Mark, can you post the questions in forums please.
Hi Prajwal,
I’ve done a deployment, and it’s saying deployed in the deployment package, however the client doesn’t appear to be receiving the updates (the updates have been downloaded to the “sources/updates/windows 7” folder on the SCCM server.).
I took a look at UpdatesDeployment.log on the client however nothing seems to be standing out (the only thing would be “No current service window available to run updates assignment with time required = 1”).
Any help would be greatly appreciated.
Thanks,
Stephen
Hi Prajwal, can you configure where the site server should store all these updates? I’ve got a separate hard drive for it but I don’t see an option.
Share a folder on that drive and you can store the updates.
Can you please explain to me how the software update deployment process will work, if I install a new machine in the environment? I installed it via MDT task sequence, added it to the domain, it has SCCM client installed, I even added the machine to the Device collection for which I have set automatic updates. Will the Automatic Deployment Rule apply to the newly added server as well? Or are there some updates that have to be installed manually?
Can someone make this clear to me? Thanks
Hi Prajwal, I deployed windows 7 updates to pilot users. I Check report, Security Update for Windows 7 (KB3146963) is required and installed on my laptop. But 2 more Desktop PC shows the update not required. All machines are windows 7 32bit. Is it a problem? Please help thanks.
Hi Prajwal, i encountered this error in sccm software updates. Can you help me how to fix for days
. Thanks
Hi, I have the same issue, try to uncheck all of the products, and then run sync. Check the logs if it’s successful,
and then check the products you need and run the sync again.
It work on my end. Hope this helps.
What I don’t understand is why you would download the software from the internet? What is the point of even using he WSUS if when creating the “Deploy Software Updates” via the wizard the updates are downloaded from the internet. I choose all the appropriate groups (by the way I am using 1511) when I set the SCCM console up as a Software Distribution Point (updates)…
That setting is for the server to download the updates in the first instance. It can get them from microsoft via the internet OR an upstream WSUS server. The clients will download the updates from the distribution point.
I am facing the same. can anyone provide a solution to overcome above?
Hi, I have the same issue, try to uncheck all of the products, and then run sync. Check the logs if it’s successful,
and then check the products you need and run the sync again.
It work on my end. Hope this helps.
Greetings Prajwal,
I wanted to start off by saying how helpful your guides have been. I have a question about creating the deployment package step where you have the Package Source set to “\SourcesUpdatesWindows 7.” Am I missing where that UNC was defined/established? Is that something that needs to be created before staring the process, so that the files have somewhere to go?
Thank you Matt. The package source path (windows 7 folder) is a folder where all the updates would be downloaded and the updates will be installed from the same folder. Yes you have to create a folder before you download the updates.
Thanks for the quick reply… So my next question is, where do you configure the system to download all Win 7 (or Win 8, Win 10, etc) updates to the desired location?
Yes, you could create a folder called updates under sources folder. Under updates folder, you can create folders like Windows 7, windows 8.1 etc to download the updates. If you wish you place all the updates in one folder you could do that as well.
Dear Prajwal,
Have you tried using other specialized software products for deployment? Is there anything decent on the market today? SCCM is very powerful, but I had a few products that I wasn’t able to deploy due to an unsupported file format. I’ve met several other product like Lansweper, Manage Engine and Total Software Deployment across the web, but I haven’t tried them yet.
Hello Prajwal
I am currently installing a newer version of SCCM 2012 in our dev enviroment before it goes to production we originally had 2007 but I have not migrated anything with the old version this is a fresh intall. I am trying to connect my WSUS server which is on a different box to my newly built 2012 sccm box, I have tried conneting using your guide and noob.com guide and to no avail I have not succeded. This is very baffling as the 2007 box connected with no problems. Do I need a fresh install of the WSUS server????
Hi Phil,
Have you figured out how to connect your existing WSUS server? I’ve hit the same road block. It’s not clear if I use “Synchronize from and upstream data source…” or not.
Thanks,
Keith
hey Prajwal now updates appears but on the client machine nothing updating those software updates. what is the major reason why client machine dnt have acces for updating installation? System center installation showing empty after done those step can you solve this issue please
Dear Prajwal
i couldnt find out the solution of sync updates nothing showing i cheek its log file there showing error. i already attached snaps what error became during sync updates tell me what is its final solution? thnx
Dear
i have problem with the updates i tired many time as you described but no updates showing in the when i try you do updates sync nothing showing after performs all these steps im tired tell me what to do sir? what can be mistake ? what to do then it will work ?
Dear Prajwal,
I’ve followed all your steps. I dont get any errors but i get the msg at the every time i deploy software updates on my updatesdeployment.log.
No actionable updates for install task. No attempt required.
All my updates are current from 2016, no expired or superseded
Computers that i’m deploying to, have not been updated in almost a year
I have no clue why the updates are not going through.
Pls help.
Hello Prajwal,
I’ve completed the following steps as mentioned. I’m getting the following msg after deployment in my
updatedeployment.log. “Optional assignment, no advance download needed”. This pc has not been updated in over a year. And
the other msg is ” EnumerateUpdates for action (UpdateActionInstall) – Total actionable updates = 0″.
Pls Help.
Hi Praj,
thank you so much for your step-by-step guide, really clear and helpful.
Just a question to be sure, you wrote:”When a general maintenance window and software updates maintenance window are both configured, clients install software updates only during the software updates maintenance window”, does it mean that the software updates maintenance windows wins over the Default Client Settings?
I know, it’s a basic question but I’m a beginner and I learn faster from masters.
Thanks!
Andrea
Great doco.
Assuming all steps have been completed without errors and you still are not getting the updates to the client:
If you have created the deployment packages and nothing is happening on your client you can run the Software Updates Deployment Evaluation cycle on the client machine from “Actions” in the Configuration Manager client app.
Remember that the default client settings are to poll for updates every 7 days as of 1/2/1970.
Praj, it may be worth adding this small step to your instructions. It seems a lot of people are just waiting expecting it to kick off in a few minutes like you have stated:
“After few minutes we see that the updates are installed on one the
client machines in the collection and there is a notification that
system needs to be restarted.”
One i run this, updates start to appear in software center.
SUCCESS
Thanks
Thanks for the information Ben. I will add it soon.
Thanks for sharing
Thanks for sharing
Hello Prajwal,
thanks very much for your great tutorials.
i have a problem with my sup. it’s installed with your step-by-step guide.
my issue is, that I miss several updates although the product and the category is selected in sup configuration settings.
for example KB 2889923 (its the lync/skype for business April 2015 update)
How ca I manually add a patch to the updates repository, or otherwise how con i reset the update point content and resync from scratch?
This is great, thanks for sharing
@PercyJ:disqus – Thank you.
Hello Prajwal,
Thank you for your documentations – these are really handy. I am having lot of problems downloading Windows updates for patching process via SCCM 2012. I select the product for which I want to download the updates for Patching. After that I create a software group – no issues so far. Then I go ahead and create a deployment package for the update where it fails saying – The Deploy Software Updates Wizard completed with Errors.
The irony is that sometimes it will working fine, sometimes it will fail in the middle of downloading updates & sometimes it will fail completely. I have made sure that our SCCM server has access to the web as well.
I checked PatchDownloader.log file and it shows the following error:
HttpQueryInfo HTTP_QUERY_CONTENT_LENGTH failed 12150
ERROR: DownloadContentFiles() failed with hr=0x80072f76
The above error sometimes will come up straight away or it will come up in the middle of downloading updates and the process will stop. I have also check the directory where the update files will be store has appropriate permission.
I am lost here. Please help.
Did I answer your question in the technet ?
Hello Prajwal,
Yes, you did answer my question and it worked. Thank you kindly.
My apologies for the late reply.
No worries. Thanks again.
Which step are you talking about ?. Post the screenshot.
Do I have to create it in different server? Also, I don’t see anything happens on the clients; even though, the wizard completed successfully. What log (on the client machine) should I look for? I went to Software Center on the client box, and nothing is in there.
If you are creating new deployment package then you need to specify the location where the updates will be downloaded. Once you complete the wizard, at the end updates will be downloaded and stored in the location that you specified. Are you saying that you are not able to deploy the updates to client computers ?
Yes, the updates DID not get to the client computers. I followed all the step above and created a Software Update Group with few updates, deployed to a test collection (couple clients Windows 7). Everything seemed no errors, but when I went to the client’s Software Center, there is nothing in there and nothing happened. What log in SCCM server and log in the clients should I log for errors. I’ve been struggling with this issues for days. Today, I tried to create ADRs (one for Windows 7, one for Windows Server 2008), and It’s still not working. I see no updates (patches) listed in the Software Update group. Please help!
Please help…
I have created a Windows Update Package for Windows 7. When I tried to run the deployment, everything look fine and completed with no errors. However, nothing is happening on the client hosts (i.e. Windows 7 hosts). I don’t know where to check for error, and what did I do wrong or need to perform?
Hi, I’m confused with he last few step od the Deploy Software Update Wizard: I’m stuck at the Deployment Package step. Which location should I pick? Can I pick local hard drive? Thank you in advance!
@Shahzad – Could you post your question in forums along with screenshot.
hello
posted the question in forums.
Helllo Prajwal
I am facing a problems related to software update. i have already installed SUP and WSUS but when i click on Synchronize Software Updates no one software update are showing there.can you please provide me any help related to this.As iam fresher in SCCM.so please help me in a proper ways
Thanks a lot
Hi Prajwal, what we are interested in is the client side (servers and Workstations). Can the SCCM client only pull down what it needs from a scheduled software update deployment or must you first have the all the updates available/downloaded on the machine? From what we’ve seen it seems that the whole package gets downloaded first if we do a scheduled software deployment and then compliance of the updates are checked.
Dear Prajwal,
I want to create Standalone Media TS with Application & Package (Office 2010, adobe reader, 7Zip, Pdf creator etc) for work group machine, could you tell me that how to create TS because i tried lot of time but not success.
Please help me.
Regards,
D.Chouhan
Have you got proxy server in your setup ?. For me this looks like you have not specified the correct proxy server info.
Hello Prajwal
I am getting similar error in wsyncmgr log. WSUS update source not found. I did nto got option to create custom or default website. i am slo not using any proxy server. this box is directly connected to internet. also there is no application pool for WSUS in IIS and only default website is showing. any idea???
SCCM is complaining that the WSUS server cannot be contacted. I check IIS and there is no WSUS server running. I have reinstalled WSUS twice now, and there is no such step prompting me to “Create a Windows Server Update Services 3.0 Web site”. It’s not there. This is installing it from the add roles and features section of the Server Manager in server 2012 R2.
The error I’m getting in the event log is this:
“On 3/12/2015 12:21:25 PM, component SMS_WSUS_CONTROL_MANAGER on computer blah reported: WSUS Control Manager failed to configure proxy settings on WSUS Server “blah”.
Possible cause: WSUS Server version 3.0 SP2 or above is not installed or cannot be contacted.
Solution: Verify that the WSUS Server version 3.0 SP2 or greater is installed. Verify that the IIS ports configured in the site are same as those configured on the WSUS IIS website.You can receive failure because proxy is set but proxy name is not specified or proxy server port is invalid.”
Google is turning up no hints about how to resolve this issue. Any ideas?
Hi Pradeep, I am not sure about the lab that you are talking. I would recommend to build your own lab for SCCM and try out the testing. I understand that the labs are easy to learn but I feel real lab is good for learning.
Hello Prajwal
iam using microsoft virtual lab for patch deployment.but i found a error when create a deployment package.i think its path has been not define properly do you have any idea related to this lab.
Thanks for the comment Carlton. I shall surely surely check it.
Prajwal,
Thanks for posting. I forgot all of the steps and your blog was very easy to follow. One thing I would like to mention. Your section on creating a Software Update Group has Bulletin ID set to “MS”. For whatever reason critical updates don’t have a bulletin ID so they get missed. As soon as I took that out I was able to get my critical updates.
Hi Prajwal,
I hope you can help me. I have configured SCCM 2012 R2 in my lab on a Windows Server 2008 R2 Operating system. I have installed the “Software Update Point” service and have successfully downloaded and filtered the patch for a Windows 7 Client sitting in my lab, as per the instructions above.
For some reason my Windows 7 Client when polling is not picking up the Patchs that have been created as a deployment Package.
Any helps would be much appreciated.
Just to confirm if I click on “Configuration Manager” on the Windows 7 Client and go to “Sites” then find site this returns a message saying that configuration manager has found a site to manage this client.
Many Thanks
Jag
Okay is it the only one Win7 client that is not pulling the updates or its whole collection. Can you try making the update package “AVAILABLE” to the client machine so that you see atleast its being distributed by DP ?.
Hi Prajwal,
I hope you can help me. I have configured SCCM 2012 R2 in my lab on a Windows Server 2008 R2 Operating system. I have installed the “Software Update Point” service and have successfully downloaded and filtered the patch for a Windows 7 Client sitting in my lab, as per the instructions above.
For some reason my Windows 7 Client when polling is not picking up the Patchs that have been created as a deployment Package.
Any helps would be much appreciated.
Just to confirm if I click on “Configuration Manager” on the Windows 7 Client and go to “Sites” then find site this returns a message saying that configuration manager has found a site to manage this client.
Many Thanks
Jag
I have replied to your comment.
Hi Prajwal,
Can you please provide me with the URL for Deploying Software updates, using automatic software updates deployment.
Thanks
Hi Prajwal, I have always had the most problems with software updates and SCCM. I have followed each step of the guide without issue thus far. I’m not sure that updates are getting to my 2008 R2 servers. I have created a software update group for deployment of critical updates to my 2012 R2 servers, and it appears that these updates showed up on the 2012 servers in the software center. I had to reboot each of them individually to finish the updates because I misconfigured the restart option I believe, but minor inconvenience. I can not seem to see any updates being deployed to the 2008 R2 servers? I didn’t have windows update setup on any of the servers, they have all never accessed windows update.
Can you give some advice as to how to check that the updates are making it to the 2008 servers or are not making it there. Also, I saw the updates in the Software Center of the 2012 servers waiting for reboot, but once they rebooted and completed the installation of the updates, I didn’t see anything in Installed Software tab of the Software Center.
I’d appreciate any help with the software updates as it’s always been the hardest thing to administer for me. Thanks.
-SK
There are lot of things that we need to check here. I am sure you would have filtered the expired updates using the search criteria from list of updates. Login to any of the client which has 2008 R2 OS and check the windows update group policy, can you tell me what is the intranet update server info there ?
Hi Prajwal,
I did filter the expired updates using the search criteria. The update group I created for the 2008 R2 servers contained just critical, not expired, and not superceeded updates. I didn’t make a specific GPO for the update server to point to my SCCM server. Is this necessary for the 2008 servers? If so I can create one and link it to the 2008 Servers OU. Thanks.
Prajwal, I solved my problem – updates were successfully deployed to my test collection. However two things bother me. First why update settings in Control Panel – Windows Update on client machines are not grayed-out. Secondly in Software Center user can follow update progress but if user clicks on installed update that requires restart in lower-right corner there is a button RESTART – I did not try but it probably would have restarted machine regardless of installation process of other updates that was in progress. I did not find any settings in SCCM client related to this “weird” behaviour. I assume this is not normal situation on clients.
Answer to your question – I do not have dedicated WSUS server, WSUS is on SCCM server itself.
I added WSUS role on SCCM server, installed SUP role, configured it and did synchronize software updates (security, critical and definition updates for Windows 7). I have chosen all non-expired and no-superseded and put them into new software update group, and, finally deployed it to target collection with one Windows 7 machine. However nothing happened on machine – I noticed in WU in CP info Windows is up to date and in installed updates list I saw many updates installed on November 10th, however not using SCCM but probably online from MS since I installed SUP yesterday. Also I can manually change update settings – they are not grayed-out as it was the case when “normal” WSUS server is deployed.
Do you have WSUS servers in your setup ?
As always nothing works in my environment:
Wakeup for a polling cycle SMS_WSUS_SYNC_MANAGER 11/17/2014 1:00:12 AM 4152 (0x1038)
Wakeup for a polling cycle SMS_WSUS_SYNC_MANAGER 11/17/2014 2:00:12 AM 4152 (0x1038)
Wakeup for a polling cycle SMS_WSUS_SYNC_MANAGER 11/17/2014 3:00:12 AM 4152 (0x1038)
Wakeup for a polling cycle SMS_WSUS_SYNC_MANAGER 11/17/2014 4:00:12 AM 4152 (0x1038)
Wakeup for a polling cycle SMS_WSUS_SYNC_MANAGER 11/17/2014 5:00:12 AM 4152 (0x1038)
Wakeup for a polling cycle SMS_WSUS_SYNC_MANAGER 11/17/2014 6:00:12 AM 4152 (0x1038)
Wakeup for a polling cycle SMS_WSUS_SYNC_MANAGER 11/17/2014 7:00:12 AM 4152 (0x1038)
Wakeup for a polling cycle SMS_WSUS_SYNC_MANAGER 11/17/2014 8:00:12 AM 4152 (0x1038)
Wakeup by SCF change SMS_WSUS_SYNC_MANAGER 11/17/2014 8:28:30 AM 4152 (0x1038)
Wakeup for a polling cycle SMS_WSUS_SYNC_MANAGER 11/17/2014 9:28:35 AM 4152 (0x1038)
Wakeup for a polling cycle SMS_WSUS_SYNC_MANAGER 11/17/2014 10:28:35 AM 4152 (0x1038)
Wakeup for a polling cycle SMS_WSUS_SYNC_MANAGER 11/17/2014 11:28:35 AM 4152 (0x1038)
Wakeup for a polling cycle SMS_WSUS_SYNC_MANAGER 11/17/2014 12:28:35 PM 4152 (0x1038)
Wakeup by SCF change SMS_WSUS_SYNC_MANAGER 11/17/2014 1:12:39 PM 4152 (0x1038)
Wakeup by SCF change SMS_WSUS_SYNC_MANAGER 11/17/2014 1:37:44 PM 4152 (0x1038)
Wakeup by SCF change SMS_WSUS_SYNC_MANAGER 11/17/2014 1:47:34 PM 4152 (0x1038)
Wakeup by SCF change SMS_WSUS_SYNC_MANAGER 11/17/2014 1:48:29 PM 4152 (0x1038)
Wakeup by SCF change SMS_WSUS_SYNC_MANAGER 11/17/2014 1:50:24 PM 4152 (0x1038)
Wakeup by SCF change SMS_WSUS_SYNC_MANAGER 11/17/2014 1:58:59 PM 4152 (0x1038)
Wakeup for a polling cycle SMS_WSUS_SYNC_MANAGER 11/17/2014 2:59:05 PM 4152 (0x1038)
Wakeup for a polling cycle SMS_WSUS_SYNC_MANAGER 11/17/2014 3:59:05 PM 4152 (0x1038)
Wakeup for a polling cycle SMS_WSUS_SYNC_MANAGER 11/17/2014 4:59:05 PM 4152 (0x1038)
Wakeup for a polling cycle SMS_WSUS_SYNC_MANAGER 11/17/2014 5:59:04 PM 4152 (0x1038)
Wakeup for a polling cycle SMS_WSUS_SYNC_MANAGER 11/17/2014 6:59:04 PM 4152 (0x1038)
Wakeup for a polling cycle SMS_WSUS_SYNC_MANAGER 11/17/2014 7:59:05 PM 4152 (0x1038)
Wakeup for a polling cycle SMS_WSUS_SYNC_MANAGER 11/17/2014 8:59:05 PM 4152 (0x1038)
Wakeup for a polling cycle SMS_WSUS_SYNC_MANAGER 11/17/2014 9:59:05 PM 4152 (0x1038)
Wakeup for a polling cycle SMS_WSUS_SYNC_MANAGER 11/17/2014 10:59:05 PM 4152 (0x1038)
Wakeup by SCF change SMS_WSUS_SYNC_MANAGER 11/17/2014 11:55:22 PM 4152 (0x1038)
Wakeup by SCF change SMS_WSUS_SYNC_MANAGER 11/17/2014 11:55:32 PM 4152 (0x1038)
Wakeup by SCF change SMS_WSUS_SYNC_MANAGER 11/18/2014 12:00:03 AM 4152 (0x1038)
Wakeup by SCF change SMS_WSUS_SYNC_MANAGER 11/18/2014 12:20:58 AM 4152 (0x1038)
Wakeup by SCF change SMS_WSUS_SYNC_MANAGER 11/18/2014 12:25:28 AM 4152 (0x1038)
Wakeup by SCF change SMS_WSUS_SYNC_MANAGER 11/18/2014 12:25:38 AM 4152 (0x1038)
Populating config from SCF SMS_WSUS_CONFIGURATION_MANAGER 11/18/2014 12:00:08 AM 4144 (0x1030)
Waiting for changes for 10 minutes SMS_WSUS_CONFIGURATION_MANAGER 11/18/2014 12:00:08 AM 4144 (0x1030)
Wait timed out after 10 minutes while waiting for at least one trigger event. SMS_WSUS_CONFIGURATION_MANAGER 11/18/2014 12:10:37 AM 4144 (0x1030)
Timed Out… SMS_WSUS_CONFIGURATION_MANAGER 11/18/2014 12:10:47 AM 4144 (0x1030)
Default SUP not specified SMS_WSUS_CONFIGURATION_MANAGER 11/18/2014 12:10:47 AM 4144 (0x1030)
Waiting for changes for 60 minutes SMS_WSUS_CONFIGURATION_MANAGER 11/18/2014 12:10:47 AM 4144 (0x1030)
Trigger event array index 0 ended. SMS_WSUS_CONFIGURATION_MANAGER 11/18/2014 12:20:58 AM 4144 (0x1030)
SCF change notification triggered. SMS_WSUS_CONFIGURATION_MANAGER 11/18/2014 12:21:03 AM 4144 (0x1030)
Populating config from SCF SMS_WSUS_CONFIGURATION_MANAGER 11/18/2014 12:21:03 AM 4144 (0x1030)
Waiting for changes for 50 minutes SMS_WSUS_CONFIGURATION_MANAGER 11/18/2014 12:21:03 AM 4144 (0x1030)
Trigger event array index 0 ended. SMS_WSUS_CONFIGURATION_MANAGER 11/18/2014 12:25:28 AM 4144 (0x1030)
SCF change notification triggered. SMS_WSUS_CONFIGURATION_MANAGER 11/18/2014 12:25:33 AM 4144 (0x1030)
Populating config from SCF SMS_WSUS_CONFIGURATION_MANAGER 11/18/2014 12:25:33 AM 4144 (0x1030)
Waiting for changes for 45 minutes SMS_WSUS_CONFIGURATION_MANAGER 11/18/2014 12:25:33 AM 4144 (0x1030)
Trigger event array index 0 ended. SMS_WSUS_CONFIGURATION_MANAGER 11/18/2014 12:25:38 AM 4144 (0x1030)
SCF change notification triggered. SMS_WSUS_CONFIGURATION_MANAGER 11/18/2014 12:25:43 AM 4144 (0x1030)
Populating config from SCF SMS_WSUS_CONFIGURATION_MANAGER 11/18/2014 12:25:43 AM 4144 (0x1030)
Waiting for changes for 45 minutes SMS_WSUS_CONFIGURATION_MANAGER 11/18/2014 12:25:43 AM 4144 (0x1030)
Hello Prajwal,
I created a software group with 75 patches for windows 8.1.
but clients only receive 11 patches and in sccm console shown 100% compliance.
please help me.
Thanks in advance
Yes you must create a boundary group. Each boundary must be a member of a boundary group before a device on that boundary can identify an assigned site, or a content server such as a distribution point.
@Rahman – You must create a boundary group. Each boundary must be a member of a boundary group before a device on that boundary can identify an assigned site, or a content server such as a distribution point.
hi Prajwal,
I need the information related to log file that generates during patch management via SCCM.
Hi Prajwal,
I am having a problem with updates, it says downloading (0% Complete) but its doing nothing since 4days any idea?
This indicates that the client is not able to find a DP to download content from. Is the content distributed to the DP ? Check the status and also check if the DP is correctly assigned to the boundary group where the boundary belongs to?
Hi prajwal there is no boundary group as i have only 1 boundary do i need to create boundary group even I have 1 boundary?
and content is already distributed to DP. the error I am getting on status is 0x800705B4. and there are only 28 machines which failed to download this update.
Hi Prajawal,
The error I am getting the operation return because the time out period has expired 0x800705B4. content is already distributed to DP & I have only 1 boundary so I have’t created boundary group. Is that compulsory to create boundary group as I have only 1 boundary? please let me know.
note:- it says in status that complaint 57 ans error 19 computers.
Thanks,
Rahman
I am trying it in the Virtual Labs as per the steps given by you .
I have choosen the Synchronize From Microsoft Update. After the process selection, Language and clicked on close. But when i go to Monitoring and Component status in this Clicked on the Wsus_sync_manager it was started and showing the message at Wsus sync has been failed.
Please suggest me regarding to the issue.
Check wsyncmgr.log and WCM.log files. In the component status window, right click on WSUS_SYNC_Manager component and check for errors/warnings.
It is recommended to create separate collections for each of the OS and then deploy the updates.
Any advantage of this? Bcoz clients will download only those patches which are required to them and this information is stored in client’s wmi itself during wsus sync.
So a xp machine will not try to download and install any patch which is related to win 7 only.
You need to deploy the updates first to one of the test machine before you deploy it to systems in your organization. You should not directly deploy it to production systems. The same applies even if you are using WSUS. Because if an update(s) causes an issue rolling back is a big task.
Hi Prajwal,
In this example you have shown the synchronized updates i.e., security updates for the windows 7. And how we can determine the selected updates will be suitable for the Windows machines in the environment. Please provide me the details how this can be done.
Want to know about Automatic deployment rules in SCCM 2012 and best practices related to it
Next – What is your opinion on having WIN 7 ,8 and XP machines put in one collection and applying patches ?
What are the draw back and advantages ?
Patches will be packaged and then will be deployed .
Your quick response will be appreciated.
Hello Prajwal
Software Updates are not installing for me. I am using SCCM 2012 R2 but I see different steps in the wizard than what you show here. I have no place to create a deployment package or specify a distribution point. Have you seen this before?
@Curt – This looks strange.. Can you give me little info about your SCCM setup ..
Thanks,
Prajwal Desai
I’m using 2012 R2 with everything except the database on one server.
It looks like they have separated the missing steps into a second wizard. Now you have to right click on the SUG and choose “Download”. Then you get this wizard:
Hi Prajwal,
Been using the site for a few weeks now, great tools. Thank you.
I want to setup an automatic deployment rule for the updates. In your post here you say it is covered in a separate article. Can you tell me where or is it still in the works? Any help is greatly appreciated.
Kindly,
Shawn
Hi Shawn, I am yet to create a post on that. This would take sometime..
Thanks,
Prajwal Desai
Hello this is a nice post .. Thanks Prajwal..
Hi,
Prajwal,
option (3) Management Pack installation done & no issue (exchange & LYNC 2013 ). other above My query Kindly let me know it
Best Regards,
Arshad
Hi Prajwal,
As My sccm 2012 R2 Server. now i checked your above comments on GPO. (sccm 2012 local policy) & AD GP policy. My case also all client not able reach the deploy updates, later discover the GPO issue according to the client Log & also sccm log file files , sccm Reports (scan reports , deploy reports)
Now i completely disabele the GP of AD. so SCCM 2012 R2 having client local polices Exist , so i hope wehn i test as deploy updates for clients it will work fine….?.
(2) Sccm 2012 R2 all Kind of (exchange connector) Mobile deviss it support…. My Exchange 2013 & Present i am able to see only 36 Mob Devices. If having any Ms article for all type of Mob device support , Please share the Link or steps.
(3) I would like to install Managment pack for Exchange 2013 & Lync 2013 on SCOM 2012 R2. Please provide me download link & steps for installtion Guide.
(3) after upgrade sccm 2012 sp1 to sccm 2012 R2 Some of My clients shows as inactive, If I try i to manually lnstall the Cleint SCCM R2 & Refesh the service , configration policy it will be fine…?
(4)some of the clients i am not able to connect remotely (remote client option) from sccm 2012 R2… what could be the reason
..(no firewall but Kaspers 10.2 issue..?
Thanking You in Advance.
Arshad
So if our Current Group Policy set up is for our current WSUS server (WsusServer1.xxx.local) then we cant use SCCM (SCCM2012.xxx.local) to deploy Windows updates until we remove current server and remove from group policy?
@EarthCoder – Good Question, When SCCM is installed it creates a local policy and those are always overwritten by GPO. I mean to say that GPO will take precedence over SCCM local policies. So you have to disable or delete the WSUS GPO settings if you are going to use SCCM 2012 to deploy windows updates. you must also set Configure Automatic Updates = Disabled, let SCCM take complete control over updates deployment.
@ Prajwal
Thanks, After disable the GP of AD, I am able to deploy the windows 7 clients updates. But other end windows 8 & windows 8.1 updates I am not able to deploy so far… on sccm 2012 R2. Any Inputs …
@Arshad – What is the problem ? Why are you not able to deploy windows 8 updates ?
Thanks for your reply & always Support.
I hope found the Solution ,
As some of the M/s WINDOWS 7 Stand for detection state unknown means log file(wuahandler.log) stand for GP Error.
then i dsable & enable My system , gppdate.exe/force , now win7 updates working fine.
Same issue with some windows 8 (only 10) clients also detection state unknown with same error we need to try Gp Enable & disable
so i will try the same & i get back to you
Best Regards
Arshad
Hi Prajwal,
As application deployment as we add DP,
I deployed windows 7 updates, or server updates fine without add DP (Distribution group name).
is it recommended to add DP because I am not able push WINDOWS 8.1 updated. ..?
wuahandler.log : err0r=0x8024401c ..(stand for GP error..?)
(2) some windows 7 client error status id (11423) & last error code (-2147012894)
Error description: : Network connection: windows update agent encountered Transient network connection-related error.
client system need to update any windows update agent ..? or SCCM client agent issue….?
My SCCM 2012 r2 agent are updated with R2 agent.
Kindly give the inputs.
Regards,
Arshad
Hi Prajwal,
for windows 8.1 updated ( for WSUS 3.0 SP2 OR WSUS 3.2), need KB2919355 update. client side …?
Regards,
Arshad
Hi Arshad, I read about the update KB2919355. “Microsoft plans to issue an update as soon as possible that will correct the issue and restore the proper behavior for Windows 8.1 Update KB 2919355 scanning against all supported WSUS configurations. Until that time, we are delaying the distribution of the Windows 8.1 Update KB 2919355 to WSUS servers. You may still obtain the Windows 8.1 Update (KB 2919355) from the Windows Update Catalog or MSDN. However, we recommend that you suspend deployment of this update in your organization until we release the update that resolves this issue.”
@prajwaldesai:disqus
Thanks for your Valuable Support.
Fine. Aapart from this update, i am unabale to deploy any windows 8 or windows 8.1 updates from sccm R2 .
(But windows 7 no issue. ) shall i send log file text of windows 8 system. Even After disabel the GP of domain
Best Regards,
Arshad
Yes Arshad log files will be helpful to understand where exactly the issue.
Prajwal Desai
Wuahandler.log text details:(dated 10-04-2014) , os windows 8.1
![LOG[Async searching completed.]LOG]!>
so this error stand for GP correct (Code= 0x8024410c)….? If yes
after admin disable th GP from Domain Controller ……
After changed the “ Configure Automatic Update” from GPO to Not Configurewe are lost the control of windows update now , many machine get the update (windows 8) from Internet .
if required i will send the text of new current update log file tommorrow
Best Regards,
Arshad
@Arshad – If the client machines are downloading the updates from internet then you can block it with the help of WSUS GPO setting.
Fine. Thank You for your Support.
@prajwaldesai:disqus
open My ticket…..
Regards,
Arshad
@Earthcooder
Thanks, After disable the GP of AD, I am able to deploy the windows 7 clients updates. But other end windows 8 & windows 8.1 updates I am not able to deploy so far… on sccm 2012 R2. Any Inputs
Hello Testing this out but i get a Scan report saying Group Policy Conflict
is there away of doing updates on machines with out Group Policy as we already have a Wsus Server deploying Windows updates, but want to test using SCCM instead we dont want to turn off Current wsus at the moment.
If you are using SCCM 2012 to eploy updates then there is no need of group policy, you can turn off. But keeping the WSUS group policy it won’t work properly.
My English is a little low. Please note that.
below is red line in log file.
Repeat to error log.
wsyncmgr.log
Sync failed: WSUS server not configured. Please refer to WCM.log for configuration error details.. Source: CWSyncMgr::DoSync
STATMSG: ID=6703 SEV=E LEV=M SOURCE=”SMS_WSUS_SYNC_MANAGER” SYS=CM-WSUS.sc2012.local SITE=SYS PID =768 TID=3976 GMTDATE=FRI 3 20 23:45:10.454 2014 ISTRO=”CWSyncMgr::DoSync” ISTR1=”WSUS server not configured. Please refer to WCM.log for configuration error details.”ISTR2=””ISTR3=””ISTR4=””ISTR5=””ISTR6=””ISTR7=””ISTR8=””ISTR9=”” NUMATTRS=0
Sync failed. Will retry in 60 minutes
WCM.log
System.Data.SqlClient.SqlException (0x80131904): Can’t connect SQL Server to Network or Instance error. Can’t search for Server or can’t Access.
Done using SC2012\Administrator credentials.
Remote configuration failed on WSUS Server.
WUAHandler.log
ONSearchComplete – Failed to end search job Error = 0x8024401c.
Scan failed with error = 0x8024401c.
But I success ping test from SQL Server to SCCM Server.
And disable public on SCCM Server after Partly successful Windows Update list display on client.
However, does not display all Windows Update list on client and server.
In my opinion, I Deployment SCCM with private and public ethernet.
It results setting public on SQL Server TCP/IP and SCCM Server.
After disable public and change SQL Server TCP/IP from private to public and disable to SCCM Server.
May be It seems IP is twisted.
Please post your questions in the forums and attach the complete log files in the ticket ?
Hi Prajwal, thanks your post. it’s very good.
I have a question.
I deployed SUS feature reference this guide.
It’s successful distributed Windows Update group for collection.
but don’t view Windows Update list on client software center.
and distributed result is unknown collection.
i have to 8530 port telnet succeed from client to server and disable firewall to all server and client.
Where can i look for this issue?
You mean to say that updates are not getting installed to client machines ?
Thank you for quick reply.
Yes. same issue server. not getting anymore.
i test to CM 2012. Consisting of private Internet environment.
When Windows Update while connected to the public Internet.
When the update is complete, disabled the public Internet.
Hi, can you tell me more about what exactly the issue is ? You are trying to deploy using SCCM to client computers and as per you the client systems are not getting updates from SCCM.. Is that true ? You need to check WCM.log file and WSyncmgr.log file on SCCM server and WUAHandler.log file on client machine to troubleshoot the updates related issues.
i install sccm 2012 SP1 to have a primary site – i need to deploy a remote branch distribution points to be working instead of adding a child SCCm in those remote sites i need your step by step to do that ? also what other sccm roles recommended this Distribution point will have ??
i have an compatibility issue between sccm 2012 sp1 and windows 8.1 client to deploying EP protection 2012 – does i need migration to sccm 2012 R2 if this is the solution please i need your full steps to migrate from sp1 to R2 – MY OS is windows server enterprise 2008 R2
thank you
Hi Prajwal,
Thanks for nice posts. After deploying software updates(followed above steps). I was unable to see updates on client machines. checked WUAHandler.log files on client machines getting “Error – 87d00692” I hope it is related to group policy.
what could be the reason for above error ?
Regards
Umesh
have you configured the GPO for WSUS pointing to SCCM server ?
Hi Prajwal,
I have started working on SCCM recently and found your posts are very helpful.
Now I am trying to put those information which I found very helpful when someone would be trying to solve them.
For example, if somebody using Windows 2008 R2 + SCCM 2012 SP1 (as per my experience), he may find these errors on ccm.log –
Looking for WSUS SP2 + KB2734608 + KB2720211
What happens here even WUS SP2 console already been installed, the other patches (KB2734608 & KB2720211) also need to be installed first. There are processes also some procedures for installing them. The IIS and WSUS services need to be stopped before attempting to install them. Once they are installed, those services can be started. Details can be found in the Microsoft KB article
Hope this could be helpful for somebody..
Thanks
Thank you Sakib 🙂
Fine. Actually even once you also sent me blow link for all log files & WSUSsyncmgr.log Mentioned here.
Some details of log file of this link & might be sccm 2007 Log file…?
WSUSsyncmgr.log
Performing sync on local request SMS_WSUS_SYNC_MANAGER 4/27/2010 11:59:54 PM 6112 (0x17E0)
STATMSG: ID=6701 SEV=I LEV=M SOURCE=”SMS Server” COMP=”SMS_WSUS_SYNC_MANAGER” SYS=SCCM SITE=LAB PID=3040 TID=6112 GMTDATE=Tue Apr 27 18:29:54.530 2010 ISTR0=”” ISTR1=”” ISTR2=”” ISTR3=”” ISTR4=”” ISTR5=”” ISTR6=”” ISTR7=”” ISTR8=”” ISTR9=”” NUMATTRS=0 SMS_WSUS_SYNC_MANAGER 4/27/2010 11:59:54 PM 6112 (0x17E0)
STATMSG: ID=6704 SEV=I LEV=M SOURCE=”SMS Server” COMP=”SMS_WSUS_SYNC_MANAGER” SYS=SCCM SITE=LAB PID=3040 TID=6112 GMTDATE=Tue Apr 27 18:30:18.547 2010 ISTR0=”” ISTR1=”” ISTR2=”” ISTR3=”” ISTR4=”” ISTR5=”” ISTR6=”” ISTR7=”” ISTR8=”” ISTR9=”” NUMATTRS=0 SMS_WSUS_SYNC_MANAGER 4/28/2010 12:00:18 AM 6112 (0x17E0)
Synchronizing WSUS server SCCM SMS_WSUS_SYNC_MANAGER 4/28/2010 12:00:18 AM 6112 (0x17E0)
Synchronizing WSUS server sccm.mylab.in … SMS_WSUS_SYNC_MANAGER 4/28/2010 12:02:16 AM 5220 (0x1464)
sync: Starting WSUS synchronization SMS_WSUS_SYNC_MANAGER 4/28/2010 12:02:16 AM 5220 (0x1464)
sync: WSUS synchronizing categories SMS_WSUS_SYNC_MANAGER 4/28/2010 12:02:44 AM 5220 (0x1464)
Best Regards,
Arshad
Hi Prajwal,
i would like to konw on sccm 2012 sp1, for updats logs for (sup) i can see only wsyncmgr.log.
But unable to find the log file as Mentioned some forums WSUSsyncmgr.log ( will Available after the Client windows updates with SCCM 2012 SP1 server…?) . Kinldy let me know it.
Best Regards,
Arshad
There is no such log file called WSUSsyncmgr.log. It’s wsyncmgr.log
Hi, Prajwal!
Your SCCM blogpost series very informative for me! Thanks a lot!
What do you think about updating Windows 2008 R2 Itanium-based servers by SCCM? There is no SCCM agents. What should I do to include these servers into SCCM updating process?
Please, let me know if you have some tips&tricks about Itanium servers.
With best regards, Ilya.
Yes the SCCM clients must be installed so that you can update servers. You need to check if the agents can be installed on Itanium based servers. For configMgr 2007 it was supported, but for SCCM 2012 R2 i don’t see the support for Itanium based servers.
Hi Prajwal
Thanks for you answer, I am a little confused, the task to download the updates is or is not made by WSUS? this step was configured (only the steps for activate the rol, not the full configuration) when WSUS rol was installed, before to install and configrue SCCM, and this folder was, in my case, e:\wsus.
WSUS creates own folders to shared, this folders are differents to SCCM folders?, I am talking about the same update downloads.
If you dont create any package and only makes deployments from all update software view, then ¿where the update are located or downloaded?. Maybe the software (SCCM) always ask the folder destination where the software update will be downloaded
Thanks again, I am new in SCCM and I am to trying to know how this software works, and the english is not my native language is spanish.
=)
The task to download the updates is or is not made by WSUS? – WSUS works in the background while SCCM takes the charge of downloading the updates and deploying them. If you are using SCCM to deploy the updates then you should not open the WSUS administration console.
When you create a software update group you basically group the updates for a product and download the updates to a folder, this folder is the package source location. This is not one of the folders inside the WSUS.
If you dont create any package and only makes deployments from all update software view, then ¿where the update are located or downloaded?. – This cannot be done because when you choose to deploy the updates they must be downloaded to a folder and then deployed. You can see the screenshot in my post where in I have defined the package source.
Hi, very good your manual, but I have a question, How do you configure the package source? could you explain more detailed, may be I missed an step or link because I dont see how create the repository (in your example package source \\server\sources\update\windows 7) snap24.jpg
Thank for you help.
The folder windows 7 is created for storing the updates. The Package source is the folder where the updates are downloaded to and deployed from. You can create a shared folder and provide that folder as package source. It is recommended to create folders for different products.
i am working in IT field since last 10 years as a desktop support engineer, I want to be a system engineer what i have to do next to became system engineer. Pl. guide me on same. I had taken academic training on Windows Server2008 R2 but nothing happen in knowledge.
Hi Hardhik, I will be happy to help you. Please post this question in forums.
Hi Prajwal Desai,
I followed all steps to download critical updates for Windows 10 and deployed to a device collection of 3 client machines to test. But won’t see any updates available from client machines in the software center. Don’t know if I missed anythings.
Deployed the application, or Windows 10 upgrade work just fine. But I couldn’t get the Windows 10 Critical updates deployment work at all.
Thanks!
Vin