In this post we will see how to Create Automatic Deployment Rule in SCCM. Automatic Deployment Rules fill a large gap in software update functionality because in older versions there was no way to automatically download and assign updates. Thanks to Microsoft for introducing the ADR’s which have the ability to automatically approve updates and deploy them.
You can create automatic deployment rule in SCCM and typically use ADR’s to deploy your monthly software updates (generally known as Patch Tuesday) and for managing definition updates.
When the rule runs, software updates are removed from the software update group (if using an existing group). The software updates that meet a specified criteria (for example, all security software updates released in the last week) are added to a software update group.
The content files for the software updates are downloaded and copied to distribution points, and the software updates are deployed to client computers in the target collection.
Create Automatic Deployment Rule In SCCM
To create Automatic Deployment Rule in SCCM, follow the below steps.
- Launch the SCCM console.
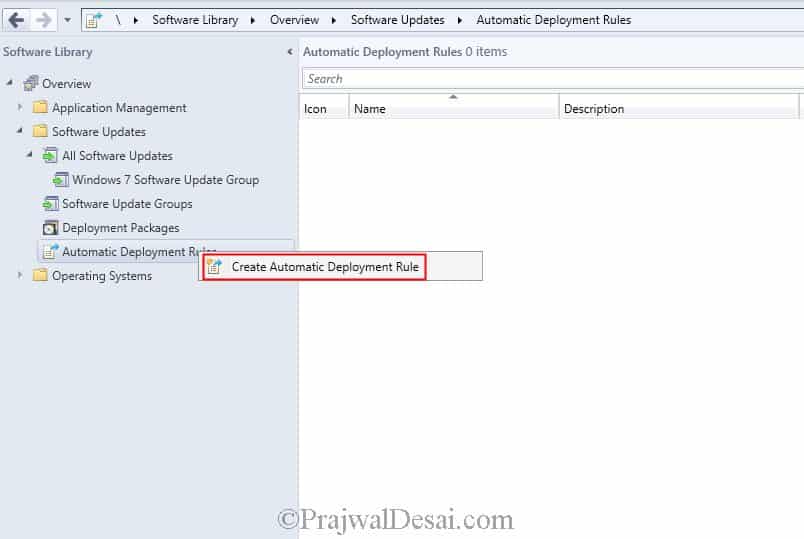
- Navigate to Software Library > Overview > Software Updates > Automatic Deployment Rules.
- To create a new ADR, right click on Automatic Deployment Rules and click Create Automatic Deployment Rule.
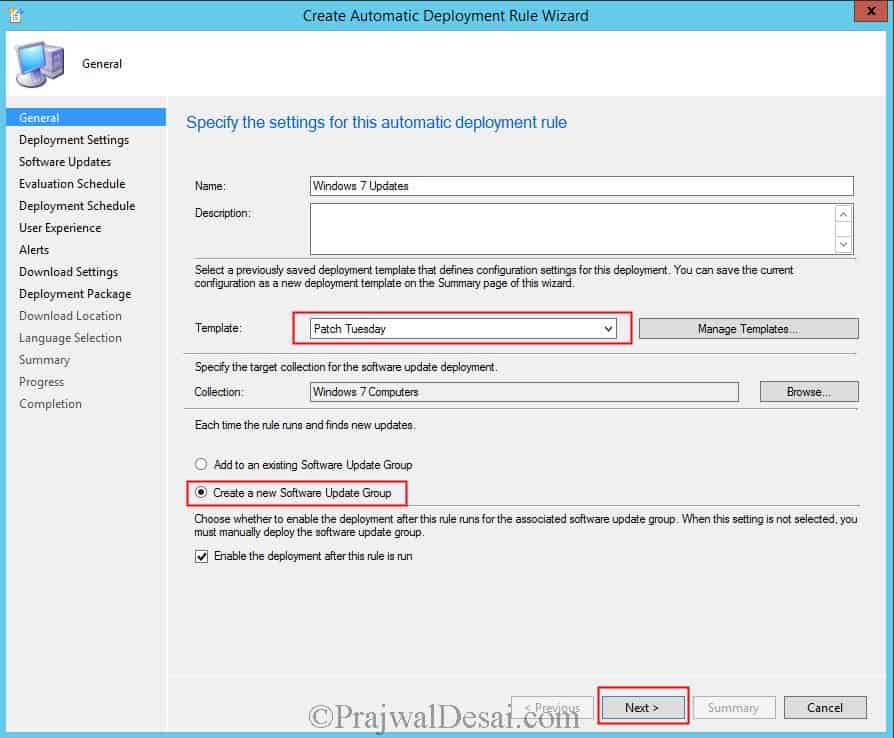
Specify the automatic deployment rule name. Choose the template, click Browse and select the target collection for update deployment.
Next choose Create a new Software Update Group. If you choose to add to an existing update group, a new one is created the first time the ADR is evaluated and reused for each subsequent evaluation of the ADR.
If you choose to use a new update group, then a new update group is created for every evaluation of the ADR. Leave the box checked for Enable the deployment after this rule is run. Click Next.
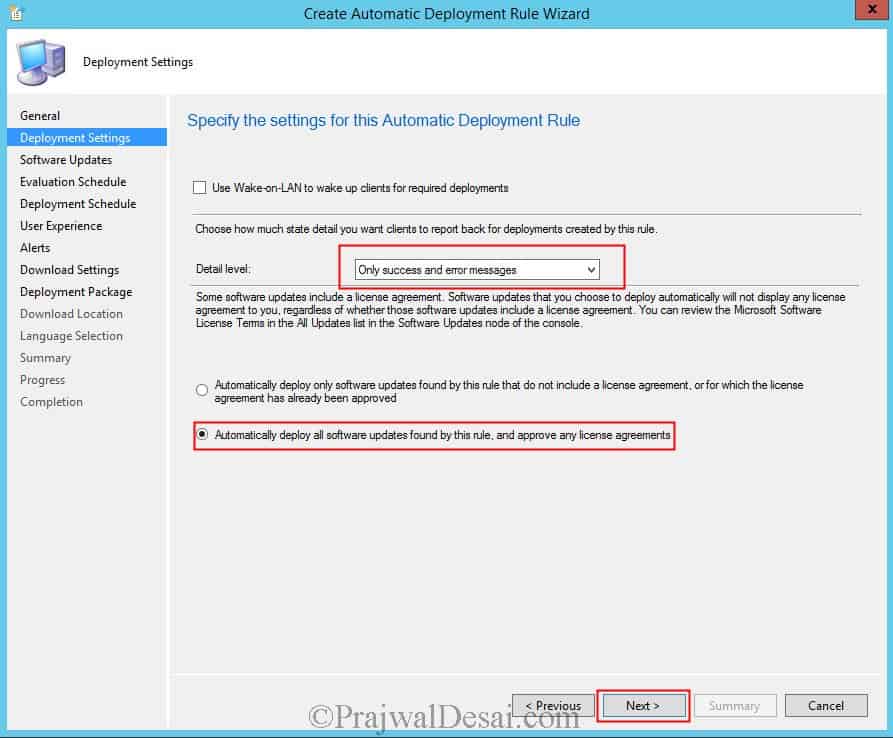
On the Deployment Settings page, choose the detail level as Only success and error messages. Next, choose Automatically deploy all software updates found by this rule and approve any license agreements. Click Next.
ADRs populate an update deployment with references to updates based on a pre-defined filter similar to console filters described in All Software Updates section.
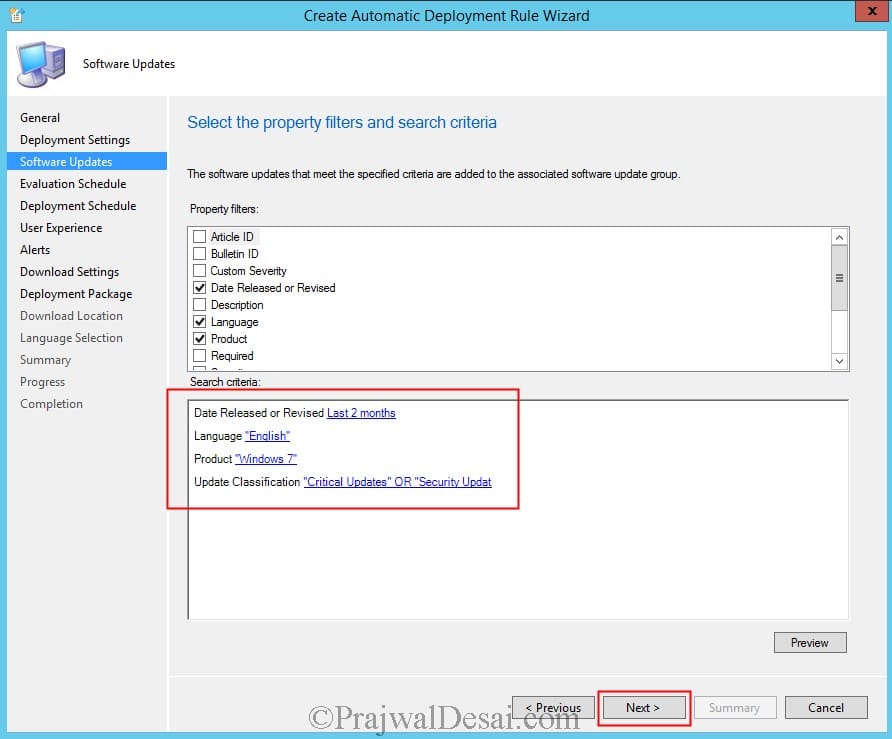
A subset of the filter criteria is displayed on this page, where you select and define the criteria for finding the updates for inclusion in the update deployment.
I will be choosing the following property filters.
1) Date Released or revised for last 2 months.
2) Updates to be in English language.
3) Updates target Windows 7 Product.
4) Updates have to be Critical updates or Security Updates.
Click Next.
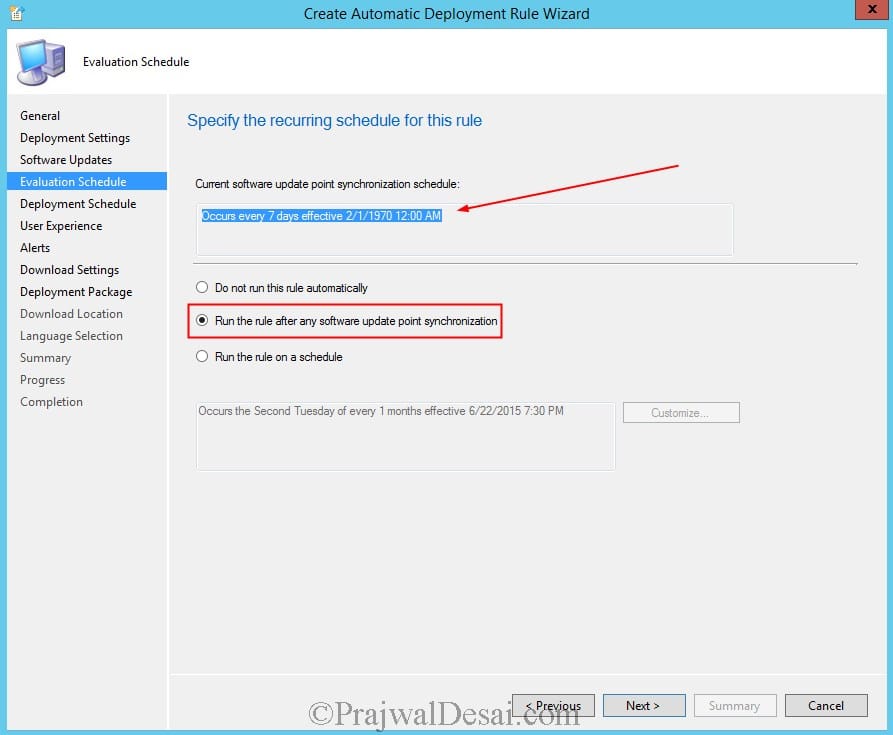
On the Evaluation Schedule window, you configure when you want the ADR rule to be evaluated. This is important because the ADR rule runs as per the schedule that you configure here so configure this carefully. For convenience, it also shows the SUP synchronization time so you can coordinate the two times.
Note – It doesn’t make sense to run an ADR evaluation more frequently than the SUP synchronization time because there will be no new updates to find. You can also disable the automatic, scheduled evaluation of an ADR, leaving it to be initiated manually. In this example I will choose to run the rule after SUP synchronization. So my rule would be run every 7 days when the SUP sync happens. Click Next.
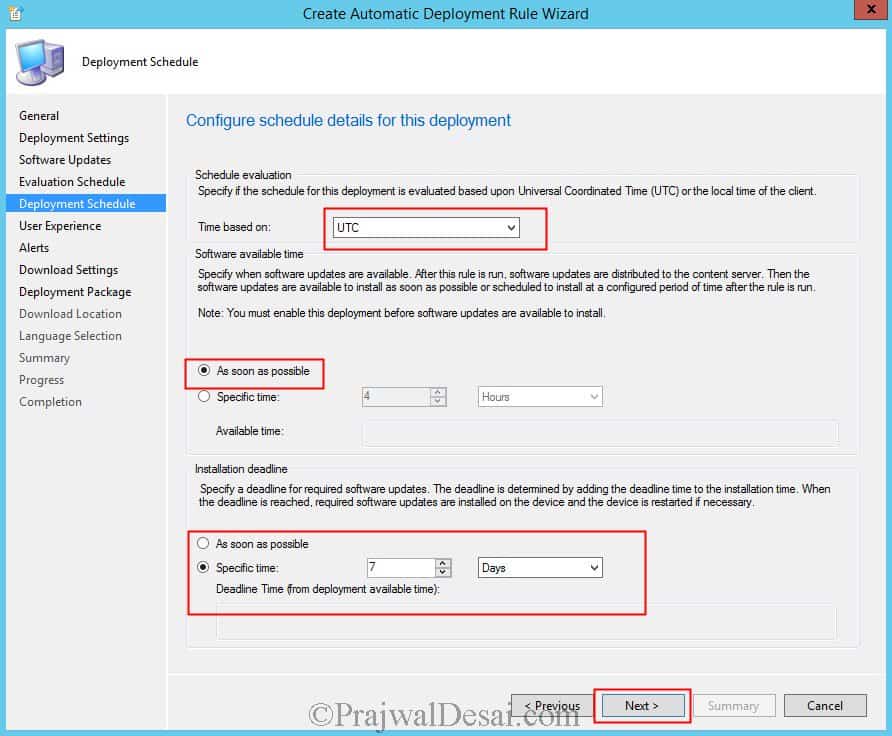
Specify the schedule details for the deployment, set Time based on to UTC. Choose the Software available time to As soon as possible and Installation deadline to 7 days. I know 7 days is a lot of time, you could choose your settings here. Click Next.
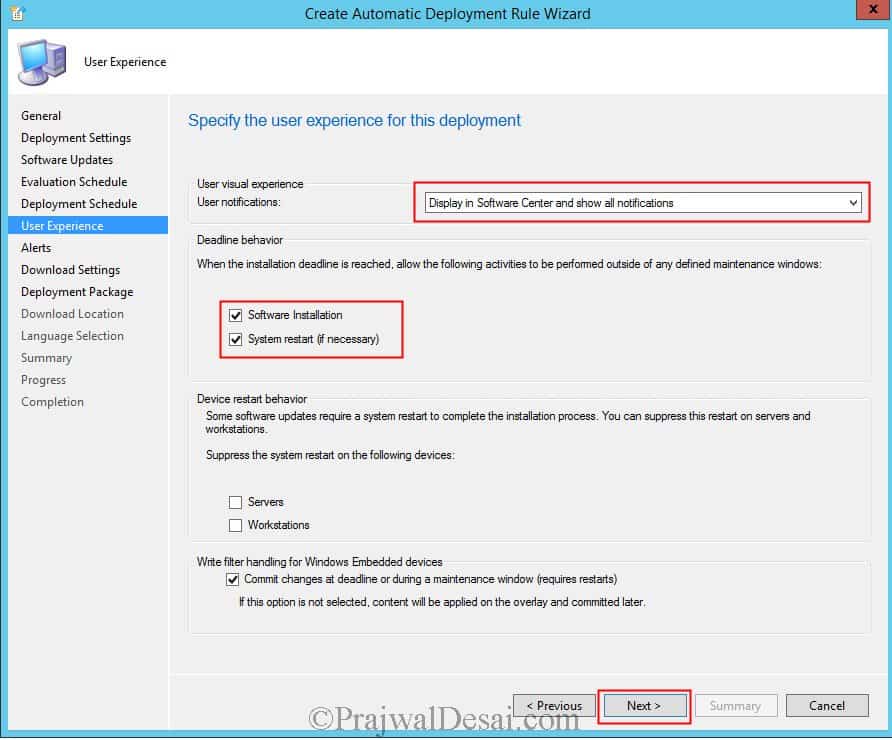
User Experience – Choose the settings as shown in the below screenshot and click Next.
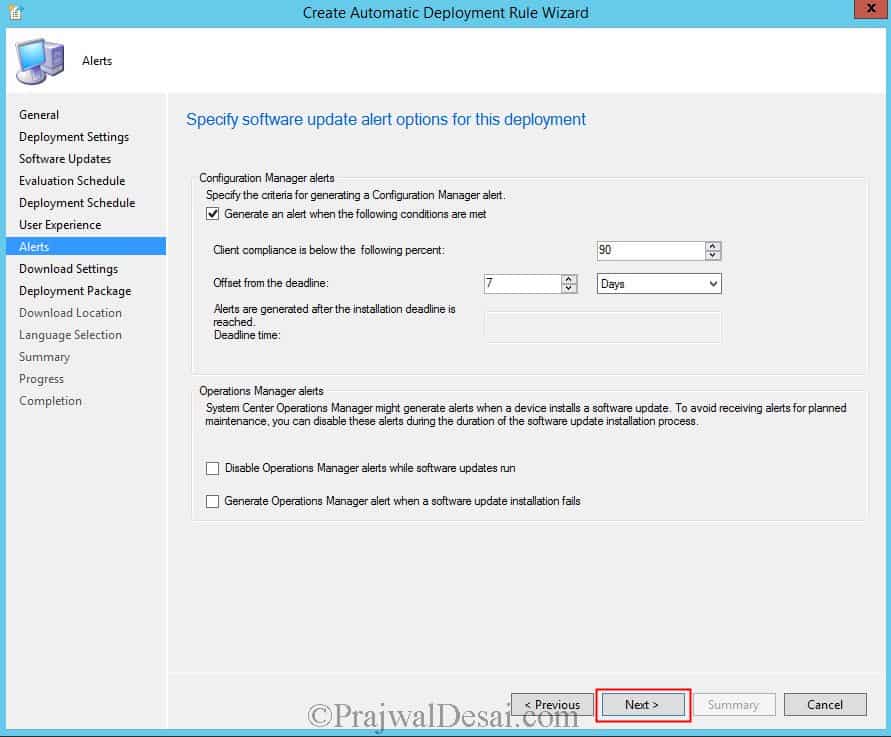
Alerts – I haven’t configured anything here. Click Next.
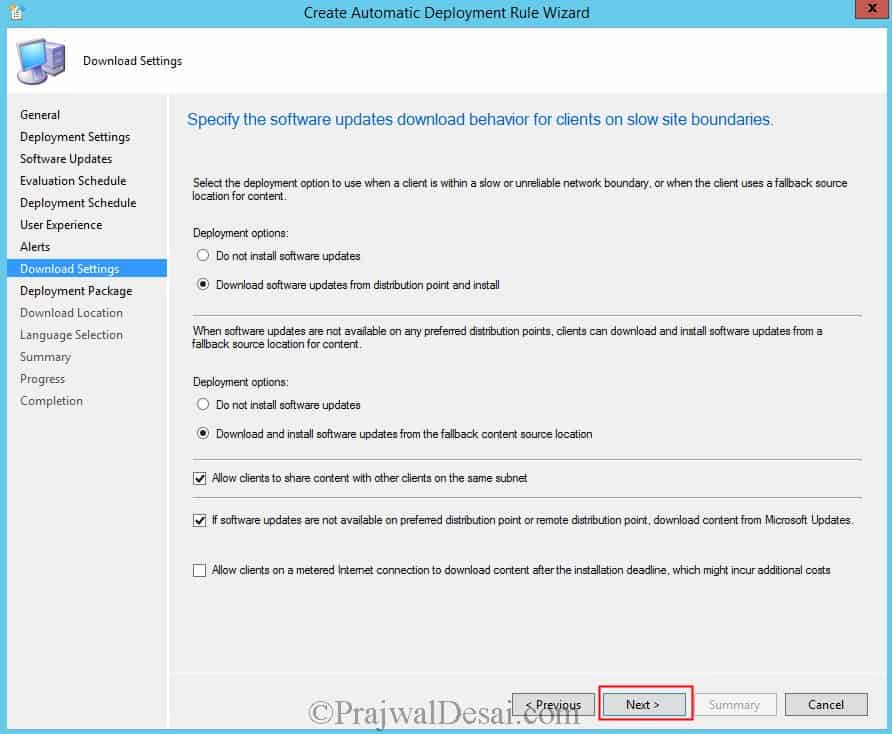
Click Next.
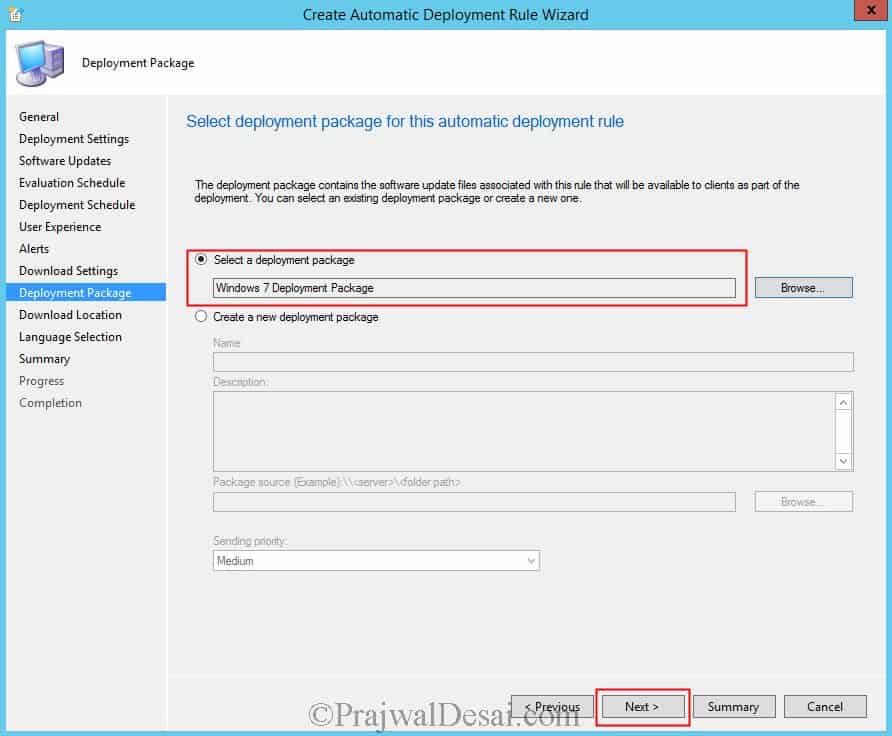
You need to specify a deployment package. Click on Browse and select the deployment package. If you have not created one then click on Create a new deployment package. If you want to know the steps to create deployment package click this link.
What are Deployment Packages – Similar to software distribution packages, deployment packages are simply the collection of files needed for a set of updates. They must have a source folder and be available to clients by assigning them to distribution points. There is no way to create a deployment package from the console, you can only create one using the Deploy Software Updates Wizard or the Download Software Updates Wizard.
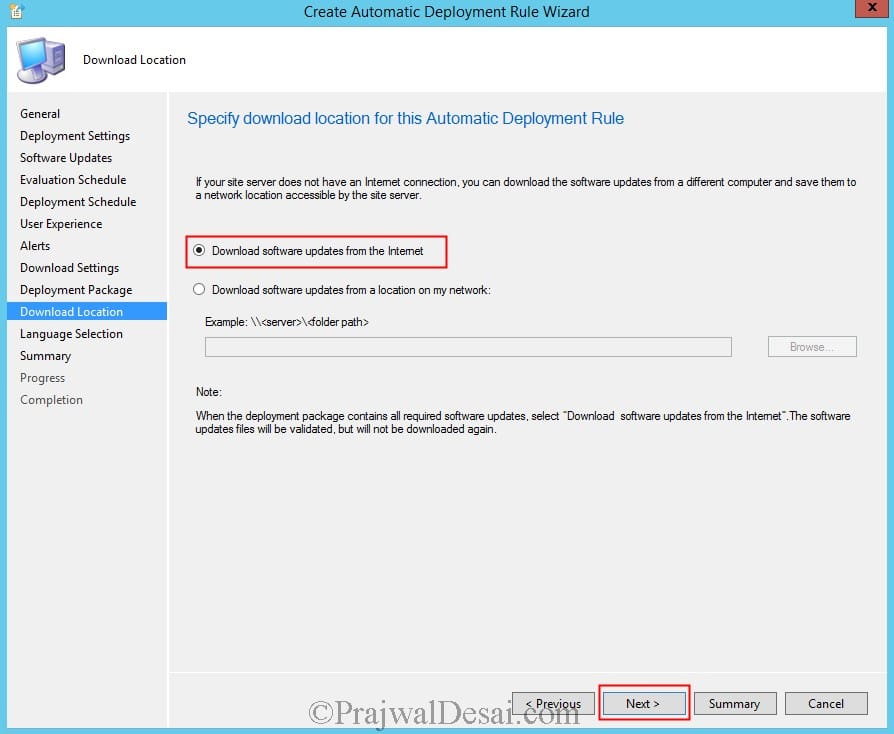
Choose Download software updates from Internet. Click Next.
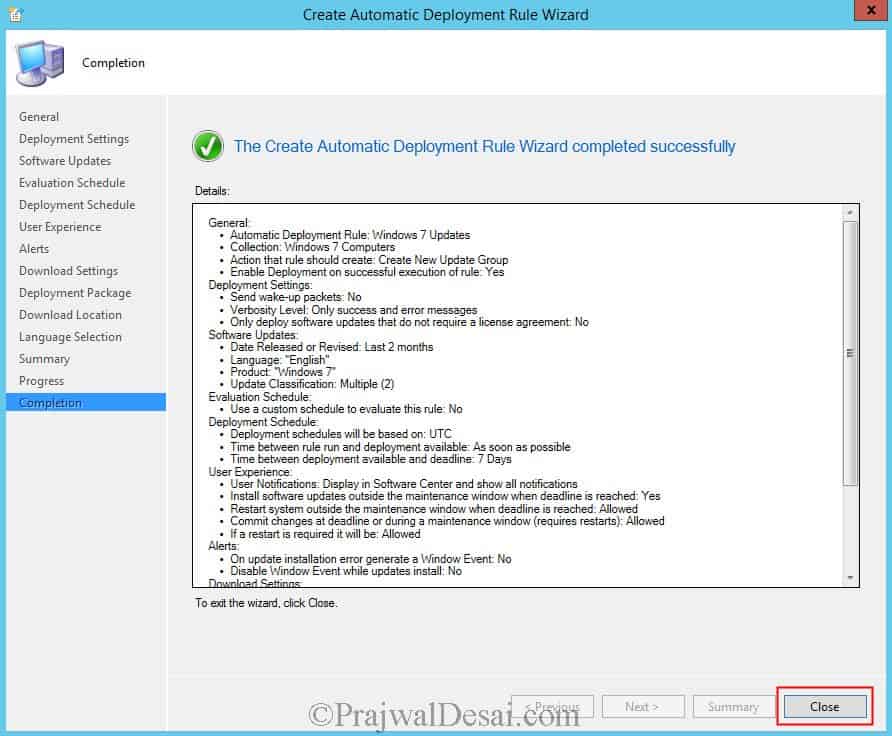
Complete the wizard. Click Close.
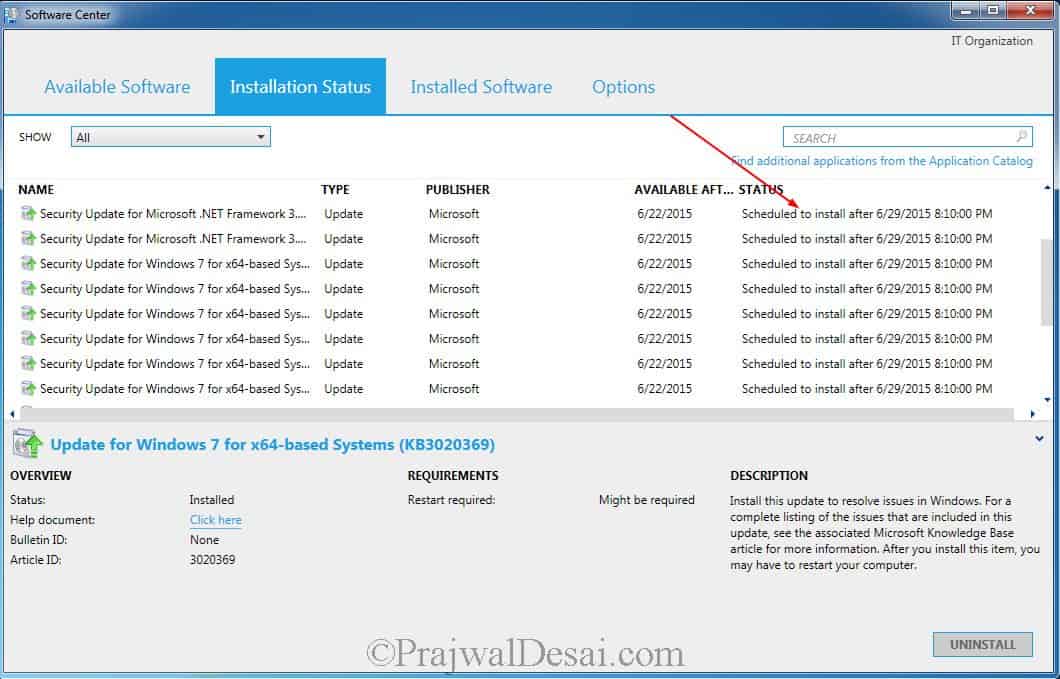
Wait for sometime and on the client machine launch the software center. We see that the deployment is scheduled to run 7 days after the creation of rule i.e. on 29th.
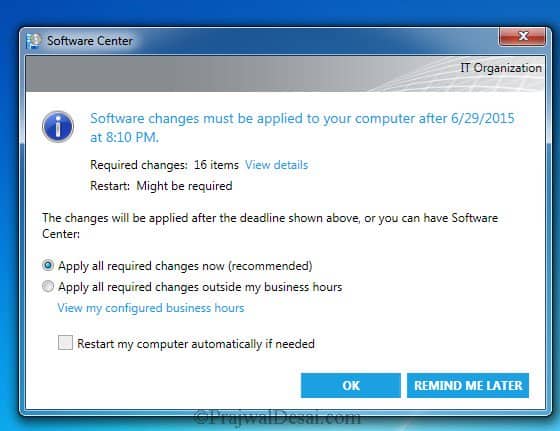
On the client machine we also see a software updates notification.
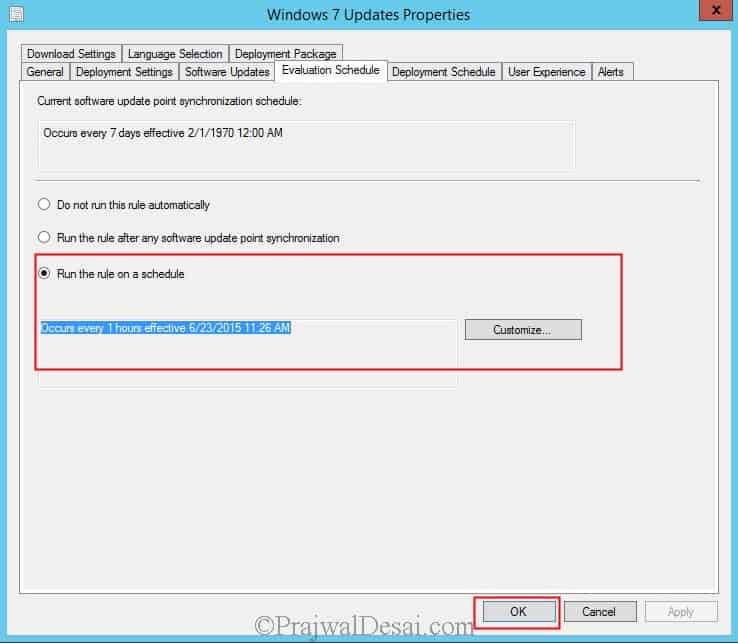
Note – I am making this change to show the updates deployment quickly. We know that updates will be deployed on 29th. Instead of waiting for next 7 days I will now change the evaluation schedule of the ADR. Right the ADR rule and click on Properties. Click Evaluation Schedule and choose Run the rule on a schedule. I have set the rule to run every one hour (You need not try this on Production environment, just stick to the schedule that you had configured earlier). Click OK.
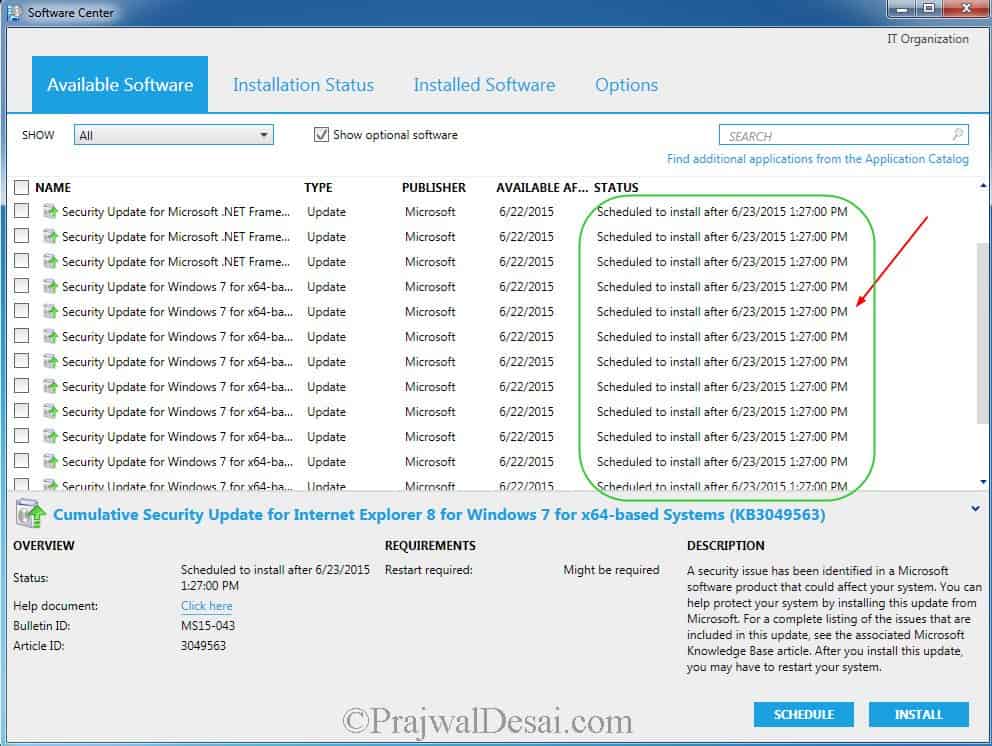
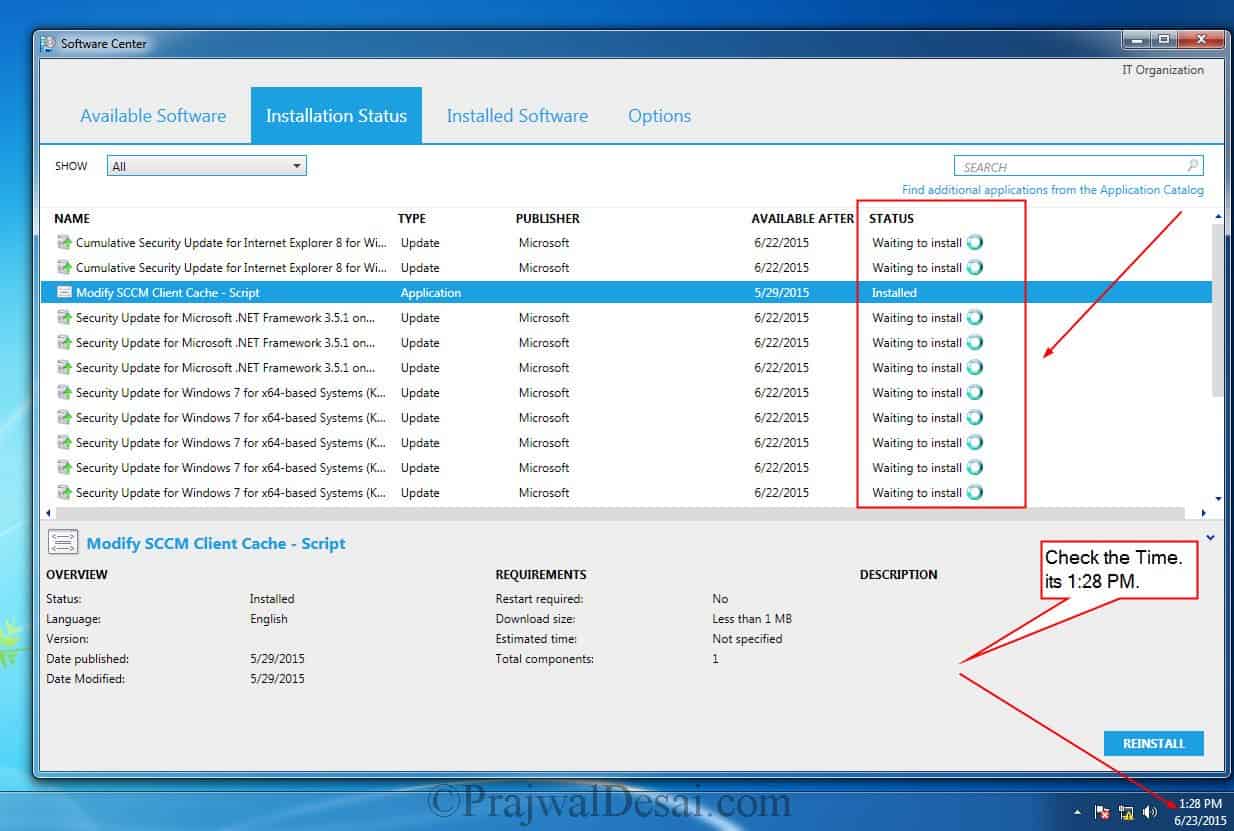
On the client machine open the software center and now we see that the updates are scheduled to install on 23rd at 1:27 PM.
At 1:28 PM we see that the status of updates were seen as Waiting to install. The updates are not being installed.
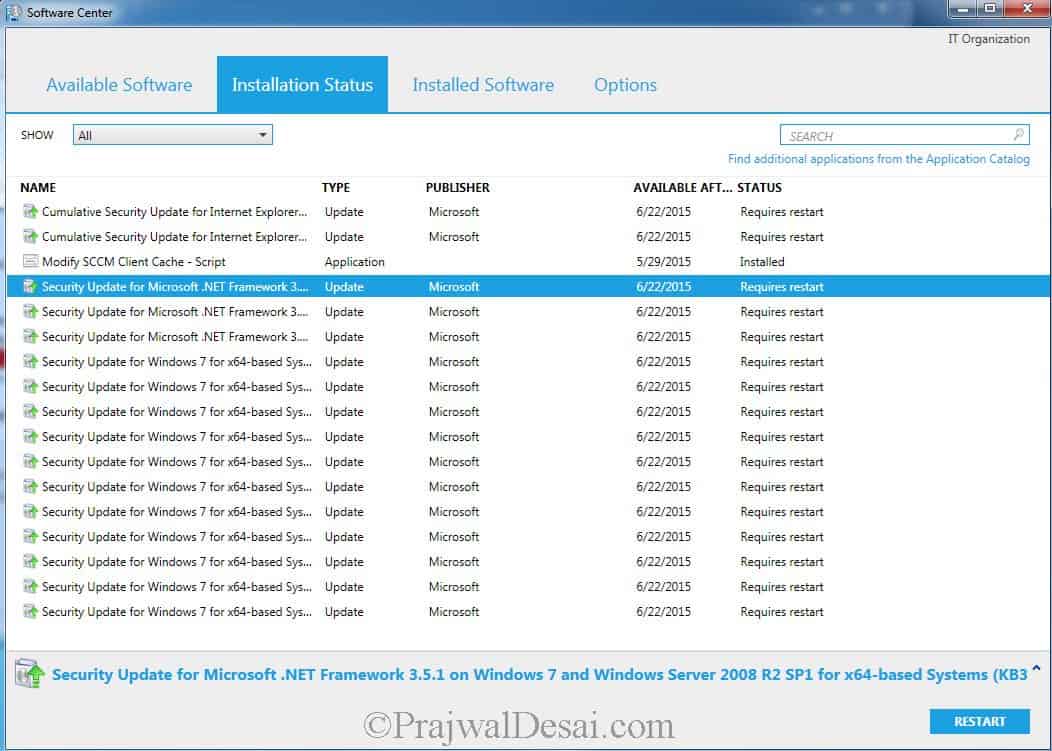
The updates have been installed and the client machine needs to a restart.
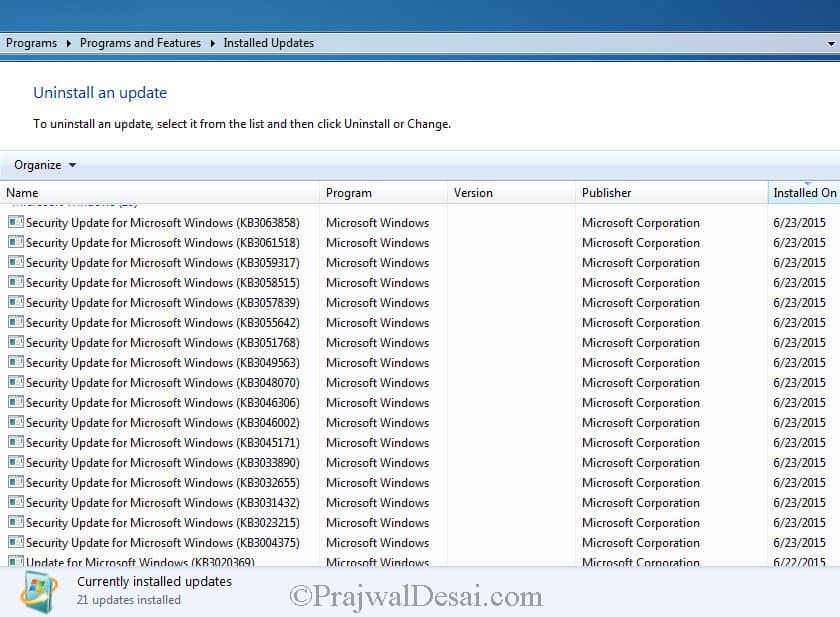
After the client computer is restarted, launch the control panel, click on Programs > Programs and Features and click on Installed Updates. You should now see the list of updates installed on the client machine deployed via ADR.
Troubleshooting SCCM ADR
After you create automatic deployment rule in SCCM, the ADR’s may encounter some issues. In such cases you will need to troubleshoot the ADR’s based on error codes and by reviewing the log files.
1) Once you deploy the ADR, the status of that new deployment should be checked regularly by looking at Monitoring | Deployments.
2) Review ruleengine.log for troubleshooting purpose.
A lot of effort has gone in putting all this together. If you have got any questions then do write in comments.




Hello,
Is the ADR using only the Software Update Point (SUP) per design or could we use a share with a UNC?
Thanks,
Dom
Hi,
once I create a deployment package it will grow the capacity month by month. Is there a way to remove superseded updates automatically from the existing deployment package and distribute them to the DP.
Is there a way to pre download the patches before install.
Say the patches are available right away and the Force install period is a week away, so the users can ‘snooze’ for a bit etc. But during this time I assume the files are not downloaded and cached in c:\Windows\CCMCACHE etc. I assum when its ready to install is only when the files get downloaded ?
We have several machines on poor connection and would like the files to download and be ready to install as soon as the window closes for instance. Possible?
Hello, all
We have created ADR. Most computers from collection have updated.
But several pcs don’t deploy windows updates.
in UpdateDeployment logs we see list of applicable updates but nothing happening
we see in this logs
No current service window available to run updates assignment with time required = 1
In ccmcache nothing downloading
In updatestore logs we see
Querying update status completed successfully.
Querying update status of 15 updates.
We have above 20 pcs with this issue and some pcs with another kind of issue.
How many updates do you see in the SUG created by ADR ?. 15 updates are the downloaded updates based on the criteria. It doesn’t mean all 15 updates are applicable. The ADR deploys only the applicable updates to the client machines.
Hello, all
We have created ADR. Most computers from collection have updated.
But several pcs don’t deploy windows updates.
in UpdateDeployment logs we see list of applicable updates but nothing happening
we see in this logs
No current service window available to run updates assignment with time required = 1
In ccmcache nothing downloading
In updatestore logs we see
Querying update status completed successfully.
Querying update status of 15 updates.
We have above 20 pcs with this issue and some pcs with another kind of issue.
Sorry, wrong duplicated message. We have created collections of PCs with updates 2004 before october 2020. And want with this SUG update them to latest update for next update to 20H2 via enablement package.
In SUG we have 15 updates. Updates deadline was 27 May. We don’t have maintance windows for this collection, and have default business hours.
Today morning one of this pc have this logs in UpdatesDeployment:
…
No current service window available to run updates assignment with time required = 1
EnumerateUpdates for action (UpdateActionInstall) – Total actionable updates = 0
Assignment {353c2bcf-0ed0-454b-9dc9-31c9c4f45ace} has total CI = 15
Detection job ({99A12193-C328-4566-90DC-54197CD8151F}) started for assignment ({353c2bcf-0ed0-454b-9dc9-31c9c4f45ace})
Unable to find CCM_PrePostActions.SiteSettingsKey=1.
Orchestration lock is not required.
Started evaluation for assignment ({353c2bcf-0ed0-454b-9dc9-31c9c4f45ace})
Evaluation initiated for (1) assignments.
DetectJob completion received for assignment ({353c2bcf-0ed0-454b-9dc9-31c9c4f45ace})
… list with 15 updates
Unable to find CCM_PrePostActions.SiteSettingsKey=1.
Orchestration lock is not required.
And nothing is happening.
What should i check?
hi, we have the same problem : no maintenance window but business hours and the same log
Unable to find CCM_PrePostActions.SiteSettingsKey=1.
Orchestration lock is not required.
we don’t find a solution
have you got an idea ?
Good evening
I patch all my systems via SCCCM and have been for years.
I accidently deleted the updates folder and removed all previous downloads. What is the best way to re-download all updates? Our image isn’t up to date – so I suspect we may need office and window updates older than 12 months. Any ideas on how to resolve this?
Thanks a mil
Aidan
Is there a way to make the ADR only run on one site server? Only the WSUS server has direct access to the Internet to download updates.
Hello Prajwal,
I have an extra patch to deploy for the month…
Is it possible to add it to the ADR?
Thanks,
Dom
How to stop running ADR without disabling it.
Hi Prajwal,
Thanks for providing the information above.It will help us to grow knowledge.
Hi Prajwal,
Please could you advise, we have multiple ADRS that work, however we have 3 ADR’s for server 2019 product that do not work – when previewing the software updates there are 0 updates for security, software or critical updates.
Any ideas?
I have also added server 2019 to the products under site config and server 2019 is also ticked in the WSUS?
This results in no software update group being created as 0 updates are found when the ADR runs.
Many thanks,
Russ
Hi Prajwal,
I have created an ADR and limited to one of the device collections. I have the other device collection to which I need the same ADR to be applied. The new device collection which I have includes all the members of the collection to which the ADR is deployed earlier. I have just changed the ADR settings to the new device collection I created. Will the deployments work normally in this scenario or is there anything I should configure more?
My ADR ran on Tues but Win10 ADR shows an error as opposed to success. I checked my Deployment Group and Jan Win10 updates are shown as downloaded. How can that be possible. Please advise?
I have disabled software update group that was created by ADR as we don’t want deployment to go ahead as per schedule. Will this stop it or does ADR overirdes this.
I have ADRs configured for Windows 10 clients and MS Office Products. However, my Windows Servers (2016) aren’t updated via SCCM. They currently go direct to MS Update, with local Active Hours etc configured. Would you suggest using ADRs to update Windows Servers? Combined with Maintenance windows on the Device Collections?
Can you offer any advice?
If you are running business apps on the servers then you must be careful while deploying ADR’s on servers.
Very Nicely explained
Hi Prajwal.
Thanks for taking the time to create this post.
Do we really need to force the language in the property filters criteria? Shouldn’t the rule obtain this information from the Language Selection tab?
I’m asking this because we didn’t add this filter on our rules and as a consequence the rule is downloading the updates in all the languages…
Cheers,
Pedro
Yes it is recommended to do so.
I have a weird problem. When I initial setup the automatic deployment rule, there was option to select Windows 10 as a product when you select the criteria for updates, but when I just went into the ADR, all the products were missing from my criteria except for Windows 8. When I tried to modify the product criteria, the option for Windows 10 was not there. When I go and view all the Software Updates, there was some Windows 10 updates there. What would cause some products to disappear?
Hi Prajwal,
it seems that ADR installs again all updates each time. I don’t think this is the correct behavior?!
Has anyone ideas?
How would you configure client settings for servers to reboot after successfully installed Windows updates?
The Source Directory Error within ADR – All Required Software Updates — I have the following error with my ADR rule which covers all required MS updates.
The Source directory “\serverpackagesource$software update packagesall required updatesxxx for package XXX00013 does not exist.
Is it easier to recreate the ADR to resolve this error. This is what the email notification delivered which prompted looking into this.
Alert: Low deployment success rate alert of update group: ADR – All Required Updates Microsoft
Alert type: Update group deployment success
Severity: Critical
Active time (UTC): 12/5/2016 2:00 PM
Condition: Generate an alert if the success of the ADR – All Required Updates Microsoft update group deployment is less than the following percent: 90%.
Alert Text: Success of Update Group Deployment “ADR – All Required Updates Microsoft” is 88%, below target of 90%.
Any assistance would be greatly appreciated.
Mark
How do you configure Client Settings for collections to complement Software Updates?
Don’t you have to configure Client Settings to go hand in hand with Software Updates settings?
Such as forcing them when to scan and evaluate for deployment?
Hi,
I have got production environment. I patches monthly windows updates and scheduled updates via SCCM 2012. Updates installed successfully at scheduled time. But some users attempted to manually uninstall some updates.
Can I force users to not uninstall any monthly updates without approval ?
or Can I force sccm to reinstall, when it find any updates removal via maually or by any users ?
Thanks
Nomi
Hi Prajwal.
I am confused on exactly what the “Software Available time” and “Installation deadline” under Deployment Schedule means.
I would like for my production update group to not any install updates until 14 days after Evaluation day, and if they have automatically not done so after 7 days after that then to install immediately.
Should I set it to:
– Software Available time = 14
– Deadline = 7
Thanks in advance
With software available time setting, you are making the updates available for the client computer. It won’t install until the ADR policy is triggered. When the configured deadline passes, the Software Updates Client Agent performs a scan to verify that the software updates are still required. Finally, the client installs the software updates. In your case i would suggest you to run the ADR rule every 14 days (2 weeks).
https://www.prajwaldesai.com/wp-content/uploads/2015/06/Create-Automatic-Deployment-Rule-In-SCCM-2012-R2-Snap5.jpg
Good Afternoon Prajwal,
I find your documents for creating various items within SCCM very beneficial. I had an update group that was associated to an ADR and that update group got corrupted somehow. I created a new Windows 7 update group to put all MS updates there, starting with June 2016 updates. Not sure what corrupted the previous update package but it reared its ugly head when I applied the June updates. Unable to resolve why it was stating that source directory was missing folderfiles I created a new update package following your other document for that. I then realized I needed to create an ADR and I did, but it has not yet show up in the Deployment window for the Software update group that I created. My question is how long do I need to wait for this to populate and would it prevent updates that I applied to the new Deployment Package from being applied. Any questions you have let me know and I will provide you with any info I have. Tks. Mark Reny
Hi Prajwal I have configured new automatic deployment rule for Windows 7 and 10, but when I run the rule there is no download updates, I have checked ruleengine.log file in CM Trace Log Tool, I have two error message it is showing in below. But when I create Deployment rule for Windows Defender it is bringing updates, we are using proxy in internet because of firewall in this datacenter. When I configures server and site system roles I set proxy also. Appreciate any advice to solve my issue. The error is showing like
I don’t think updates were downloaded correctly. If the file is downloaded correctly, check to see if it is changed in your update list as downloaded? Also is this patch required to accept a license agreement?
Hi Prajwal,
I’ve followed step by step your guide. I’ve created a new deployment package, but when i check the content status, it’s size is 0,00 MB. I’ve checked log file, and found this error: failed to download the update from internet. error = 16389
I already deploy update by sccm, it’s the first time I try with ADR. Could you help me?
edit: I’ve browsed and I’ve figured out that the updated was downloaded in the right folder although the package is still sized 0 and the log file say that was impossible to download. I can’t understand why.
Hi Prajwal, I successfully Deployed Windows 7 into pilot users. SCCM reports shows 2 more user in pilot users, the update is not required. Please advice why their computer not required even though we all using Windows 7.
I have an issue while deploying windows security update through SCCM 2012 R2, some clients not updating some is updating , but most of the clients showing in the complaints group.
Hi, I want to setup automatic definition download, Endpoint protection –> download definitions. Kindly suggest the steps or procedure to create it.
Client agent settings > Computer Restart
https://www.prajwaldesai.com/wp-content/uploads/2013/09/Default-Client-Settings-in-SCCM-2012-SP1-Snap6.jpg
Thanks 🙂
Hi Prajwal, thanks for this tut! I use ADR for updating the SCEP Definition. i would like to have this updates completely unattended and with no reboot countdown. Users are nagged with a countdown that wants to restart the Computer after 90 minutes. first question. where can i define the timer for example to be 8h instead of 1,5h? second how can i make this mandantory like in 2007 and completely unattended, so that the users won’t recognice it? Thank you very much!
Hi Prajwal. I wonder if you could help with an issue that I’ve been having that is causing me a lot of pain. When creating an ADR for daily SCEP definition updates, all the books and advice I’ve seen always says “recommend using UTC time so that all machines get updated at the same time”. But this is exactly what I DON’T want to do. I want my machines to update based on client time – so that any machines online overnight can get the def updates outside of core business hours – at 2am for example. However, I cannot get this to work. The deployment settings in the ADR show ‘based on client local time’ – but it seems to completely ignore this. For instance in Europe (where my single, primary server is based) the PCs get updated at 2am, but in New Zealand they get updated at 2pm – right in the middle of their busiest period! How do i get this to work? I can’t use a maintenance window because some PCs would never get updated if the window was set for early hours of the morning. What i want is for any machines online to update, and those that aren’t will get the deployment shortly after they do switch on.
In that case could you create new ADR for SCEP updates specifying client local time and see if it works fine ?.
That’s exactly what i have done. The problem is that SCCM seems to completely ignore it – it does not work. The ADR runs on PS server time, and the deployment then totally ignores the fact that it’s set to run at client local time. I can’t believe i’m the only person whoever used SCEP and wants machines to update based on local time – but i put a question on the SCCM forum and nobody can come up with an answer.
Thanks mate, this is a good series – wouldn’t hurt to put in a little explanation data – but I guess us lazy folks need to do some work – great series Prajwal.
Mark G.