


In this article, I will show you how to disable Windows Hello for Business using Intune. You can now use Intune to disable the “Your organization requires Windows Hello” or “Use Windows Hello with your account” prompt during Autopilot OOBE and get rid of WHfB permanently.
Windows Hello is a biometric device unlocking function that works with fingerprints or facial recognition. Microsoft Intune can be used to administer Windows Hello, and it is accessible on Windows 10 and Windows 11. A more secure approach to sign in to devices is with Windows Hello.
With Microsoft Intune, you can set up a tenant-wide policy that instructs Windows 10 or Windows 11 devices to use Windows Hello for Business when they enrol with Intune. This policy targets your entire organization and supports the Windows Autopilot out-of-box-experience (OOBE).

If you choose not to configure a tenant-wide policy for Windows Hello for Business, you can use a device configuration Identity protection profile to configure groups of devices for Windows Hello. Organizations that don’t use Intune can make use of Group policy to disable Windows Hello. If you are looking to disable Windows Hello for Business using Intune, this post is for you.
Why disable Windows Hello for Business?
Although Windows hello is a great feature, not everyone needs it. Not all organizations prefer to use Windows hello because it requires tow-factor authentication instead of passwords. When you assign a new laptop to your employees provisioned by Autopilot, the Windows Hello appears during the OOBE.
Your organization requires Windows Hello during Autopilot OOBE
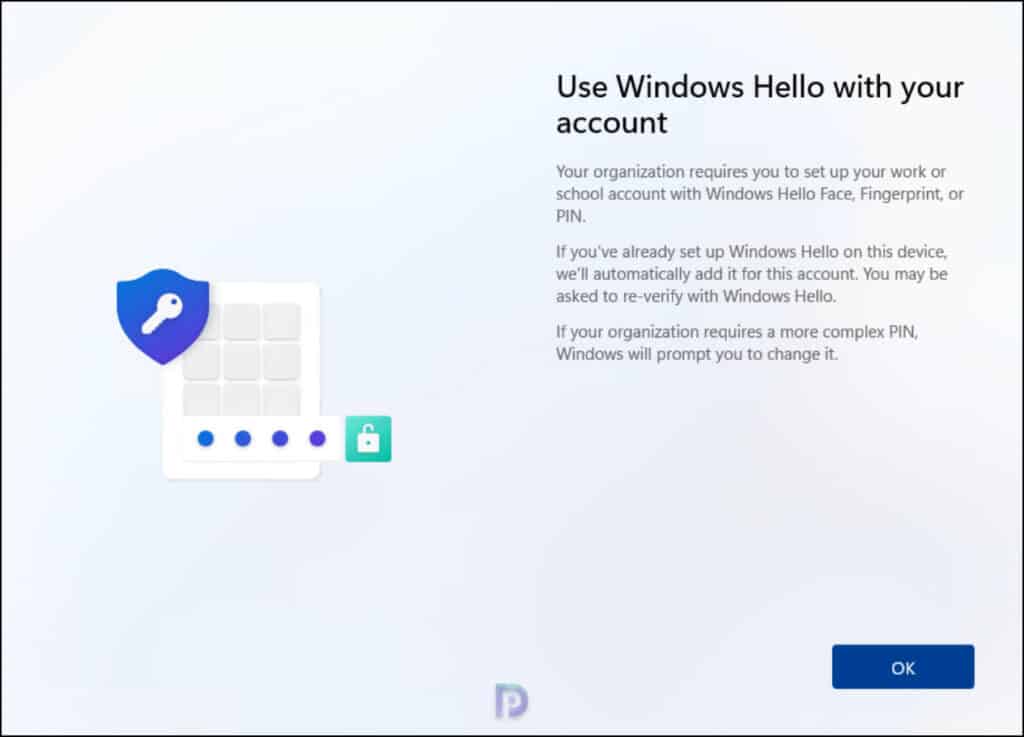
The below screenshot is an example of the Windows Hello screen appearing on the laptop provisioned with Autopilot during the OOBE. With Windows Hello for business enabled during user-driven Autopilot, you see the window with the following message:
Use Windows Hello with your account. Your organization requires you to set up your work or school account with Windows Hello Face, Fingerprint, or PIN. If you have already set up Windows Hello on this device, we’ll automatically add it for this account. You may be asked to re-verify with Windows Hello. If your organization requires a more complex PIN, Windows will prompt you to change it.

Difference between Windows Hello and Windows Hello for Business
With Windows Hello, individuals can create a PIN or biometric gesture on their personal devices for convenient sign-in. This configuration is referred to as Windows Hello convenience PIN, and it’s not backed by asymmetric (public/private key) or certificate-based authentication.
Whereas the Windows Hello for Business is configured by group policy or mobile device management (MDM) policy such as Intune, always uses key-based or certificate-based authentication. This behavior makes it more secure than Windows Hello convenience PIN.
Ways to Turn off the Windows Hello for Business
Listed below are different ways to disable the Windows hello for business configuration in Intune
- Configure Windows Hello for Business from Windows Enrollment (Applies for entire tenant)
- Use Intune WHfB device configuration profile to disable Windows Hello for Business (Scoped method)
- Use Endpoint Security – Account Protection
I want to highlight an important point here. When you disable the Windows hello for business from Windows enrollment settings, the settings apply to the entire tenant and can’t be scoped. So use this method if you would like to remove the Hello for Business prompt during OOBE (for Autopilot as an example).
Disable Windows Hello for Business using Intune
You’ll need to be signed in with an Intune Administrator role. Perform the following steps to disable Windows Hello for Business using Intune:
- Sign in to Microsoft Intune Admin Center.
- Go to Devices > Windows > Windows Enrollment.
- Under the General section, select Windows Hello for Business.

On the Windows hello for Business window, we see two options:
- Configure Windows Hello for Business: Not Configured.
- Use security keys for sign-in: Not Configured.

Next to the option “Configure Windows Hello for Business“, select the drop-down and select Disabled. When disabled, users can’t provision Windows Hello for Business.
Note: If you don’t want to enable Windows Hello for Business during device enrollment, set the Configure Windows Hello for Business to Disabled. When set to Disabled, you can still configure the subsequent settings for Windows Hello for Business even though this policy won’t enable Windows Hello for Business.
The other options that you see are applicable when you enabled Configure Windows Hello for Business setting. Once you have made the above changes, select Save.
This will disable

Configure Windows Hello for Business using Intune
Sometimes, even after disabling the Windows hello for business, users see the Windows Hello screen during the sign-in. If you are looking to disable Windows hello for business settings for a specific device group or user group and not for entire Intune tenant, you must create a configuration profile.
Perform the following steps to create a device configuration profile in Intune to configure Windows Hello for Business. First sign-in to the Intune Admin center. Select Devices > Configuration profiles > Create profile.

On the Create a profile window, configure the following and select Create.
- Platform: Windows 10 and later
- Profile Type: Templates
- Template Name: Identity Protection

In the Basics tab, enter the following properties.
- Name: Enter a descriptive name for the profile which you can easily identify them later. For example, a good profile name is Configure Windows Hello for Business.
- Description: Enter a brief description for the profile. This setting is optional, but recommended.
Click Next.

Next to setting “Configure Windows Hello for Business“, click the drop-down and select Disabled. The setting “Use security keys for sign-in” is set to Not Configured. Select Next.

In the Assignments tab, select the Azure AD groups that will receive the WHfB profile. Click Next.

On the Applicability Rules tab, you can use the Rule, Property, and Value options to define how the Intune WHfB profile applies within assigned groups. For example, you can apply this Windows Hello for Business profile to a specific Windows version or OS edition. Intune applies the profile to devices that meet the rules you enter. I am not going to specify anything here, click Next.

On the Review + create, review your Windows Hello for Business settings. When you select Create, your changes are saved, and the Intune WHfB profile is assigned. The policy is also shown in the profiles list in Intune admin center.

After you have assigned the Intune WHfB profile to your devices and users, the profile settings will gradually apply once the devices check-in with the Intune service. You can also force sync Intune policies on your computers.
Monitor Intune WHfB Profile Status
You can monitor the device configuration profiles in Microsoft Intune with a few simple steps. Furthermore, you can check the status of a profile, see which devices are assigned, and update the properties of a profile. To accomplish that, go to Devices > Configuration Profiles > select Configure Windows Hello for Business profile. Under the section “Device and user check-in status“, select View Report.
From the screenshot below, we see that profile assignment has succeeded on multiple devices. In case you encounter any errors, the error code will help you to troubleshoot the profile assignment failures in Intune.


Create a group in Azure , put the user in it and exclude that group. The problem is that Intune doesn’t yet have the option to ” Do not provision on logon” switch that the on prem GPO has for this … in a hybrid environment I use the GPO but my Azure join folks are forced to set it up because they can’t get the GPO and the Intune configuration profiles make it mandatory even if you skip it….its back next login.
hi, i have a Q
we already disable WHFB in intune windows enrolment also we have configuration profile to disable WHFB for all our users and devices, now we are going to enable it for some users.
if we enable WHFB on the Windows enrolment page is that causing any issue for all of users or they will get notification to set it up ? as i mentioned we do have configuration profile and and applied to all to disable WHFB, thanks
Thank you for the information on enabling Windows Hello for business.
But one of my employees needs to disable his Windows Hello for business from his domain joined laptop. Intune is blocking it as it is set to all users using a domain-joined laptop.
I need a way to exclude one user from Intune’s Windows Hello for the business list.