This article is a step-by-step guide to install Endpoint Protection Role in SCCM (ConfigMgr). You’ll learn how to enable Endpoint protection client and create Endpoint Protection Antimalware Policy.
The Endpoint Protection point site system role must be installed before you can use Endpoint Protection.
Endpoint Protection in SCCM manages Antimalware policies and Windows Defender Firewall security for client computers in your Configuration Manager hierarchy.
Beginning with Windows 10 and Windows Server 2016 computers, Microsoft Defender Antivirus is already installed. When you install Windows 11, Microsoft Defender is already installed.
What is Endpoint Point Protection Role in SCCM?
Endpoint Protection in SCCM allows you to create Antimalware policies that contain settings for Endpoint Protection client configurations. You can deploy these Antimalware policies to client computers
What are the advantages of Endpoint Protection Role in SCCM?
Enabling the Endpoint Protection role in SCCM provides the following advantages:
- Configure Antimalware policies, Windows Defender Firewall settings, and manage Microsoft Defender for Endpoint to selected groups of computers.
- Use Configuration Manager software updates to download the latest Antimalware definition files to keep client computers up to date. Learn how to deploy Endpoint Protection updates using SCCM.
- Send email notifications, use in-console monitoring, and view reports. These actions inform administrative users when malware is detected on client computers.
- Endpoint Protection helps protect your PC from malicious software (malware) such as viruses, spyware, and other potentially harmful software.
Endpoint Protection Role Prerequisites
The endpoint protection point role in SCCM requires the following Windows Server features as prerequisites:
- .NET Framework 3.5
- Windows Defender feature (Windows Server 2016)
- Windows Defender Antivirus feature (Windows Server 2019)
- Microsoft Defender Antivirus feature (Windows Server 2022 or later)
A Software Update Point site system role must be installed and configured to deliver definition updates if you want to use Configuration Manager software updates to deliver definition and engine updates.
Where Should I Install the Endpoint Protection Role?
The SCCM Endpoint Protection point role must be installed on one site system server only, and it must be installed at the top of the hierarchy on a central administration site or a stand-alone SCCM primary site.
Before you begin installing the endpoint protection role, you must have the WSUS installed and configured for software updates synchronization. Learn how to install WSUS for Configuration Manager.
Note: When you install an Endpoint Protection point, an Endpoint Protection client is installed on the server hosting the Endpoint Protection point.
Install Endpoint Protection Role in SCCM
Let’s see how to install the Endpoint protection role in SCCM:
- Launch the Configuration Manager console.
- Go to Administration > Site Configuration > Servers and Site System Roles
- Right-click the server and select Add site system roles.
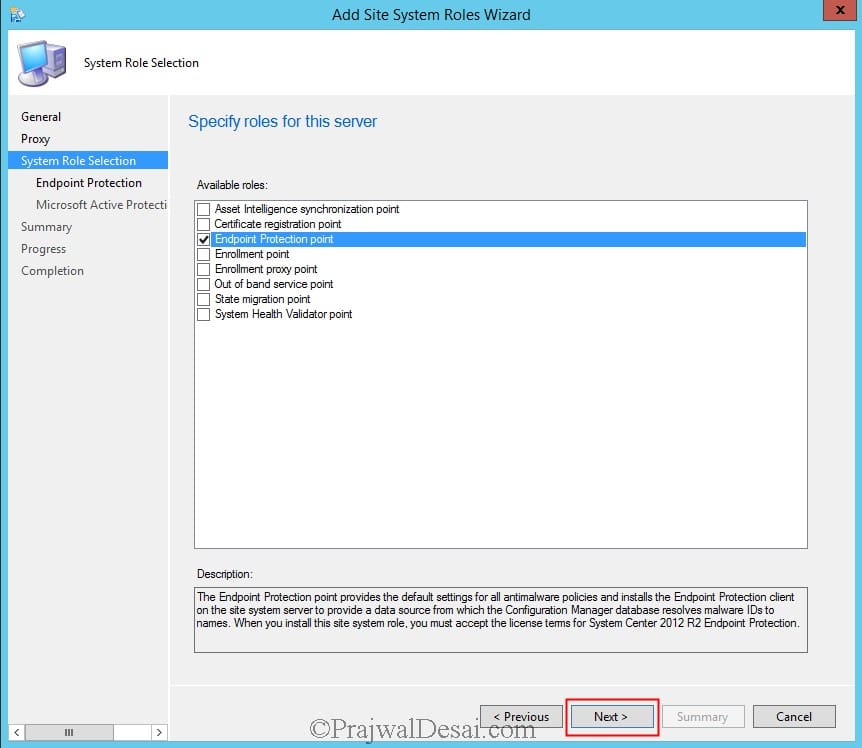
- From the list of roles, select the Endpoint Protection Point. Click Next.
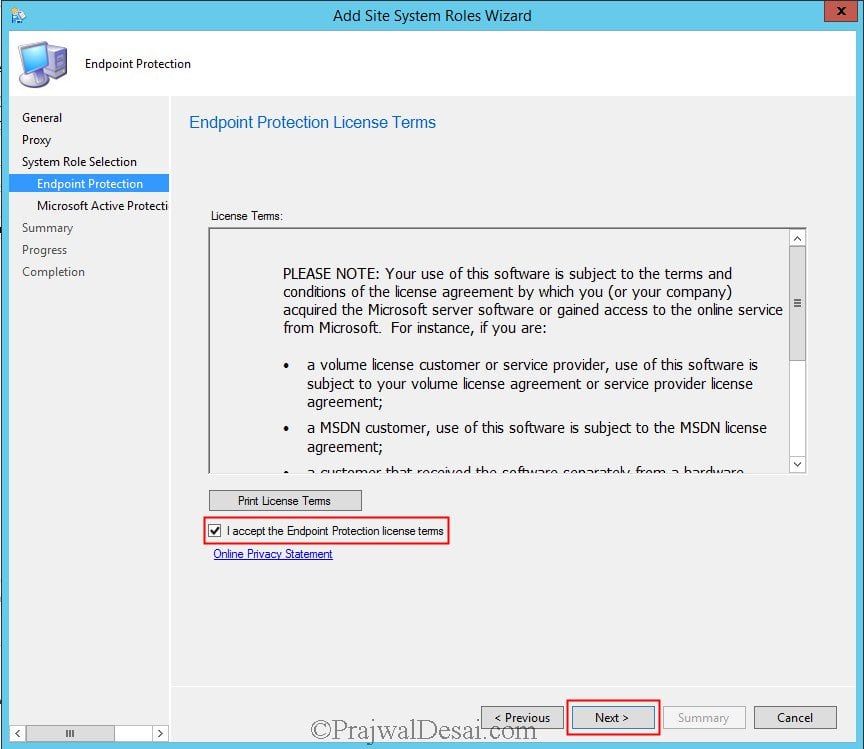
You cannot use Endpoint Protection in Configuration Manager unless you accept the license terms. Select I accept the Endpoint Protection license terms and click Next.
This option configures the Cloud Protection Service (formerly known as Microsoft Active Protection Service or MAPS) settings that are used by default. You can then configure custom settings for each Antimalware policy you create.
Select Basic Membership, click Next.
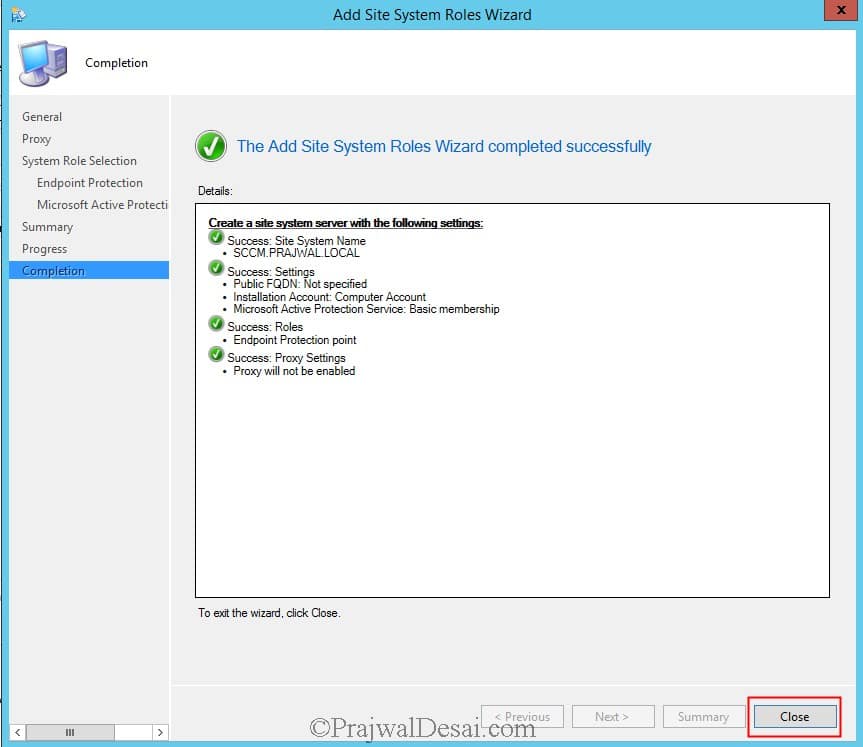
On the Summary page, review the settings and click Next. The Endpoint Protection role has been installed successfully. Click Close.
Enable Endpoint Protection using Custom Device Settings
After you install Endpoint Protection role in SCCM, let’s create a Custom client device settings to enable Endpoint protection on client computers.
You need to enable this setting to install Endpoint Protection client on systems. In the Configuration Manager console click Administration, under Site Configuration, right click Client Device settings and click on Create Custom Client Device Settings.
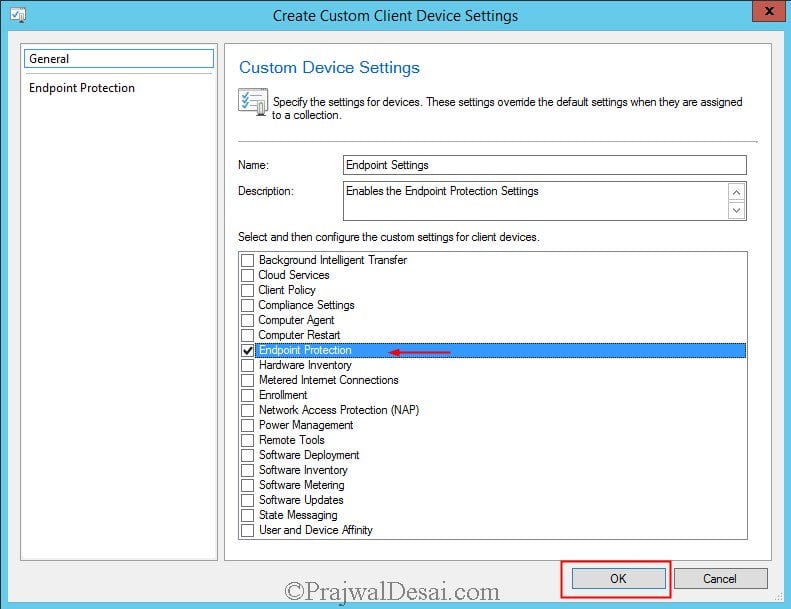
Specify a name for the custom client device settings and check Endpoint Protection and click OK.
- On the left pane click Endpoint Protection setting, on the right side set Manage Endpoint Protection client on client computers to Yes.
- When you enable this setting the Configuration Manager can be used to manage the endpoint protection clients on the client computers.
- There is another setting to Install Endpoint Protection client on client computers. When you enable this setting and if this device settings are deployed to the target collection, the endpoint protection client is installed on all the computers present inside the target collection. Click on OK.
Deploy Endpoint Protection Client Settings
The next step after enabling the Endpoint protection via custom settings is to deploy the Endpoint protection client settings to a device collection.
To deploy the Endpoint Protection client settings:
- Launch the SCCM Console.
- Navigate to Administration\Overview\Client Settings.
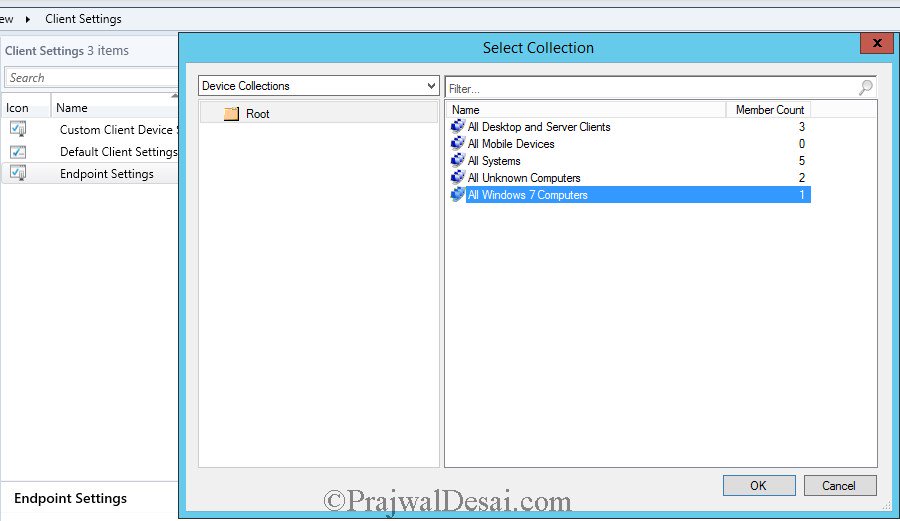
- Right-click the Endpoint Settings and select Deploy.
- On Select Collection window, choose the device collection to which you want to deploy the settings.
After you Deploy Endpoint Protection client settings, the clients will get the latest endpoint protection client installed. These client computers will get the Endpoint protection settings that you created in the above step.
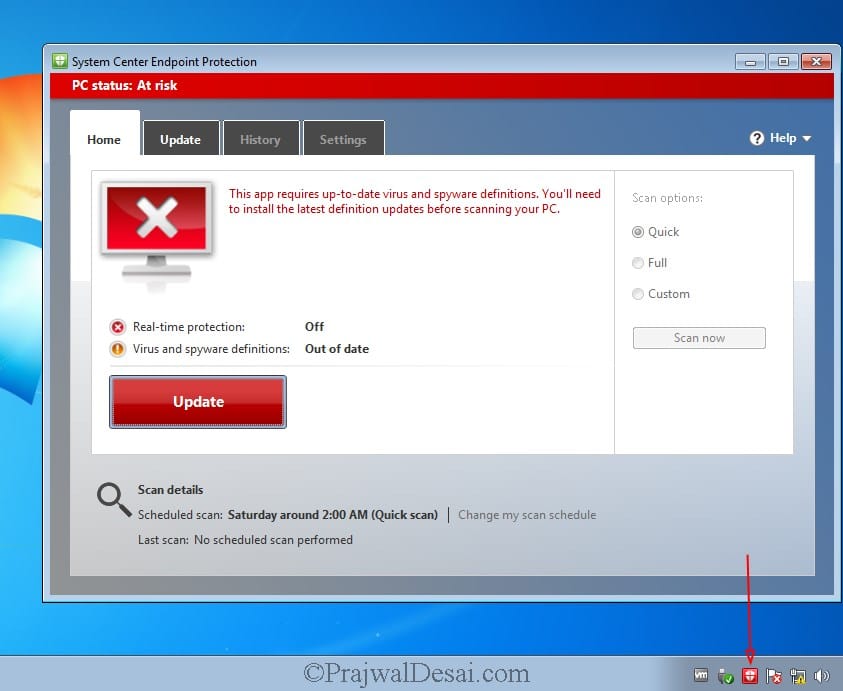
On the client computer, when you launch the Endpoint Protection client, it shows PC Status: At Risk. Don’t worry, since the client is newly installed, the status is read because there are no updates downloaded.
Clicking the update button will download the latest Endpoint protection definition updates on the client computers.
Create Endpoint Protection Antimalware Policy
The Antimalware policy includes information about the scan schedule, the types of files and folders to scan, and the actions to take when malware is detected.
Antimalware policies when deployed to the device collections specify how Endpoint Protection protects them from malware and other threats.
You must create an Antimalware policy soon after you install the Endpoint protection role in SCCM. When you enable Endpoint Protection role in SCCM, a default Antimalware policy is applied to client computers.
You can either edit the default client Antimalware policy or create a new Antimalware policy defining settings and apply them to your computers.
In addition, you can also use additional policy templates that are supplied or create your own custom Antimalware policies to meet the specific needs of your environment.
It’s recommended to create your own Antimalware policy. This way you can customize the settings required by your organization.
Here are the steps to create Endpoint Protection Antimalware Policy:
- Launch the Configuration Manager console.
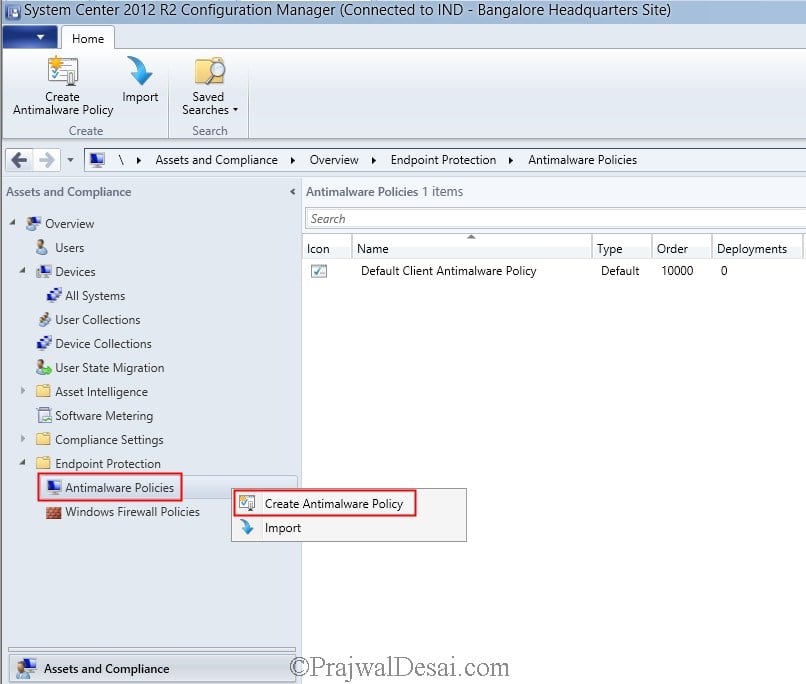
- Go to Assets and Compliance\Overview\Endpoint Protection\Antimalware Policies.
- Right-click Antimalware Polices and select Create Antimalware Policy.
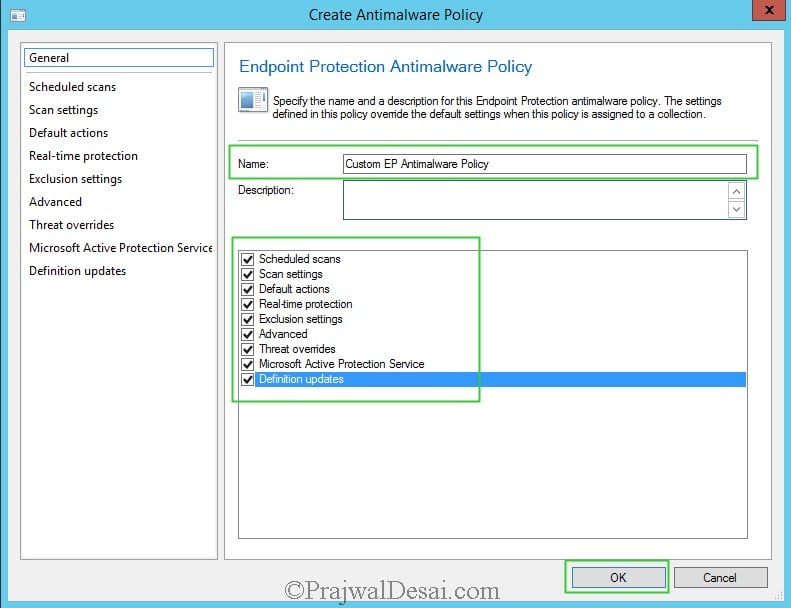
Specify a name for the new antimalware policy and enable all the settings as shown in the below screenshot. Click OK.
Customize Antimalware Policy Settings
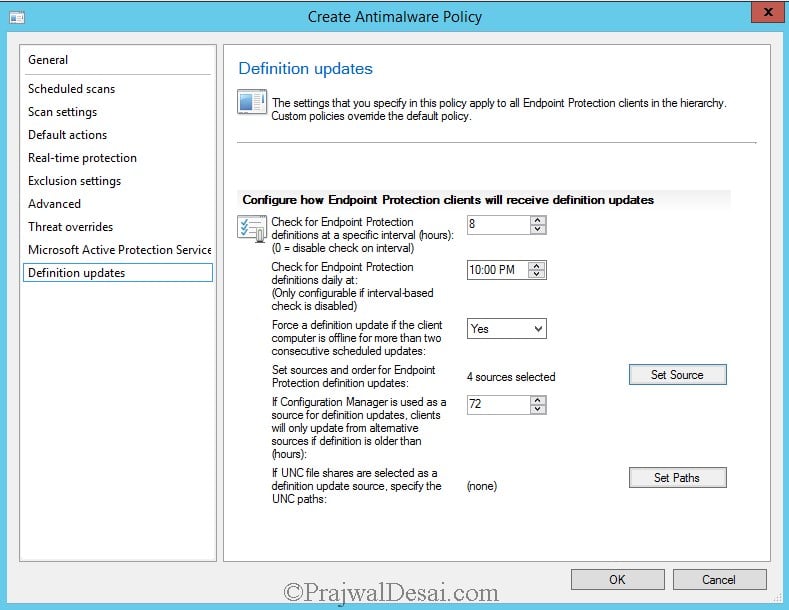
Let’s look at the steps to customize Antimalware policy settings. On the left pane, click Definition updates. Here you can configure how Endpoint Protection clients will receive definition updates.
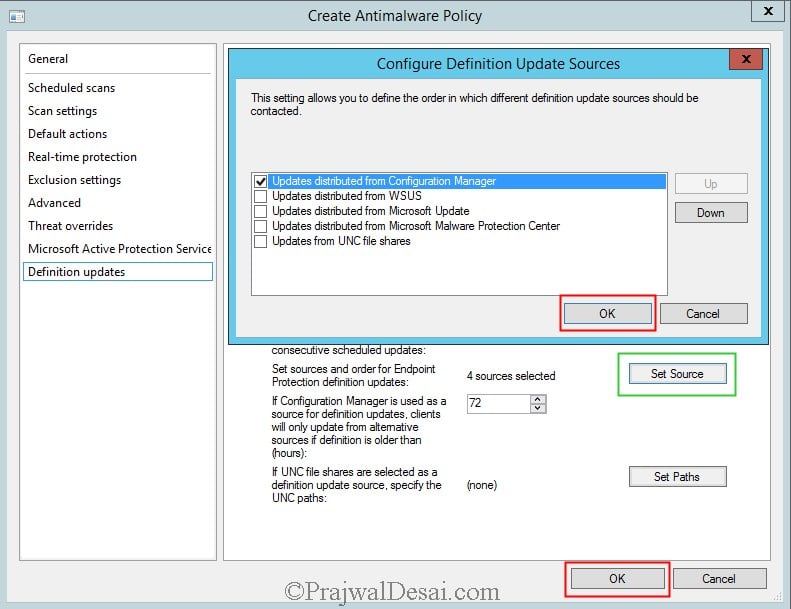
Click on Set Source, we see a new window showing the options using which we can deploy the definition updates to the EP clients. Uncheck all the sources and select Updates distributed from Configuration Manager and click OK. This option uses Configuration Manager software updates to deliver definition and engine updates to computers in your hierarchy.
On the left pane select Scan Settings, on the right pane you will find the scan settings such as scan email and attachments, scan removable drives etc. Configure these settings as per your requirements and click OK.
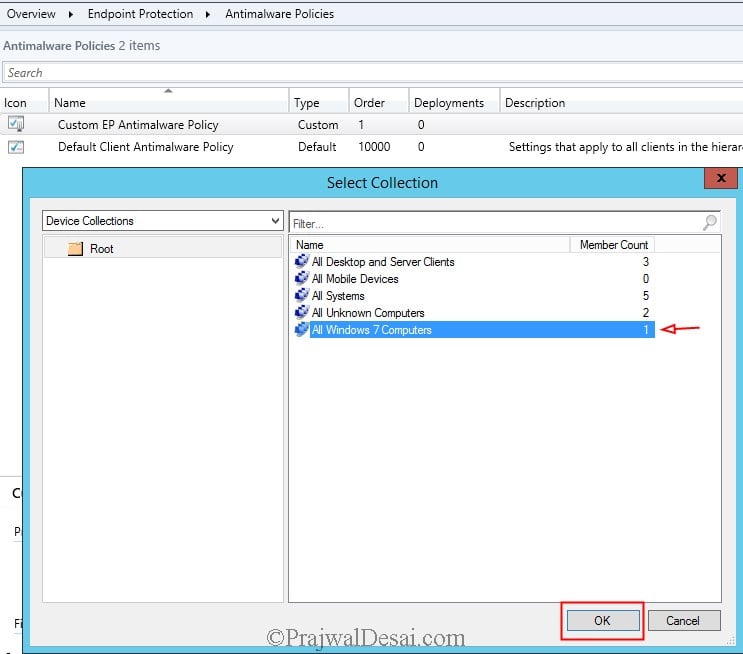
The next step is to deploy the custom Antimalware policy to a collection. Right-click on the Antimalware policy and click Deploy. Choose the target collection and click OK.
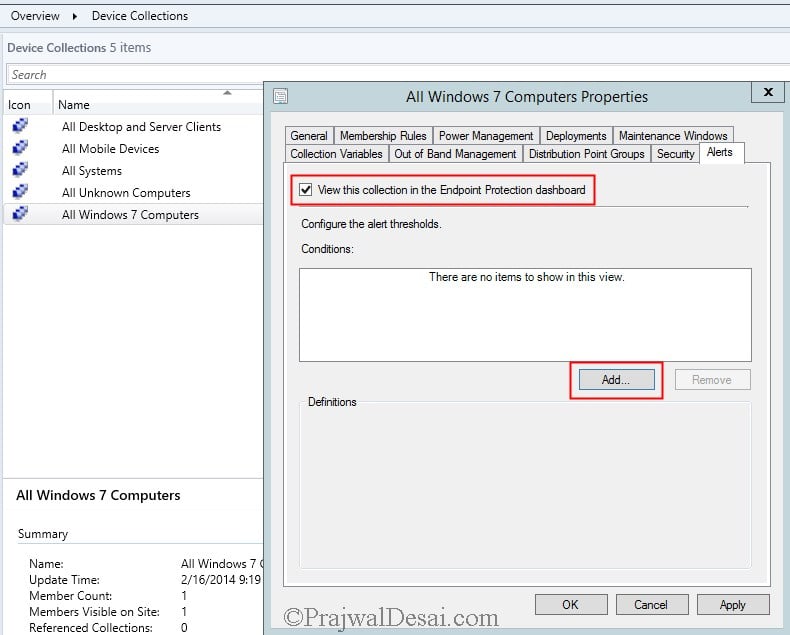
In the Configuration Manager console, click on Assets and Compliance select Devices and choose Device Collections, right-click the target collection on which you deployed the Antimalware policy and click on properties. Click on Alerts, check the box View this collection in the Endpoint Protection Dashboard. Click Add.
In Add New Collection Alerts window, check all the boxes and click OK. Click OK again to close the Computer properties window.
Enable Definition Updates in Software Update Point
The below steps show you how to configure the Software Update Point to enable the Endpoint Protection Definition updates.
- Launch the Configuration Manager console.
- Go to Administration > Site Configuration > Sites.
- Under Configure Site Components, click Software Update Point.
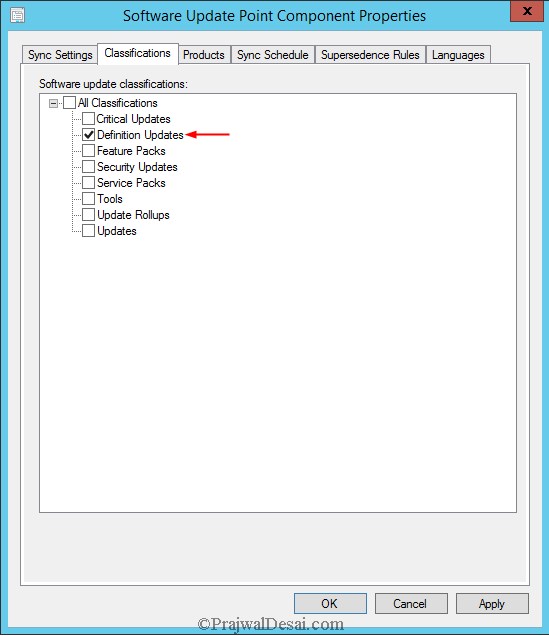
- In the Classifications tab you must select Definition Updates. Click on Apply.
In the Products tab, select Forefront Endpoint Protection 2010 as the product and click Apply and then click OK.
Synchronize Endpoint Protection Updates in SCCM
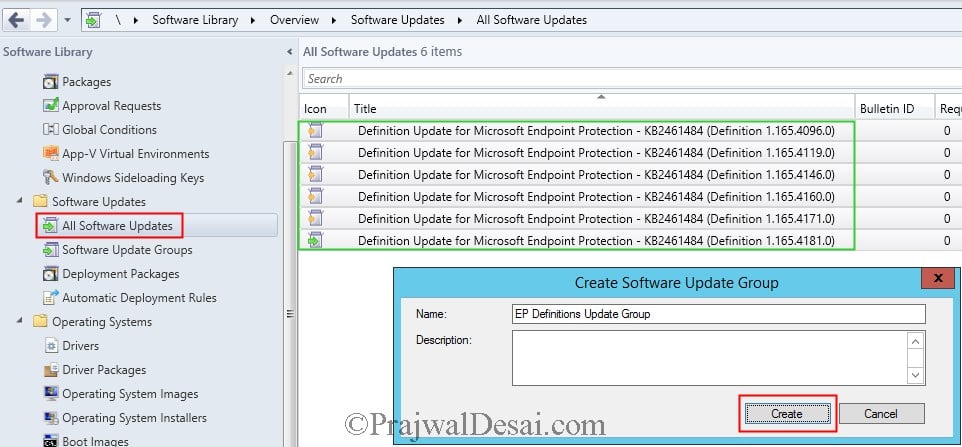
In the Configuration Manager console, Click on Software Library, expand Software Updates, right click on All Software Updates and choose Synchronize Software Updates. After the synchronization process is over you should see the list of definition updates under All Software Updates.
We will now select all the definition updates and put them inside a Software Update Group. To create a SUG, select the updates and right click and click on Create Software Update Group. Provide a name to SUG and click Create.
Deploy Endpoint Protection Updates using SCCM
In Configuration Manager, there are 2 ways to deploy the definitions
- Manually deploy Endpoint Protection updates
- Automatic deployment of Endpoint Protection updates
In this example, we will be deploying the Endpoint Protection client definitions manually. If you want to deploy definition updates using Automatic method, then you can Create a Automatic Deployment Rule in SCCM.
Click on Software Update Groups, right-click on the Software Update Group that we created and click on Deploy.
Specify the Deployment Name, choose the collection to which you want to deploy this software update deployment. Click Next.
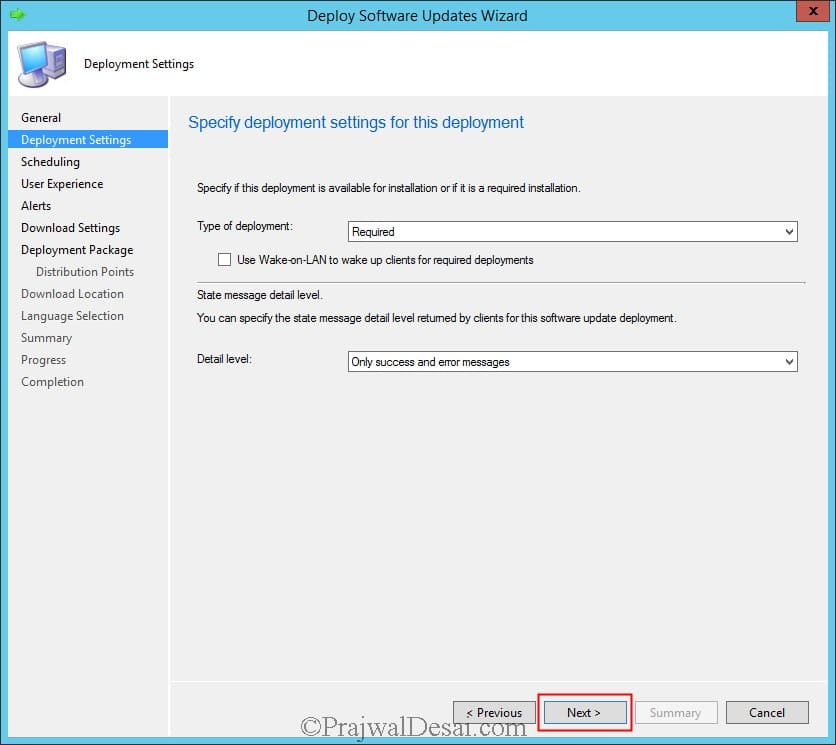
Set the Type of Deployment to Required and set the Detail Level to Only success and error messages. Click Next.
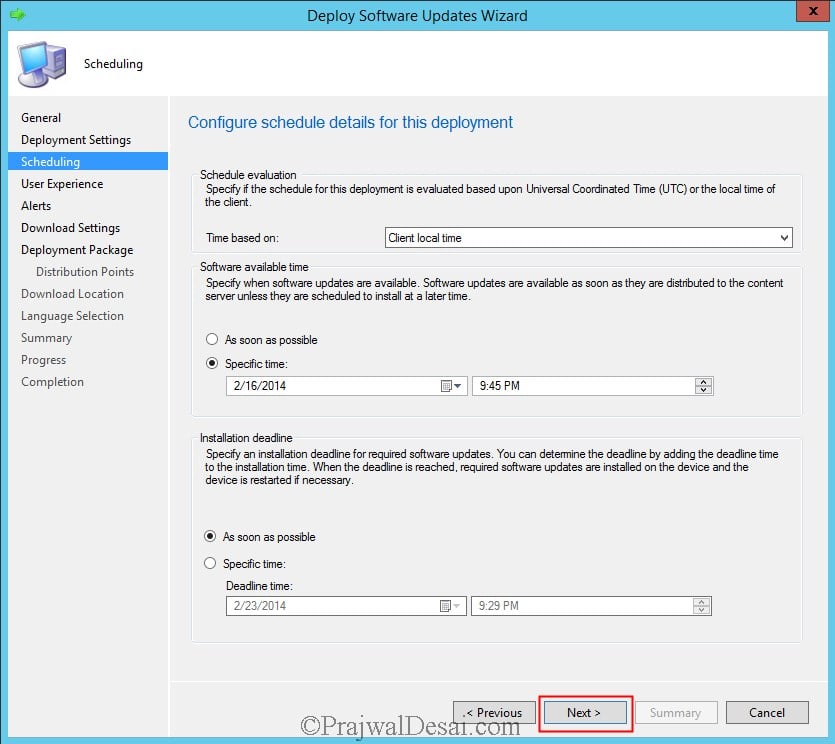
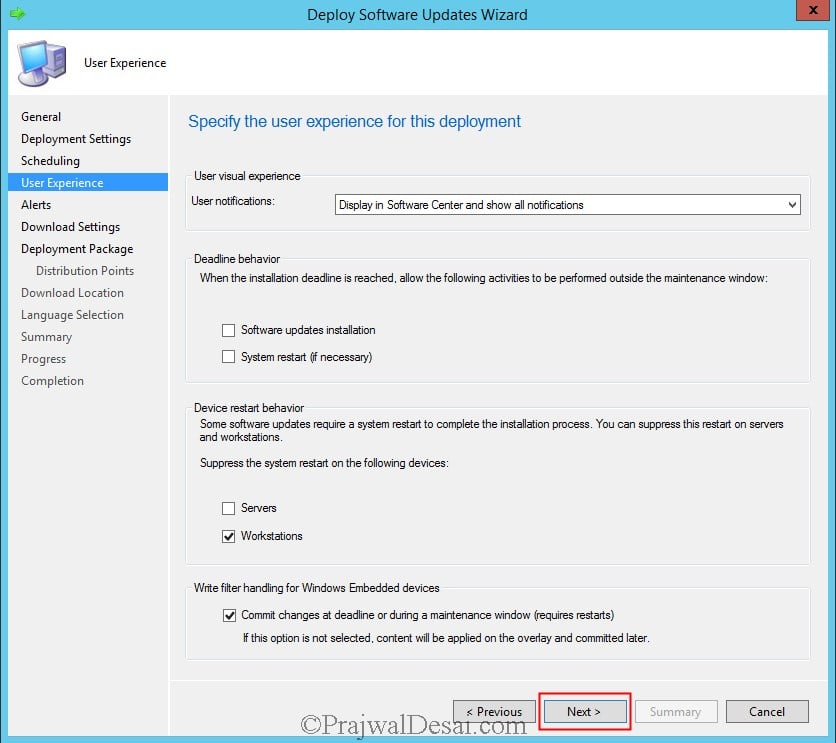
Choose the Time based on to Client local time, Software available time to specific time, Installation deadline to As soon as possible. Click Next.
Click Next.
If you are using Configuration Manager software updates to distribute definition updates, consider placing definition updates in a package that does not contain other software updates. This keeps the size of the definition update package smaller which allows it to replicate to distribution points more quickly.
We will create a new deployment package to deploy the definition updates. Specify the Name and Package source and click Next.
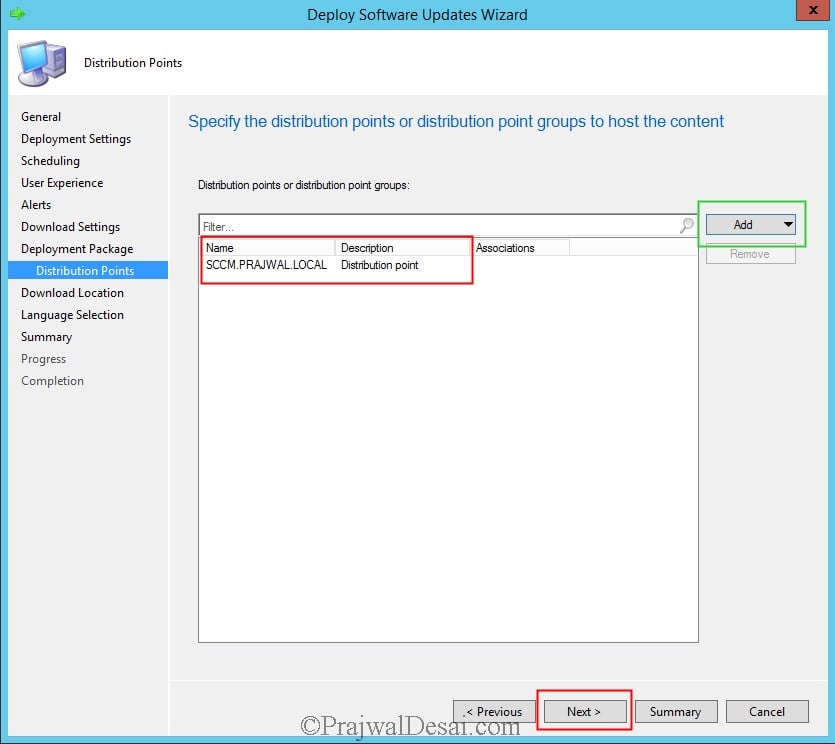
Add the DP and click Next.
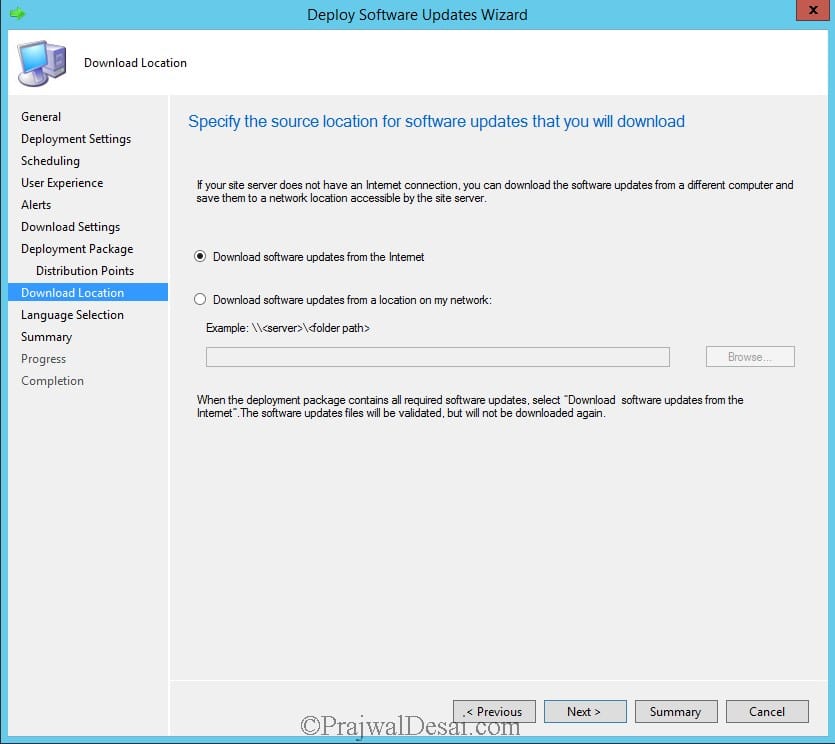
Choose Download software updates from the Internet. Click Next and click Close to close the wizard.
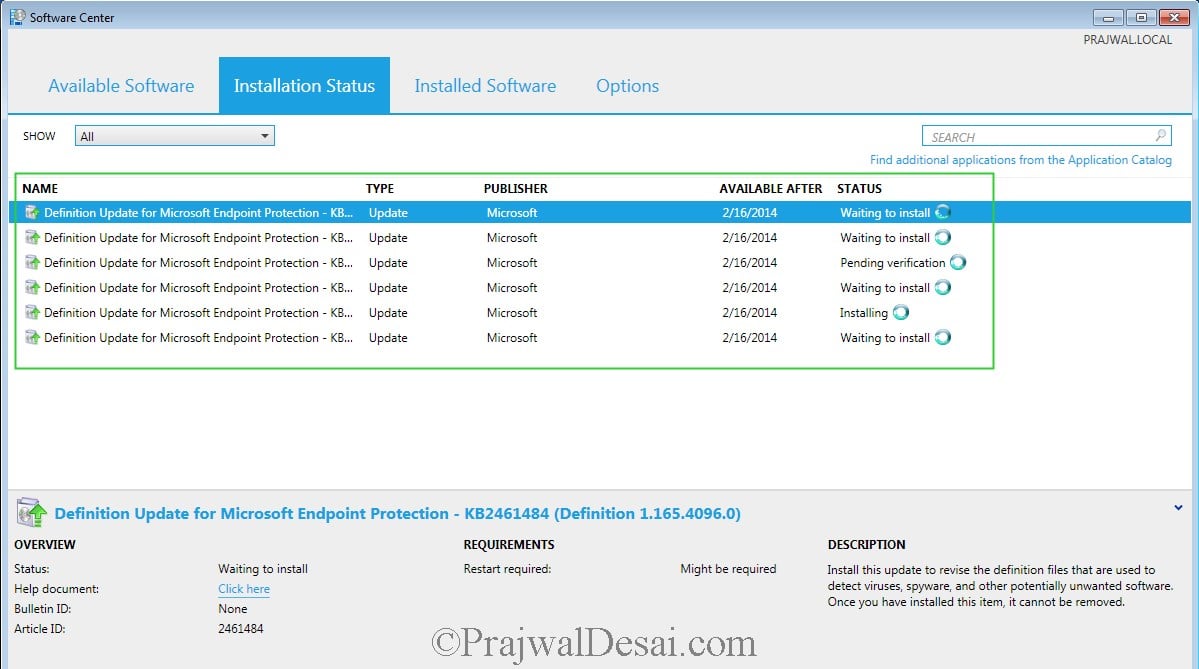
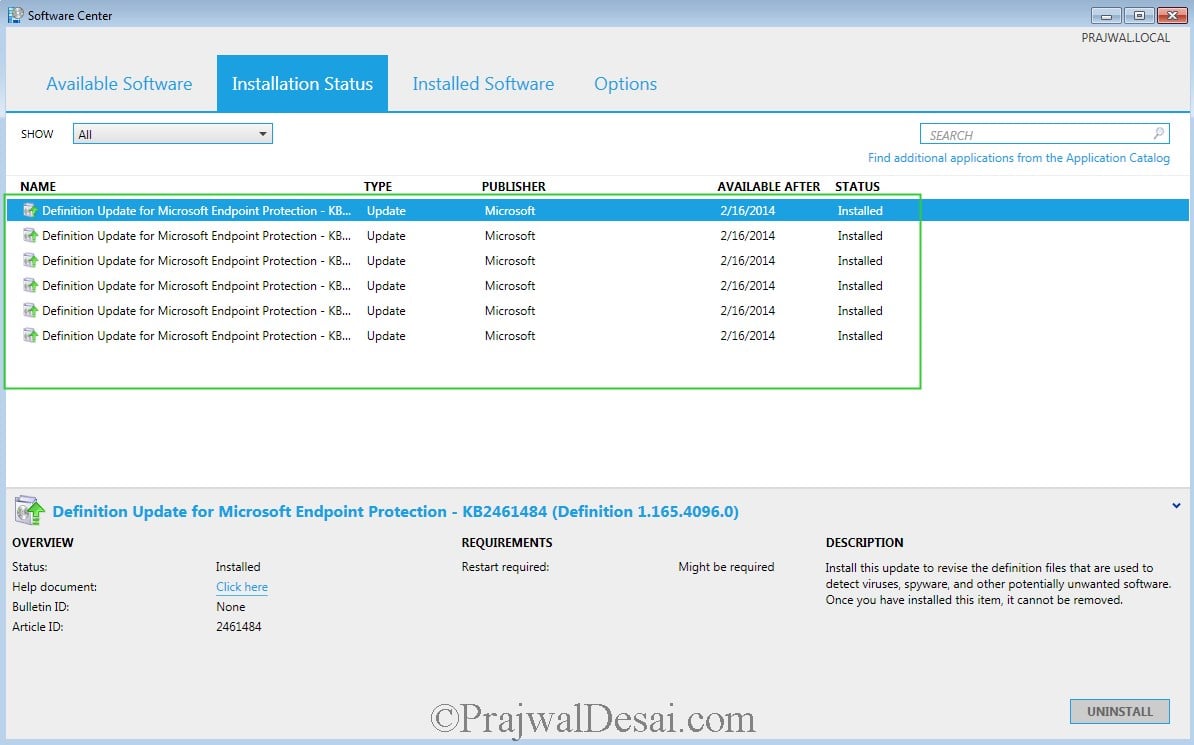
On the client machine we see a notification that Software changes are required.
The definition updates are downloaded from the DP and then installed on the client systems.
The definition updates are installed successfully.
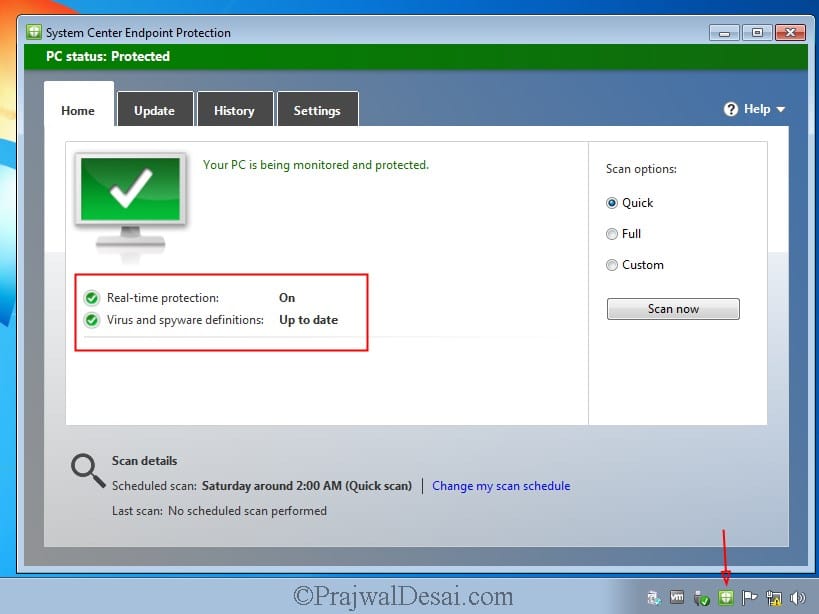
Now see the change, the status of Endpoint Protection client is Green and virus and spyware definitions are up-to-date.














Hi,
any idea how we can configure and deploy Windows Defender Exploit Guard policys in sccm using powershell?
We are only now implementing Endpoint Protection are wanting to manage this part through SCCM.
In order to manage the EP clients it looks like we need to install the SUP so that the Antimalware definitions can be downloaded and deployed to client machines, create anti-malware policies, etc…
We already have an existing WSUS server for MS updates. I don’t want to manage Windows Updates through SCCM so would there be a problem with having 2 WSUS servers on the domain?
Ideally, the desktops & servers would download MS updates from the existing WSUS server, and then receive the EP definitions and AntiMalware Policies from another.
Is this possible?
If you aren’t using ConfigMgr to deploy updates, you can use WSUS and deploy the EP definitions. There can be multiple WSUS servers existing in the setup.
Hello,
Thank you for this documentation. I have SCEP 4.7.214.0 on the Clients which are installed by CM but I have SCEP 4.10.209.0 for the SCEP install locally, how do I upgrade the SCEP in CM Console and then deploy it…?
I have change an antimalware policy but I do not see the new policy applied on the Client, it has still the custom one manually created… how do I update the client policy?
Thanks,
Dom
I’ve created the endpoint protection server role and I’ve deployed the endpoint protection client to a collection of devices. I’ve also created the antimalware policy and deployed that to a collection of devices. But the policy does not show up in the configuration manager configuration tab in control panel. What am I doing wrong and where and how should the antimalware policy be displayed?
Run the console as administrator and tell me if that shows the policy.
I’ve created the endpoint protection server role and I’ve deployed the endpoint protection client to a collection of devices. I’ve also created the antimalware policy and deployed that to a collection of devices. But the policy does not show up in the configuration manager configuration tab in control panel. What am I doing wrong and where and how should the antimalware policy be displayed?
Hello,
I have MEM-CM 2006 where should I install the new role Endpoint Protection?
Which criteria need to be taken into account?
I have 19 servers:
1 Primary Server: Asset Intelligence Synchronization Point, Component Server, Management Point, Service Connection Point, Site Server, Site System, SMS Provider
1 Management Server: Component Server, Enrollment Point, Enrollment Proxy Point, Management Point, Site System
3 Software Update Servers: Component Server, Site System, Software Update Point
1 Reporting Server: Application Catalog Web Service Point, Application Catalog Website Point, Component Server, Fallback Status Point, Reporting Services Point, Site System
1 Internet-Base Client Management: Component Server, Distribution Point, Management Point, Site System, Software Update Point
13 Distribution Point Servers: Site System, Distribution Point
1 SQL Server: Component Server, Site Database Server, Site System
Where should I install Endpoint Protection Point Role?
Thanks,
Dom
Hi Prajwal, in your guide above you mention selecting “Forefront Endpoint Protection 2010” from the Products tab when configuring the Software Update Point. I understand that’s no longer around (at least I don’t see it listed in Products on SCCM CB 2006). By default, I see “System Center Endpoint Protection” already selected. Is that sufficient for deploying SCEP updates? We’re all Windows 10 clients here these days. Just wondering as I also see “Microsoft Defender Antivirus” listed under the Windows category, as well as other Forefront categories… Thanks!
Hi
We are now patching our servers using Azure Patching, therefore i have disabled Software Update Point for servers. What is the best option for me to update the definitions?
Hi Prajwal,
I have followed your steps but Forefront Endpoint Protection 2010 seems to be missing on Products tab. Do you know how i can enable it or install it?
Many thanks
I believe FEP 2010 will not be available anymore as it has reached EOL – https://www.prajwaldesai.com/sccm-2007-end-of-support/
Hi, Thanks for your post. We have had the Endpoint protection point inplace for 2 years. Onprem and internet clients have been updating successfully.
We are now adding the Cloud Delivered Protection Services Subscription as basic for WDATP reporting, our internal clients update the settings but internet clients dont. We have a DMZ SUP, DP, MP.
If I create a new policy I can see it in the registry on internet clients but the Cloud Delivered Protection settings do not come across.
Any suggestions?
Thanks
Hi Prajwal,
this is my first time to come across sccm. need assistance on how to use sccm or at the client end to upgrade to win 10.
thank you
William
Hi,
Prajwal this is my first question on your blog. I want to know whether we can upgrade windows defender definition on all client through SCCM { currently we can not set the process that upgrade the Virus and threat protection update.}
we have Symantec endpoint protection installed on all client, simultaneously we want to update the windows defender definition through SCCM and let the windows Defender run the quick scan once a day. is it possible to keep both the antivirus on?
if yes please let me know how.
Thanks in advance.
Hi ,
Anyone Who have done this & can help me?
Regards,
Amit Desai.
Hi we are on the process of removing SEP and keep only Endpoint Protection.
some times 2 sofwares doping the same thing can cause some false positives.
So, I’ve been following the steps in this (and your previous guides) pretty closely, but after I Synchronize Software updates, I’m not seeing a single one for Definition Update for Microsoft Endpoint Protection. I have other updates (I followed the previous guide for “How To Deploy Microsoft Office 2013 Using SCCM 2012 R2”), but no definition updates. What am I missing?
Hi, Skylar Ragan. did you find out solution?
What would be the query to detect all SCEP installed on all devices?
Thanks
Hello everyone! Prajwal Desai thank you for posting these installs. Is anyone having an issue where the the latest definition updates are being deployed through an ADR rule but when you go to the actual definition under Software Library, it shows as Required 0 ? Everything was working fine until the 21st of this month 03/21/16. All of my clients last update definition is 1.215.2461.0 and now their definitions are Out of date. They obviously do need the latest definition but according to sccm they are 0 Required that need the latest definition? Windows Updates are still being deployed and installing correctly, so my clients are reporting correctly to my main site server. I don’t know what else to look for.. Any suggestions? I’m running on 2012 R2 SP1 CU3 update and my clients are running on the latest hotfix for that CU3 update which is 5.00.8239.1403
Hi,
I am facing same problem. How this problem is resolved?
Hi Prajwal,
Do you happen to know what the SUP Product ‘Forefront Client Security’ does?
Thanks,
Andrew
Forefront client security was a security software which was more like an AV. Later Microsoft replaced Forefront Client Security with a newer product called Forefront Endpoint Protection 2010. But malware updates are still available for Forefront Client Security clients.
Ok, so if we have Forefront Endpoint Protection deployed ot our clients and that Product selected in the SUP settings then we don’t need Forefront Client Security selected (must be an old setting from a few years back I guess)
Correct.
Hi Prajwal,
Loving your guides, been setting up ConfigMgr by following them 😉
I have a question about the deployment of EP definitions.
I am using Software Update deployment with a monthly maintenance window. I want to deploy EP definitions to install at once.
I have been trying a few different approaches, but I am just seeing the definition updates in Software Center ready to install.
How do I configure my setup to make the EP definitions install at once and outside a maintenance window?
KL_Dane
Nice post buddy… really appreciate your hard work…
When we create software update group, we can rt. Click and download the data related to these metadata and keep them in a separate shared folder.
We can download these updates directly while deploying the updates as well as shown in this post…
@Naveen – Yes you can download the updates before and store them in a folder. This is the normal practice followed.
You can also choose to download updates while deploying them to the clients. However in case if the updates fail to download you might have to start again, so first method is recommended.
Hi Reza, you can get alerts by creating a subscription for that alert.
Prajwal,
On my current SCCM 2007 R3 SP2 with FEP 2010, I setup FEP alert to e-mail me any virus outbreak. I couldn’t seem to find this setting on my SCCM 2012 R2 with SCEP 2012 (I did configure it already).
Would you please let me know?
Thanks, Reza
Hi Prajwal,
fine. i will give more info by opening the ticket.
Regards,
Arshad
Hi!
Any tips for client side troubleshooting. Some time one or two client start scanning daily. They have the right policy and everything but cant figure out why they scan daily.
Hi Prajwal,
Nice Post.
I would like to know do you haveing Kasperskey 10 Client Push steps to SCCM 212.
As i am tring to push some client as Kasperskey 10 test it fails on software centre while installation or sometime unable to see any stuff on SC
My procedure:
created as application package with Manaual Script file & program tab ” setup.exe” / a / s. (also DP added), can you help me out where i am doing wrong…….?
(2) After KP 10 Push & we can push the update 10.2 on Exsting Client KP 10
Thanking You
Best Regards
Arshad
is KP 10 available for download ? I will try the app deployment in my lab and will give you the exact steps..
Hi Prajwal, I have created the SCEP ADR, It will work, bit some server definition not update. I everytime uninstall SCEP and install. then only definition got update. Could you please advice on this issue