This post covers the steps to deploy Office 365 Proplus using SCCM. There are multiple methods to deploy Office 365 proplus using SCCM. However in every method a configuration file is used along with Office 365 deployment. The SCCM Office 365 Installer feature was first released in SCCM 1702. Since then lot of enhancements have been made to the tool. In this post I am using SCCM 1806 to create Office 365 installer. I believe this is the most easiest method to deploy Office 365 proplus using SCCM.
Before you deploy Office 365 using SCCM, I would also like to add a point here about the Office 365 installer. When you create office 365 installer using SCCM, there is no uninstall command added in deployment type. Not sure why but i assume you would use only Office 365 post deployment. In addition you can still add the uninstall command but why would you do that ?.
Deploy Office 365 ProPlus using SCCM
To deploy Office 365 proplus using SCCM, launch the configuration manager console. Click Software Library > Overview > Office 365 Client Management. Click Office 365 Installer in the console. This will bring up Microsoft Office 365 client installation wizard.
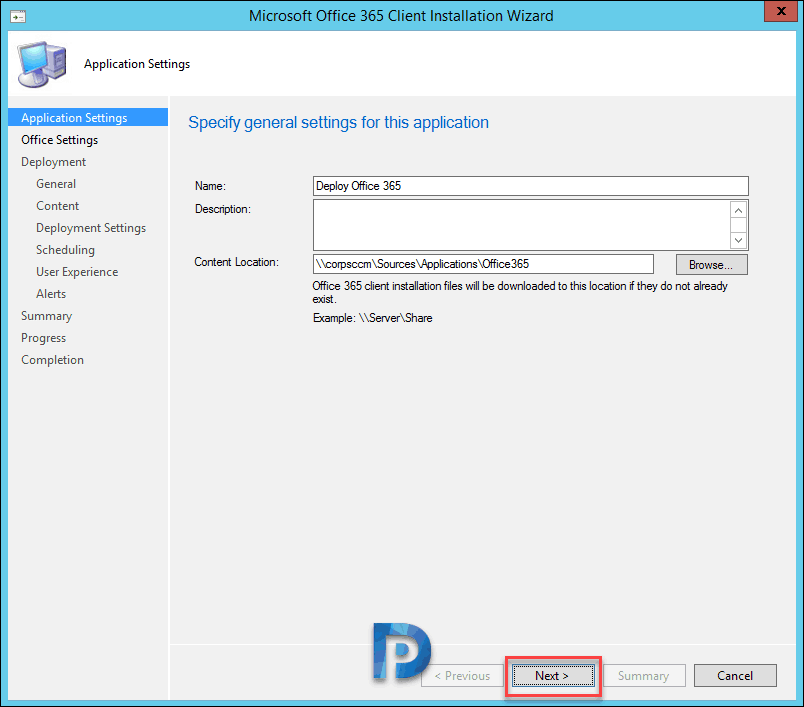
Under Application settings you specify name and content location. The content location is the path where the Office 365 installation files are downloaded. Click Next.
Click the button Go to the Office Customization Tool.
Office 365 Customization Tool
You will see Office Customization tool launched. This tool will create the configuration file for all the changes that you do. You can customize a lot of settings. And the settings are deployed along with Office 365. To create or update a configuration file, click Next link in the tool.
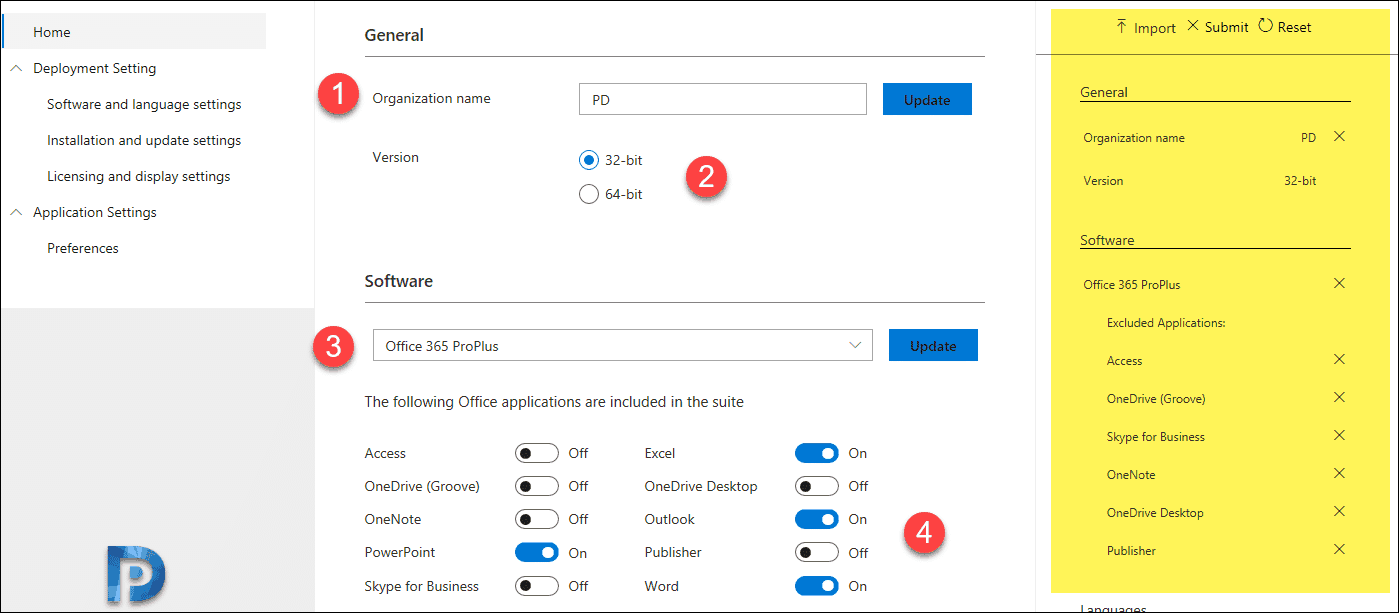
This is very important step. Look into right pane to see changes that you make.
- Select Organization name. Click Add button.
- Select the office version. In most cases 32-bit office version is deployed. Click Update button when you make any changes.
- Next, select the Office version. The best part here is you can select what office apps you want to deploy.
What’s available under Software ?
- Office Suite – Includes Office 365 ProPlus and Office 365 Business.
- Visio – Includes Visio STD and PRO 2016, Visio Pro for Office 365.
- Project – Includes Project STD and PRO 2016, Project online desktop client.
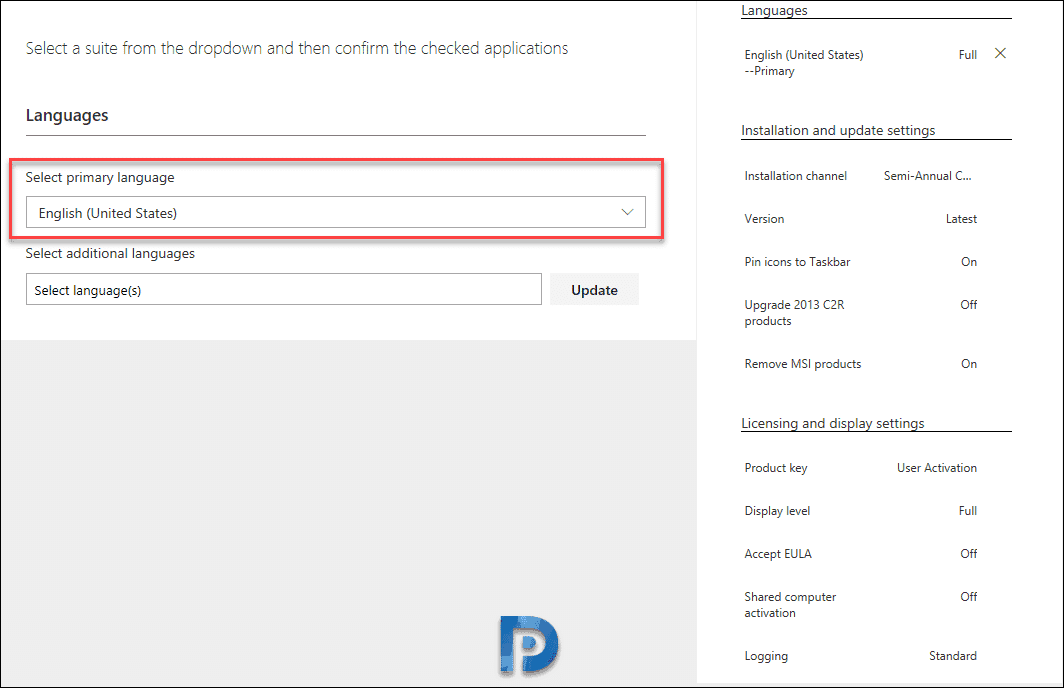
Select Primary language. You can add additional languages if required. When you add addition language, click Update button.
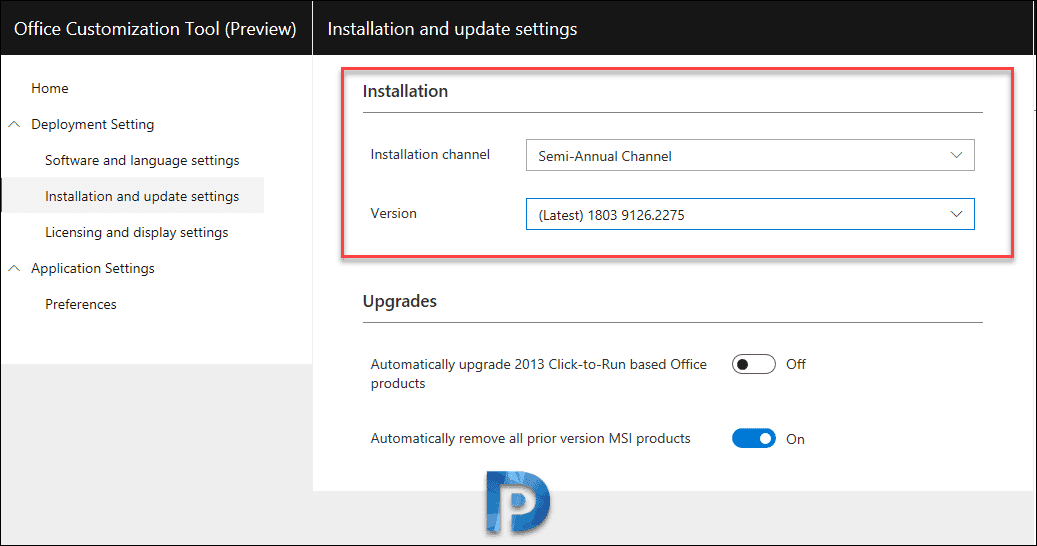
Select the installation channel and version of Office 365. I always prefer to have the latest version of office 365 deployed.
Under Upgrades, you find two very important options.
- Automatically upgrade 2013 click-to-run based office products.
- Automatically remove all prior version MSI products.
Select the options based on your requirement and proceed to next step.
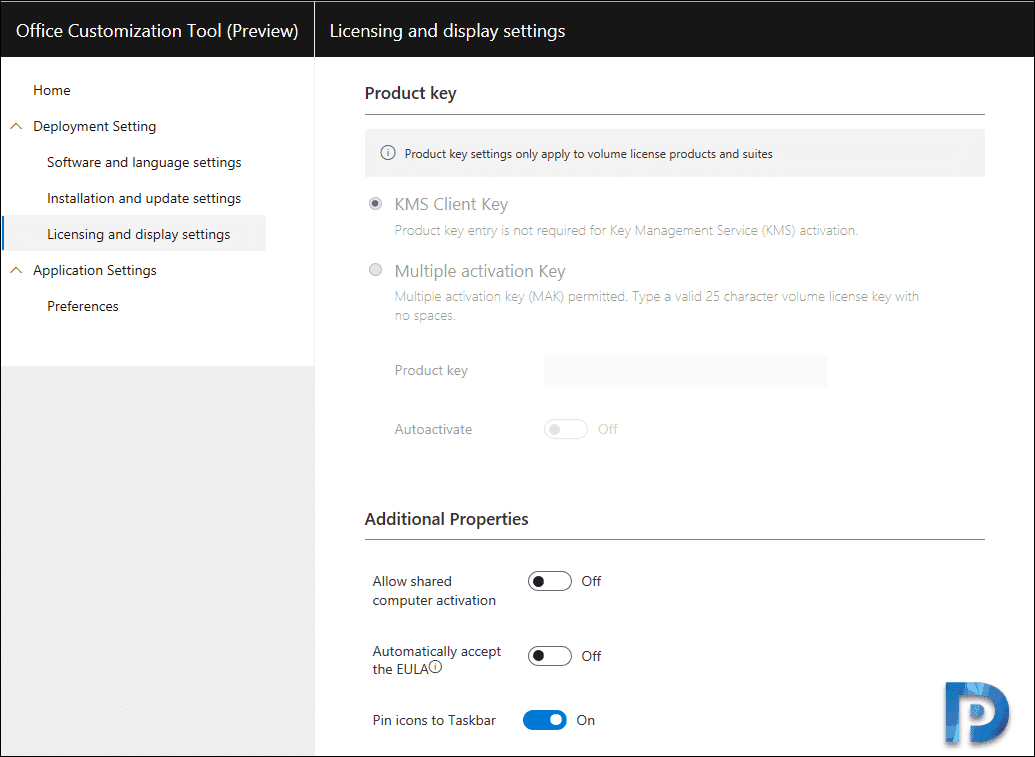
Under Licensing and display settings, there is not much you can change. The default one is KMS client key.
Lot of options under Preferences. Select the office app first and then customize the settings on right pane.
Select either Yes or No to deploy the application now. Click Next.
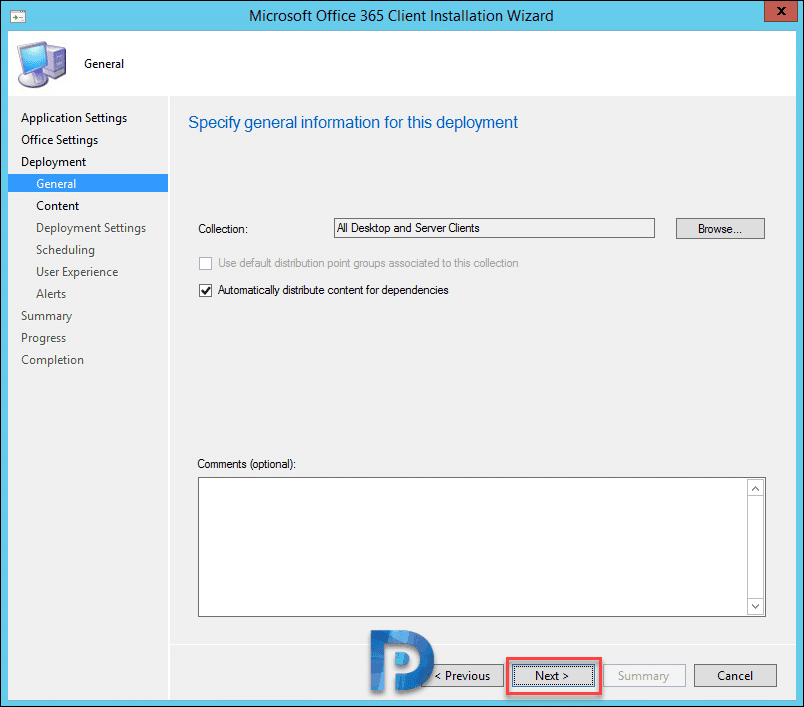
Choose the collection to which you want to deploy this application. Click Next.
Configure the deployment settings. Click Next.
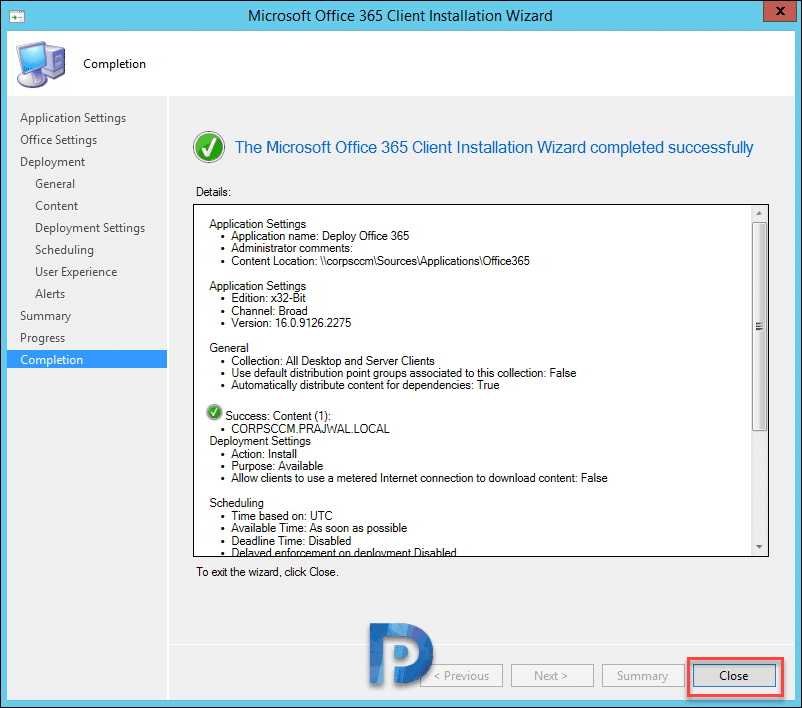
For remaining steps, click Next and on completion page click Close.
Office 365 ProPlus Configuration File
Here is the office 365 proplus configuration file that you get once you customize with above settings.
<Configuration>
<Add OfficeClientEdition="32" Channel="Broad" OfficeMgmtCOM="TRUE" Version="16.0.9126.2275">
<Product ID="O365ProPlusRetail">
<Language ID="en-us" />
<ExcludeApp ID="Access" />
<ExcludeApp ID="Groove" />
<ExcludeApp ID="Lync" />
<ExcludeApp ID="OneNote" />
<ExcludeApp ID="OneDrive" />
<ExcludeApp ID="Publisher" />
</Product>
</Add>
<RemoveMSI All="TRUE" />
<AppSettings> <Setup Name="Company" Value="PD" /> </AppSettings>
</Configuration>
Testing Office 365 Installation
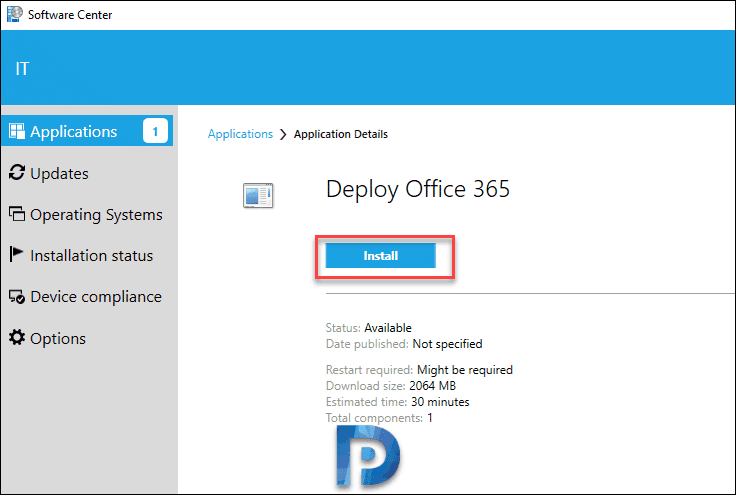
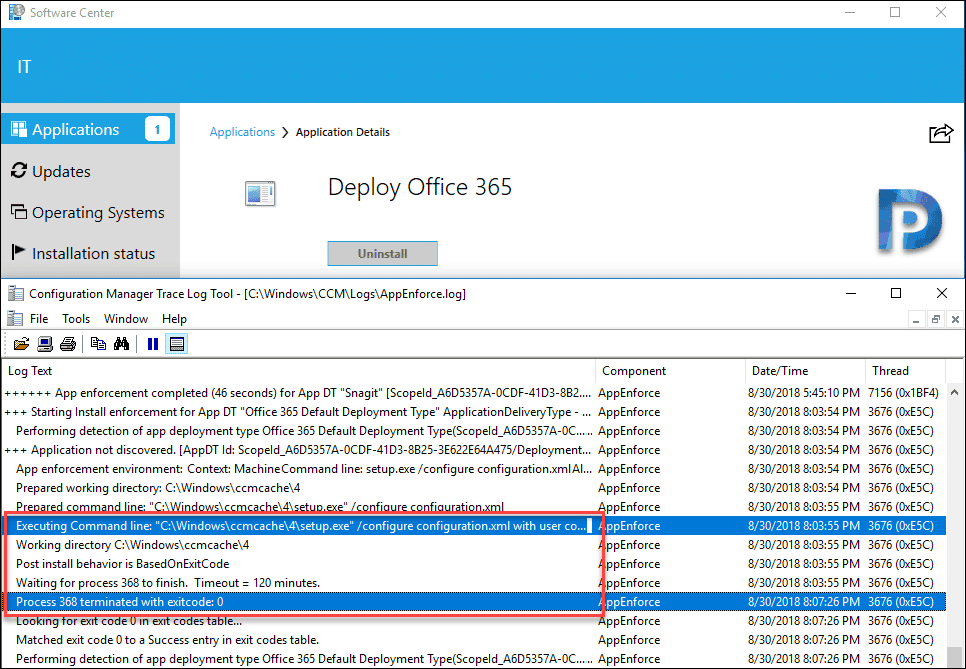
Launch software center on client machine and select the Office 365 app. Click Install, the application is first downloaded from DP and installed.
While the app is installing, open Appenforce.log to monitor the installation.









Hi, thanks for this. Very helpful. quick question… is there a way to have this tool also create desktop shortcuts for Outlook or other Office apps?
Once you create the installer and then I don’t want to deploy it but want to add it to a task sequence. Can I create a Application from it or does it need to be a package?
Hello,
I have noticed new problem after MS 365 Apps for enterprise is uninstalled from computer – MS Outlook icon/shortcut (32bit) is not deleted from location: “C:\Users\user\AppData\Roaming\Microsoft\Windows\Start Menu\Programs”, which refers to file: “C:\Program Files (x86)\Microsoft Office\root\Office16\OUTLOOK.EXE”.
If you uninstall 32bit office and then install 64bit office, icon still stays there and we need to manually repair icon.
Please assist, how to deal with that problem?
Hello Prajwal,
Followed the instructions but am getting this error in appenforce logs:
1. Process 9228 terminated with exitcode: 4294967295
2. Looking for exit code -1 in exit codes table…
3. Unmatched exit code (4294967295) is considered an execution failure.
If I click on ‘Retry’ in the Software Center, O365 installs successfully. But I don’t want users to have to resort to doing that. Any suggestions that could point me in the right direction?
Is there a way to disable the Internet and network paths as hyperlinks in word using o365 customization tool. I don’t see the option under word/proofing/autoformatas/replace as you type/… do we know if there is any xml code for this that I could add manually to the customization.xml file?
Hi, I tried install (deploy) Office 365 via WIN 10 install task sequence when I install new laptops and task sequence show error 0x80004005 when office 365 is in installation process. Any ideas why?
Hi Can you confirm when running through the sccm setup wizard and it creates the config.xml file you do not need to modify this file with the source location of the install files .
We use lots of DP for deployment will it just auto download the content from the DP with out changing the config.xml file.
Hi,,, was able to deploy office 365 to client machine but on client machine software center their no office 365 notification appearing
Hello Prajwal,
thanks a lot for this guide. I manage M365 in our company and came across this following problem. I do use the Customization Tool in SCCM to create the installation package. However, as our company is in multiple countries, I was forced to include all required languages in the pack which in the end leads to a big installation package and also “bloats” each OS with multiple installation files.
Question is, is it possible just to deploy lets say English language and then create Language Packs each per needed language and deploy it to respective countries make it available to install from Software Center?
It would look like that if I manage 7 countries, I would have seven additional items in Software Center available to install?
I am not keen to manage multiple M365 full installation packages. In best case scenarios just one full package and then only language packs.
Thanks a lot.
David
Hello, great article BTW
My Office download is randomly failing. Would you happen to know what log file I need to reference?
Thanks!
What is the error ?. Check this article – https://www.prajwaldesai.com/download-of-office-365-file-failed-error/
Do you know if it’s possible to do a no content SCCM install for Office 365, so that it doesn’t pull the files from your distribution point, but from Microsoft like with the updates?
I guess that can be done. I will do some research on this.
We are currently doing that. Instead of using the built in tool in configmgr, We setup a application that is just the XML file and the setup file and run “setup /config “yourfile.xml”
and we didn’t specify the update path in the XML
Currently we have a network share setup for a local CDN, but based on the site below, I don’t see why you couldn’t go to MSFT for the bits on the client.
After the Costumization Tool, the Wizard closes with a Error: download of office 365 file failed error = 5″
Full permission on the Share is available.
Anybody an idea how to fix this?
Thanks
BR
Sometimes the firewall may not allow the install bootstrap to download the data cabs from Microsoft. So have a check on that.
Had the same issue. What I found out is, that it runs under the user context that runs the sccm console. I gave the Sources Folder full permissions to everyone and my admin-user appeared in computer-managment / shared folders / sessions. So this account needs write permissions at the destination-folder, after that the deployment was successfull.
Regards,
Jan
Hi, How we deploy if we create multiple deployment types for different languages in single office 365 application because there is no option to select deployment type in deployment creation like package model?
I’ve run through the Office deployment tool and deployed Office with a new build. If I install Office 365 on an existing PC from the software centre, it installs all Office apps – Word, Excel etc but deploying the same package via a task sequence only installs OneDrive, OneNote and Skype. Have I missed something?
Hi *
do I have a chance to re-run the office customization wizard for a goven deployment?
Is there a log somewhere that details out what’s happening during the provisioning process? I’m having a deployment issue where an enforced O365 deployment is failing with an unknown error, and the deployment isn’t appearing in Software Center when it’s configured to do so. Other applications deploy to the client correctly, so I’ve eliminated the usual suspects like boundaries, etc. I’m convinced that something is going on during the O365 application provisioning process within SCCM on this server.
Right now we have some computers with O2016 and 365 clients, I want to upgrade to O2019, I create the Deployment package on my SCCM, on machines that do not have installed Office version works fine, The SCCM deploy the O2019 Fine, but on the machines that have any Office version installed SCCM doesn’t do an upgrade!!! How Can I fix it???
I’ve tried working through this procedure several times on two different computers and I keep getting an error message that says “Download of Office 365 file failed, error = “. However the software is downloaded to the required folder but no application shows up in SCCM. I am not choosing to deploy at this time.
The Office 365 Installer worked great for building an application for the deployment of Office 2019 Volume but doesn’t work for 365.
Did you ever figure out what was the cause of the error? Also getting this message.
HI Prajwal. Interesting article. I’d like to know if there’s any way to automate this using powershell. Is this possible? Thanks!!
Hey Prajwal, I’ve used your guides before and wanted to take a moment and thank you for sharing your knowledge! I had a question about installing Visio 365 and Project 365 while the Office 365 “core” (Outlook, Word, Excel, PP, Access, Publisher, OneNote, OneDrive, Skype, etc.) is already installed.
I want to think of Visio and Project as ‘bolt-ons’ that we add users to. I have 3 collections: Office 365 core, Visio, and Project. All users get added to Office core, no questions asked. About 12 users to get added to Visio and 25 get added to Project. The problem I’m seeing is, when I try to install Visio overtop Office 365, there’s something in the background that holds onto an Office core program(s). Visio gets stuck in a limbo state of installing and it eventually takes the entire Office Suite down with it. the only fix I know of is uninstalling the Suite and re-installing with Visio. This takes the install time from 5 minutes to 30+ depending on bandwidth. Do you know if this is at least possible? We found a process called WebEx MAPI which was holding onto the user’s .ost file and making the Office install fail. I wrote a batch wrapper that SCCM calls for the install, the first line task-killing the MAPI process. However, this fix didn’t work for Visio or Project.
Any help you can throw my way would be much appreciated guys, thanks! Would love to hear how you handle this particular problem.
Try closing all the running Office programs before you install visio, open Temp folder and check if you get some office log files, the log files must contain the error messages.
From what I’ve found in other forums, the fix is to add FORCEAPPSHUTDOWN=”TRUE”, which I added to my config file, but it didn’t change anything about my install. Does the OneDrive for Business active sync need to be disabled in order for all office 365 suite products to be considered ‘closed’?
I’ve poured through the log files for 2 different users experiencing the same problem, and they weren’t very helpful. I’m looking for a way now to figure out what process is holding on to my Office deployments. I can’t get SCCM to cleanly uninstall Office or install Visio because of this. If I try to delete the Microsoft Office folder under “C:Program Files (x86)”, I get an error message saying the action can’t be completed because the folder (files) is in use, so I know there’s a process holding my Office 365 hostage, holding some Office product open even though all are ‘closed’.
The one error I found which I don’t agree with says “Reg key failed, possibly because the key is not present yet”. Which, if this is referring to the product key, it doesn’t make any sense as we’re using Office 365 E3 enterprise licenses.
Thank you for your reply. I appreciate it so much!
I have a similar situation. What i’ve done is created an (click to run) application with Office 365 and Visio / project online plan (using the wizard in SCCM). I then added some xml files (Add-project.xml , add-visio.xml, remove-project.xml, remove-visio.xml) . Visio / Project subscribers are in a separate collection.
First I tried to control the visio/project installs with custom deployment methods, but that does not work well, because the application is always shown as ‘Office’ and it’s not possible to add a collection membership. So I ended up creating additional applications with deployment methods that share the same source as the office package. (obviously you need to change the detection settings of the visio/project packages, I’m checking for existence of visio.exe or winproj.exe)
This works nicely.
O365 Updates are managed via SCCM, but there is a little side effect:
When you have an office installation that got updated and you want to add Visio or Project, the entire office installation gets rolled back to the version that is defined in the package. After a while, the latest update gets offered again, bringing both Office and visio/project to the latest build.
This can be avoided by keeping the installation source (and version discription in the .xml) in line with latest approved update build version.
W.r.t. closing applications, this can be done either in the .xml (forcefully, with a risk of dataloss), or in the deployment method, by adding processes that need to be closed (All office apps ; word.exe excel.exe etc.), which gives an improved user experience when offered as an ‘available’ deployment through software center,
At my workplace all users have an O365 E5 license assigned by default, but only selected users have a Visio or Project license assigned to them. Rather than treating Visio and Project as separate installations, I include them in my core O365 installation. This means that every machine has Visio and Project installed when O365 is deployed. If a user launches Visio or Project on their machine they will only be able to use the applications in trial mode unless they are assigned a relevant license. This allows me to only work with one O365 deployment, and it also allows me to simply assign a Visio or Project license if a user requires either application. No need for multiple SCCM collections or additional deployments.
I have a couple of questions. I created the Application adding 3 additional language options. How do I set it up so that only the OS Language will be matched with the Office 365 language? Right now, all 4 install. Second, Uninstalling. I created a remove.xml that I found on another post on your site that works when running the command from a command prompt. But when clicking Uninstall within Software Center, I get 0x87D00325(-2016410843) which I now means that the software was removed but still detected, but it actually was not uninstalled. The programs are still there.
Ok, I was able to fix the uninstall issue. Even with the Uninstall content settings line under Content read Same as install content, I had to add the path to the setup.exe and xml under the programs tab, uninstall starts in section.
I am still trying to figure out how get only various languages to install in certain groups. Such as for the Japan computers, I only want Japanese and English versions to install. But all 4 languages downloaded will install.
1811… One big process for everything! Whoa. Thank you Microsoft! That was MUCH easier!
Ya it is very easy to package and deploy O365 via SCCM
Hi Prajwal,
Did something changed in 1804 version of sccm? I don’t have a submit button, and can’t end configuration. I’ve tried in all browsers.
Restart your server once.
didn’t help
There is a Review button that opens the configuration panel to show you what has been selected. On the configuration panel there is a Submit button.
Hi,
How does this work with previous versions of office installed? Does it update them to the version being installed, even if the currently installed version is 32bit and you go to install 64bit?
Regards,
Craig
We have office 2010 installed and if i push it out to a computer with 2010 on it i get Unmatched exit code (2147549183) is considered an execution failure.
but if i uninstall 2010 then it installs just fine. not sure why the upgrade action doesnt work for us
Hi there!
Thank you for a great website, and as usual you provide a very useful post.
When I get to the Office Customization Tool, there are several drop-down menues that don’t work (Select a Channel, Version and Primary Language). They are greyed out, and nothing happens when I click the down arrow. Without making these choices, I can’t finish the wizard. When I try to import the configuration from this article, I get an error saying “Your import was not successful”.
I’m using SCCM 1806.
Does anyone know the solution to this issue?
Hi Prajwal Desai,
the installation returns this error on appenforce.log:
Waiting for process 11812 to finish. Timeout = 120 minutes.
Process 11812 terminated with exitcode: 2147549183
Looking for exit code -2147418113 in exit codes table…
Unmatched exit code (2147549183) is considered an execution failure.
Do you have any ideas?
Thank you.
I’m having the same issue, but only on some machines. My test machine I can install\uninstall O365 without issue, but when I try to run it on my machine (I test on myself first) I get this error. I’ve tried to match my test machine to my machine as far as existing Office Products (Office 2013 x86 & Project 2013) and it works fine. I have the configure file set to uninstall all MSI Office products, but it bombs out right away.
Hi,
I tried the steps exactly as your article describes, but the application does not show up on the client side, all I get on the logs is “Did not detect app deployment type Office 365 Default Deployment Type”, any ideas why?
Im having the same issue, I followed the steps below however nothing is appearing on the software center. What’s makes me think if there is a GPO to be enabled. or a user policy on the client configuration.
So did you find out if there is any GPO applied ?.