In this post, we will go through the steps to deploy Lync client using SCCM (ConfigMgr). We will download the latest version of Lync Client and create an application in SCCM and deploy it to Windows computers.
As an example, we will package the latest available Lync client, which is version 2013. There are two versions of the Lync 2013 client available for downloads: Lync Basic 2013 and Lync 2013. Note that Lync was renamed Skype for Business in April 2015. Along with a new name came some new features and a fresh new look.
The Lync Basic client includes enhanced presence, contacts, instant messaging (IM), Lync meetings, and basic voice functionality. Features not supported in Lync Basic include multiparty video, OneNote integration, virtual desktop infrastructure (VDI) support, skill search, recording, Enterprise Voice features, and advanced call handling.
To distribute Lync client across your enterprise computers, we will use the basic steps to deploy software using SCCM. I would recommend using the latest Configuration Manager current branch version to deploy Lync client.
Check out some useful guides related to application deployments with SCCM
- Deploy Microsoft Teams Using Intune
- How to Deploy Microsoft Teams Using SCCM
- Fix Lync is becoming Skype for Business – KB3115883 (MS15-044)
- Deploy Microsoft 365 Apps with Intune
- How to Deploy Zoom Client Using SCCM | ConfigMgr
Difference between Lync 2013 and Lync Basic 2013
Lync Basic 2013 provides all the basic functionality that’s available in the full version of Lync (Lync 2013). However, if you want to use any of the following features, you will need to upgrade to Lync 2013:
- Advanced call features (not available with all Office 365 subscriptions); advanced call features include team ring, call forwarding, simultaneous ring, voice mail, call park, call delegation, response groups, and remote call control
- Calendar delegation
- Gallery video view
- OneNote sharing
- Recording
- Skill search (not available with Office 365)
- Virtual Desktop Infrastructure (VDI) (not available with Office 365)
Where can I download the Lync Client Installer?
Lync Basic 2013 is available on the Microsoft Download Center and comes in two versions:
- Microsoft Lync Basic 2013 (64 Bit)
- Microsoft Lync Basic 2013 (32 Bit)
Lync 2013 is available via the Microsoft Volume Licensing Service Center for customers with a Volume Licensing agreement. You can download the Lync 2013 client from VLSC or you can use Office Customization tool to customize the Lync 2013 which comes with Office 2013.
Prepare Lync Configuration File
Before you deploy Lync client using SCCM, you’ll need a configuration file where we define the settings for client installation. In this example, my Lync configuration file consists of few lines of code and this configuration is for 32-bit Lync client deployment. You can follow the same procedure to deploy Lync 2013 64 bit client deployment.
I have saved this file with name config-pd.xml inside the folder lync.ww. We will use this configuration file along with Lync installer during the application deployment in SCCM.
<Configuration Product="Lync">

	<Display Level="none" CompletionNotice="yes" SuppressModal="yes" AcceptEula="yes" />

	<Logging Type="standard" Path="%temp%" Template="Microsoft Office Lync Setup(*).txt" />

	<!-- <USERNAME Value="Customer" /> -->

	<COMPANYNAME Value="PRAJWALDESAI" />

	<!-- <INSTALLLOCATION Value="%programfiles%\Microsoft Office" /> -->

	<!-- <LIS CACHEACTION="CacheOnly" /> -->

	<!-- <LIS SOURCELIST="\\server1\share\Office;\\server2\share\Office" /> -->

	<!-- <DistributionPoint Location="\\server\share\Office" /> -->

	<!-- <OptionState Id="OptionID" State="absent" Children="force" /> -->

	<Setting Id="SETUP_REBOOT" Value="IfNeeded" />

	<Command Path="%windir%\system32\msiexec.exe" Args="/qb /X{81BE0B17-563B-45D4-B198-5721E6C665CD}" />

 	<Setting Id="AUTO_ACTIVATE" Value="1" />

 	<Setting Id="HIDEUPDATEUI" Value="True" />

</Configuration>
How to deploy Lync Client using SCCM
Use the following steps to deploy Lync 2013 client using SCCM.
- Copy the Lync setup folder to the sources folder or any shared folder on the ConfigMgr server.
- Launch the Configuration Manager console, click Software Library.
- Under Application Management, right click Applications and select Create Application.
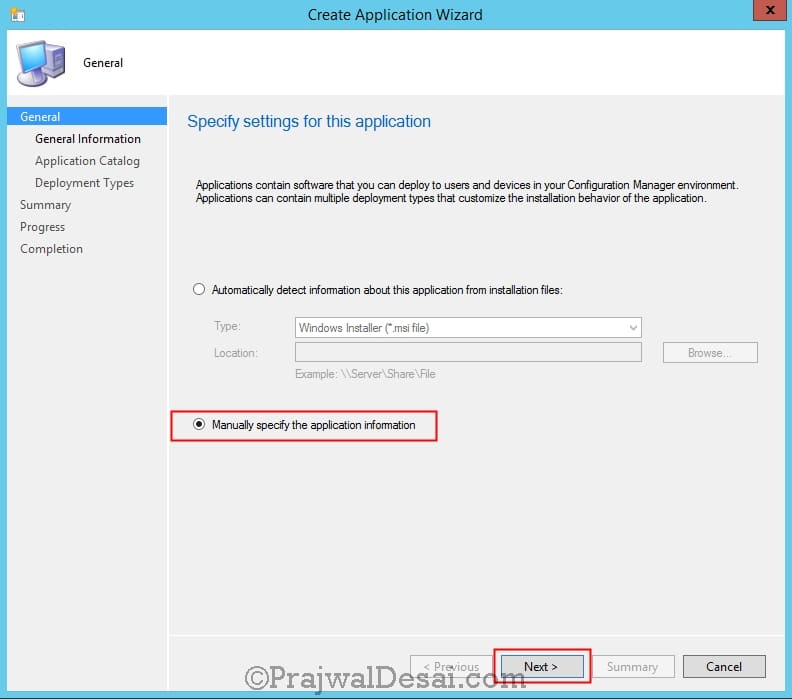
Choose Manually specify the application information and click Next.
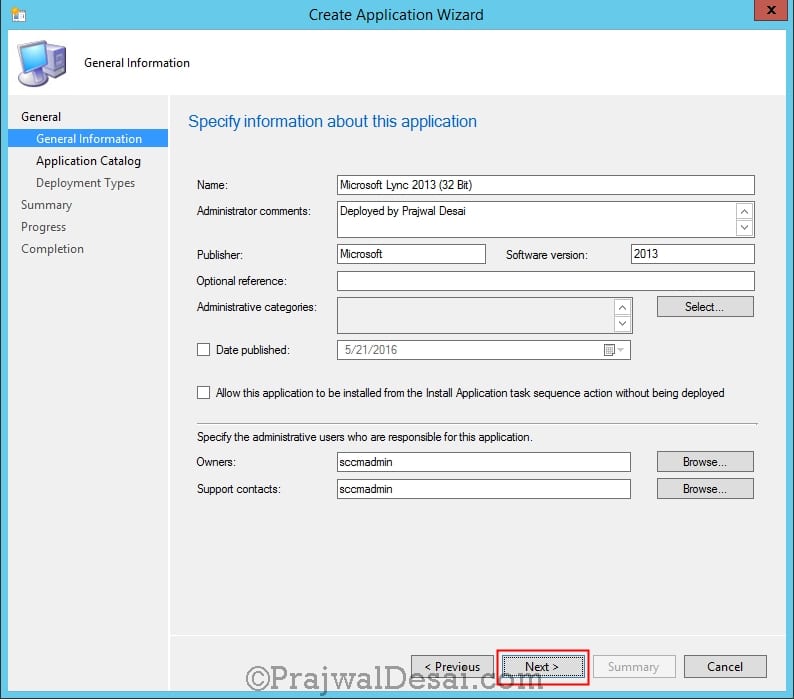
Specify some information about the application such as Name, Publisher etc. Click Next.
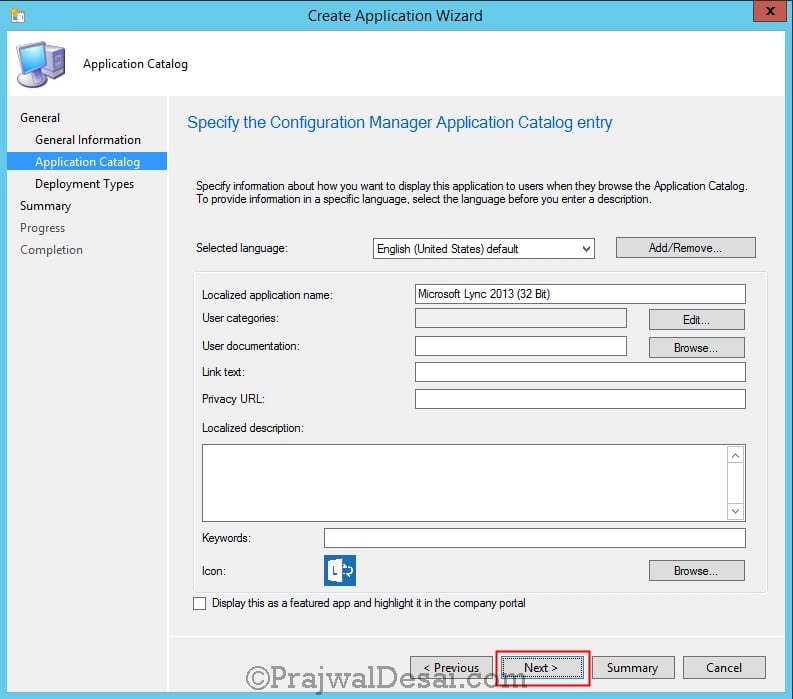
You can specify more information about the application here, the information specified here will be seen by users in the Software Center. Click Next.
We will now configure the Deployment Type for Lync 2013 client setup. On the Deployment Types window, select Add.
Let the deployment type be a Windows Installer (*.msi), choose Manually specify the deployment type information. Click Next.
Specify some information about this deployment type and click Next.
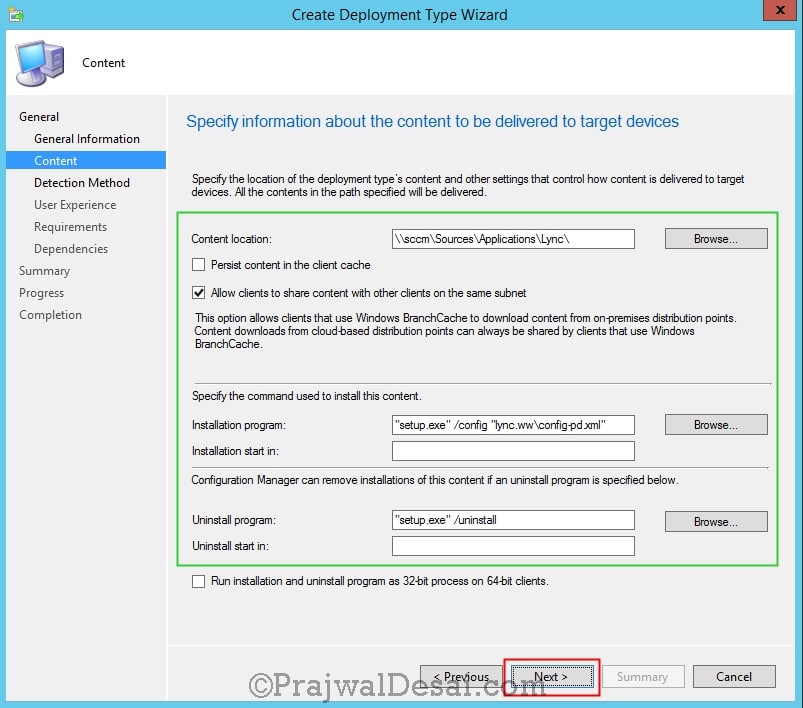
For the Content Location, provide the path where the Lync 2013 files are present. The next step is to specify install and uninstall command.
Specify the Installation Program and Uninstall Program as per the below details.
- Lync Client Install Command: “setup.exe” /config “lync.ww\config-pd.xml”
- Lync Client Uninstall Command: “setup.exe” /uninstall
Click Next.
Lync 2013 Client Detection Method
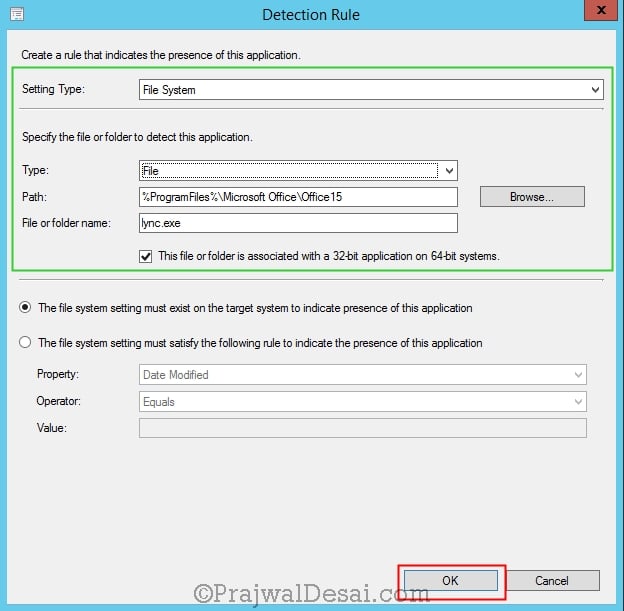
On the Detection Rule window, choose Setting Type as File System. Under Specify the file or folder to detect the app, set the following
- Type: File
- Path: %ProgramFiles%\Microsoft Office\Office15
- File or Folder name: lync.exe
Click OK and then Next.
Click on Add Clause. On the Detection Rule window, select Setting Type as Registry. Under Specify the registry key or value, set the following
- Hive – HKEY_LOCAL_MACHINE
- key– SOFTWARE\Microsoft\Office\15.0\Registration\{0EA305CE-B708-4D79-8087-D636AB0F1A4D}\ProductName
- Value – Microsoft Lync 2013
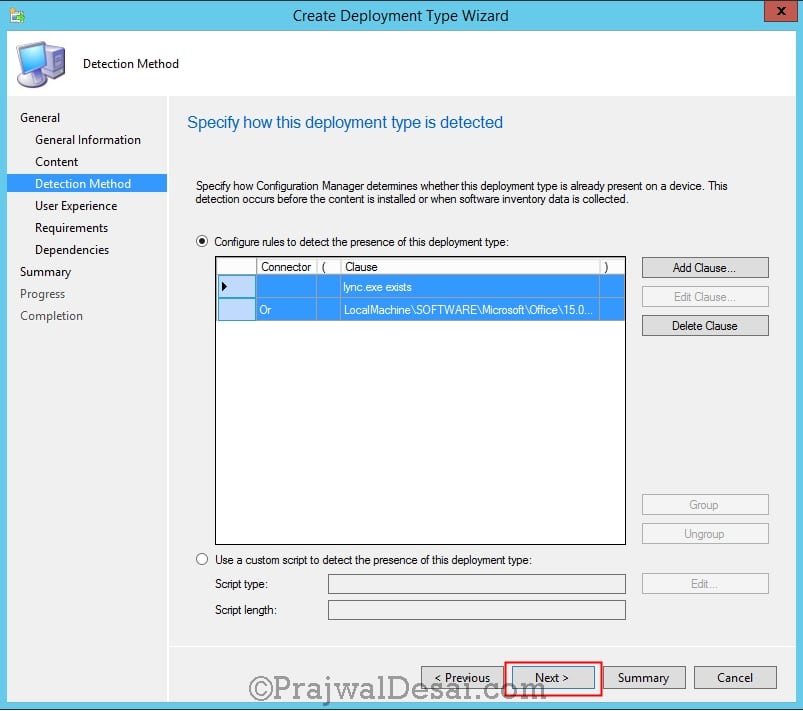
Click OK and then Next.
In the above steps, we have added 2 rules to detect the presence of the app. One of these rules to detect the app is also fine. Furthermore, under Connector field change And operator to Or. Click Next.
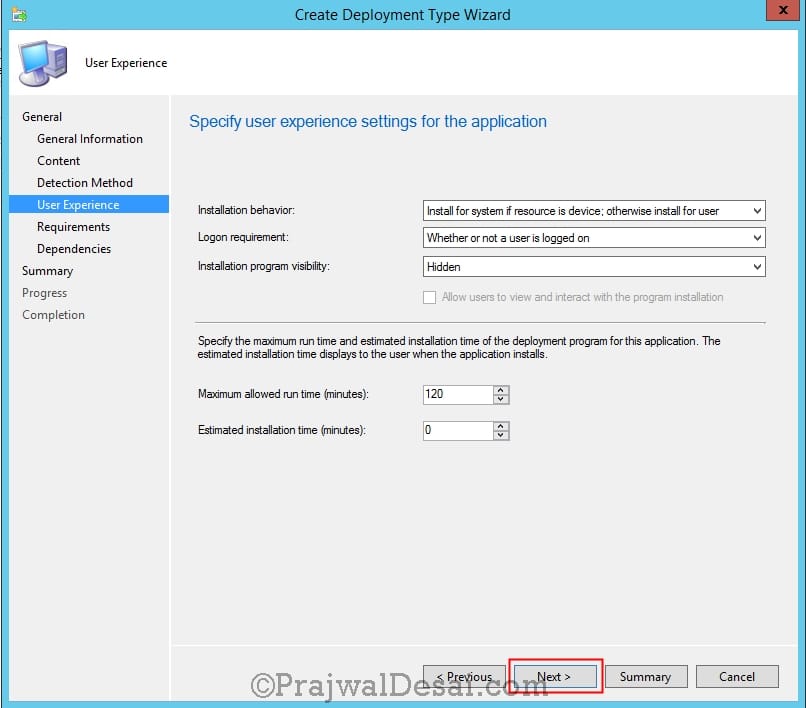
Selection the Installation behavior as Install for system if resource is device; otherwise install for user, Logon requirement as Whether or not a user is logged on and Installation program visibility to Hidden. Click Next and complete the remaining steps.
Click Close.
Distribute Lync Client Application Content to Distribution Points
Once you have created an application for Lync 2013 Client in SCCM, the next step is to distribute the application content to all the distribution points. To complete that, right-click the Lync application and select Distribute Content. Add the Distribution Points that you wish to distribute the content to and complete the remaining steps of distribute content wizard.
After you distribute the application to DP, right-click on the Lync application and click on Deploy. Pick a device collection to which you want to deploy the Lync client. Choose the Collection where this application is to be deployed and click Next. Under Deployment settings, set the Action as Install and Purpose as Available. Click on Next and complete the wizard.
Testing Lync 2013 Client Installation
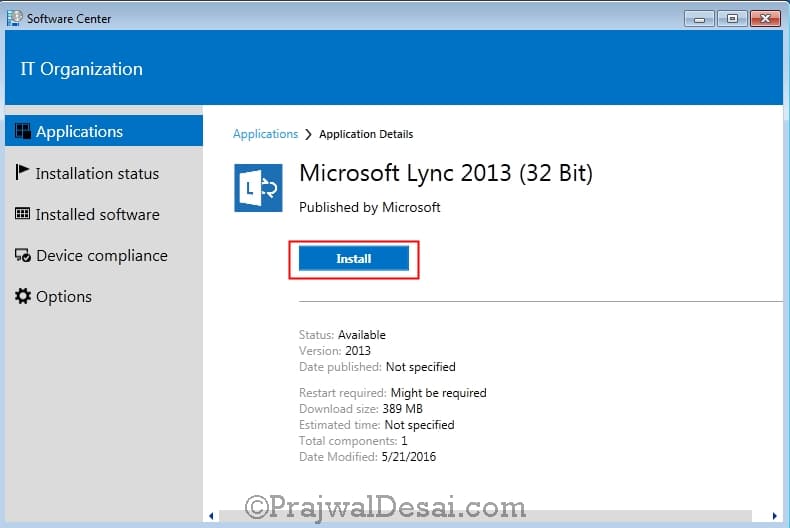
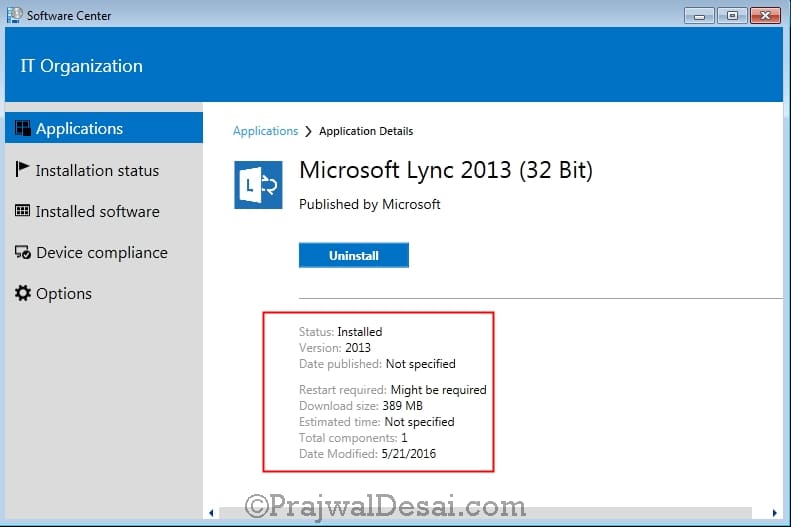
In this step, we will check if the Lync client installs correctly on the client computers. Log in to a computer and launch the Software Center. The Lync 2013 app can be seen in the Software Center under Available Software. Select the Microsoft Lync 2013 app and click on Install. The app is downloaded from the DP and installed.
The Lync 2013 client is installed successfully.
The Lync 2013 client has been installed on the computer. If you want to what’s going in the background during the client installation, you can open the AppEnforce.log file on the client computer using CMTrace Log Tool. If the Lync 2013 client fails to install, use the SCCM logs files to troubleshooting further.








Hi Prajwal,
At the end of the silent install, a popup window appears: “This action is only valid for products that are currently installed”. I could not find what it means, there is nothing relevant in the “Microsoft Office Lync Setup(date).txt”.
Can you help me?
Thank you,
Ádáz
Hi Prajwal,
Thanks for great post, I deployed office 2013 without access using sccm 2012r2, now I want to deploy access to existing office installation ? How to achieve this?
Hi Prajwal,
I tried to push lync 2013 through the process you mentioned, but no luck. Kindly help
Thanks
Kishore