This guide covers different methods to change RDP port (Remote Desktop Port) on Windows computers such as SCCM (ConfigMgr) CMPivot, PowerShell and Windows registry.
The Remote Desktop feature on your computer listens for the connection request over a designated port 3389 when you use the Remote Desktop client to connect to a computer (either a Windows client or Windows Server). The Remote Desktop port (RDP port) 3389 on Windows is a popular target for hackers. Thus, it might make sense to change the RDP port.
After you change the RDP port, the next time you connect to this computer by using the Remote Desktop connection, you must type the new port. If you’re using a firewall, make sure to configure your firewall to permit connections to the new port number.
Please be aware that port 1-1023 should not be used when selecting a non-standard RDP port because these are known ports, but port 49152-65535 is a dynamic or private port that is not in use by any service or application. For instance, you can change RDP port from 3389 to 33091.
- How to Turn off or disable Remote Desktop on Windows 11
- How To Enable Remote Desktop Using Group Policy (GPO)
- Disable Remote Desktop Access using Intune (MEM)
- Deploy Remote Desktop Client using SCCM | ConfigMgr
Why change the RDP port number?
Microsoft uses port 3389 for all external communications. A technique of automated password guessing is frequently used by hackers to connect to distant computers using the 3389 listening port. Such attacks, like the one Microsoft has just discovered, are known as brute force and password spraying attacks.
Undoubtedly, this serious security flaw puts your remote computers in danger. Many administrators decide to alter the RDP port number from 3389 to any other available port to get around this vulnerability, which makes it more challenging for hackers to figure out the listening port.
In addition to defending against hackers, administrators alter the RDP port number to get around firewalls. Some systems’ firewalls are set up to prevent both incoming and outgoing messages to and from port 3389, respectively, for security concerns. The purpose of this approach is less to block remote access and more to stop hackers from entering the system through the port. Changing RDP port helps to reduce the risk of port scanners and RDP vulnerabilities.
Check the RDP Port Number using PowerShell
On any Windows computer, you can check the RDP port number by running the below PowerShell command.
Get-ItemProperty -Path 'HKLM:\SYSTEM\CurrentControlSet\Control\Terminal Server\WinStations\RDP-Tcp' -name "PortNumber"

We see the RDP port number on the given computer is 3389.
PortNumber   : 3389
PSPath       : Microsoft.PowerShell.Core\Registry::HKEY_LOCAL_MACHINE\SYSTEM\CurrentControlSet\Control\Terminal
               Server\WinStations\RDP-Tcp
PSParentPath : Microsoft.PowerShell.Core\Registry::HKEY_LOCAL_MACHINE\SYSTEM\CurrentControlSet\Control\Terminal
               Server\WinStations
PSChildName  : RDP-Tcp
PSDrive      : HKLM
PSProvider   : Microsoft.PowerShell.Core\Registry
Change RDP Port using Registry
You can change the listening port for Remote Desktop on your computer using Registry. Make sure you back up the registry before you make any changes.
- Launch the registry editor. (Type regedit in the Search box.)
- Navigate to the following registry subkey: HKEY_LOCAL_MACHINE\System\CurrentControlSet\Control\Terminal Server\WinStations\RDP-Tcp
- Find PortNumber registry key whose default value is 3389.

- Right-click the PortNumber key and select Modify. On the Edit DWORD (32-bit) Value, select Decimal and type the new port number, and then click OK. Close the registry editor, and restart your computer.
In the screenshot below, I have changed the remote desktop port from 3389 to 33091.

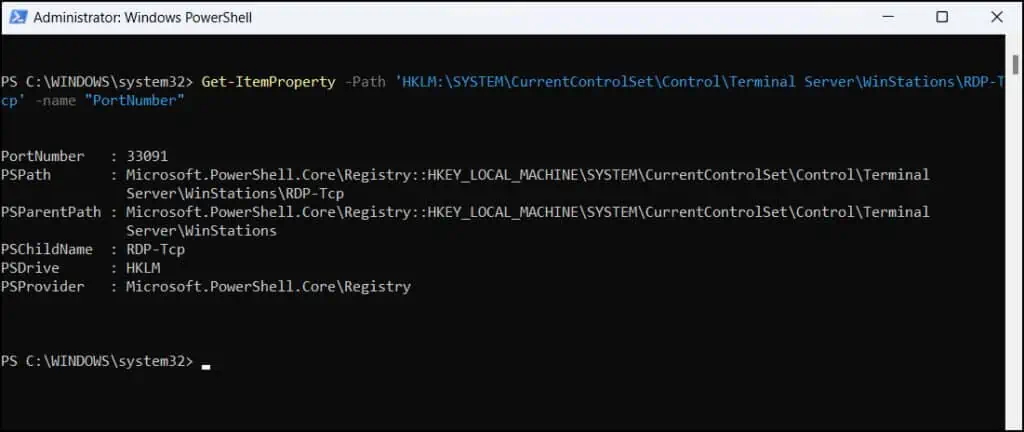
To confirm if the remote desktop port number is changed, run the below PowerShell command.
Get-ItemProperty -Path 'HKLM:\SYSTEM\CurrentControlSet\Control\Terminal Server\WinStations\RDP-Tcp' -name "PortNumber"
In the output, we see the RDP port number shows 33091 and this confirms that we have successfully changed the remote desktop port using registry.

Change RDP Port using PowerShell
One of the quickest ways to change the remote desktop port is using a PowerShell script. You can use the PowerShell script to change RDP listening port number on multiple computers.
The below PowerShell script is provided by Microsoft, that sets the remote desktop port to 3390. The script also adds the firewall rule to allow the RDP port on the computer.
$portvalue = 3390

Set-ItemProperty -Path 'HKLM:\SYSTEM\CurrentControlSet\Control\Terminal Server\WinStations\RDP-Tcp' -name "PortNumber" -Value $portvalue

New-NetFirewallRule -DisplayName 'RDPPORTLatest-TCP-In' -Profile 'Public' -Direction Inbound -Action Allow -Protocol TCP -LocalPort $portvalue
New-NetFirewallRule -DisplayName 'RDPPORTLatest-UDP-In' -Profile 'Public' -Direction Inbound -Action Allow -Protocol UDP -LocalPort $portvalue
To run the above PowerShell script, launch the PowerShell as administrator on your computer and run the script. You can also open Windows PowerShell ISE and paste the code and edit it before you run.
You can also deploy RDP port change PowerShell script on multiple computers using Microsoft Intune or Configuration Manager.

Adding firewall rules for custom RDP ports
You must modify the Windows Defender firewall to permit your new custom RDP port after changing the default RDP port to a custom port. To add the rules for unique RDP ports, use the PowerShell scripts below.
New-NetFirewallRule -DisplayName 'RDPPORTLatest-TCP-In' -Profile 'Public' -Direction Inbound -Action Allow -Protocol TCP -LocalPort $portvalue
New-NetFirewallRule -DisplayName 'RDPPORTLatest-UDP-In' -Profile 'Public' -Direction Inbound -Action Allow -Protocol UDP -LocalPort $portvalue
Name                          : {d601232d-c37c-402e-88d7-8313cd2acefd}
DisplayName                   : RDPPORTLatest-TCP-In
Description                   :
DisplayGroup                  :
Group                         :
Enabled                       : True
Profile                       : Public
Platform                      : {}
Direction                     : Inbound
Action                        : Allow
EdgeTraversalPolicy           : Block
LooseSourceMapping            : False
LocalOnlyMapping              : False
Owner                         :
PrimaryStatus                 : OK
Status                        : The rule was parsed successfully from the store. (65536)
EnforcementStatus             : NotApplicable
PolicyStoreSource             : PersistentStore
PolicyStoreSourceType         : Local
RemoteDynamicKeywordAddresses : {}

Name                          : {de0e40f9-7420-4054-ae98-028a4c7f0abe}
DisplayName                   : RDPPORTLatest-UDP-In
Description                   :
DisplayGroup                  :
Group                         :
Enabled                       : True
Profile                       : Public
Platform                      : {}
Direction                     : Inbound
Action                        : Allow
EdgeTraversalPolicy           : Block
LooseSourceMapping            : False
LocalOnlyMapping              : False
Owner                         :
PrimaryStatus                 : OK
Status                        : The rule was parsed successfully from the store. (65536)
EnforcementStatus             : NotApplicable
PolicyStoreSource             : PersistentStore
PolicyStoreSourceType         : Local
RemoteDynamicKeywordAddresses : {}
CMPivot Query to Check the RDP Port
You can quickly query registry values using CMPivot. Using a simple CMPivot query, you can check the RDP port on multiple computers in SCCM.
- Launch the ConfigMgr console and go to Assets and Compliance > Overview > Device Collections.
- Right-click on the device collection and select Start CMPivot.
- Run the below CMPivot query to check the RDP port of all the devices within the device collection.
Registry('HKLM:\SYSTEM\CurrentControlSet\Control\Terminal Server\WinStations\RDP-Tcp') | where Property == 'PortNumber'

Change RDP Port Using SCCM
Now that we have a PowerShell script that allows us to modify the remote desktop port number, we can deploy this script via SCCM. We will use the SCCM scripts feature to accomplish this.
In the ConfigMgr console, go to \Software Library\Overview\Scripts. Create a new script and on the Script details window, specify the following details.
- Script Name: Change RDP Port
- Script Description: Modifies the RDP Port
- Script Language: PowerShell
- Script timeout seconds: 200 seconds
In the script window, paste the below PowerShell script and click Next and close the Create Script wizard.
$portvalue = 3390

Set-ItemProperty -Path 'HKLM:\SYSTEM\CurrentControlSet\Control\Terminal Server\WinStations\RDP-Tcp' -name "PortNumber" -Value $portvalue

New-NetFirewallRule -DisplayName 'RDPPORTLatest-TCP-In' -Profile 'Public' -Direction Inbound -Action Allow -Protocol TCP -LocalPort $portvalue
New-NetFirewallRule -DisplayName 'RDPPORTLatest-UDP-In' -Profile 'Public' -Direction Inbound -Action Allow -Protocol UDP -LocalPort $portvalue

You have top approve the PowerShell script before you deploy it to your devices. Right-click on the Change RDP Port script and select Approve. If the Approve/Deny script is grayed out, refer to the article on how to resolve SCCM Script Approve Deny Option is disabled.

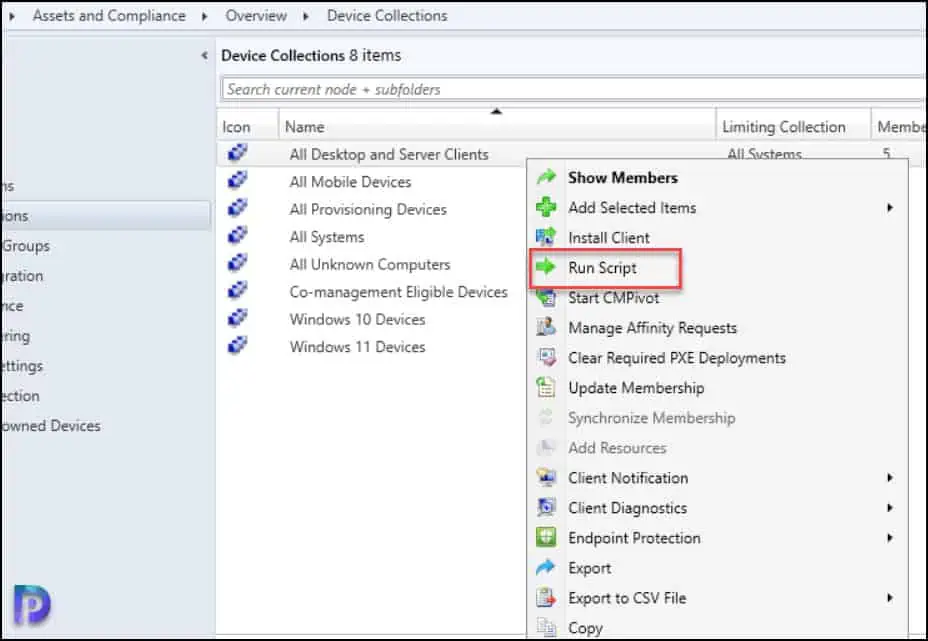
Once you have approved the PowerShell script, right-click a device collection on which you wish to run the script and select Run Script.

Select the PowerShell script that modifies the RDP Port and click Next. The Configuration Manager now runs the script on all the devices that are part of the device collection. The devices must be online in order for the script to work. Close the Run Script window after the script execution is complete.

After running the PowerShell script, you can run the CMPivot query to check the RDP port number on computers. From the CMPivot query output, we see the listening port for remote desktop for all the computers is now changed from 3389 to 3390.


