On the Windows Server, you can remove DHCP role using two ways – Server Manager and PowerShell. I will cover both the methods to completely remove the DHCP role and management tools from Windows Server.
You can use this guide to remove the DHCP role from Windows Server 2019, Windows Server 2022. The guide should work on all the latest Windows Server operating systems.
You can remove the DHCP role from Windows Server using PowerShell or GUI (Server Manager). The PowerShell method is quick and easy while with Server Manager, you have to go through few steps for DHCP role removal.
First a small introduction about DHCP. Dynamic Host Configuration Protocol (DHCP) is a client/server protocol that automatically provides host with its IP address and other related configuration.
The other information includes the subnet mask and default gateway. DHCP allows hosts to obtain required TCP/IP configuration information from a DHCP server. DHCP can also update DNS records on behalf of its clients.
You shouldn’t install DHCP Server role on domain controllers. It is best to leave the domain controller server running without installing any other roles on it.
There is no advantage of running DHCP on domain controller. It is best to install and run the DHCP server services on a dedicated server or VM.
If you are new to the concept of DHCP, I recommend reading about the DHCP basics from Microsoft DHCP documentation. Learn how to manage DHCP servers by creating a device collection for DHCP servers in SCCM.
Remove DHCP Role using Windows Server GUI
To remove roles and features on Windows Server, you must also use Server Manager. Launch the Server Manager and click Manage > Remove Roles and Features.

On the Server Selection window, click Next.

On the Remove server roles page, uncheck the DHCP Server option.

When asked for Remove features that require DHCP server box, click Remove Features. Ensure the remove management tools option is checked. This means the DHCP management tools are also removed along with the DHCP role on the server.

On the Features page, don’t select anything. Click Next.

On the Confirmation window, click Remove.

The DHCP role removal on Windows Server begins now. On the Results page, wait for the feature removal to complete.
Removing the DHCP Server role, also removes the DHCP server service from the list of services.
After the DHCP role is removed from the Windows Server, the server requires a restart. To complete removing the DHCP features, restart the server.
Upon restart, you will notice that DHCP role and management tools are uninstalled from the server.

Tip – If you launch the event viewer on the Windows Server, you can see a list of events that indicate the DHCP role removal from Windows Server. This is optional, and you can use them to troubleshoot DHCP role removal issues.
Initiating changes to turn off update DHCPServer of package DhcpServerRole. Client id: DISM Package Manager Provider.
Initiating changes to turn off update DHCPServer-Tools of package DhcpServerToolsRole. Client id: DISM Package Manager Provider.
A reboot is necessary before the selectable update DHCPServer of package DhcpServerRole can be turned off.
A reboot is necessary before the selectable update DHCPServer-Tools of package DhcpServerToolsRole can be turned off.
Selectable update DHCPServer of package DhcpServerRole was successfully turned off.
Selectable update DHCPServer-Tools of package DhcpServerToolsRole was successfully turned off.
Remove DHCP Role using PowerShell on Windows Server
You can use PowerShell to remove DHCP role from Windows Server. This is an alternate method to uninstall DHCP role in case you want to avoid using the Server Manager.
Launch the PowerShell as administrator. There are two commands that you need to use to completely remove DHCP role and management tools from Server.
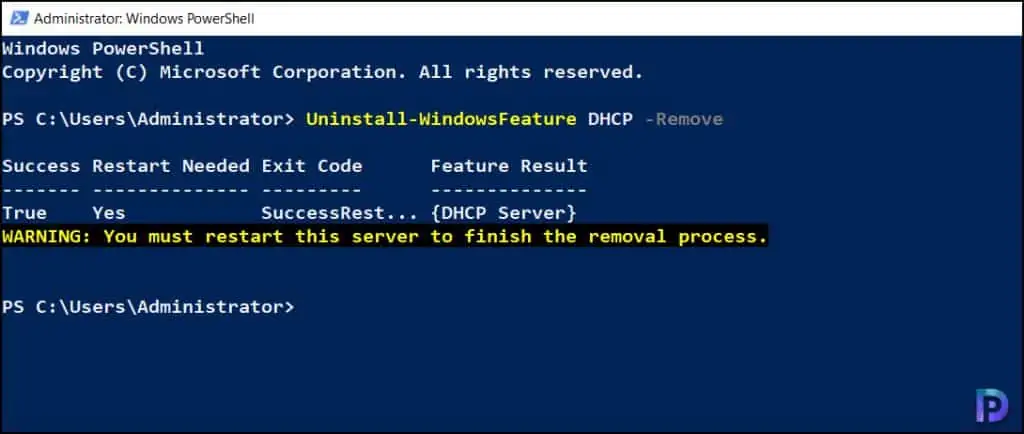
First, run the following PowerShell command to remove DHCP role from Windows Server.
Uninstall-WindowsFeature DHCP -Remove
When you run the above command, the DHCP role uninstalls from Windows Server. You must restart this server to finish the removal process. But wait, you can run the next command and then restart the server.

In the same PowerShell window, run another command to remove the DHCP console as well.
Uninstall-WindowsFeature RSAT-DHCP
To complete the removal of DHCP role, restart the Windows Server. The DHCP server services and DHCP console are uninstalled.


