If you are running SCCM current branch version 1702, there is an update rollup available. Yesterday Microsoft released an update rollup for SCCM CB version 1702. This rollup is called configuration manager 1702 hotfix rollup (KB4019926). SCCM 1702 came with some awesome features which is documented here. This update rollup contains fixes for most of the issues reported after installing SCCM version 1702. The update rollup should be available to install under Updates and Servicing node of console.
The issues that are fixed in this update is documented here. Issues related to OSD, software distribution and content management, MDM and SCCM console are fixed. If you are installing this update on your primary site, the update needs to be installed manually on secondary sites.
Installing the update is simple and straight forward. In the past I have published the post on installing the update 1702 for SCCM. You can follow this guide for installing updates.
Related Posts :-
- Configuration Manager Current Branch Update 1610 New Features
- Update Rollup 1 SCCM current branch version 1606
- Early wave update for SCCM 1606 KB3180992
- Configuration Manager 1608 Technical Preview New Features
- Technical Preview 1607 for System Center Configuration Manager
Installing Update Rollup for SCCM Current Branch Version 1702
Let’s see some quick steps to install update rollup for SCCM current branch version 1702. Launch the console, navigate to Administration > Overview > Updates and Servicing. You should see the update available to download. Right click the update and click Download.
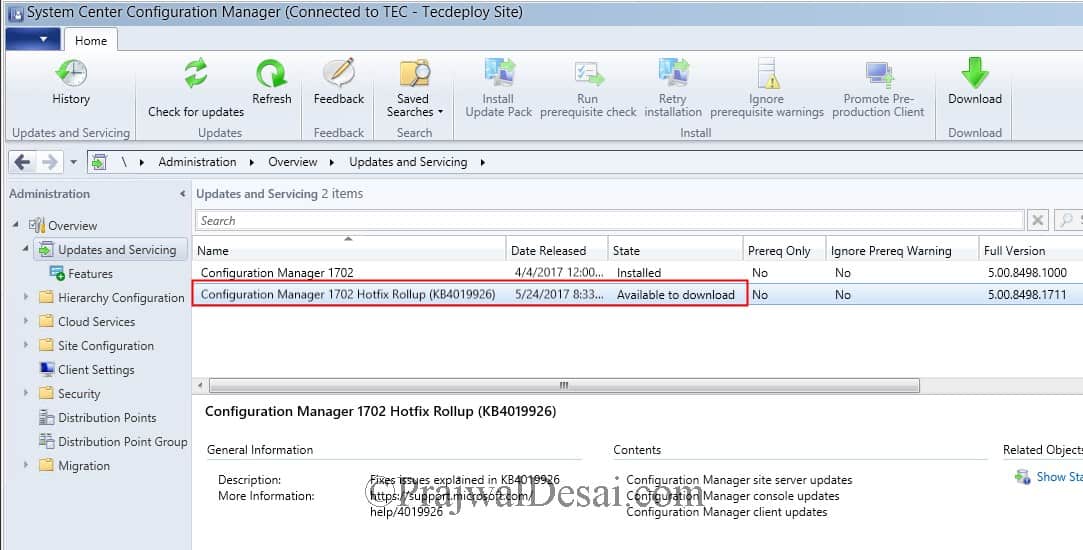 [su_label type=”success”]TIP[/su_label] Check the dmpdownloader.log file to monitor the update download process.
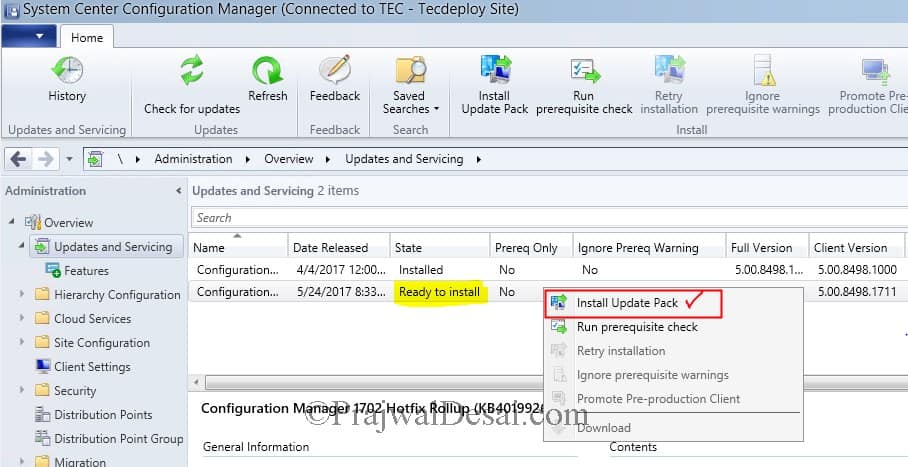
Wait for the update state to change from Available to download to Ready to install. Right click on update and click Install Update Pack.
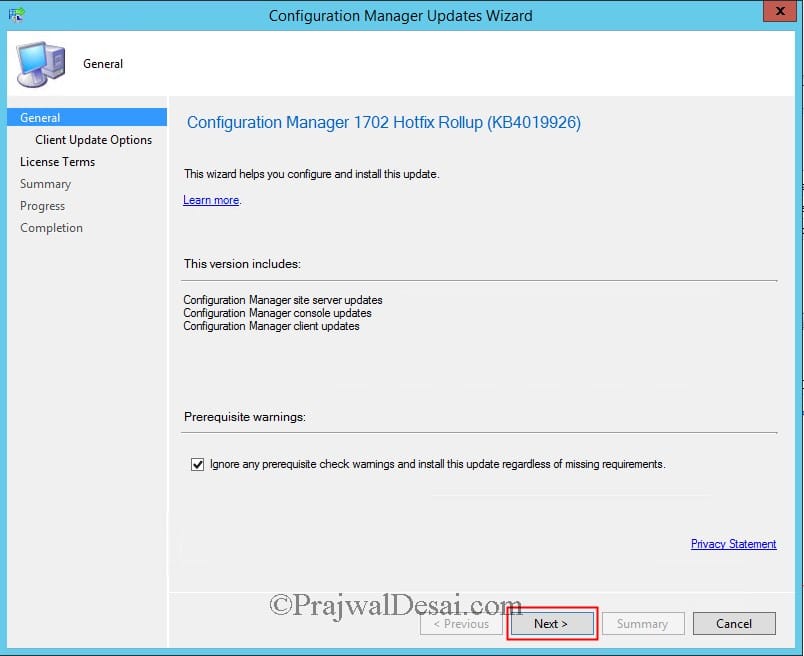
The update begins with a wizard, click Next on dialog box.
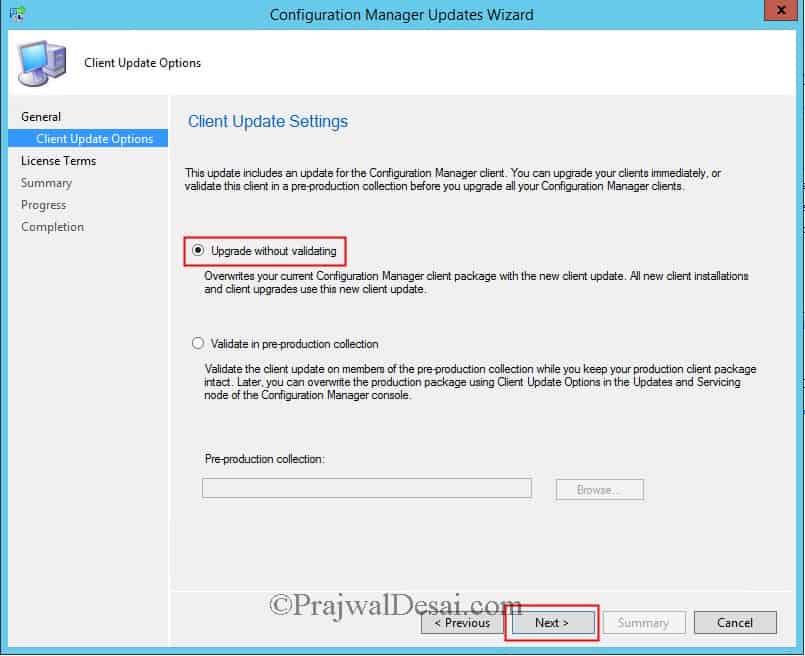
Choose upgrade without validating and click Next.
Click Next for rest of the steps and click Close.
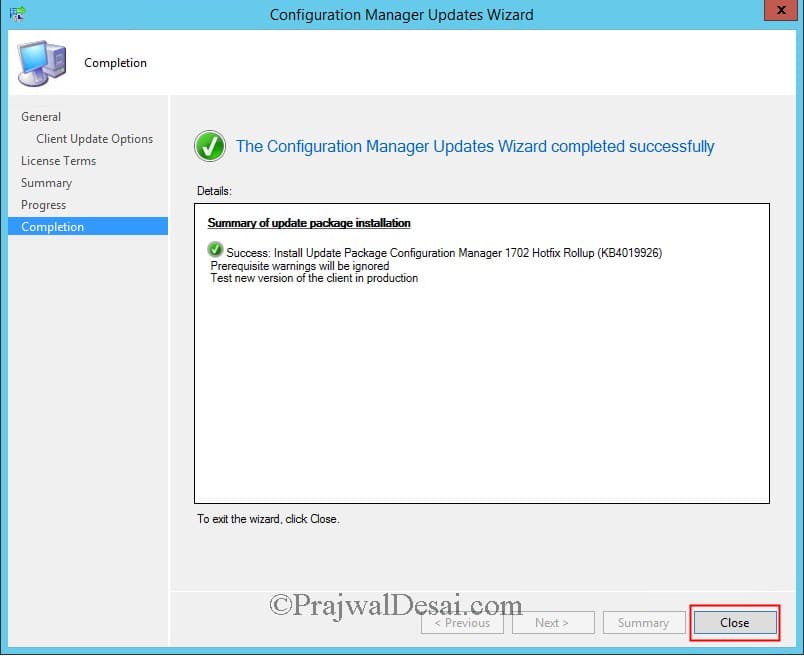 [su_label type=”important”]TIP[/su_label] To monitor installation status, go to Monitoring > Overview > Updates and Servicing Status. Right click update and click Show Status.
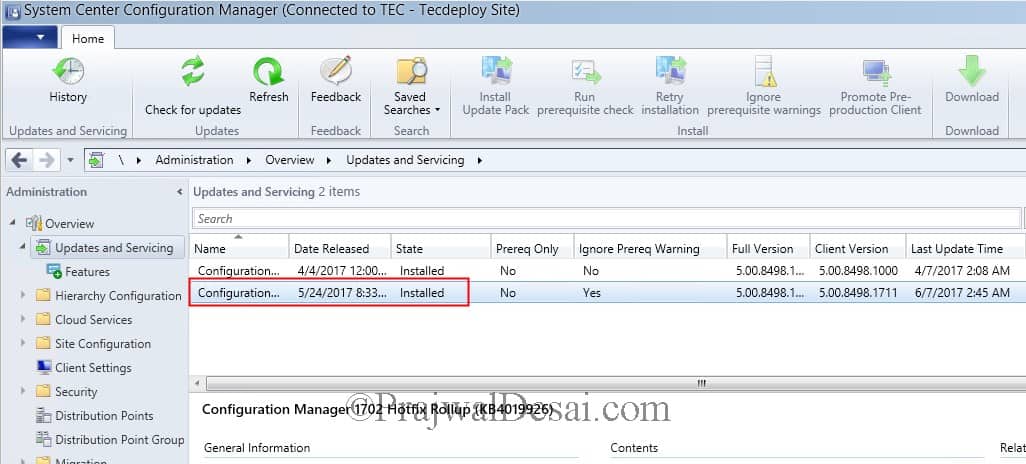
Refresh the console and you should see the update state is Installed.
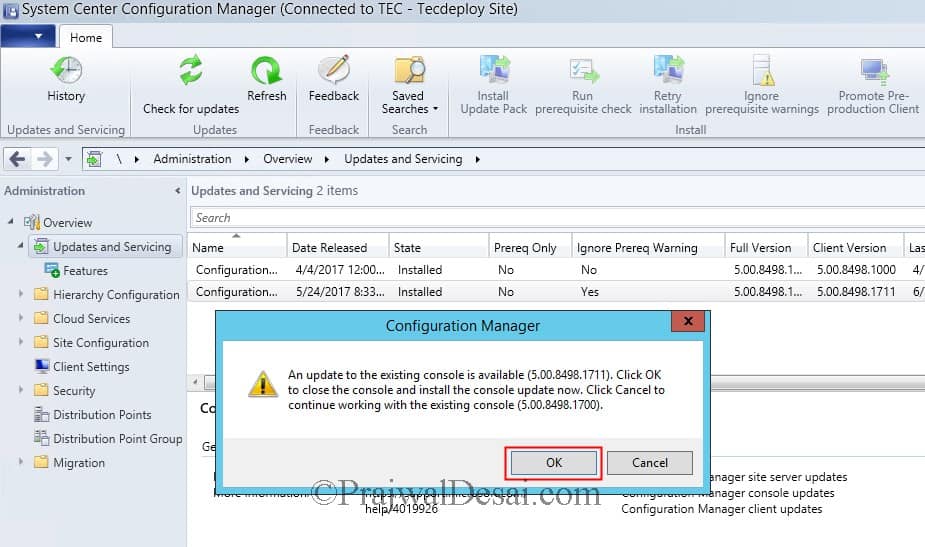
After the update rollup is installed, refresh the console. You now see a message box that shows an update is available to existing console. The console version will be updated from 5.00.8498.1700 to 5.00.8498.1711. Click OK to proceed with installing update.
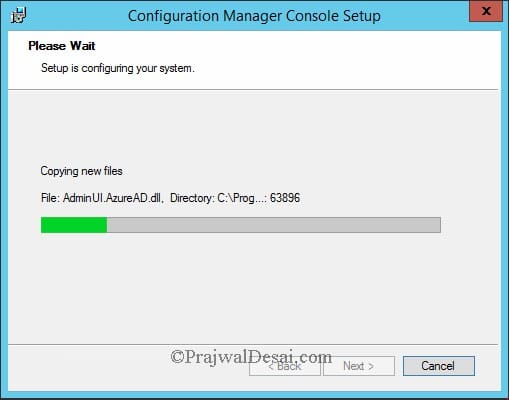
Allow the configuration manager console setup to complete.
Finally click Finish. This will launch the configuration manager console.
Post the update installation, the console version and site version are shown as :-
Console version – 5.00.8498.1711
Site version – 5.0.8498.1000






Hi,
I have upgraded from CM2012 SP1 to CM CB 1702. Having weird issue as the Updates and Servicing are blank. I’m a Full Admin of SCCM, and Scopes = All instances.
dmpdownloader looks fine and says CMInstallPath\EasySetupPayload\ConfigMgr.Update.Manifest.cab is signed and trusted.
Successfully dropped the state message 14
and so on… Looks ok.
Do you have any idea ?
I have started the Update for 1702 Hotfix Rollout KB4019926 today.
Prerequisted checks are fine.
Installation works until point – Upgrade site control settings – [In progress]:Upgrading site control settings. Check cmupdate.log for details.
in cmupdate.log the last entry is:
[In progress]:Upgrading site control settings. Check cmupdate.log for details.
It hangs here since 5 hours now.
Nothing happens now.
Does someone have an idea what is going on?
Thank you!
best regards
Volker
What do you see under Monitoring > Overview > Updates and Servicing Status > Right click update and Show Status ?.
Hello.
I have start the installation for the 1702 Hotfix Rollout KB4019926 this morning.
All looks good until the step under ‘Installation’ – Upgrade site control settings.
It stucks here since more then 5 h now.
[In progress]:Upgrading site control settings. Check cmupdate.log for details.
This is the last in the CMUpdate.log:
calling UpgradeProxySetting for role AI Update Service Point
Nothing happens since then.
Can someone help please?
Thanks
Volker
I have successfully installed this update rollup on my primary site. To update secondary sites, it seems you have to run the Recover Secondary Site option. However 1 of my 2 secondary sites is stuck on Prerequisite checks complete. Status: Passed. Any one had this issue and have a fix for it?
Has the update been pulled?
Seems all the links for KB4019926 are dead, giving nothing but a little face.
Hi i have also a Problem with this Hotfix. I hope you can help me. It dosen´t star the Prereq Job. Stuck on ‘Prerequisite checking’. No Log (ConfigMgrPrereq) on c:! Download was OK. The Files ar saved to: “C:Program FilesMicrosoft Configuration ManagerEasySetupPayload”.
What can i do?
Hello, I just noticed this hotfix in configuration manager this morning on our site running 1702. I right clicked and chose download. However, the status remains “Available to download” after nearly 6 hours. I have checked the EasySetupPayload folder and the installation files have not begun to show up. I cannot find anything significant in the dmpdownloader log. I have also tried restarting SMS_EXECUTIVE service.
Past posts regarding issues downloading hotfixes stated to move the manifest cab into EasySetupPayload then restart SMS_EXECUTIVE server. After restarting the service, the cab is removed and nothing happens. dmpdownloader.log looks the same.
Has anyone else experienced similar issues?
Also, I want to say that I have been a long time lurker of this site. Prajwal, your site has helped me through several years of SCCM support. I greatly appreciate all that you do here!
Hi, when I had faced a similar situation when I was downloading the update rollup. I had to restart the sms_exec service twice to get it downloaded. What else do you see in dmpdownloader.log file ?.
I have restarted the service several times already today. I have even tried rebooting the server. This is what I get in dmpdownloader.log after I restart sms_exec. (“XX-SiteSystem-XXL” being the FQDN of our site system)
AdminUI Content Download thread is exiting… SMS_DMP_DOWNLOADER 6/8/2017 2:46:37 PM 9196 (0x23EC)
Waiting for child threads to exit. SMS_DMP_DOWNLOADER 6/8/2017 2:46:37 PM 1264 (0x04F0)
FastDownload thread exited. SMS_DMP_DOWNLOADER 6/8/2017 2:46:37 PM 1264 (0x04F0)
EasySetupDownload thread exited. SMS_DMP_DOWNLOADER 6/8/2017 2:46:37 PM 1264 (0x04F0)
AdminUI Content Download thread exited. SMS_DMP_DOWNLOADER 6/8/2017 2:46:38 PM 1264 (0x04F0)
OMS Upgrade Analytics Download thread exited. SMS_DMP_DOWNLOADER 6/8/2017 2:46:38 PM 1264 (0x04F0)
SMS_DMP_DOWNLOADER is exiting… SMS_DMP_DOWNLOADER 6/8/2017 2:46:38 PM 1264 (0x04F0)
EasySetupDownload thread is exiting… SMS_DMP_DOWNLOADER 6/8/2017 2:46:37 PM 8796 (0x225C)
OMS Upgrade Analytics Download thread is exiting… SMS_DMP_DOWNLOADER 6/8/2017 2:46:37 PM 9180 (0x23DC)
SMS_EXECUTIVE started SMS_DMP_DOWNLOADER as thread ID 5644 (0x160C). SMS_DMP_DOWNLOADER 6/8/2017 2:47:09 PM 9920 (0x26C0)
SMS_DMP_DOWNLOADER is starting… SMS_DMP_DOWNLOADER 6/8/2017 2:47:09 PM 5644 (0x160C)
Connecting to MessageDownloader. SMS_DMP_DOWNLOADER 6/8/2017 2:47:09 PM 5644 (0x160C)
Logging level set to: 1 SMS_DMP_DOWNLOADER 6/8/2017 2:47:09 PM 5644 (0x160C)
Reading :SOFTWAREMicrosoftSMSComponentsSMS_DMP_DOWNLOADER:RestLsuUrl from provider Registry SMS_DMP_DOWNLOADER 6/8/2017 2:47:09 PM 5644 (0x160C)
Returning value from provider Registry SMS_DMP_DOWNLOADER 6/8/2017 2:47:09 PM 5644 (0x160C)
Log Messages is set to: False SMS_DMP_DOWNLOADER 6/8/2017 2:47:09 PM 5644 (0x160C)
Reading :SOFTWAREMicrosoftSMSIdentification:Server from provider Registry SMS_DMP_DOWNLOADER 6/8/2017 2:47:09 PM 5644 (0x160C)
Returning value XX-SiteSystem-XXL from provider Registry SMS_DMP_DOWNLOADER 6/8/2017 2:47:09 PM 5644 (0x160C)
Reading :SOFTWAREMicrosoftSMSIdentification:Site Server from provider Registry SMS_DMP_DOWNLOADER 6/8/2017 2:47:10 PM 5644 (0x160C)
Returning value XX-SiteSystem-XXl from provider Registry SMS_DMP_DOWNLOADER 6/8/2017 2:47:10 PM 5644 (0x160C)
Reading :SOFTWAREMicrosoftSMSIdentification:Server from provider Registry SMS_DMP_DOWNLOADER 6/8/2017 2:47:10 PM 5644 (0x160C)
Returning value XX-SiteSystem-XXL from provider Registry SMS_DMP_DOWNLOADER 6/8/2017 2:47:10 PM 5644 (0x160C)
Reading :SOFTWAREMicrosoftSMSMPFDMInboxes:State System (Incoming – high priority) from provider Registry SMS_DMP_DOWNLOADER 6/8/2017 2:47:10 PM 5644 (0x160C)
Returning value C:Program FilesMicrosoft Configuration Managerinboxesauthstatesys.boxincominghigh from provider Registry SMS_DMP_DOWNLOADER 6/8/2017 2:47:10 PM 5644 (0x160C)
Reading :SOFTWAREMicrosoftSMSIdentification:Site Server from provider Registry SMS_DMP_DOWNLOADER 6/8/2017 2:47:10 PM 5644 (0x160C)
Returning value XX-SiteSystem-XXl from provider Registry SMS_DMP_DOWNLOADER 6/8/2017 2:47:10 PM 5644 (0x160C)
Reading :SOFTWAREMicrosoftSMSIdentification:Server from provider Registry SMS_DMP_DOWNLOADER 6/8/2017 2:47:10 PM 5644 (0x160C)
Returning value XX-SiteSystem-XXL from provider Registry SMS_DMP_DOWNLOADER 6/8/2017 2:47:10 PM 5644 (0x160C)
Reading :SOFTWAREMicrosoftSMSMPFDMInboxes:Hierarchy Manager (Forwarding messages) from provider Registry SMS_DMP_DOWNLOADER 6/8/2017 2:47:10 PM 5644 (0x160C)
Returning value C:Program FilesMicrosoft Configuration Managerinboxeshman.boxForwardingMsg from provider Registry SMS_DMP_DOWNLOADER 6/8/2017 2:47:10 PM 5644 (0x160C)
Reading :SOFTWAREMicrosoftSMSComponentsSMS_DMP_UPLOADER:OfflineMode from provider Registry SMS_DMP_DOWNLOADER 6/8/2017 2:47:10 PM 5644 (0x160C)
Returning value 0 from provider Registry SMS_DMP_DOWNLOADER 6/8/2017 2:47:10 PM 5644 (0x160C)
Reading :SOFTWAREMicrosoftSMSIdentification:Installation Directory from provider Registry SMS_DMP_DOWNLOADER 6/8/2017 2:47:10 PM 5644 (0x160C)
Returning value C:Program FilesMicrosoft Configuration Manager from provider Registry SMS_DMP_DOWNLOADER 6/8/2017 2:47:10 PM 5644 (0x160C)
Checking for preview version SMS_DMP_DOWNLOADER 6/8/2017 2:47:10 PM 5644 (0x160C)
Site is preview? no SMS_DMP_DOWNLOADER 6/8/2017 2:47:10 PM 5644 (0x160C)
Is it a fast channel? :False SMS_DMP_DOWNLOADER 6/8/2017 2:47:10 PM 5644 (0x160C)
Easysetup fwlink to download the manifest: SMS_DMP_DOWNLOADER 6/8/2017 2:47:10 PM 5644 (0x160C)
HasIntuneSubscription: Site has no Intune subscription. SMS_DMP_DOWNLOADER 6/8/2017 2:47:10 PM 5644 (0x160C)
dwRet: 10080 SMS_DMP_DOWNLOADER 6/8/2017 2:47:10 PM 1964 (0x07AC)
Checking for preview version SMS_DMP_DOWNLOADER 6/8/2017 2:47:10 PM 1964 (0x07AC)
Site is preview? no SMS_DMP_DOWNLOADER 6/8/2017 2:47:10 PM 1964 (0x07AC)
This is not tech preview. SMS_DMP_DOWNLOADER 6/8/2017 2:47:10 PM 1964 (0x07AC)
OMS Upgrade Analytics Download thread is starting… SMS_DMP_DOWNLOADER 6/8/2017 2:47:11 PM 1964 (0x07AC)
Download OMS upgrade analytics SMS_DMP_DOWNLOADER 6/8/2017 2:47:11 PM 1964 (0x07AC)
Reading :SOFTWAREMicrosoftSMSComponentsSMS_CLOUDCONNECTION:OSReadinessWorkspaceName from provider Registry SMS_DMP_DOWNLOADER 6/8/2017 2:47:11 PM 1964 (0x07AC)
Returning value from provider Registry SMS_DMP_DOWNLOADER 6/8/2017 2:47:11 PM 1964 (0x07AC)
AdminUI Content Download thread is starting… SMS_DMP_DOWNLOADER 6/8/2017 2:47:10 PM 9584 (0x2570)
Download Admin UI content payload SMS_DMP_DOWNLOADER 6/8/2017 2:47:11 PM 9584 (0x2570)
Get AdminUI content cab url SMS_DMP_DOWNLOADER 6/8/2017 2:47:11 PM 9584 (0x2570)
The payload will be downloaded to C:Program FilesMicrosoft Configuration ManagerAdminUIContentPayloadConfigMgr.AdminUIContent.AUC SMS_DMP_DOWNLOADER 6/8/2017 2:47:11 PM 9584 (0x2570)
Download manifest.cab SMS_DMP_DOWNLOADER 6/8/2017 2:47:11 PM 9584 (0x2570)
dwRet: 1440 SMS_DMP_DOWNLOADER 6/8/2017 2:47:11 PM 9372 (0x249C)
EasySetupDownload thread is starting… SMS_DMP_DOWNLOADER 6/8/2017 2:47:11 PM 9372 (0x249C)
Checking if dmpdownloader has synced recently… SMS_DMP_DOWNLOADER 6/8/2017 2:47:11 PM 9372 (0x249C)
Sync is not necessary. SMS_DMP_DOWNLOADER 6/8/2017 2:47:11 PM 9372 (0x249C)
Last time user Requested to sync: Thu Jun 08 09:53:34 2017 SMS_DMP_DOWNLOADER 6/8/2017 2:47:11 PM 9372 (0x249C)
Last time dmpdownloader Synced:Thu Jun 08 14:29:11 2017 SMS_DMP_DOWNLOADER 6/8/2017 2:47:11 PM 9372 (0x249C)
Last poll time: Thu Jun 08 14:47:11 2017 SMS_DMP_DOWNLOADER 6/8/2017 2:47:11 PM 9372 (0x249C)
Registering registry key change … SMS_DMP_DOWNLOADER 6/8/2017 2:47:11 PM 9372 (0x249C)
Calling EasySetupDownload … SMS_DMP_DOWNLOADER 6/8/2017 2:47:11 PM 9372 (0x249C)
Hasn’t synced recently. SMS_DMP_DOWNLOADER 6/8/2017 2:47:11 PM 9372 (0x249C)
Generating state message: 0 for package 00000000-0000-0000-0000-000000000000 SMS_DMP_DOWNLOADER 6/8/2017 2:47:11 PM 9372 (0x249C)
Write the state message in C:Program FilesMicrosoft Configuration Managerinboxesauthstatesys.boxincominghigh___CMUexxueavw.SMX SMS_DMP_DOWNLOADER 6/8/2017 2:47:11 PM 9372 (0x249C)
Successfully Dropped the state message 0 SMS_DMP_DOWNLOADER 6/8/2017 2:47:11 PM 9372 (0x249C)
Download Easy setup payloads SMS_DMP_DOWNLOADER 6/8/2017 2:47:11 PM 9372 (0x249C)
Get manifest.cab url SMS_DMP_DOWNLOADER 6/8/2017 2:47:11 PM 9372 (0x249C)
HasIntuneSubscription: Site has no Intune subscription. SMS_DMP_DOWNLOADER 6/8/2017 2:47:11 PM 9372 (0x249C)
The site is non-hybrid with no intune subscription SMS_DMP_DOWNLOADER 6/8/2017 2:47:11 PM 9372 (0x249C)
GetSABranchInfo: Site is at 1 branch. SMS_DMP_DOWNLOADER 6/8/2017 2:47:11 PM 9372 (0x249C)
Redirected to URL SMS_DMP_DOWNLOADER 6/8/2017 2:47:13 PM 9584 (0x2570)
Got fwdlink and recreating the SMS_DMP_DOWNLOADER 6/8/2017 2:47:13 PM 9584 (0x2570)
Redirected to URL SCCMConnectedService.svc SMS_DMP_DOWNLOADER 6/8/2017 2:47:13 PM 9372 (0x249C)
The flighting request url is SMS_DMP_DOWNLOADER 6/8/2017 2:47:13 PM 9372 (0x249C)
File ‘C:Program FilesMicrosoft Configuration ManagerAdminUIContentPayloadConfigMgr.AdminUIContent.AUC’ is signed and trusted. SMS_DMP_DOWNLOADER 6/8/2017 2:47:14 PM 9584 (0x2570)
File ‘C:Program FilesMicrosoft Configuration ManagerAdminUIContentPayloadConfigMgr.AdminUIContent.AUC’ is signed with MS root cert. SMS_DMP_DOWNLOADER 6/8/2017 2:47:14 PM 9584 (0x2570)
STATMSG: ID=9702 SEV=I LEV=M SOURCE=”SMS Server” COMP=”SMS_DMP_DOWNLOADER” SYS=XX-SiteSystem-XXL SITE=CRP PID=9052 TID=9584 GMTDATE=Thu Jun 08 18:47:14.324 2017 ISTR0=”” ISTR1=”” ISTR2=”” ISTR3=”” ISTR4=”” ISTR5=”” ISTR6=”” ISTR7=”” ISTR8=”” ISTR9=”” NUMATTRS=0 SMS_DMP_DOWNLOADER 6/8/2017 2:47:14 PM 9584 (0x2570)
AdminUI Content Download interval is: every 1440 minutes SMS_DMP_DOWNLOADER 6/8/2017 2:47:14 PM 9584 (0x2570)
Flighting is not configured, fallback to default setting. SMS_DMP_DOWNLOADER 6/8/2017 2:47:14 PM 9372 (0x249C)
Generating state message: 1 for package 00000000-0000-0000-0000-000000000000 SMS_DMP_DOWNLOADER 6/8/2017 2:47:14 PM 9372 (0x249C)
Write the state message in C:Program FilesMicrosoft Configuration Managerinboxesauthstatesys.boxincominghigh___CMUjqbdn25w.SMX SMS_DMP_DOWNLOADER 6/8/2017 2:47:15 PM 9372 (0x249C)
Successfully Dropped the state message 1 SMS_DMP_DOWNLOADER 6/8/2017 2:47:15 PM 9372 (0x249C)
Download manifest.cab SMS_DMP_DOWNLOADER 6/8/2017 2:47:15 PM 9372 (0x249C)
Redirected to URL ConfigMgr.Update.Manifest.cab SMS_DMP_DOWNLOADER 6/8/2017 2:47:16 PM 9372 (0x249C)
Got fwdlink and recreating the httprequest/response SMS_DMP_DOWNLOADER 6/8/2017 2:47:16 PM 9372 (0x249C)
Generating state message: 2 for package 00000000-0000-0000-0000-000000000000 SMS_DMP_DOWNLOADER 6/8/2017 2:47:17 PM 9372 (0x249C)
Write the state message in C:Program FilesMicrosoft Configuration Managerinboxesauthstatesys.boxincominghigh___CMUqo5y0evh.SMX SMS_DMP_DOWNLOADER 6/8/2017 2:47:17 PM 9372 (0x249C)
Successfully Dropped the state message 2 SMS_DMP_DOWNLOADER 6/8/2017 2:47:17 PM 9372 (0x249C)
File ‘C:Program FilesMicrosoft Configuration ManagerEasySetupPayloadConfigMgr.Update.Manifest.cab’ is signed and trusted. SMS_DMP_DOWNLOADER 6/8/2017 2:47:17 PM 9372 (0x249C)
Signing root cert’s thumbprint: cdd4eeae6000ac7f40c3802c171e30148030c072 SMS_DMP_DOWNLOADER 6/8/2017 2:47:17 PM 9372 (0x249C)
Finished calling verify manifest SMS_DMP_DOWNLOADER 6/8/2017 2:47:17 PM 9372 (0x249C)
Generating state message: 3 for package 00000000-0000-0000-0000-000000000000 SMS_DMP_DOWNLOADER 6/8/2017 2:47:17 PM 9372 (0x249C)
Write the state message in C:Program FilesMicrosoft Configuration Managerinboxesauthstatesys.boxincominghigh___CMUhayg4t2s.SMX SMS_DMP_DOWNLOADER 6/8/2017 2:47:17 PM 9372 (0x249C)
Successfully Dropped the state message 3 SMS_DMP_DOWNLOADER 6/8/2017 2:47:17 PM 9372 (0x249C)
Manifest.cab was successfully moved to the connector outbox SMS_DMP_DOWNLOADER 6/8/2017 2:47:17 PM 9372 (0x249C)
Generating state message: 4 for package 00000000-0000-0000-0000-000000000000 SMS_DMP_DOWNLOADER 6/8/2017 2:47:17 PM 9372 (0x249C)
Write the state message in C:Program FilesMicrosoft Configuration Managerinboxesauthstatesys.boxincominghigh___CMUg144yym5.SMX SMS_DMP_DOWNLOADER 6/8/2017 2:47:17 PM 9372 (0x249C)
Successfully Dropped the state message 4 SMS_DMP_DOWNLOADER 6/8/2017 2:47:17 PM 9372 (0x249C)
Get new Easy Setup Package IDs SMS_DMP_DOWNLOADER 6/8/2017 2:47:17 PM 9372 (0x249C)
There is no new easy setup payload found SMS_DMP_DOWNLOADER 6/8/2017 2:47:18 PM 9372 (0x249C)
Download QFE payloads SMS_DMP_DOWNLOADER 6/8/2017 2:47:18 PM 9372 (0x249C)
Generating state message: 14 for package 00000000-0000-0000-0000-000000000000 SMS_DMP_DOWNLOADER 6/8/2017 2:47:18 PM 9372 (0x249C)
Write the state message in C:Program FilesMicrosoft Configuration Managerinboxesauthstatesys.boxincominghigh___CMUg3bamfj0.SMX SMS_DMP_DOWNLOADER 6/8/2017 2:47:18 PM 9372 (0x249C)
Successfully Dropped the state message 14 SMS_DMP_DOWNLOADER 6/8/2017 2:47:18 PM 9372 (0x249C)
searching for QFE packages in C:Program FilesMicrosoft Configuration ManagerEasySetupPayloadoffline SMS_DMP_DOWNLOADER 6/8/2017 2:47:18 PM 9372 (0x249C)
Updating LastSyncedTime registry value SMS_DMP_DOWNLOADER 6/8/2017 2:47:18 PM 9372 (0x249C)
Easy Setup Download interval is: every 1440 minutes SMS_DMP_DOWNLOADER 6/8/2017 2:47:18 PM 9372 (0x249C)
Checking if dmpdownloader has synced recently… SMS_DMP_DOWNLOADER 6/8/2017 2:47:18 PM 9372 (0x249C)
Sync is not necessary. SMS_DMP_DOWNLOADER 6/8/2017 2:47:18 PM 9372 (0x249C)
Last time user Requested to sync: Thu Jun 08 09:53:34 2017 SMS_DMP_DOWNLOADER 6/8/2017 2:47:18 PM 9372 (0x249C)
Last time dmpdownloader Synced:Thu Jun 08 14:47:18 2017 SMS_DMP_DOWNLOADER 6/8/2017 2:47:18 PM 9372 (0x249C)
Last poll time: Thu Jun 08 14:47:18 2017 SMS_DMP_DOWNLOADER 6/8/2017 2:47:18 PM 9372 (0x249C)
Registering registry key change … SMS_DMP_DOWNLOADER 6/8/2017 2:47:18 PM 9372 (0x249C)
Calling EasySetupDownload … SMS_DMP_DOWNLOADER 6/8/2017 2:47:18 PM 9372 (0x249C)
Recently synced. SKIPPING. SMS_DMP_DOWNLOADER 6/8/2017 2:47:18 PM 9372 (0x249C)
Updating easysetup download interval… SMS_DMP_DOWNLOADER 6/8/2017 2:47:18 PM 9372 (0x249C)
Easy Setup Download interval is: every 1440 minutes SMS_DMP_DOWNLOADER 6/8/2017 2:47:18 PM 9372 (0x249C)
I have tried restarting the service several times. I have even rebooted the server. Nothing stands out in the log error-wise. Can I privately message you dmpdownloader.log? I assume don’t want a large log posted on here.
You can send the log file to support@www.prajwaldesai.com
Hi Prajwal. I just sent the log to you. Thanks!
Did you get my reply ?.
Did you find a solution to this? We have the same problem here.
We are still having an issue. I have given up for the time being. I think I may need to open up a case with MS.
I had to open a case with Microsoft. Old entries for the update had to be deleted from the database. WARNING: I would not try this unless you are absolutely sure of what you are doing, and also have a current site backup.
Here are the case notes. You will see at the bottom that I decided to manually download the update to save time. I was, however, able to confirm that CM did process the update and it was scheduled for download. So the fix did work. I hope this helps.
Issue:
=========
CM hotfix KB4019926 not giving any option to continue further.
Cause:
=========
Dmpdownloader was stuck in processing the update. Following database tables had old entries:
1. EasySetupSettings
2. Cm_UpdatePackageSiteStatus
3. Cm_UpdateReadiness
4. Cm_UpdateReadinessSite
Resolution:
==========
Removed the old entries from following tables:
1. EasySetupSettings
2. Cm_UpdatePackageSiteStatus
3. Cm_UpdateReadiness
4. Cm_UpdateReadinessSite
Dmpdownloader was showing that it will wait for 24 hours and then start the download.
Manually downloaded the update instead of waiting.
Changed the state of the update as “Download Success” in the database.
I updated yesterday and this still does not deploy to unknown device collection. I got a brand new machine and does not exists anywhere. Still i get no task sequences available.