


This article is a step-by-step guide to deploy Visio 2013 using SCCM (ConfigMgr). You can deploy Visio 2013 as an application with Configuration Manager to your Windows devices.
Configuration Manager makes it easier to deploy Microsoft Office apps including Visio and Project. If you are looking to perform Visio 2013 deployment with SCCM, this guide is for you. You can also deploy Visio 2013 viewer using SCCM.
Visio 2013 for Windows is available in two editions: Standard and Professional. The Standard and Professional editions have the same interface, but the Premium edition has more templates for more advanced diagrams and layouts, as well as features that make it easy to connect diagrams to data sources and show data graphically. Read more about the latest versions of Visio in Microsoft 365 Notes.

Office Deployment Guides
Before you proceed further, here are some deployment guides for all the versions of Microsoft Office:
- Best Guide to Deploy Office 2021 Using SCCM | ConfigMgr
- Office 2019 Deployment Using ConfigMgr | MEMCM
- Deploy Office 365 ProPlus using SCCM
- How to deploy Office 2016 using SCCM
- Deploy Microsoft Office 2013 Using SCCM
- Deploy Office 2010 Using SCCM
Customize Visio 2013 Deployment
Before you use ConfigMgr to deploy Visio 2013, you can change how it is deployed with the Office Customization Tool. Running “setup.exe /admin” will launch the Office Customization Tool and allow you to customize individual components of Visio. The tool creates a MSP file that stores all the customizations, which you can later use by running “setup.exe /adminfile file.MSP“.
You can also use the Config.xml file to configure installation tasks and use it only when you run Setup.Config.xml is not installed or cached on users’ computers. Administrators can edit the Config.xml file to customize the installation. By default, Setup will install the core product whose Config.xml file is in the core_product_folder_name.WW folder.
Important: If a 64-bit version of Office is already installed on a computer, the 32-bit version of Office for Visio cannot be installed. Additionally, you cannot install Visio’s 64-bit version on a computer that already has the 32-bit version of Office installed. For more information, please refer to the guide that explains how to choose between the 32-bit and 64-bit versions of Office.
Deploy Visio 2013 using SCCM
Let’s go through the steps to deploy Visio 2013 using SCCM. Launch the Configuration Manager console and navigate to Software Library > Overview > Application Management > Applications. Right click on Applications and click Create Application. Click on Manually specify the application information. Click Next.

On the General Information page, specify the details for the Visio 2013 deployment, which include name, publisher, etc. Click Next.

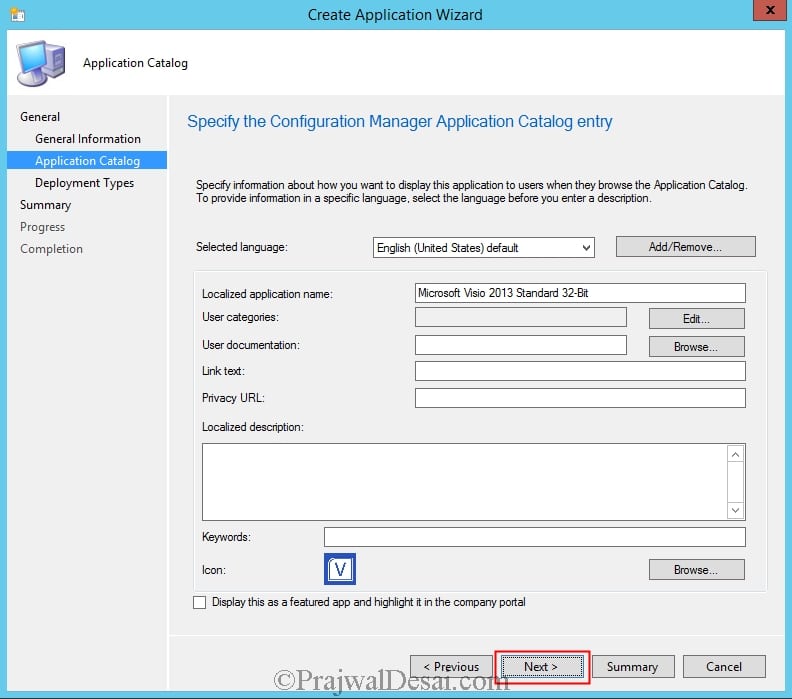
On the Application Catalog page, click Browse and assign a logo for the Visio 2013 application. In the Software Center, this icon will be present alongside the application. Refer to the guide on how to customize Software Center in SCCM. Click Next.
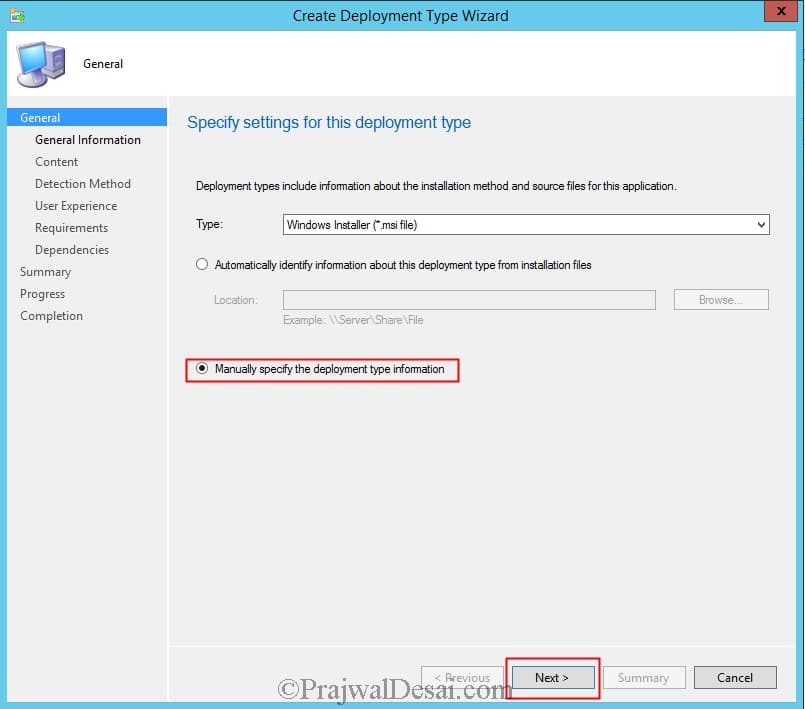
On the Deployment Types page, click on Add. This will open up a new window. On the General page, select “Manually specify the deployment type information.” Click Next.
On the General Information page, specify a name for the deployment type. Click Next.

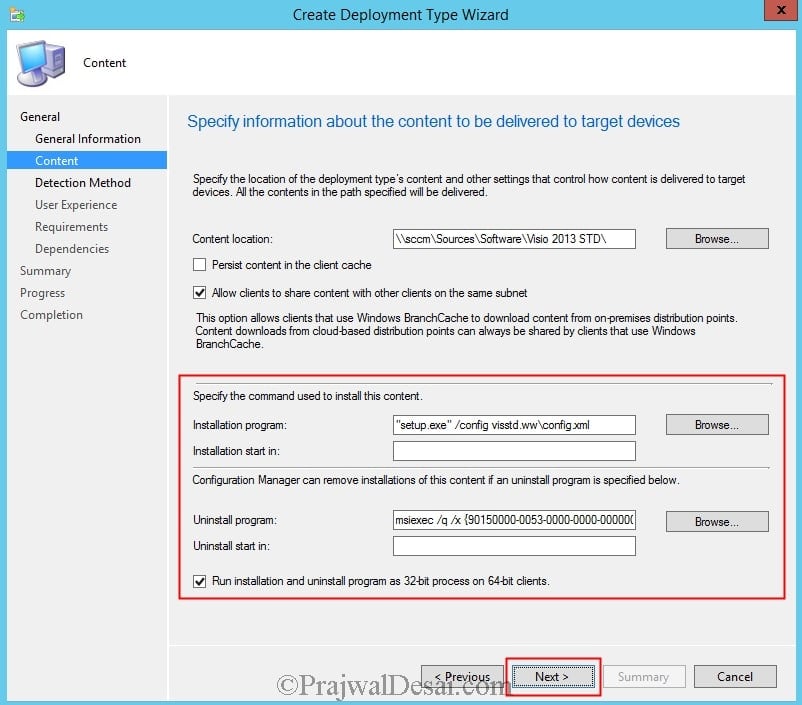
On the Content page, specify the folder path that contains the Visio 2013 setup files.
Next, specify the install and uninstall commands for Visio 2013 as follows:
- Visio 2013 Install Command: “setup.exe” /config visstd.wwconfig.xml
- Visio 2013 Uninstall Command: msiexec /q /x {Product Code}
Click Next.
Here is the example of config.xml that I used during the deployment.
<Configuration Product="VisStd">

	<Display Level="none" CompletionNotice="no" SuppressModal="yes" AcceptEula="yes" />

	<Logging Type="standard" Path="%temp%" Template="Microsoft Office Visio Standard Setup(*).txt" />

	<USERNAME Value="PD" />

	<COMPANYNAME Value="PRAJWALDESAI.COM" />

	<!-- <INSTALLLOCATION Value="%programfiles%Microsoft Office" /> -->

	<!-- <LIS CACHEACTION="CacheOnly" /> -->

	<!-- <LIS SOURCELIST="server1shareOffice;server2shareOffice" /> -->

	<!-- <DistributionPoint Location="servershareOffice" /> -->

	<!-- <OptionState Id="OptionID" State="absent" Children="force" /> -->

	<Setting Id="SETUP_REBOOT" Value="Never" />

	<!-- <Command Path="%windir%system32msiexec.exe" Args="/i serversharemy.msi" QuietArg="/q" ChainPosition="after" Execute="install" /> -->

</Configuration>
Visio 2013 Detection Method
When you deploy Visio 2013 using SCCM, you have to specify a detection method to detect the presence of the application. If the Visio 2013 is already installed on the computer, the SCCM will not install Visio 2013 on that machine.
To add the detection method for Visio 2013, click on Add Clause and choose the setting type as Windows Installer. Enter the product code and select the option “This MSI product code must exist on the target system and the following condition must be met to indicate the presence of this application.”
- MSI Property: Version
- Operator: Greater than or equal to
- Value: 15.0.4569.1506
Click Next.

On the User Experience dialog, specify the Install behavior, logon requirement, and program visibility according to the settings shown in the below screenshot. Click Next.

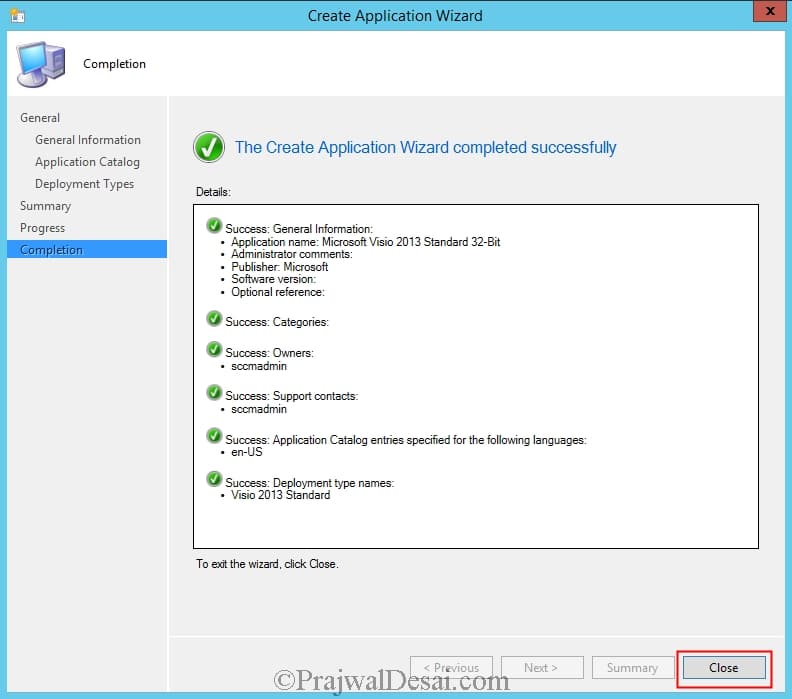
Complete the remaining steps of the Create Application Wizard. On the Completion window, click Close. This completes the steps to create Visio 2013 application in SCCM.
You must distribute the content to the distribution points after creating the Visio 2013 application in SCCM. When your application is prepared, distribute content by selecting it with the right mouse click. Select the distribution point(s) for the content that you want to be distributed. Once the content is at the distribution point, the application can be sent to a group of devices. You could deploy the app as available or deploy it as required.
Test Visio 2013 Installation with SCCM
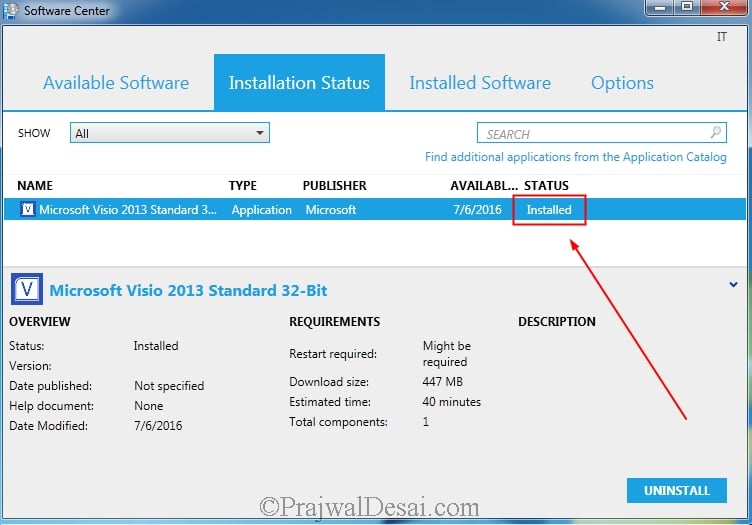
The Visio 2013 application has been deployed to the computers, it’s time to verify whether the application installs successfully or not. If you don’t find the Visio 2013 application listed in the Software Center, manually trigger the machine policy retrieval and evaluation cycle.
Launch the Software Center on the client computer. Select the Applications tab, then select the Visio app from the list of apps, and then click Install. The Visio 2013 app downloads from the local distribution point to the CCMCache folder on the client computer for installation.

After a few minutes, we can see that Visio 2013 has been successfully installed on the computer. The status of the application changes from “installing” to “installed.”
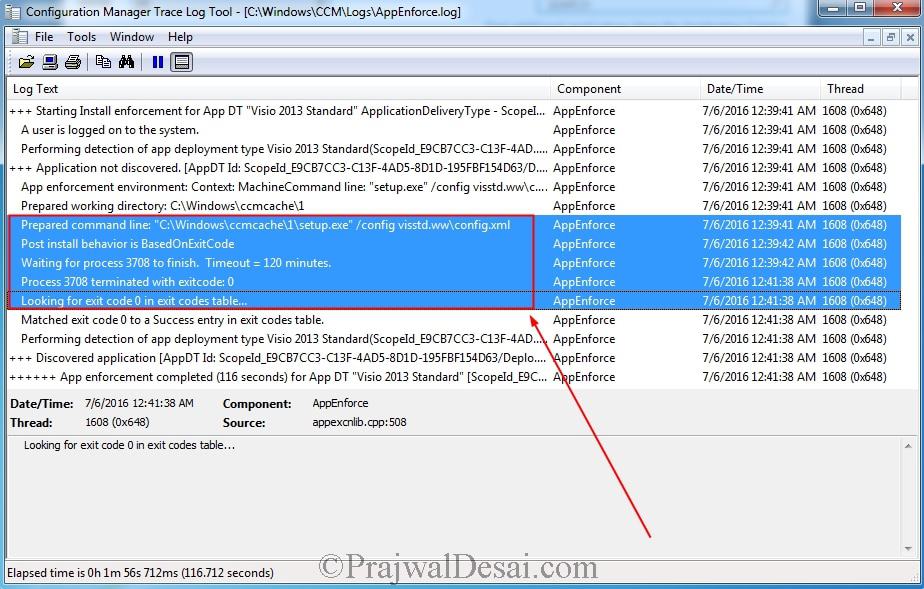
If you have trouble installing the Visio 2013 application, open the AppEnforce.log file to see more information.

Is there a step by step guide on how to deploy Visio Pro 2019 as a separate install using SCCM?
Thanks for the good guide!
For me the uninstall method with MSIEXEC is not working.
MSIEXEC pops up for a second, asks if Visio should be uninstalled what I confirm, but after that nothing happens.
Any suggestions?
Having issues installing Visio Pro 2013, followed the guide and ensured “config.xml” not VisSTD.
Within the AppEnforce.log I keep getting:
RegQueryValue failed to obtain size for associated prog ID, error code 2
Failed to get associated command string for .exe”, error code 80070002
PrepareCommandline failed with 0x80070002 for cmdline “setup.exe” /config visstd.ww\config.xml
CMsiHandler::EnforceApp failed (0x80070002).
AppProvider::EnforceApp – Failed to invoke EnforceApp on Application handler(0x80070002).
CommenceEnforcement failed with error 0x80070002.
Method CommenceEnforcement failed with error code 80070002
++++++ Failed to enforce app. Error 0x80070002. ++++++
Any suggestions ?
I did the same work. But my deployment open setup screen and wait to push setup button. No silent installation. Thanks
its very good guide
but would you be able to provide similar guide for Visio 2017
Hi Prajwal, please post a guide on how to install Visio and Project 2016.
Hi Prajwal,
I have followed all steps but i can see it fails just after downloading in software centre and am receiving the error ‘Failed to get associated command string for .exe”, error code 8007473’ in the appenforce log on the client
Can you help at all?
Thanks
I am having a problem with trying to suppress the “Choose the installation you want” window display. I want it to not show, only confirm when the installation is complete. In the Office customization tool (msp settngs) I have the display level as “None” and “Completion notice” ticked but still when Visio installs the window shows the “Install” and “Customize”. I want this not to show and only install without any more user input. Would I need to use an xml for this or are there other options that I haven’t yet found?
Hope you can help.
Thanks
Dan
Have same problem. Did you solve this? Thanks
is there guide deploy visio 2016?
thanks
Not yet, but i will post it soon.
Thanks.
Please do Prajwal I’m pulling my hair out with Visio and Project 2016 deployments via SCCM (the detection method and uninstall strings). Thanks a lot! James.