

In this step-by-step guide, we will show you how to deploy Office 2016 using SCCM. To implement Office 2016 deployment using SCCM, we will use the Microsoft Office Customization tool to modify the setup.
The Office Deployment Tool allows the administrator to customize and manage Office 2016 Click-to-Run deployments. Administrators can use this tool to manage Office Click-to-Run installation sources, product or language combinations, and deployment configuration options.
For Office 2016 deployment, we have got the Microsoft Office Professional Plus 2016 32-bit volume license copy with us. We will use the same to customize and distribute it to Windows devices using Microsoft SCCM.

Also Read: Guide to deploying Microsoft 365 apps using Microsoft Intune
Office Deployment Guides
Take a look at some useful deployment guides for different versions of Microsoft Office using Configuration Manager.
- Best Guide to Deploy Office 2021 Using SCCM | ConfigMgr
- Office 2019 Deployment Using ConfigMgr
- Deploy Office 2019 using SCCM
- Deploy Office 365 ProPlus using SCCM
- How to Deploy Office 2010 Using SCCM
Steps to Deploy Office 2016 using SCCM
We will now go through the steps to deploy Microsoft Office 2016 using SCCM (ConfigMgr).
Step 1: Run the Office 2016 Deployment Tool
In this step, we will run the Office deployment tool. On the Configuration Manager server, run the command prompt as an administrator and change the path where Office 2016 setup files are located. Run the command setup.exe /admin.
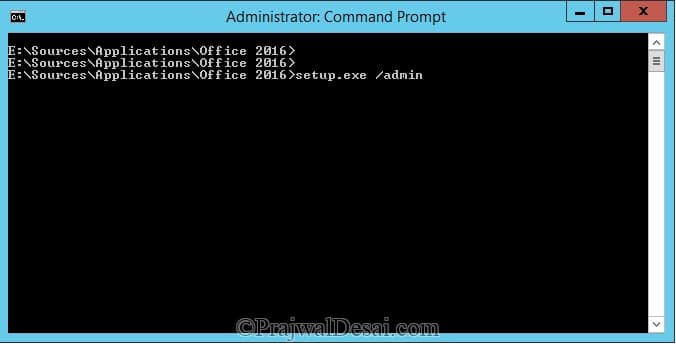
Once the Microsoft Office Customization tool launches, select the option “Create a new setup customization file for the following product.” Ensure that the correct product is selected. Click on OK.

Step 2: Customize Office 2016 Setup
The Microsoft Office Customization Tool allows you to customize the Office 2016 before you deploy it with SCCM. You can specify the KMS client key, modify setup preferences, add registry entries, configure office security settings and much more.
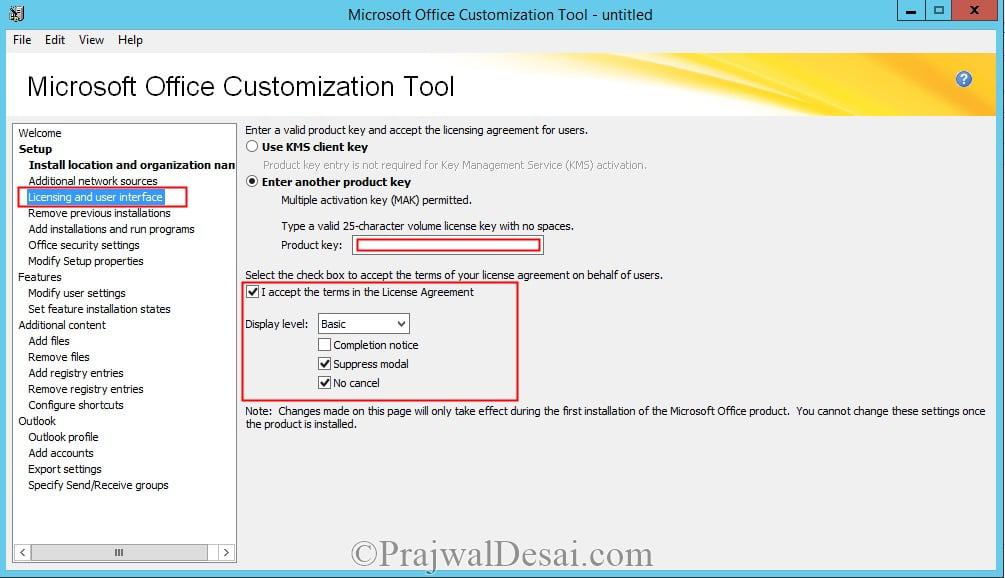
First, let’s look at the option – Licensing and user interface. Here you can configure how the Office 2106 is activated after it is installed on the Windows devices. Select the option Licensing and user interface. For product key, choose the option Use KMS client key if you have KMS server in your organization for activating Office 2016, else choose Enter another product key and enter the Office 2016 key.
Select the option I accept the terms in the license agreement. Set the Display level to Basic, checkbox the options “Suppress modal” and “No cancel“. These settings ensure the Office 2016 setup is silent and requires no user intervention.
Now select the Modify Setup properties option. Click Add, specify the Name as SETUP_REBOOT and Value as Never. Click OK.

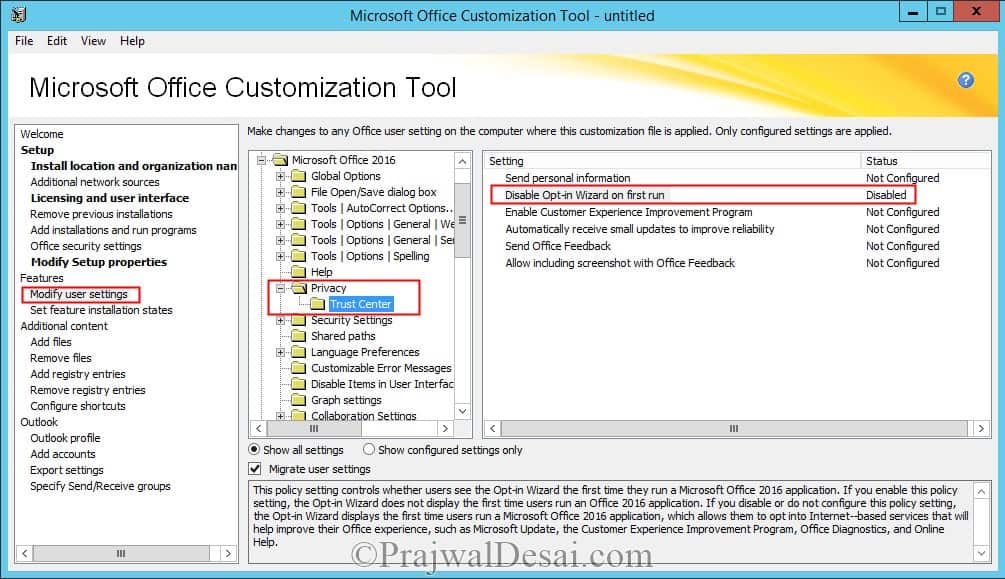
When you install Office 2016, it begins a wizard on the first run. You can disable this wizard from the Office 2016 deployment tool. Select Modify user settings > Microsoft Office 2016 > Privacy > Trust Center. Double-click the setting Disable Opt-in Wizard on first run and set the status as Enabled.
Once you have configured the required settings, select File > Save As and save the customization file inside the Updates folder. Close the Office 2016 deployment tool.

Step 3: Create Office 2016 Application in SCCM
You can create a new application in SCCM for Office 2016 using the following steps:
- Launch the Configuration Manager console.
- Go to Application Management, right click Applications and select Create Application.
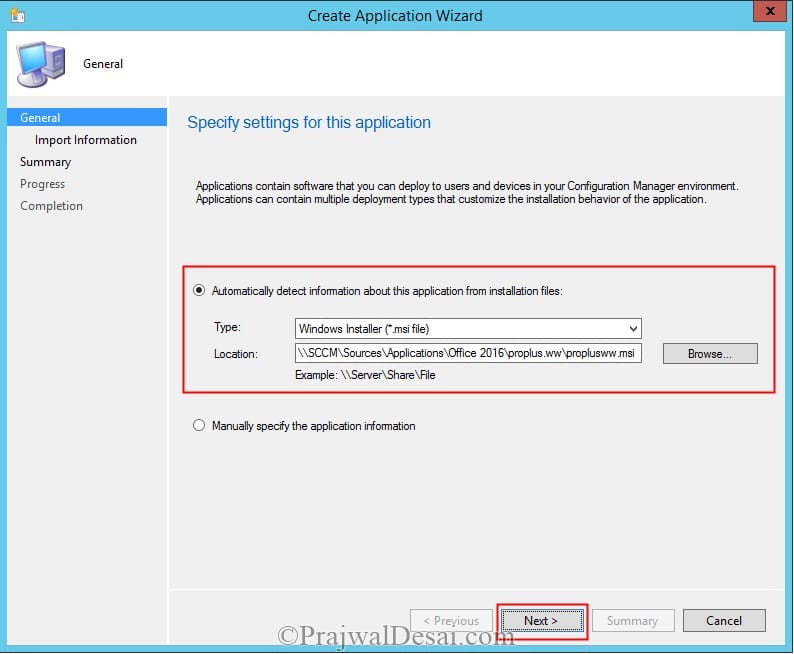
On the General tab of the Create Application Wizard, select the option “Automatically detect information about this application from installation files“. Select the Application Type as Windows Installer and specify the path to file proplusww.msi. Click Next.
The Office 2016 application information is now imported from msi file. Click Next.

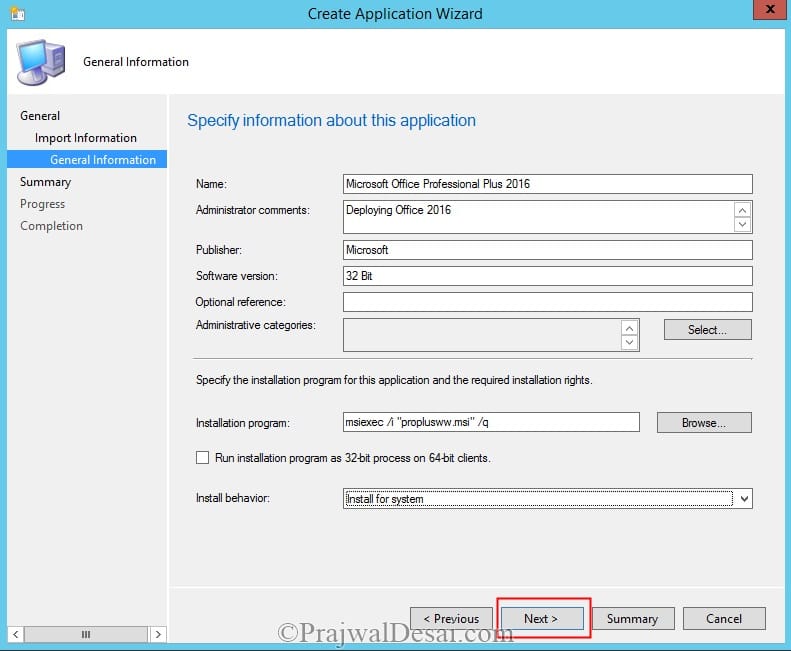
Specify the information about the Office 2016 application. Specify Name, Publisher, and Software version. The installation command of Office 2016 will be changed later because it needs modification. Select the Install behavior as Install for system. Click Next.
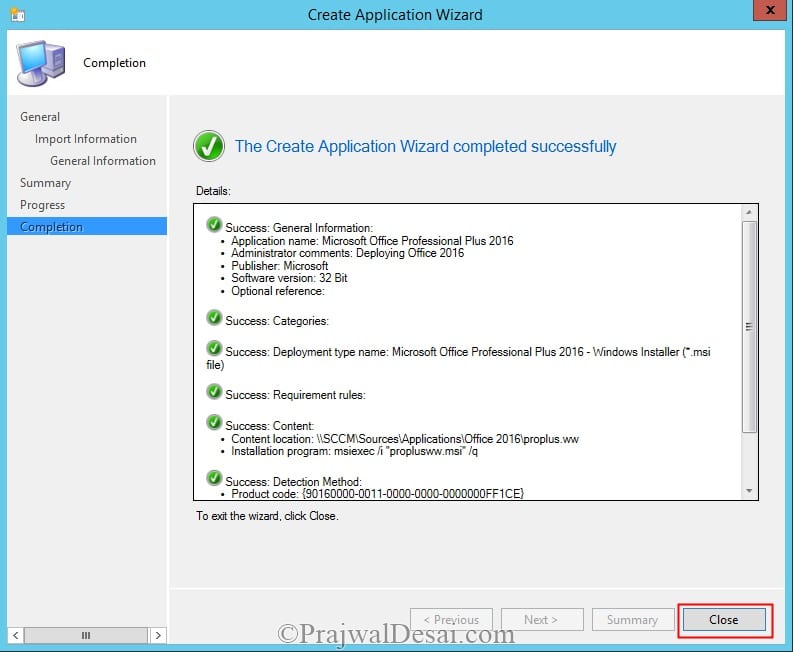
The Office 2016 application is now created in ConfigMgr. Close the Create Application Wizard.
Step 4: Modify Office 2016 Installation
Right-click the Office 2016 application and select Properties. Click on the ‘Deployment Types‘ tab, click on the msi file, and click Edit. Select the Content tab, set the Content location to the Office 2016 folder ( or a folder where Office 2016 installation files are present, remove proplus.ww after Office 2016 ). Click on Apply.

Select the Programs tab, change the Installation Program command to “setup.exe.” Click on Apply and OK.

The next step is to make the application available to DP. Right-click the Office 2016 application, click on Distribute Content, choose your DP and wait until the application is available with DP. You can verify this by checking the Content Status of the Office 2016 application under Distribution Status.
Deploy the Office 2016 application to the desired collection. Right-click on the Office 2016 application and click on Deploy. Select the Device Collection and select the Action as Install and Purpose as Available. (I haven’t covered the screenshots of deploying application as it’s simple to deploy an application to collection).
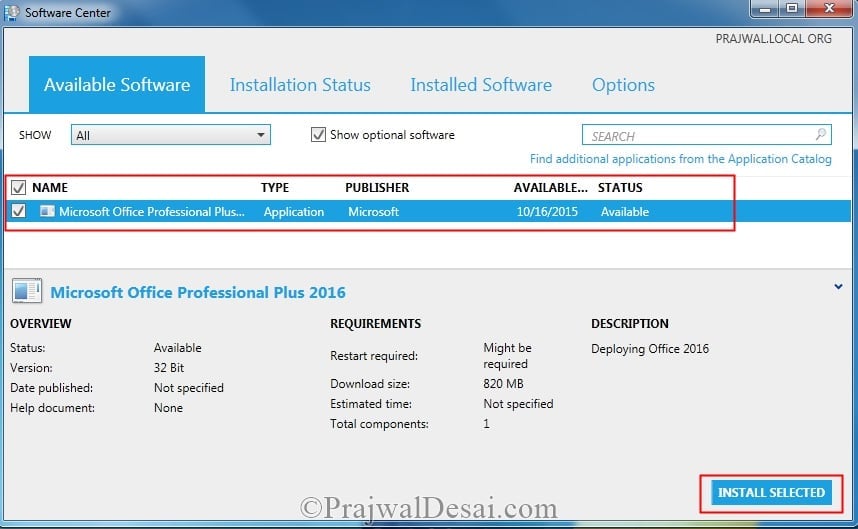
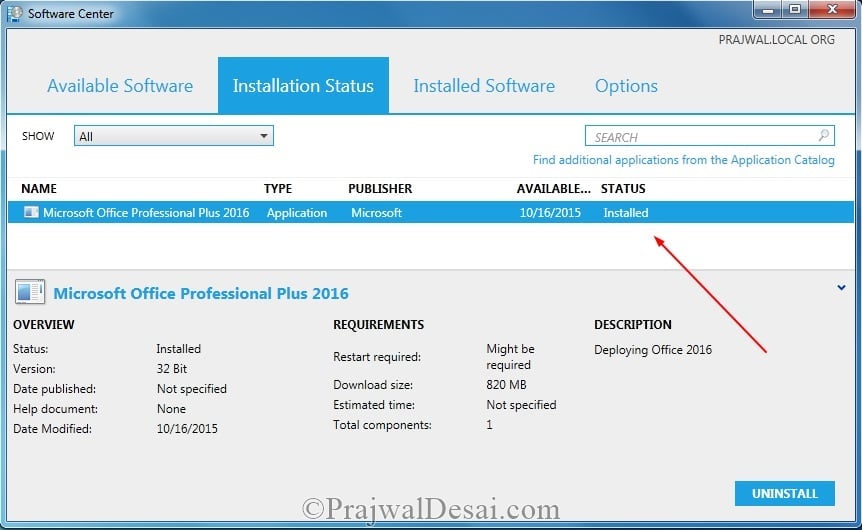
After few minutes, on the client computer we see that the application is available. Select the software and click on Install Selected.
Open Appenforce.log file in case you face issues with installation. You could also monitor the installation process.
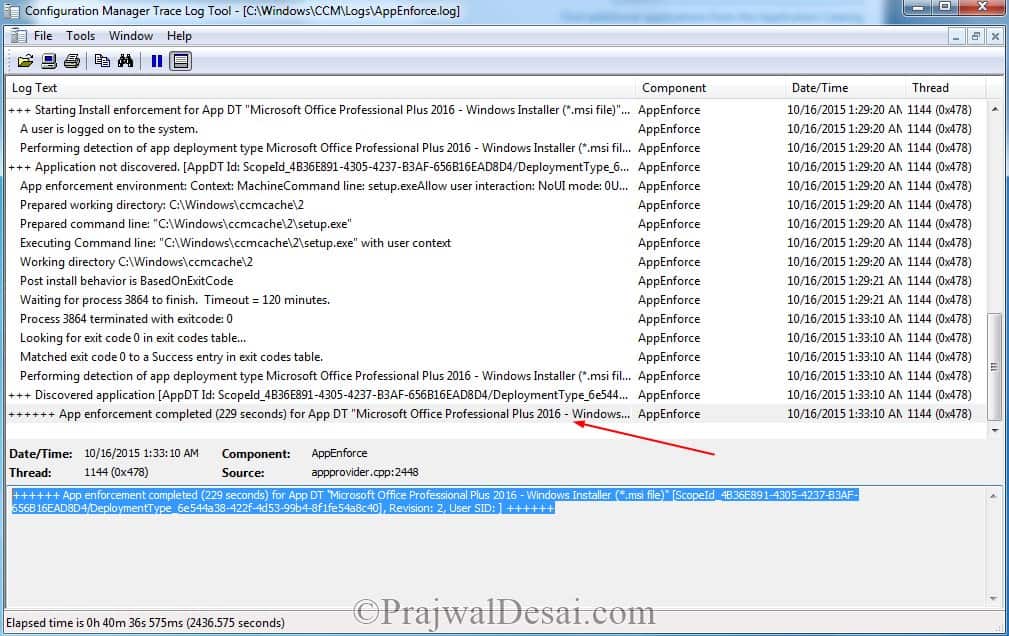
The application is first downloaded to the client computer and then installed. We now see that the application is installed successfully.

Hi Prajwal,
How do I deploy the upgraded version of Office 2016? is it possible through only patches?
The easiest way would be deploying Office 2016 and then push the latest updates.
If I edit the CustomOffice.msp after everything has been created, will the existing deployment go out with the updated msp settings or do I need to delete it and start a new deployment? I went in and told it to redistribute the content but not sure if that did it as I’m still having an issue.
Hi Prajwal,
thanks for the nice tutorial.
I’ve got one silly question – how do I make this Installation silent and unattended?
Thanks!
Ralph
Hello Prajwal,
Great job. Thanks a lot for this post . It was very helpful. Do you happen to have a post that guides the uninstallation of MS Office Professional Plus 2016 using SCCM? I need to carry this out in my environment.
Your help would be much appreciated.
Thanks
Are you uninstalling Office 2016 and installing O365 ?.
yes i want to uninstall it
In this post, you created an MSP with OCT, but I see no mention or screen as to where this custom_setting.MSP was used in SCCM. Can you tell ?
I fixed this issue. I understand that SSCM does not use directly this file, but rather thru a file inside the deployment directories.
**It might not be called ‘proplus.ww’ depending on your version of Office.** For example, in my case I used the ‘standard.ww’ file found in the ‘standard.ww’ folder. Said folder is found in the root directory of the installation files.
Hi Prajwal Desai,
as advised, i had followed all your documents in upgrading 2016..
i keep getting the message as timeout error occurred..
machine it says installing and download content but it failed with errors.
Application deployment error 0x87D00213 (-2016411117). also it took long time
please advise
I have one quick question how did you all get the proplusww.msi file? i downloaded the iso from microsoft volume licensing website and did not find that file within or even googling i couldn’t find out how to get it.
Hi Jose,
I have the same problem, in my behavior does not function, please help!!!
I’m struggling with this install. I can get the Office 2016 install to work through Software Center, but not when I make it part of a Task Sequence. It just hangs. Deployment becomes unresponsive and eventually my screen just goes black. Tried on virtual machine and laptop. Logs are not very helpful as they just stop. If I restart the computer, the logs pick back up, but still no helpful information. AppEnforce says “Waiting for process xxxx to finish”, but it never does. I never get my process to terminate with an exit code. Smsts.log has only one error that I can see: NotifyProgress received: 16 (Application failed to evaluate). But it passes that error and continues on for a bit before stalling. Any suggestions from anyone?
Hi Prajwal,
Great Post. Just a suggestion, the step for “Disable Opt-in Wizard on first run” the sentence reads out “set the status as Enabled”, but the screenshot shows the setting as “Disabled”. This caused confusion with me. I thought others might be too.
Once again keep up the good work.
Having issues with this distribution. I created the custom install *.msp and entered in the following for the installation program setup.exe /adminfile “updates\office2016ProPlus64.msp”. And the install doesn’t seem to start. Checking to see if anyone else has tried this way. I also have a number of patches in the updates folder that I want to get applied right after the install.
Hi Prajwal,
Great post. Be useful if you could update it with the uninstall method for Office 2016.
– You need to create an config.xml file and place it in the root of the office folder where setup.exe is
– The content for this file for Office 2016 is:
Uninstall command in the deployment should be: setup.exe /uninstall ProPlus /config config.xml
Config file for Office 2013 uninstall would be:
Hi Prajwal.
Your posts are very informative. What do you recommend in the settings of the customization tool if I want to have it display the progress window of uninstalling Office 2010 and then the progress window of installing 2016. We had issues of my command file killing the Office apps processes and then users trying to restart the applications while it was trying to uninstall 2010/install 2016. This caused some botched installations that our service desk had to fix. Basically I want something to display on the screen so that the user does not touch any Office applications until the whole process is completed. Thank you for your help.
Hi Prajwal,
thanks for this and a lot of other great posts!
Actually it works very well, but: After installing i couldnt get Word to open. In OCT Feature Installation i set to run “everything from Workstation”, which i get from another post. I wonder that you not set this step.
Do you have any ideas why Word will not start?
It worked well. However it is prompting to accept the license agreement and then prompts to click on upgrade..Request you inputs..
In our environment Skype for business basic 2016 installed and we want to deploy 0365 ProPlus but not success due to we are unable to uninstall SFB2016. please suggest
I followed the steps, but the application is not installing quietly. its asking for upgrade or customized.
Okay, maybe I am missing something. I noticed that you used the customization tool to create the MSP file, but I do not see any reference of that file in the Application setup for Office 2016. I would expect that you would have to the use the adminfile switch for the Installation Program portion where you have setup.exe.
I like the way you use the msi to get the info, and only after that do you change the installation. Nice! 😀
Hi.. I need to uninstall previous office versions (either 2010 prof plus or 2013 prof plus) during this deployment. Is it possible to deploy 2016 with silent uninstall of 2013 at same time?
Please note that i have tried the remove option in /admin file but it removes only selected products.
this works, but i was wondering if i deploy this as part of a OSD task Sequence? how do i do it for that?
Can I modify Office 365 ProPlus components through SCCM 2012? Ex: I deployed Office 365 ProPlus to client workstations and only deploy Word. Later on, I would like to add the rest of the Office product such as Excel / Outlook… etc. Can I do that through SCCM 2012 v1702?
Thanks a lot.
how to uninstall office standard 2016?
is there uninstaller instruction? i tried using powershell but no luck. need help to deploy uninstaller
It worked for me too
It Worksss
So what about the uninstall command? Would be nice to know how others do that and if it works well.
Yes it works.
There is some buggy things here 🙂
Office Shortcut’s ends up direct under “All Programs” and not in “All ProgramsMicrosoft Office”
Sorry, didn’t test that actually.
All of our users do not have local admin access to their computers. I am creating applications in SCCM so they show up in the Software Catalog with Require Admin approval. Is there a way to set these applications to install without admin credentials once approval has been granted?
Hi Bill, the applications deployed will be installed with default SYSTEM credentials. So the users will be just clicking Install in software center. Let me know if you have further questions.
I followed your steps but the deployment did not work. I see the following errors in the AppEnforce and AppDiscovery logs:
+++ Application not discovered. [AppDT Id: ScopeId_4DE5254E-9251-46C2-AFF3-92787ECB960D/DeploymentType_1a695295-a569-4a3d-b052-88ffa863bc8c, Revision: 2]
+++ Did not detect app deployment type Microsoft Office Professional Plus 2016 – Windows Installer (*.msi file)(ScopeId_4DE5254E-9251-46C2-AFF3-92787ECB960D/DeploymentType_1a695295-a569-4a3d-b052-88ffa863bc8c, revision 5) for system.
Anyone else seen this? How do I get around it?
I looked at the Detection Method tab, I am using Windows Installer as the Setting Type and Product Code of {90160000-0011-0000-1000-0000000FF1CE}
Mine was failing that it could not detect the app. Using the following worked for me:
{90160000-008C-0000-1000-0000000FF1CE} for x64 Office 2016
{90160000-008F-0000-1000-0000000FF1CE} for x86 Office 2016
I followed your steps and but the deployment did not work. I see the following errors in the AppEnforce and AppDiscovery logs:
+++ Application not discovered. [AppDT Id: ScopeId_4DE5254E-9251-46C2-AFF3-92787ECB960D/DeploymentType_1a695295-a569-4a3d-b052-88ffa863bc8c, Revision: 2]
+++ Did not detect app deployment type Microsoft Office Professional Plus 2016 – Windows Installer (*.msi file)(ScopeId_4DE5254E-9251-46C2-AFF3-92787ECB960D/DeploymentType_1a695295-a569-4a3d-b052-88ffa863bc8c, revision 5) for system.
Anyone else seen this? How do I get around it?
I looked at the Detection Method tab, I am using Windows Installer as the Setting Type and Product Code of {90160000-0011-0000-1000-0000000FF1CE}
We had this issue too.. it installed side by side 2010 even tho I told the OCT to remove all older versions. It also installed One drive for business even tho I have it as Not Available in the OCT.
having same issue, were you managed to uninstall previous versions of office before installing office 2016?
Hello Prajwal,
I tried Running the command setup.exe /admin and don’t see Microsoft Office Customization Tool coming up. Like in 2013 i dont have admin folder also. Am i missing something. Is my software not volume license copy?
Regards,
Santhosh B S
Hi Santosh, if you don’t see the admin folder then you could use the office deployment tool – https://www.microsoft.com/en-us/download/details.aspx?id=49117&WT
i did and edited the xml files. when i run Setup.exe /download Download.xml i get a message as restart your computer or there may not have enough free space available error message. I have enough free space on my dis. i restart the system, tried on several machines but no luck.
Could you post the issue over here -https://www.prajwaldesai.com/community
Hi prajwal hope you doing well
i am new in sccm i got error when i delpoy O365 through sccm Please help thanks in advance
Please post the questions in community forums.
Dear Prajwal …O365 is installed on background but in software center they show error 0x87D00324 i am working in test lab and they are n internet access i post you logs file as well
Hello!
I have a question about uninstalling office 2016. For office 2013 we used a value “Setup.exe /uninstall ProPlus” in deployment type settings. How about this version?
Prajwal, do you have a guide for going from Office 2010 to 2016 O365? Do I uninstall O2010 first and then install 2016? Thanks!
@Micheal – No I don’t have this. I would recommend you uninstall office 2010 first and then deploy Office 2016 cleanly.
Hi Prajwal, thanks a lot for the post. Can i do this with o365? My organization has business subscription of o365. All users at this time have office 2013. How would i go about upgrading all users to office 2016/o365 via SCCM R2? Please assist if possible, I’m a newbie to o365 and SCCM.
Hi,
How can I upgrade Office 2013 32bit to Office 2016 64bit using SCCM?
You can upgrade from Office 2013 32-bit to Office 2016 32-bit, and you can upgrade from Office 2013 64-bit to Office 2016 64-bit. If you install 32-bit and then later decide you want to switch to 64-bit, you have to uninstall the 32-bit version, and then re-install the 64-bit version. The reverse is also true—going from 64-bit Office to 32-bit Office also requires an uninstall and then a re-install.
Prajwal,
I’m looking to push out Office 2016 to my organization, however I want certain Office features disabled (access, infopath, publisher, project, etc). How do I configure the customization tool so that it does not enable these programs?
Thank you,
Jeff
The option should be available in the OCT. Have you gone through all the options available while using OCT ?.
Hi Prajwal,
We are deploying MS office 2013 to production, we planned through the AD sites I request you to provide the AD SITES deployement query. We have 160 AD Sites. How to handle multiple ad sites in single query?
Thank you very much.
Regards,
Deepak Kumar
Hi Prajwal,
Followed same steps as mentioned but on the client side installation is failing,Checked Appforce logs(Error: 1. Looking for exit code 30030 in exit codes table,2. Unmatched exit code (30030) is considered an execution failure.).
Can you please help me out on this issue
Thank you. You need to deploy the follow KB to upgrade Lync 2013 to SFB.
https://support.microsoft.com/en-in/kb/3039779
I hope it helps. If you still need deployment steps, let me know.
Hi Prajwal,
Your posts always very useful, helpful and save so much time and energy.
I am trying to deploy Skype for Business (SFB) entry using SCCM 2012 R2 to our ORG. I am stuck where i am unable to find MSI for SFB even Microsoft O365 team were not able to provide. Can you please kind enough to assist me how can i create a package or application for SFB.exe and deploy it across our ORG. We are using Office 2010 PRO Plus in our environment.
Please help
Sir,
The setup was successful and application is created for Office 2016 setup but i have not yet deployed it. My client machines have office 2010 installed on them, so deploying office 2016 through SCCM will upgrade clients office 2010 to office 2016 or is it going to create another instance of office on the client machine?
Instead of E: drive use the server name where the content is stored.
Thanks a lot.. it works fine. the post is really helpful
Sir,
While creating the application, i receive the error “Please specify a valid UNC file path”. this is the location where my msi file is stored “E:SoftwareOffice 16 32bit setupstandard.wwstandardww.msi”
plz help
Hi Prajwal,
Thanks a lot for the post. very helpful and it worked fine fine.
I installed 2016 and unfortunately it did not uninstall 2010. what would you suggest i should do to uninstall office 2010?
Thanks
This is exactly the info I needed. Thank you very much.
Thank you. Glad to hear that it helped you.
At one point, the instructions say: Select Modify user settings > Microsoft Office 2016 > Privacy > Trust Center. Double click the setting Disable Opt-in Wizard on first run and set the status as Enabled. But the photo shows the setting as “Disabled”. You may need to update that as to not confuse anyone.
This worked very well. However, this doesn’t seem to install without the user requesting it. Or do I just need to wait? How do I deploy as per sccm 2007 advertisements automatically?
Do you see the admin folder inside the office 2013 folder ?
Hi. I’m having trouble right from the start. I’ve downloaded and installed the office deployment tool. When I run setup.exe /admin from an admin prompt, I only get the /help screen. The tool doesn’t open. Any thoughts? I’ve done this before successfully with office 2013 a few years ago.
I followed the instruction and distributed the application. The problem I have is now I can not deeply to devices the only option I have is users I test to deploy to users but i tis not appearing in Software Center.
I am using SCCM 1511.
I chose KMS Client key while customizing Office.
I followed the instruction and deployed. Everything worked out fine. Just one thing – when I clicked install from software center it prompted with the screen (Choose the installation you want Install Now / Customize). I clicked customize office and selected all to run from this computer. The install was successful.
How can, I suppress the pop up box of Install Now / Customize screen? I did create custom_setting and saved the file in updates folder – yet the install is not silent. Appreciate your input.
One more thing in the Privacy Trust Center screen you mentioned Disabled to opt at first run as Disabled per your screen shot but your notes say as Enabled. Which one is correct?
Hello Prajwal! I followed your guide for Office 2013 and 2016. Things appear to be working well with one exception. After Office 2016 installs, it says that a restart is required. I did modify the setup properties to include the SETUP_REBOOT and set value to Never. Any thoughts on this? Thanks!
Is this is for one computer or for all ?.
I haven’t deployed this to my whole organization yet, just a few test machines. After further testing I found that it only required the reboot if Office 2013 was already installed. If not, it would install fine and not require a reboot. For those requiring a reboot, I took a look at the logs and found that it leaves an exit code of 3010.
So my guess its a reboot required by earlier version of office and not when you install the new one. What do you think ?
Hi Prajwal, great post. I was wondering if you can shed some light: (1) Skype for business 2016 gone missing. (2) Excel 2016 complained not the default program for spreadsheet. If there anywhere on OCT I can edit Not to tell me if it’s not the default program? I found it for WORD, but unfortunately, not Excel. Both questions were discussed on several websites, but no concrete answer. Thank you. Note: (1) happened either through Office 2010 to 2016 upgrade or freshly imaged system. (2) Excel 2016 not default only happened when upgrading from 2010 or 2013 to 2016.
Did you get help with this? I have the same problem with S4B. everything else Works fine, but skype comes up with the recording program and not skype for business…
Hello Sir! After following all of your directions my software installations stays at the installing status. The last step in the AppEnforce log says waiting for process 1560 to finish. Any advice to get Office to install?
was this solved? as i am facing the same issue
Worked like a charm !!!
Thank you.