This post covers the steps to deploy Office 2010 using SCCM. SCCM is a very good tool when you think of deploying software to the end computers. In this post we will be deploying Microsoft Office Professional Plus 2010 32 bit edition.
The copy of Office that we have is Volume License Edition of Microsoft Office 2010. So we will customize the Office installation using a tool called Office Customization Tool which can be downloaded here.
Most of all if you are using a Volume License Edition of Microsoft Office, then OCT comes along with the it. We are basically looking for an unattended setup of Microsoft Office. This can be achieved only when you customize the installation using office customization tool.
Deploy Office 2010 Using SCCM
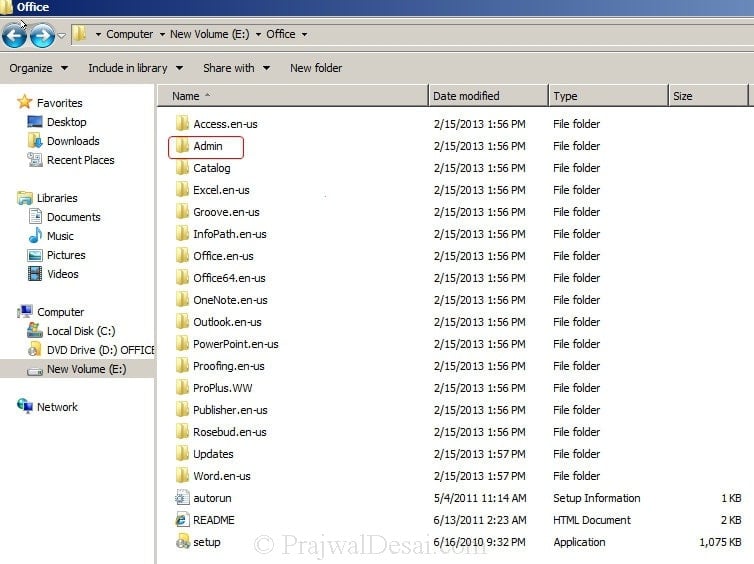
Let’s look at the steps to deploy office 2010 using SCCM. First of all copy the contents of office 2010 in a folder called Office. Notice that since this is a VL copy, Admin folder is already present.
Launch the command prompt as administrator. Change the path to the office folder. Run the command Setup /admin.
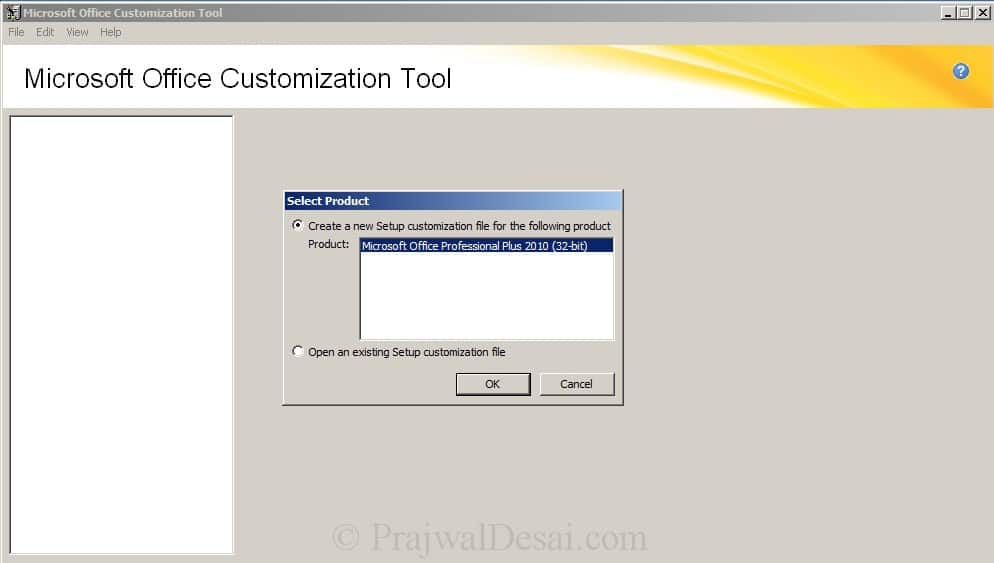
You will see Microsoft Office Customization Tool. Click Create a new setup customization file for following product, verify that correct product is selected. Click OK.
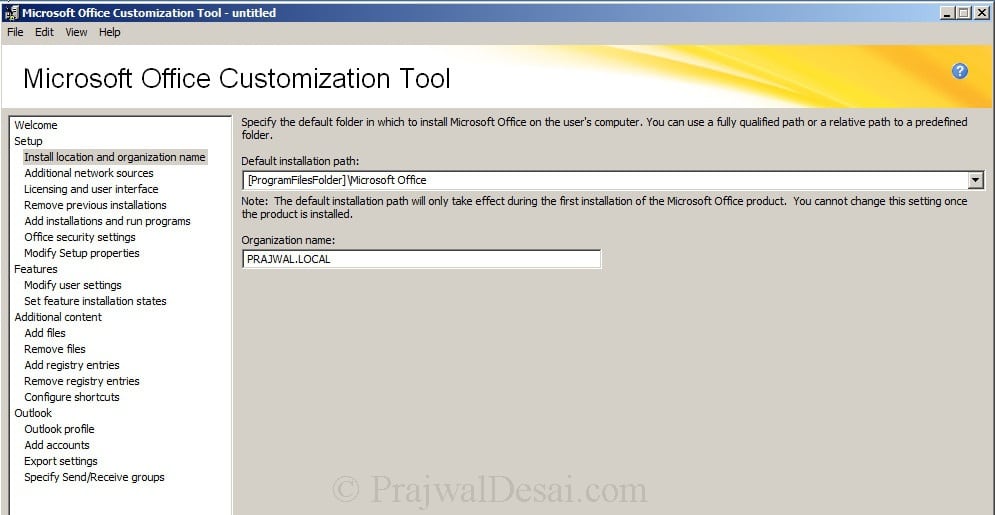
Select Install location and organization name. In the text box provide the organization name.
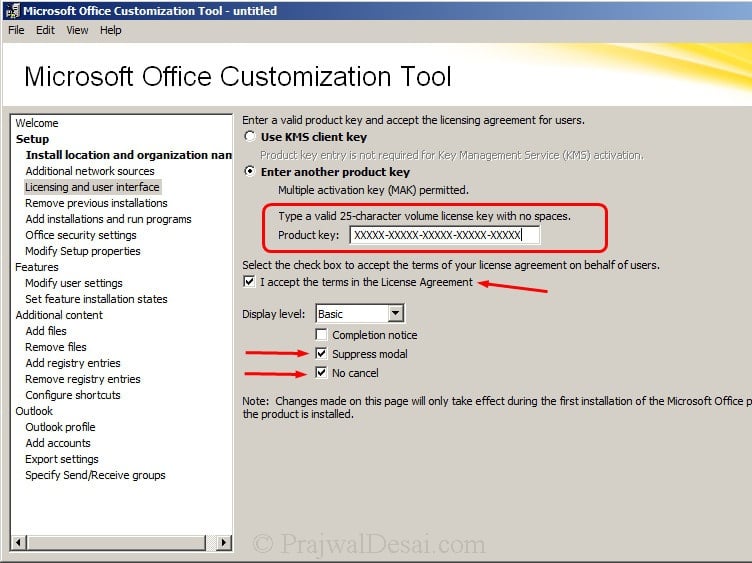
Click on Licensing and user interface. You can choose a KMS key if you have a KMS server in your organization. If you have a product key then type it. Check the box “I accept the terms in the license agreement“. Set the Display level to Basic. Check the boxes Suppress modal and No cancel.
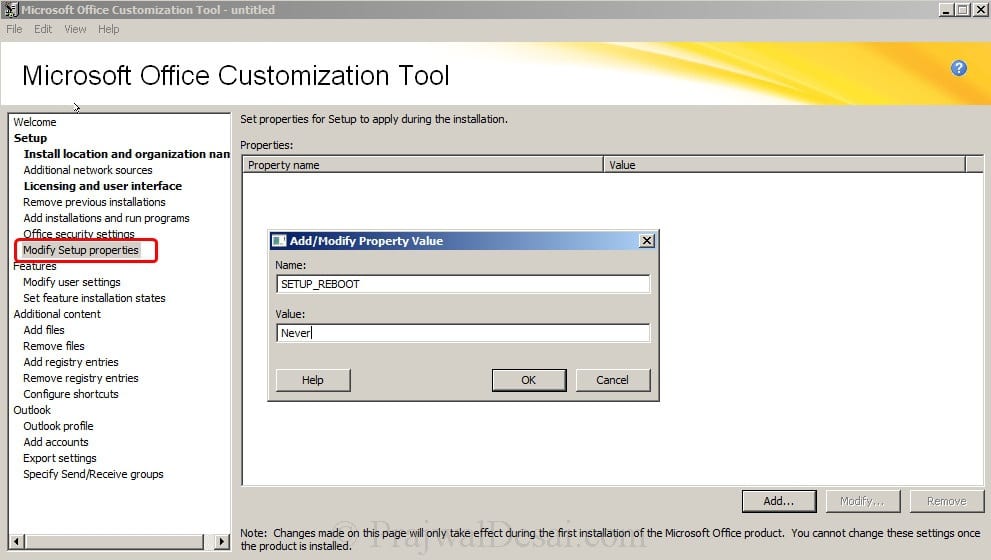
Click on Modify Setup properties, click Add. Provide the Name as SETUP_REBOOT and Value as Never.
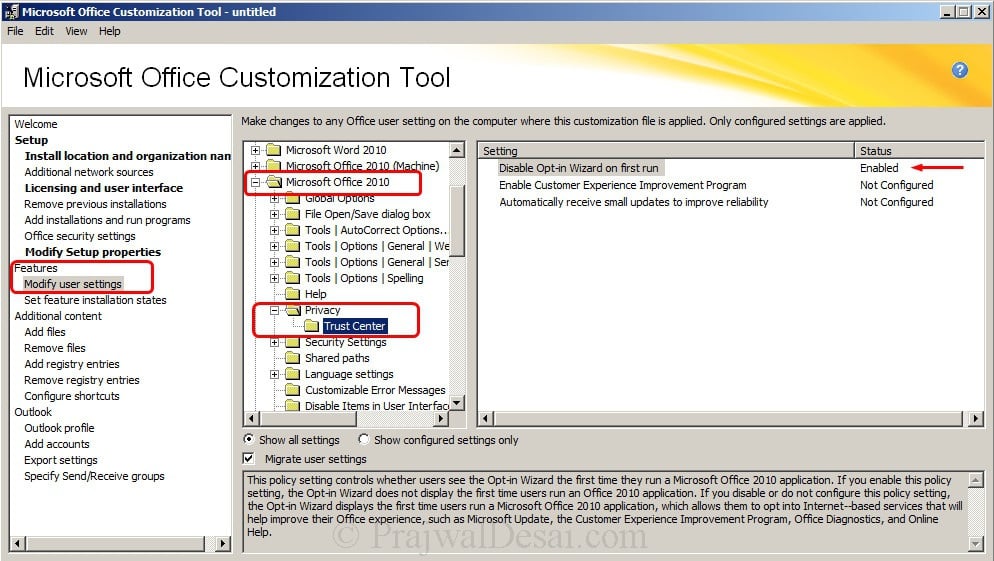
Select Modify user settings > Microsoft Office 2010 > Privacy > Trust Center. Double click the setting Disable Opt-in Wizard on first run and Set the status as Enabled.
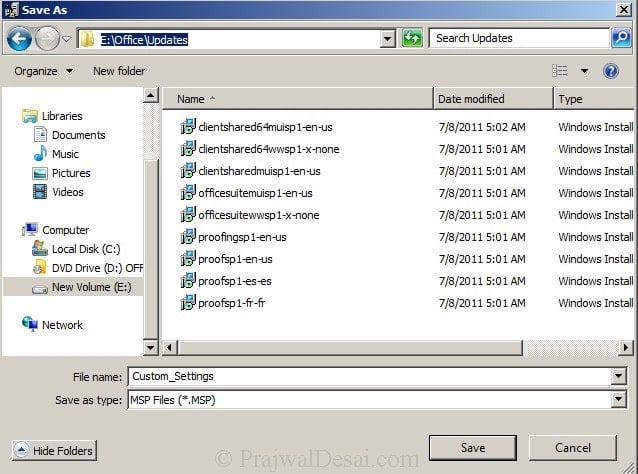
Click on File, Save and save the MSP file in the Updates folder.
Create Office 2010 Application
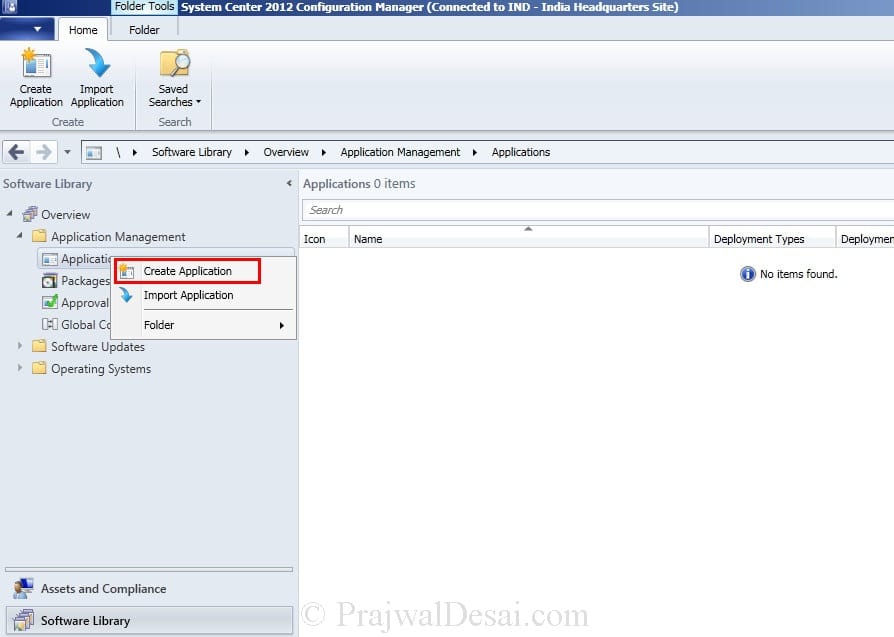
On the SCCM Server, Under the Application Management, right click Applications and click Create Application.
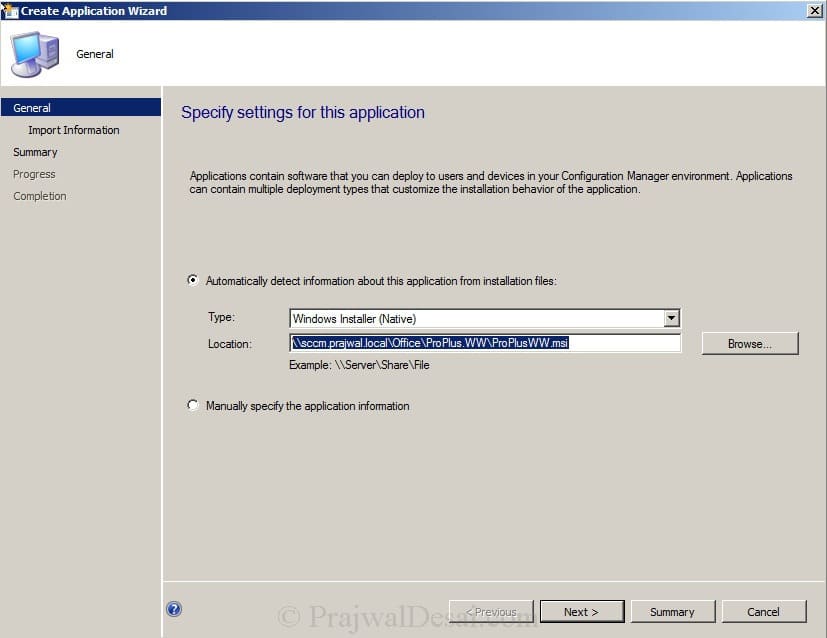
Choose Automatically detect information and set the location of the msi file as shown in the below screenshot. Click Next.
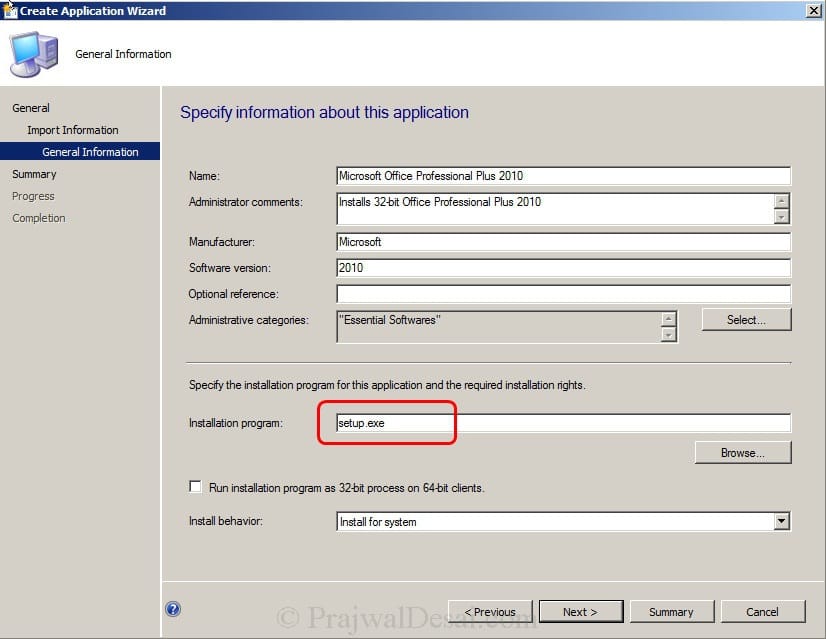
Specify the Installation program as setup. Choose Install behavior as Install for system. Click Next and Finish.
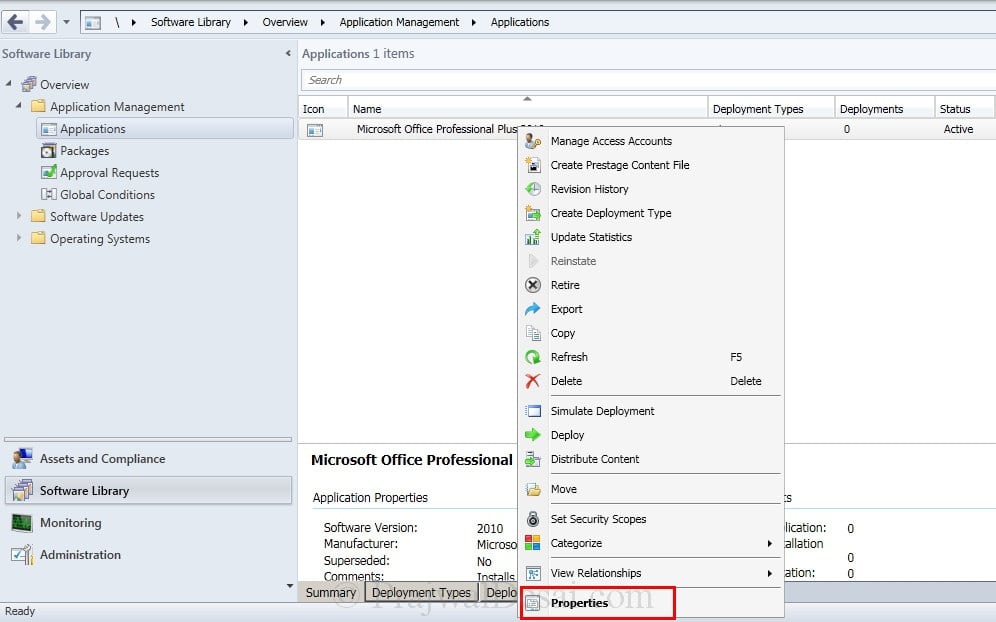
Right click the Microsoft Office application that you have created and click Properties.
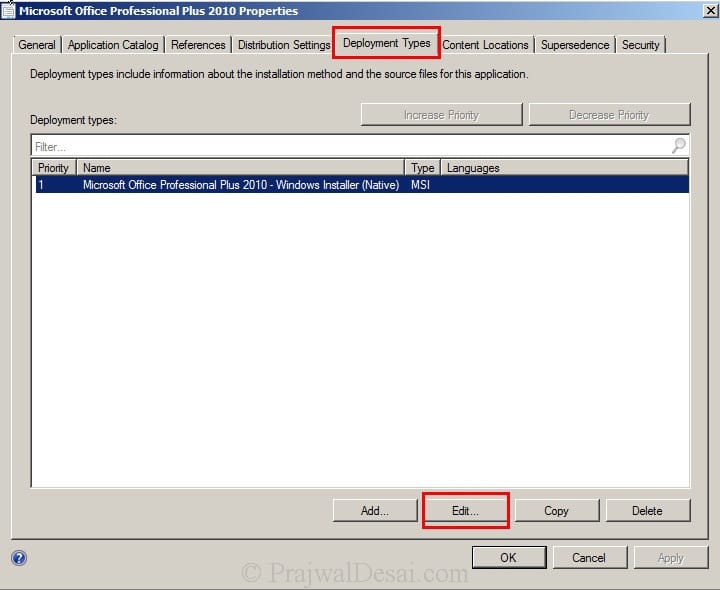
Navigate to Deployment Types, Click Edit.
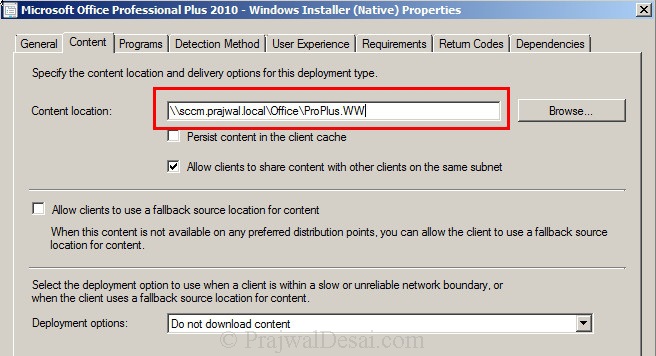
The Content Location is set to \\sccm.prajwal.local\Office\ProPlus.WW.
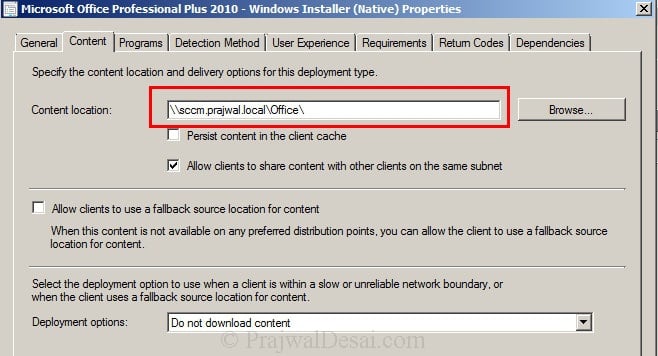
You need to set the content location to \\sccm.prajwal.local\Office\ (Delete “ProPlusWW” from the path)
In the Programs tab, set Uninstall program to setup.exe /uninstall.
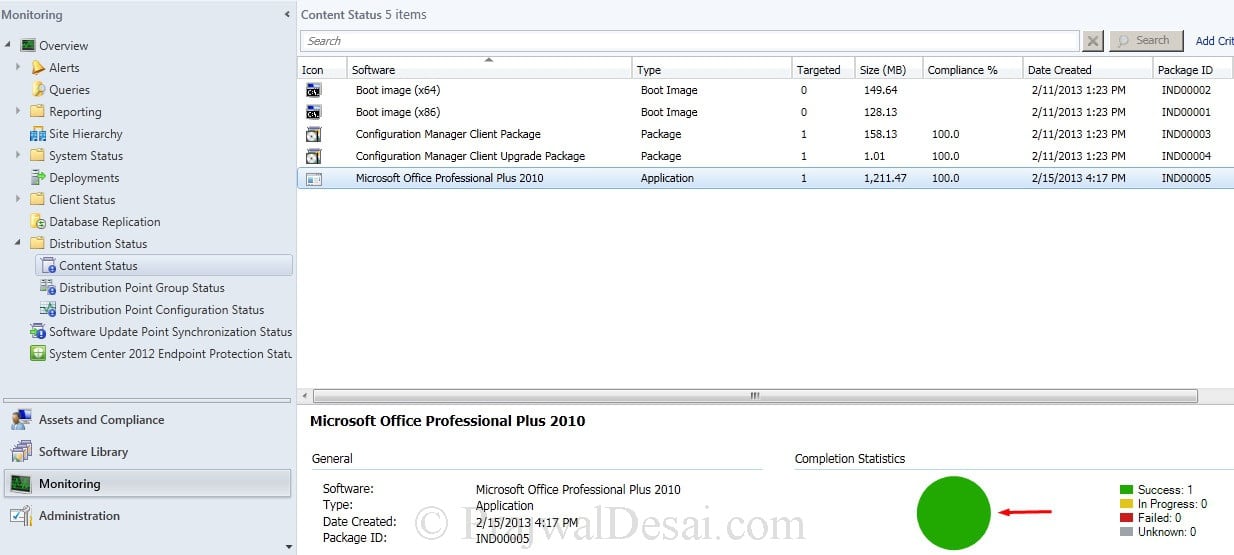
Right click the Microsoft Application and Distribute the content to the distribution Point. Do not proceed until you see the content status of the Microsoft Office as Green.
Deploy the Office application to a device collection. Right click the Microsoft Office application and click Deploy.
You can deploy it to a Device collection or User collections. You can also choose to deploy it to All Systems. Click OK and Next.
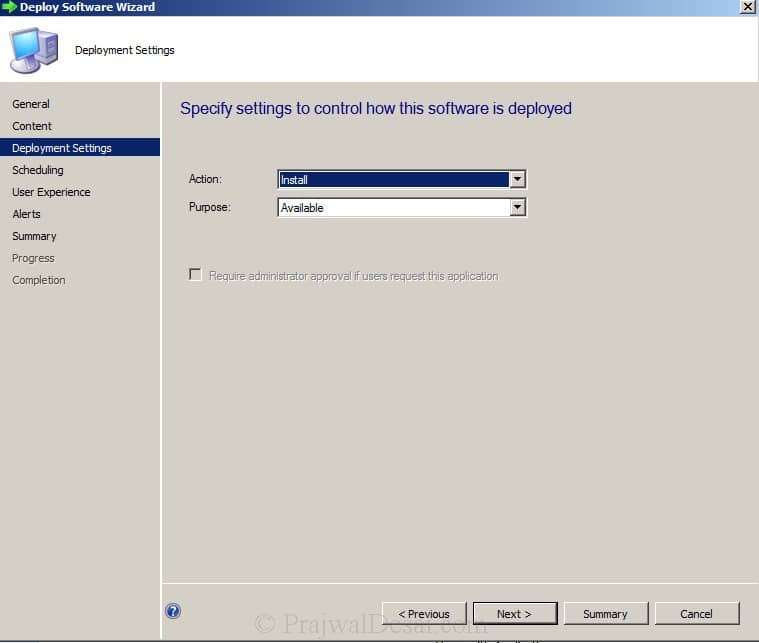
We will Choose to Install the application and Purpose is set as Available.
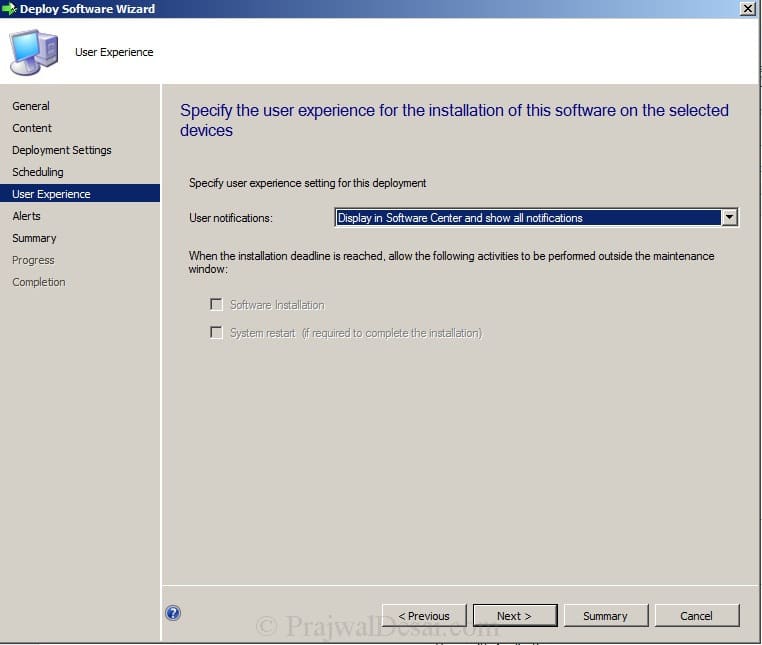
Select User notifications as Display in Software Center and show all notifications. Click on Next and Close.
Testing Microsoft Office 2010 Installation
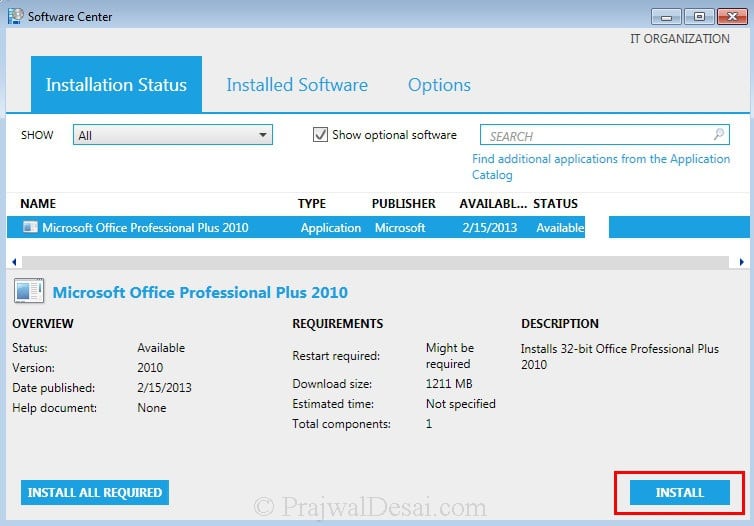
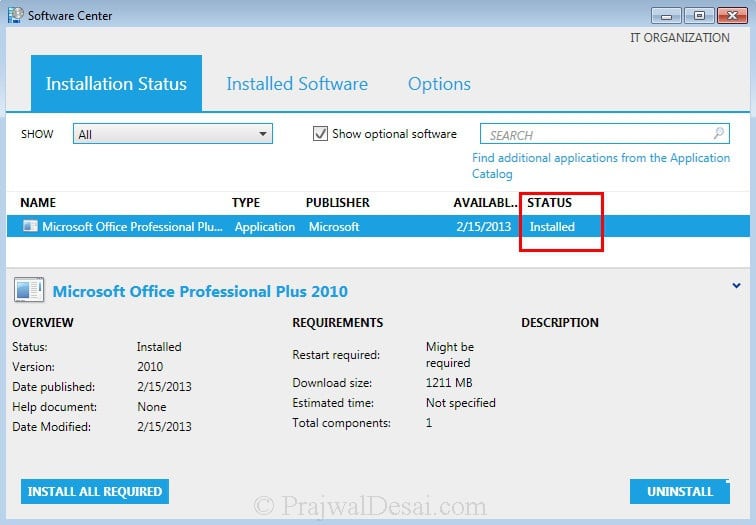
On the client computer, launch the Software center, Click Install to start the installation. The application is first downloaded and then installed. Wait for few minutes to complete the installation.
The Office 2010 installed successfully.








is there a clean way to remove only Outlook 2010 and push Outlook (from office pro plus)?
Hi P.D!
I’d like deploy only the normal.dotm (usingSCCM). Is it possible?
Great Stuff Mate
Setup.exe launches the screen where you need to select or click install/customize. How can I avoid that because of that the installation is failing with the error 0x87D00213(-2016411117). Thanks
Hi Prajwal,
I’m new in SCCM.
I have a question about the Application deployment.
As per your guide we creating an MSP file and save it in the “\Updates” folder. The next step is to create the application in the SCCM. According to the guide I didn’t saw that you pointed to the newly created .MSP file. You only pointed to the setup .msi file. The “\Updates” folder contain other .MSP files. How the SCCM knew what file to pick up and run the setup? Do I need to configure/adjust the config.xml file in the “\ProPlus.WW” folder?
I’m asking this question because I’m having an issue to activate the Office 2010 after installation on the user’s PC. I don’t have any problem to run the batch file or command manually. I want to run it as a post install task seamless for the users . Can you tell me if it’s possible?
Thank you in advance.
I having the same issue. Has this been resolved? Thanks.
Check if AV is blocking the download.
Hi Prajwal,
Thank you for your blog, it is very useful for me to creating my home lab. I created the home lab as per your blog, am getting error while deploying the office 2010 application. In client am able to see the package but it is downloading till 99%. after am getting failed. error code for this is “The software change returned error code 0x80091007(-2146889721).”
Can please suggest on this.
Regards,
Upendar
Check if a security software such as AV is blocking the download. If it’s failing at 99% then probably it is checking the complete download at the end and could be blocking it.
Hi Prajwal and all,
I need some help as soon as possible. I have MS-Office 2013 installed in my environment. Now, the client to set the default font for MS-Word (Time New Roman size 13). What I did was created a Normal.dotm file with default font TNR size 13, then use Office Customization Tool to create a .MSP file (lets say custom.MSP), and create a package under Application Management in SCCM Console, then distribute the package to DP and deployed it. In my OCT custom.MSP file, I only modified the Add Files (so I added my new Normal.dotm) and Add Registry (these two area are needed for my Font change) under Additional Content section. My questions are: 1) Do I have to create my MSP file as a new installation for MS-Office which include User Agreement setup, license key. etc.? 2) The package is downloaded on client hosts, but it failed installed. why and what went wrong? If you have any other suggestions or advise, please do help me. Thank you very much!
Thanks for posting this article Prajwald. I do have a scenario I hope you can assist with.
In this article the local client would download the entire contents of the Office folder from your Content Location (1311MB) to install ProPlus. So, if I want to install Access, OneNote, Outlook, Publisher, Project and Visio as separate installs after ProPlus is installed, they too would download the entire Office folder separately to install. This could potentially consume 7866MB of disk space and surpass ccmcache’s size limit.
1. How can I minimize the size of the downloads for all the individual Office product installs?
2. Is there a way to separate all the applications into their own Content Source folder to minimize disk space for each install? If so, what files/folders are required in the Content Source folders to make it work?
Thanks!
You could try this – https://www.prajwaldesai.com/increase-sccm-client-cache-size/
Hi I have followed these steps and got the deployment working. With OSD these steps do not work. I have made sure the install is hidden and updated my MSP Display Level to NONE. It is set to install for system and run regardless of user logon state. There are no errors…the install doesn’t blow up, it does not error out, it just hangs. It’s like it’s waiting for me to accept something or close some sort of prompt. Hitting alt tab does nothing there are no other windows running. Am I supposed to be doing this different for OSD?
Try deploying only this application via TS and see how it goes.
Great and wonderful document. I followed the steps to install office 2010 32-bit on win7 64-bit working successfully and installing successfully from the software center, but when in uninstall it from software center the status showing removal failed??!! . by the way I have done the 7 zip steps working great installing and uninstalling from software center.
please can you help me out.
thank you
did you check the log files to see why is it failing to uninstall ?.
Great document. Followed the steps to install Office 2013 64 bit on Win 8.1(production environment). But when I open any office application it does ask for a product key(only the first time or until I type it in). And the next time it asks me to proceed with activation. I would like to have the activation automated. Am I missing something? Thanks in advance!
Do you have KMS in your organization ? This link will help you – http://technet.microsoft.com/en-us/library/ff793434.aspx
Abdullah mahdi
Great and wonderful document. I followed the steps to install office 2010 32-bit on win7 64-bit working successfully and installing successfully from the software center, but when in uninstall it from software center the status showing removal failed??!! . by the way I have done the 7 zip steps working great installing and uninstalling from software center.
please can you help me out.
@Abdullah – You have to create a file named Uninstall.xml if you want to uninstall office 2010 using sccm. Please refer this post – https://www.prajwaldesai.com/how-to-deploy-microsoft-office-2013-using-sccm-2012-r2/
Hi Prajwal
I want to deploy Office 2010 Standard to several computers.
I’m currently testing on 5 pc’s, but I need to be able to deploy Office to about 100.
I have tried before with manually entering the details and creating my own Deployment Types.
What I’m trying to realise is deploying 1 Office application, with a Deployment Type for x64 and one for x86.
I have received the Office files from my colleague and it contains both a x86 and a x64 folder.
I haven’t had any issues using OCT on the Setup.exe in both folders and I saved the result in /Updates.
When I deploy the Application, the deployment fails each time on the x64 Deployment Type.
I haven’t got any x86 computers at my disposal for testing.
I hope you could help me out in this.
Thanks in advance!
PS: I just noticed that the button below says “Sent”, this should be “Send” 😉
@Stijn – You can deploy the 32bit office software to 64 bit operating systems(Microsoft recommends the same). If the x64 deployment type is failing then you need to check AppEnforce.log file on the client machine. If possible post the contents of AppEnforce.log here.
how do you suggest i push an uninstall of office 2k10 pro? i created a .bat file that will do this, however i am not sure how to push .bat files to computers….
Hi you can follow this post – https://www.prajwaldesai.com/how-to-deploy-microsoft-office-2013-using-sccm-2012-r2/
I have specified the code to uninstall the office suite.
you can create a .xml file that will help in uninstalling the Office 2013 / 2010. Save the file as Uninstall xml in the folder proplusr.ww (you can choose any filename, only the extension should be xml)
first off, everything works flawlessly! i love this site. the reason that i am using this is not part of an upgrade, but part of a downgrade. is there a step in this process in which i can add the deletion of the PRO version? i am trying to hit my compliance numbers and am going from PRO to STD. when i do the install it just addes STD to PRO. PLEASE HELP!!! THANK YOU!!!
Downgrading from PRO to STD is tricky and i guess you have to uninstall the PRO edition and then install STD edition.
When you save the MSP file as Custom_Settings.MSP how does the installer know to use that file?
When office setup runs, it searches the Updates folder on the installation point for a customization file. Thats the reason its placed in Updates folder.Also note that only one Setup customization .msp file per product in the Updates folder is supported. The customization .msp files that you place in the Updates folder will be deployed first.
More info :- http://technet.microsoft.com/en-us/library/cc178960%28v=office.15%29.aspx
That’s right, if you have KMS and you already imported Office 2010 KMS key to KMS server. It will automatically activated once the computer as long as the computer is join to the domain.
That’s right.
Thanks… ” good night”, if any I will come back to you.
Regards
Arshad
Most welcome.
I would like to ask option of office package 2013 setup Microsoft office custom Tool (oct) , Kms (Microsoft Key management services) key as default in My pdf file Instruction. If I proceed with same, all steps & deploy the application . Later it will not prompt me for any activation key
For the Volume license key option we need to put the key as supplied, then proceed with all steps save as Test. MSP file etc. In this case also it will not prompt any keys client end side. Please clarify both Options.
Regards,
Arshad
If you are using KMS option then i guess you need not enter any key in the customization tool, if there is a KMS server setup then it will activate the office suite. If you have MAK key for office 2013 then you need to specify that in OCT. The system on which Office suite is installed will be activated…
I hope I have answered your question, let me know if you need some more details..
Thanks for your Reply. yes I done app to the DP (distributed Point) , content status as Successful , green pie chart as Successful & compliance also 100%
Yes if I am not wrong it is Volume License. Tested this package office 2013 on the one system as manually installed (Setup command) , it is working fine.
They attempted this application from couple of weeks but not able to deploy to software center & they told me try if possible to deploy it.
I done same steps your as well as My PDF file (similar almost)
Friday & Saturday off for me. If you having any Technical input & you need more info of product 2013 do let me know.
I will try on Sunday & come back to you.
Regards
Arshad
Okay Arshad, let me know if you need any help from my end..
As I am new to SSCM 2012, I INSTALLED office professional 2013 (32 BIT) with your same steps as OFFICE 2010 along with My (OCT & PDF installation steps) Application office 2013 successful deployment ok. But I am unable to see the new application on the client system software center as I tested in the 2 system (shall I wait for more than 4 hour to see on the client system..?)
FYI…
Also in my save as *. MSP file on the update folder ( there is no other files available only my saved LMR.MSP file), so there is any missing in my office 2013 Package…?
Add file in OCT are Memory (2gb , disk space, OS as win7 * win8 )as per My PDF file
Any feed back will be welcome.
Regards
Arshad
Arshad, have you distributed the office app to the DP ? Check the content status of the application. Secondly which copy of office are you using, MSDN or Volume license ???
Hi,
Prajwal…
Good Support & Valuable forum, Keep it Up !!!
Regards
Arshad
Thank you Arshad.
Prajwal,
I followed your steps and MS office did not showed up in software center. Can you please let me know where to check for error. I am new to SCCM.
Is the software center not displaying only MS office or all the apps that you deploy ??
its downloading then am getting ‘past due-will be retired’ error..
what does AppEnforce.log says ?? Also have you used any detection method to install this software ??
Where are you specifying to use MSP file?
I have not specified the msp file, its picked from the Updates folder.
wow thank you for this worked like a charm
Thank you 🙂
Hi, I have followed your steps and my office shows up in the software center, it downloads succesfully but hangs during the installation (it is installing now for more than an hour) not normal. where could i check for logs to see what is going on?
thanks in advance.
Check AppEnforce.log file…
Thanks for the article.It looks a manual installation method.What about automatic installation of Office 2010 without any user intervention ?
I think that can be done easily with MDT using a task sequence…
Hi Prajwal,
Great video.. Your website is very informative. I am kind of new to SCCM andI want to create a custom image of win 7 ( Which includes basic Applications like Office 2010,Winzip, Adobe etc) and then install it on new PC.
I am Able to create the image but it it fails when It comes to installing office 2010.All Other applications are being installed.
I would appreciate if you can Post a Video about how to create a custom Win 7 or Win 8 Image Which will have all the applications preinstalled especially Office 2010.
Thanks
Thanks Ashfaaq. I will add a post on the topic that you mentioned.
Thanks alot , it saves the day.
Thank you 🙂
ACCESS or VI SO from MS-Office Suite & we are selecting basic agreement level means it will install only some components if yes which are those
Lets assume that you are installing office 2010 by double clicking a setup.exe file, you come across 2 options Install or Customize. If you select Install, the basic components are installed which include Word, Excel, Powerpoint etc. If you are looking for more customization then lot of things can be customized using OCT.