Are you tired of your hard drive going to sleep and interrupting your workflow? We will show you how to prevent hard disk from going to sleep in Windows 11/10 in this article.
Many users find it frustrating when their hard drive goes into sleep mode, especially when they are in the middle of an important task or downloading large files. Luckily, Windows 11 offers a simple solution to change your hard drive’s sleep settings and stop your PC from going into sleep mode.
By adjusting the power settings on your computer, you can customize how long it takes for your hard disk to go to sleep. This way, you have full control over when and if it should enter a low-power state. Whether you need constant access to files or want to prevent interruptions during downloads or backups, changing these settings can make a significant difference.
To manage power options on multiple devices, you can either use Configuration Manager or Microsoft Intune. For example, you can configure power plan settings and deploy them to devices using SCCM. On the other hand, Intune lets you configure power options and apply them to managed devices.
Prevent Hard Disk from going to Sleep in Windows 11/10
On Windows 11/10 devices, you can prevent your hard disk from going to sleep by performing the following steps:
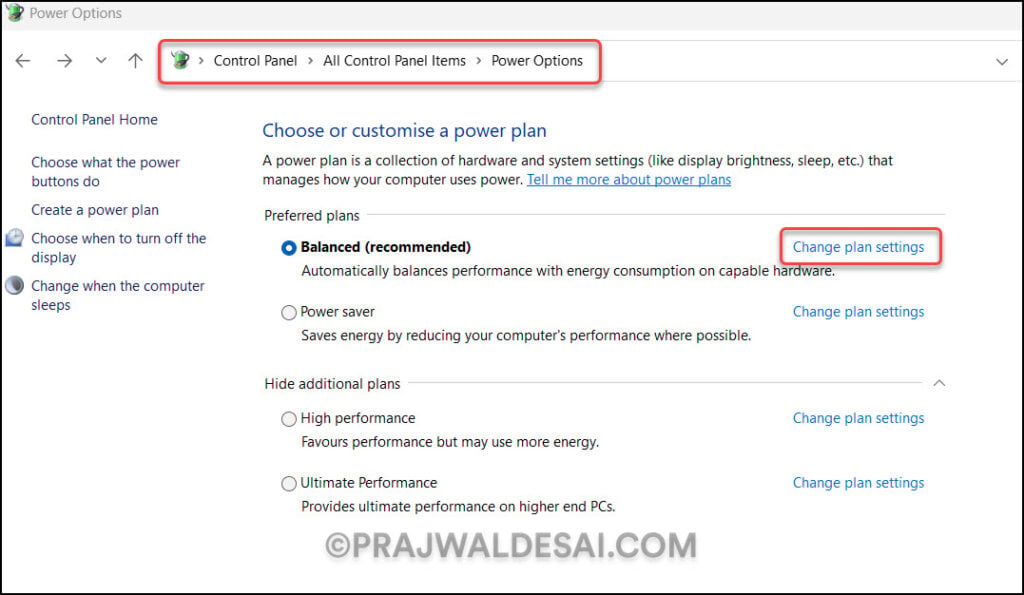
Step 1: On your Windows PC, go to Control Panel > All Control Panel Items > Power Options. Here you’ll find preferred plans and additional power plans defined by Microsoft. Next to the current power plan, select the option “Change plan settings.“

Step 2: Under the plan settings, click “Change advanced power settings“.

Step 3: On the Advanced Settings tab of Power Options, click on the + sign next to Hard Disk. Expand the option “Turn off the hard disk after,” and you’ll find that the default value of this setting is 20 minutes. To prevent your hard disk from going to sleep frequently, set the value from 20 minutes to a higher value. If you want your hard disk to never go to sleep, enter the value as “Never” and click Apply and OK.

Prevent External Hard Drives from going to sleep
If you have an external drive connected to your Windows PC and do not want it to go into sleep mode, you must use third-party tools. For example, the Sleep Preventer tool prevents your computer from going to sleep. Additionally, it can stop the PC from entering hibernate mode, dimming the screen, or activating the screensaver.
The problem with using these third-party software programs is that they don’t guarantee they work on the latest builds of Windows 10 and Windows 11. We do not recommend using these apps unless they are frequently updated.
Prevent external USB hard drive from entering sleep mode
Several users have complained that their external USB hard drive goes into sleep/suspend mode after only a few minutes of being connected to their PC. It takes several seconds to regain access to it. You can stop external USB drives from entering sleep mode by using the following steps:
- On your Windows PC, right-click on Start and launch the Device Manager.
- In Device Manager, expand “Universal Serial Bus Controllers.”
- Right-click on “USB Mass Storage Device” and select Properties.
- Under the Power Management tab, uncheck “Allow the computer to turn off this device to save power.”
The above steps will ensure the connected USB device will not go into sleep mode. You’ll have to perform the steps on every USB storage device that you connect.


I did as advised, but the external drive still quickly spins down, though it now takes a little longer to do that. Also, I don’t have any access to any ‘control panel’ which I believe was removed recently from Windows 11 – this is a new computer, a desktop, and many tips from older web pages which seem to target laptops (battery protection) over desktops, don’t apply. Even the existing Microsoft ‘help’ refers me to measures which aren’t present on this computer. Disappointing…
CV