This post details the steps to manage SCUP software update catalogs. In my previous post, we saw the steps to install and configure SCUP. SCUP is a stand-alone tool to manage third party updates. Furthermore when you integrate with SCCM, updates can be managed very efficiently. When you install and launch SCUP tool, you basically see four options.
- Updates Workspace.
- Publications Workspace.
- Rules Workspace.
- Catalogs Workspace.
We will be discussing more about Catalogs Workspace in this post. First of all let’s understand what is catalogs workspace. To manage software update catalogs we use the Catalogs Workspace. In the same workspace we can add new catalogs. After adding new catalogs we can managing existing catalog subscriptions. We can also import info about these updates from a catalog to SCUP repository.
SCCM SCUP – Manage SCUP software update catalogs
In the section we will see how to manage SCUP software update catalog. This includes adding catalogs, importing them and publishing the updates. We call an update as third party update that has not come from Microsoft. A lot of organizations such as Dell, HP have got updates too. Therefore to deliver the updates, these vendors register their catalogs with Microsoft. Registered catalogs from software vendors are called partner catalogs. Catalogs that you create, and that aren’t registered with Microsoft, are called user catalogs.
Manage SCUP software update catalogs – Add Catalogs in SCUP
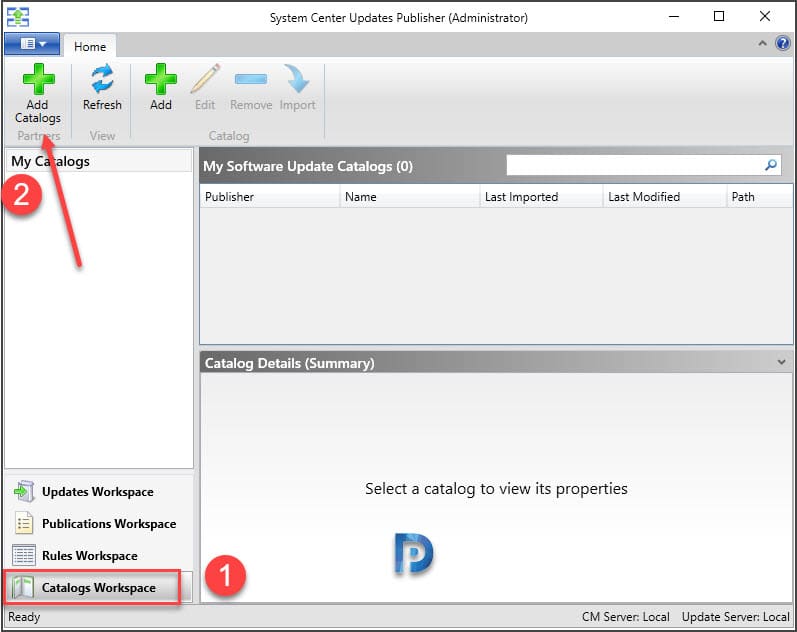
As a first step we will add catalogs in SCUP. Click Catalog Workspace. Next click Add Catalogs button.
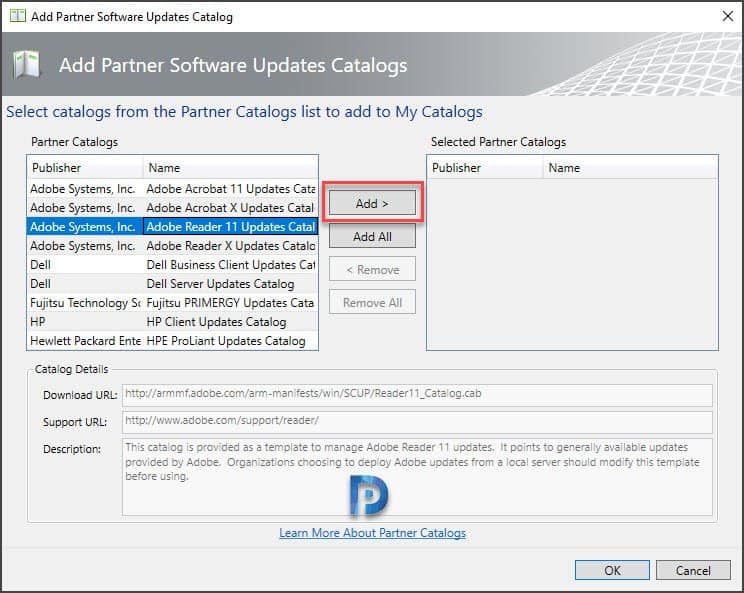
Select the partner catalog and click Add. When you click any catalog, at the bottom you find some useful info. This includes Download URL, Support URL, Description.
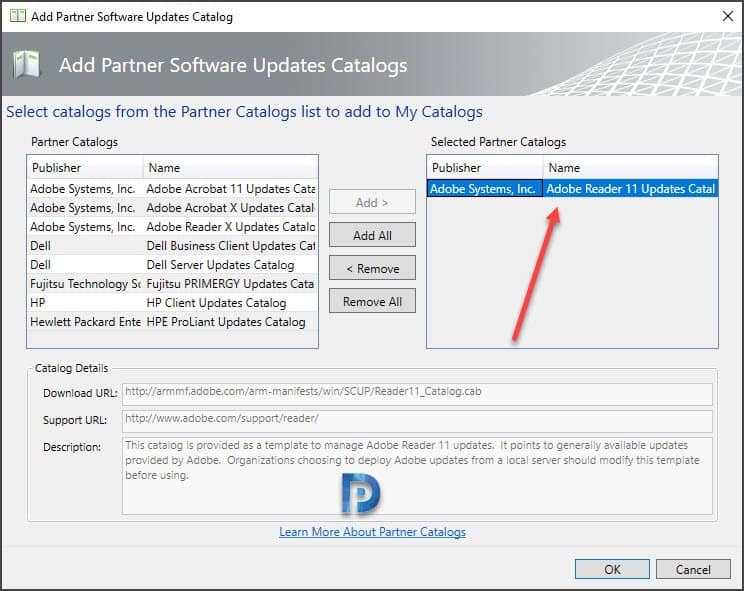
You will now see catalog added under Selected Partner Catalogs. In addition you can also select more catalogs and add them to the list.
Manage SCUP software update catalogs – Import Catalogs in SCUP
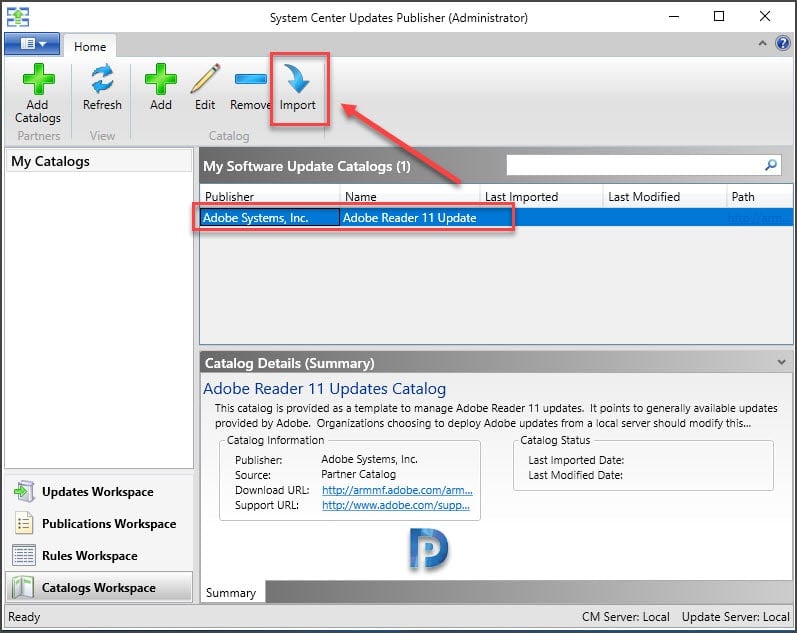
To import updates in SCUP, click Catalogs Workspace. On the top ribbon click Import.
Select the catalogs that you have added. These catalogs will be imported. Click Next.
 [su_note note_color=”#f2dede” text_color=”#a94442″ radius=”0″] Note – If you choose to always accept catalogs from a publisher, that publisher is added to the trusted publishers list.[/su_note]
The import catalog step is complete. We can see that 41 updates were processed and imported.
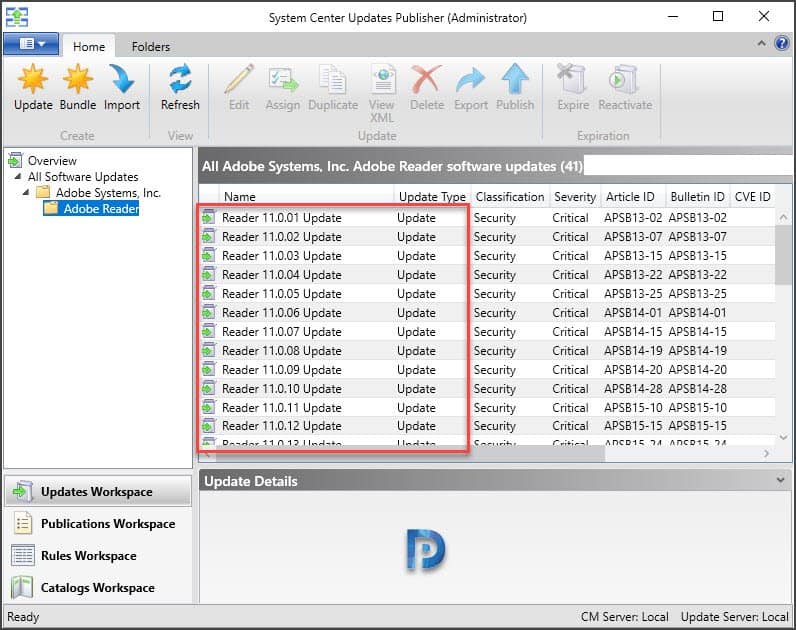
To see the imported updates, click Updates Workspace. Under All Software Updates expand the folders. You will see list of updates here.
Manage SCUP software update catalogs – Publish Updates in SCUP
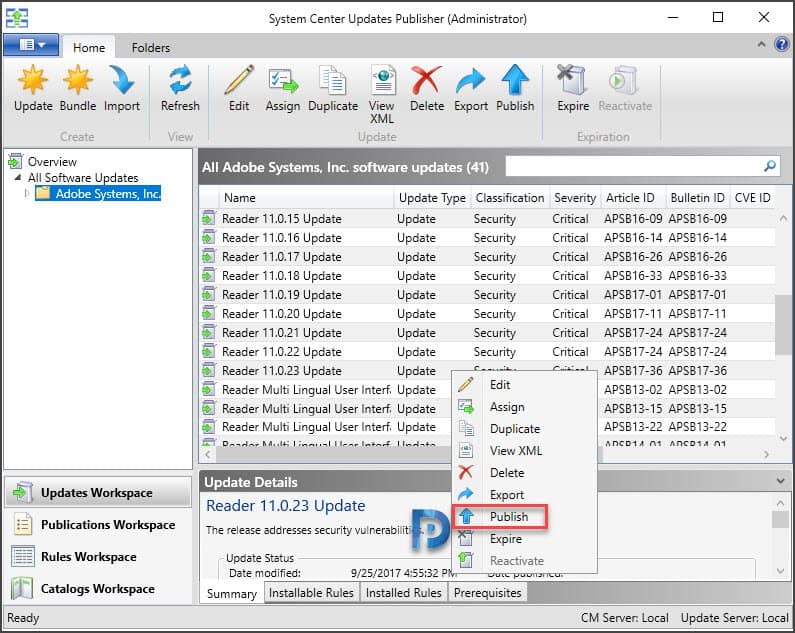
In the above steps, we saw the steps to import and add catalogs to SCUP. We will now see how to publish the updates. The steps are simple. Select any of the update that you want to publish. Right click and select Publish.
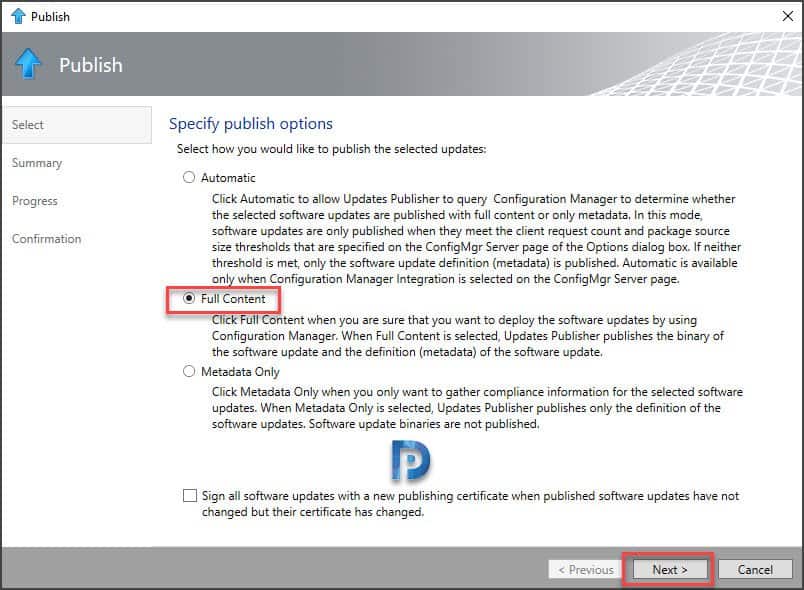
Specify Publish Options :- There are 3 options that you see here. They are almost self explanatory. However read this before you select the publish option.
- Automatic – Select this option if SCUP and ConfigMgr are integrated. This option determines whether selected software updates are published with either full content or only metadata.
- Full Content – Choose this option to deploy software updates using SCCM. After selecting this option, SCUP publishes binary and metadata of software update.
- Metadata Only – Select this option to collect only compliance information for selected updates. Because we have selected only Metadata, software binaries aren’t published.
Since I have configured SCUP and SCCM integration, I will select Full Content and click Next.
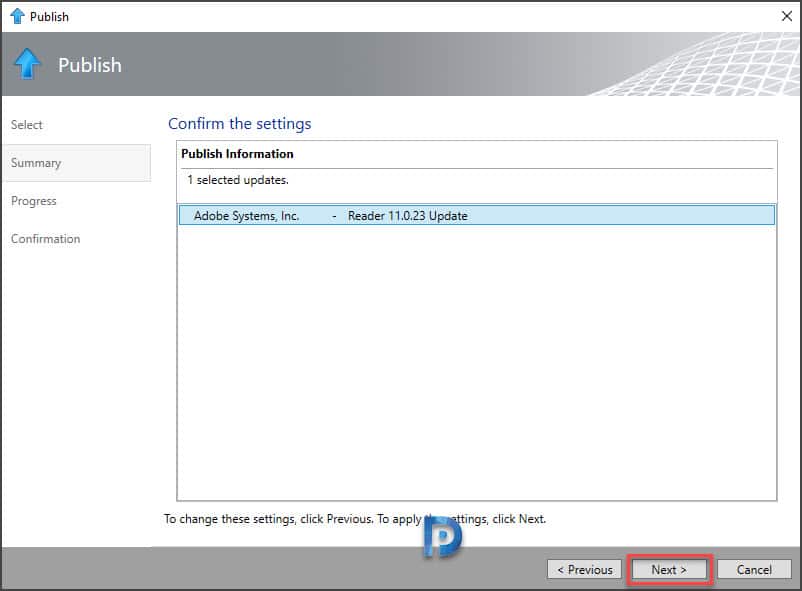
This is just the confirmation page. Click Next.
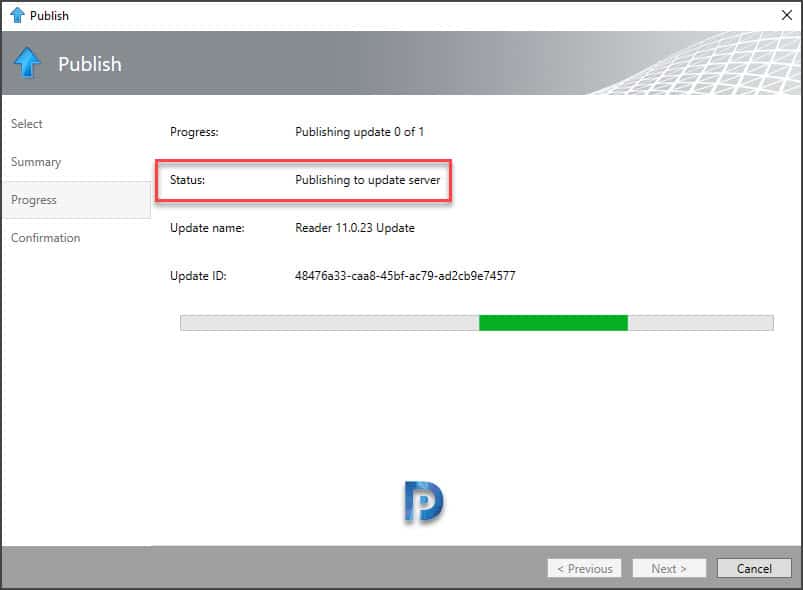
The updates are now in the process of publishing.
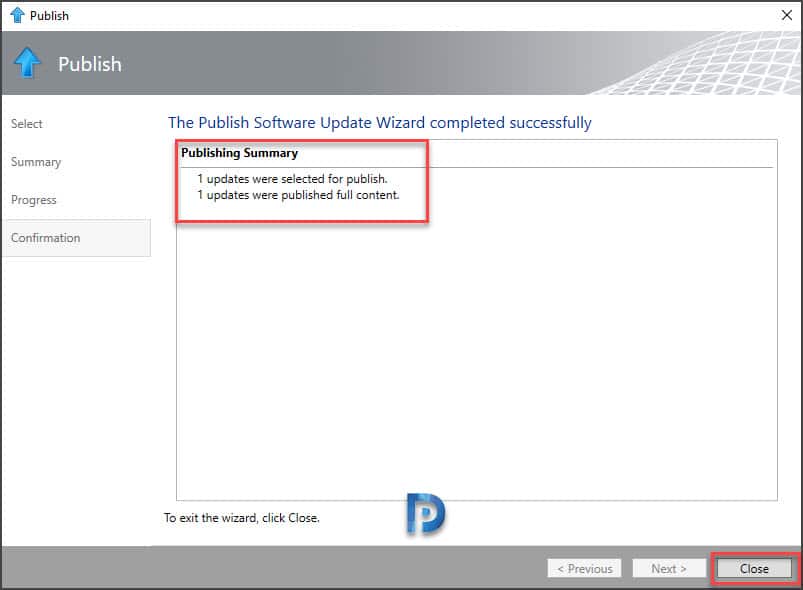
Publishing updates is now complete. Click Close.





Dear Mr. Prajwal Desai,
I have an issue with 3rd party updates. our environment is running adobe DC 2017 and upgrade was downloaded in SCCM and deployed on some machines as well smoothly but, WSUS server certificate “3rd party WSUS signing certificate” expired and we regenerated a new signing certificate from our CA Server which is working with all the products updates except the adobe reader DC 2020 update. the .cab file which is available on WSUS is showing the old certificate in its properties. I have tried all the possible solutions but clients are still getting that old .cab file. i have removed that file from WSUS also from CM_sources and CM_packages but clients are still getting that old .cab file and giving error “Failed to download updates to the WUAgent datastore. Error = 0x800b0101.” I will be very grateful if you guide me how can I redownload the .cab file with updated certificate so client didn’t receive this error.
Thanks
Hi Prajwal,
Can you share the list of Partner catalogs?
Here is the detail of the log file :
Page CatalogDownloadProgressPageViewModel about to start. ImportWizardViewModel 23/05/2018 11:40:04 1804 (0x070C)
Starting download(s) for 1 catalogs. CatalogDownloadProgressPageViewModel 23/05/2018 11:40:04 1804 (0x070C)
Starting the downloads up… CatalogDownloadProgressPageViewModel 23/05/2018 11:40:04 1804 (0x070C)
Starting a new download, there are currently 0 active download jobs, max is 4. DownloadManager 23/05/2018 11:40:04 1804 (0x070C)
Starting new task to schedule download jobs. DownloadManager 23/05/2018 11:40:04 1804 (0x070C)
Waiting for downloads to complete. CatalogDownloadProgressPageViewModel 23/05/2018 11:40:04 1804 (0x070C)
Task started to activate pending download jobs. DownloadManager 23/05/2018 11:40:04 7560 (0x1D88)
Activating job ‘3d3d8c2a-f8ff-44f7-b0ea-fda95ab937c7’, there are now 0 jobs pending activation. DownloadManager 23/05/2018 11:40:04 7560 (0x1D88)
Job ‘3d3d8c2a-f8ff-44f7-b0ea-fda95ab937c7’ was activated, there are now 1 active jobs. DownloadManager 23/05/2018 11:40:04 7560 (0x1D88)
All pending jobs have been activated, activation task is ending. There are 1 active jobs. DownloadManager 23/05/2018 11:40:04 7560 (0x1D88)
Download file: ‘http://armmf.adobe.com/arm-manifests/win/SCUP/Reader11_Catalog.cab’ failed. FileDownloader 23/05/2018 11:40:04 6976 (0x1B40)
==================== Exception Detail Start ======================= FileDownloader 23/05/2018 11:40:04 6976 (0x1B40)
Exception type: WebException FileDownloader 23/05/2018 11:40:04 6976 (0x1B40)
Exception HRESULT: -2146233079 FileDownloader 23/05/2018 11:40:04 6976 (0x1B40)
Exception Message: Le serveur distant a retourné une erreur : (503) Serveur non disponible. FileDownloader 23/05/2018 11:40:04 6976 (0x1B40)
Exception source UpdatesPublisher.BaseServices FileDownloader 23/05/2018 11:40:04 6976 (0x1B40)
Exception TargetSite Void MoveNext() FileDownloader 23/05/2018 11:40:04 6976 (0x1B40)
Stack: à Microsoft.UpdatesPublisher.BaseServices.WebClientWrapper.d__17.MoveNext()
— Fin de la trace de la pile à partir de l’emplacement précédent au niveau duquel l’exception a été levée —
à System.Runtime.ExceptionServices.ExceptionDispatchInfo.Throw()
à System.Runtime.CompilerServices.TaskAwaiter.HandleNonSuccessAndDebuggerNotification(Task task)
à Microsoft.UpdatesPublisher.BaseServices.FileDownloader.d__11.MoveNext() FileDownloader 23/05/2018 11:40:04 6976 (0x1B40)
===================== Exception Detail End ======================== FileDownloader 23/05/2018 11:40:04 6976 (0x1B40)
Job 3d3d8c2a-f8ff-44f7-b0ea-fda95ab937c7 has completed, the error code is 1. DownloadManager 23/05/2018 11:40:04 7256 (0x1C58)
Removed job 3d3d8c2a-f8ff-44f7-b0ea-fda95ab937c7 from active job list, there are no longer any active jobs. DownloadManager 23/05/2018 11:40:04 7256 (0x1C58)
All downloads have completed, 0 successful and 1 failures. CatalogDownloadProgressPageViewModel 23/05/2018 11:40:04 1804 (0x070C)
Page ImportUpdatesResultPageViewModel about to start. ImportWizardViewModel 23/05/2018 11:40:04 1804 (0x070C)
Hello Prajwal,
I have same issue, the import fails when I want to create a catalog.
I also wanted to know how to update the software like Java, adobe, firefox, google chrome, 7-zip, VLC, …
Can you please provide SCUP log?
Hello Prajwal,
I tried to publish Adobe Reader 11.0.23 but stuck in Progress dialog.
Progress : Publishing update 0 to 1
Status: Retrieving content
Update name: Reader 11.0.23 Update
I installed and configured SCUP as per your guidance on blog.
It would be a big help if you can tell what should I do to fix the issue!!
Thank you
HI.
Can you give me links to downlaod pdfs?
Thanks
Amrit
Hello Prajwal,
I have a small issue ,software update point shows like this however logs shows fine wcm.log and wsyncmgr.log
Hello,
where I can found the cab for Adobe Reader 2017 MUI? I find only DC version cab.
Regards
But how do you retire already published updates? I don’t think SCUP supports supersedence.
Actually, it does. You just need to re-publish it when it says “yes” in the superseded column and it supersedes it in SCCM
I mean you have to retire them manually in SCUP and then re-publish. In my experience Adobe does not retire old software in their catalog.
Adobe will retire Acrobat and Reader updates, but not some much Flash. IIRC there is an option to right click and expire/retire the update in SCUP. Publish it, and it’ll follow through into SCCM.
I need application without deployments and package without deployments SQL query or script send please