


This guide covers the steps to install SCCM distribution point on Windows 10 computer. I’ll show you how to turn on the SCCM PXE responder service on Windows 10 along with the Windows 10 DP role installation.
A Windows 10 distribution point in Configuration Manager hosts the content files that you deploy to devices and users. SCCM Distribution Points play a key role in the delivery of packages, programs, endpoint protection updates, applications, software updates, and operating system deployments (OSD).
Starting with SCCM 1806, you can enable PXE responder on a distribution point server and get rid of WDS as it isn’t required any more. This is a great feature, as the PXE-enabled distribution point can now be a client or server OS.

Until now, the Configuration Manager distribution point role has always been installed on a Windows Server, so this configuration will be interesting. However, let’s see how simple it is to install a Windows 10 distribution point in your SCCM hierarchy for the first time.
You can also choose Windows 11 as the operating system to install distribution point role. Ensure you install all the required prerequisites before installing the DP role. Refer to the following guide to learn how to install ConfigMgr DP role on Windows 11.
The procedure for installing DP on Windows 10 remains the same as that for other operating systems. Refer to the following guide for a step-by-step guide on how to install SCCM distribution point role on Windows Server.
Windows 10 as a Remote Distribution Point
If you’re unsure why SCCM DP should be installed on Windows 10, allow me to explain with a scenario: You have a remote site that has few users and no distribution point server. A SCCM DP is typically needed at every site to meet client needs. Now, you want to set up a distribution point server there, but you don’t have enough hardware resources. All you have is a laptop that is running Windows 10.
The good news is that you can answer PXE requests without WDS by using a client OS, like Windows 10, as an example. You don’t need a Windows Server and WDS to image the clients. Additionally, you could use a laptop running Windows 10 OS, enable SCCM PXE on it, and use it as a distribution point if you have remote sites without any distribution points installed. The DP role works flawlessly on both Windows 10 and Windows 11 operating systems.
Prerequisites for Windows 10 Distribution Point
To install the distribution point role on Windows 10, ensure the following prerequisites are met:
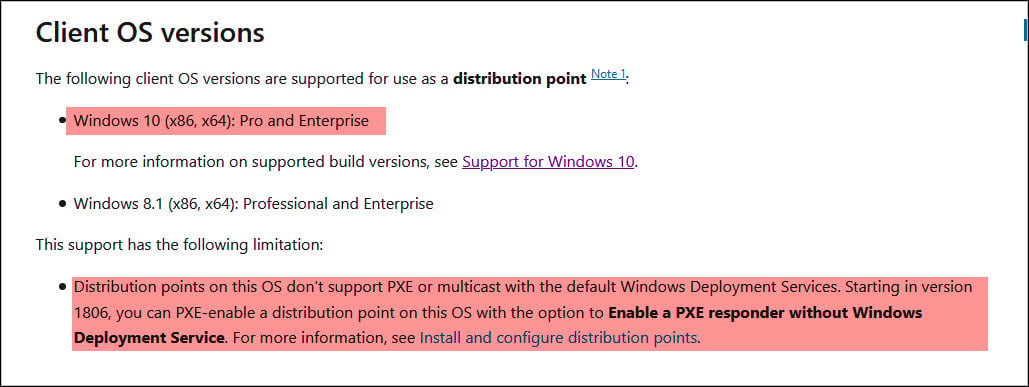
- The following client OS versions are supported for use as a SCCM distribution point – Windows 10 (x86, x64) Pro and Enterprise. Windows 8.1 is also supported but I recommend not to use it to install DP role because it’s outdated.
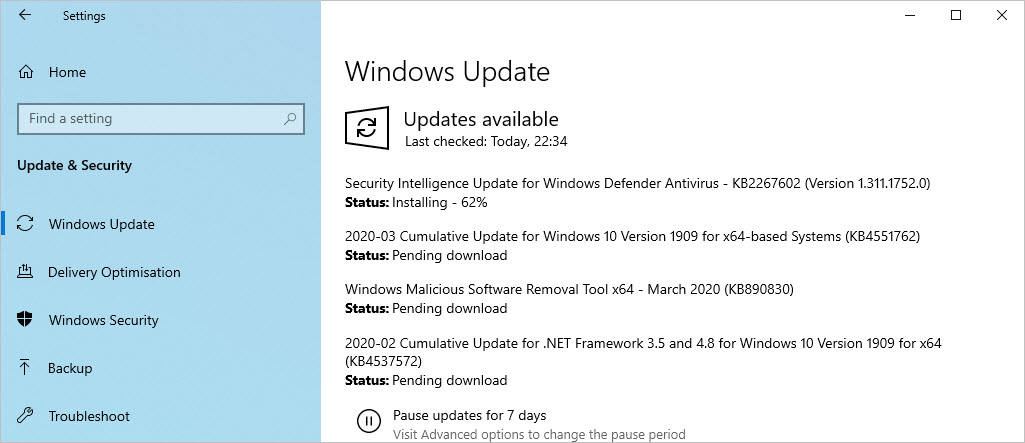
- Install the latest Windows updates on the Windows 10 machine that you wish to designate as a remote distribution point.
- Starting in version 1806, you can PXE role a Windows 10 distribution point. However, the option to enable a PXE responder without Windows Deployment Service is recommended.
- The distribution point must have the following inbound rules configured in the Windows firewall:
- Windows Management Instrumentation (DCOM-In)
- Windows Management Instrumentation (WMI-In)
- In case the DP prerequisites fail to install, you can manually install the IIS base components on a DP.
Configure Windows 10 for DP Role Installation
In this section, I’ll go over the steps you need to take before installing the DP role on Windows 10. The first step here is to install Windows 10 (Enterprise or Professional edition). Your Windows 10 distribution point can be either a VM or a laptop running Windows 10 Pro or Enterprise.
Big organizations typically use Configuration Manager to image the laptops. The task sequence will install operating system, system drivers, and required updates. You can go through the following guide to deploy Windows 10 using Configuration Manager.
Install Windows 10 and Latest Updates
If you aren’t using ConfigMgr to deploy the Windows 10 image, plug in the USB drive containing the Windows 10 installation and manually install it on the laptop. After you install Windows 10, you must install the latest updates. Go to Windows 10 settings > Windows Update and check for the latest updates. Once all the required updates are installed, restart the computer.
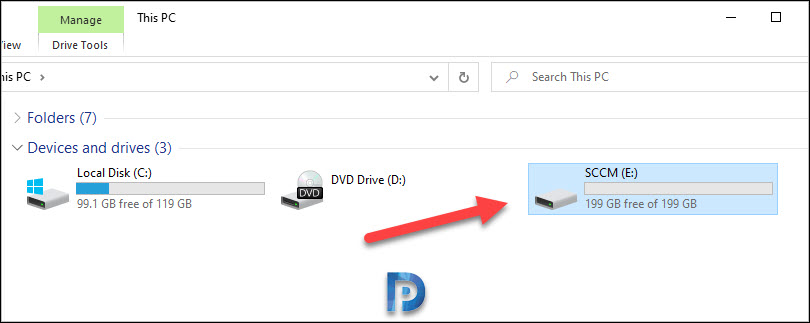
Disk Space for SCCM Content Library
After the Windows 10 device has been updated, the next step is to make sure it has enough space for the content library. If you aren’t sure what a content library is, check out this excellent guide from Microsoft on understanding content library in Configuration Manager.
The content library stores all content files for software deployments, for example: software updates, applications, and OS deployments. Although you configure the drive settings during the distribution point installation, you shouldn’t use the C: drive for the content library on Windows 10 DP. That’s because as you add applications and updates in SCCM, the content library size could eventually increase, and you could end up with a full C: drive. You may have to run the content library cleanup tool to remove orphaned content from the DP.
A recommended option is to choose a drive other than C: and ensure you have enough space on it. If you are installing the DP role on a Windows 10 virtual machine, you can increase the disk space as needed from the virtual machine settings.
Add Site Server Computer account to Windows 10 DP local administrator’s Group
You must add the SCCM site server computer account to the Local Administrators group on Windows 10. This step must be done before you install distribution point role otherwise the DP role installation fails.
In this example, CORPSCCM is the name of the site server and CORPDP is my Windows 10 device on which I am going to install the distribution point role. On the Windows 10 machine, open the Local Users and Groups console and select Groups. Right-click Administrators group and select Properties. On the General tab of admin properties, click the Add button and select the SCCM site server computer account. Click Apply and OK.
After performing the above steps, you must restart the Windows 10 device.

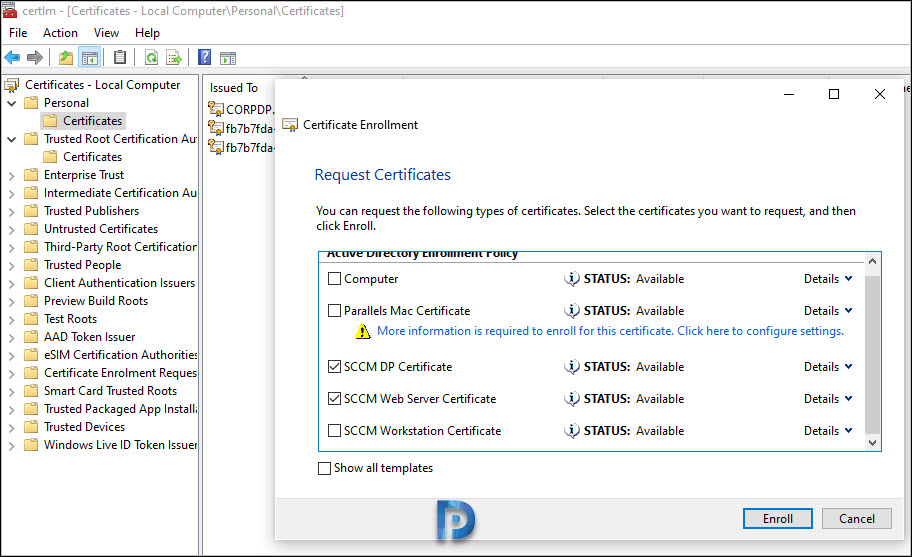
PKI Certificates for Windows 10 Distribution Point
If you are running the SCCM DPs on enhanced HTTP, skip the below step. If you have the DPs and management points running on HTTPS, you must enroll the distribution point certificate and web server certificate on this computer. This must be done before installing the DP role on Windows 10. In case you need the detailed steps to take, refer to the ConfigMgr PKI guide.
Install SCCM Distribution Point on Windows 10
Let’s look at the steps to install SCCM distribution point on Windows 10 computer.
- Launch Configuration Manager console.
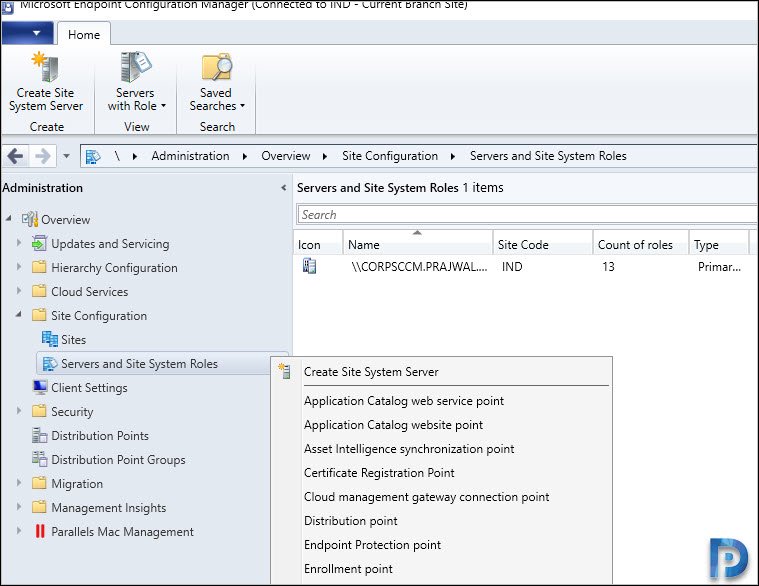
- Go to Administration > Overview > Site Configuration.
- Right click Servers and Site System Roles and click Create Site System Server.
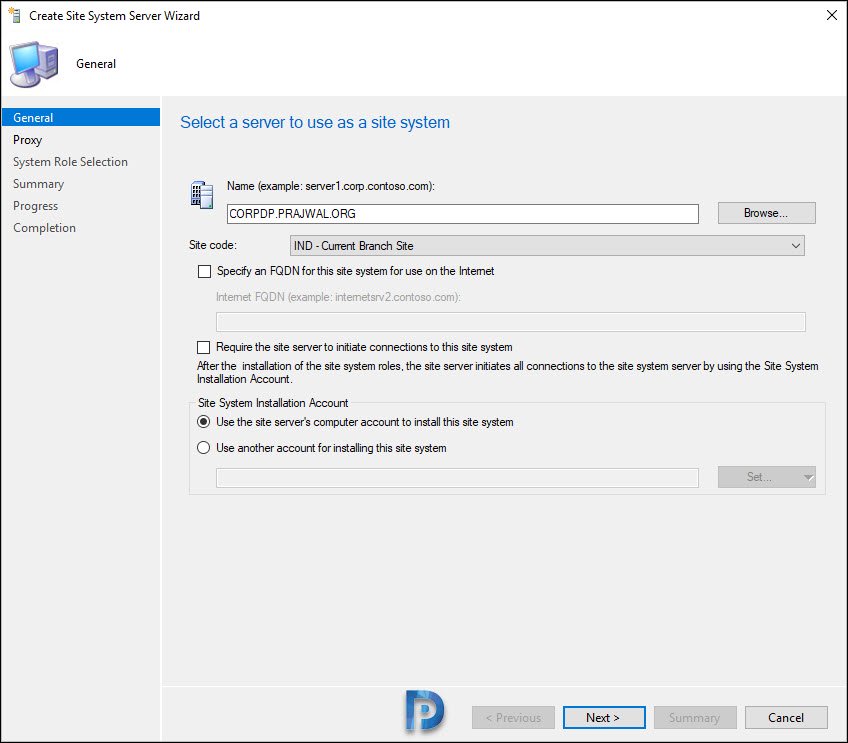
On the General page of create site system server wizard, click Browse and select Windows 10 computer on which you want to install the distribution point role. Select the correct site code and click Next.
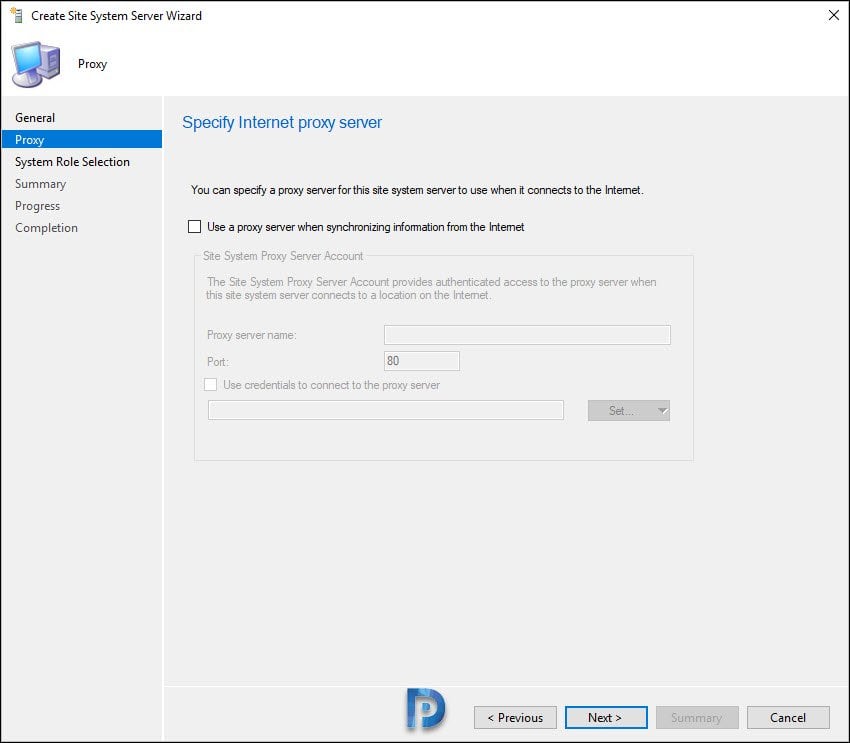
On the Proxy page, specify the internet proxy server if you have one in your setup. Otherwise click Next.
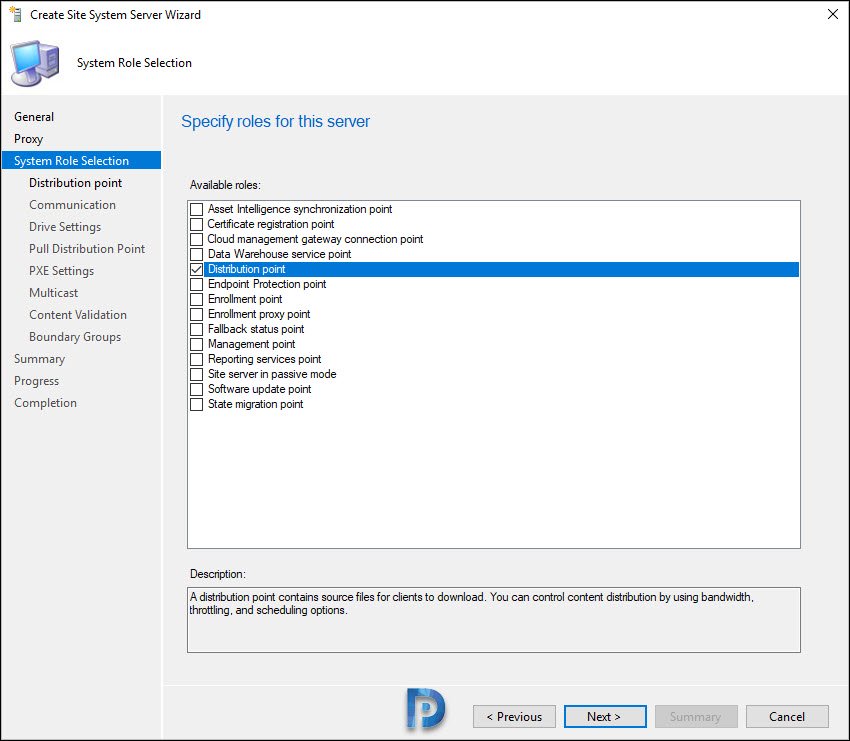
On the System Role Selection page, from the list of Available Roles, select Distribution Point. Click Next.
You can add a description for the Windows 10 DP and check the box Install and configure IIS if required by Configuration Manager. Click Next.

For distribution point communication, I will select the HTTPS protocol. Microsoft recommends using HTTPS communication for all Configuration Manager communication paths. Since both my DP and MP are set up to work with HTTPS, I will choose HTTPS on the Communication page and enter the DP certificate and password. If you are not using HTTPS, then select HTTP and select to create self-signed certificate. Click Next.

On the Drive Settings page, specify the drive space reserve (MB) which is 50 MB by default. You may increase this space up to 1 GB as a best practice. Specify the content locations for the content library and package share. By default, the content locations are set to Automatic.
The primary content location will be set to the disk drive that has the most disk space at installation and the secondary location assigned the disk drive that has the second most free disk space. Click Next.

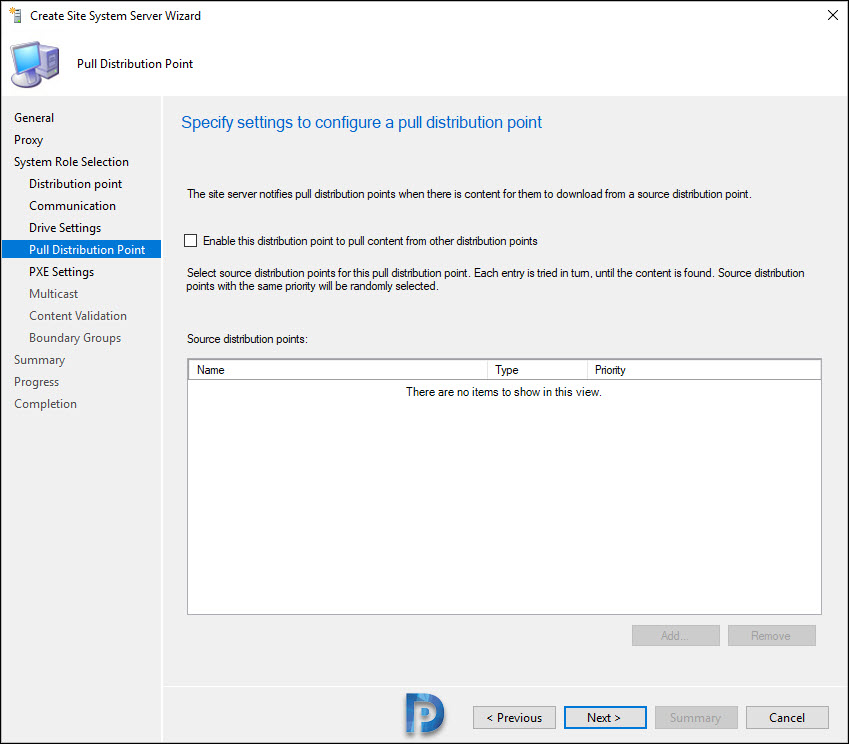
If you are new to the concept of pull distribution points, I recommend reading the guide on SCCM Pull Drive Configuration. You can configure the pull DP after installing the DP. On the Pull Distribution Point page, click Next.
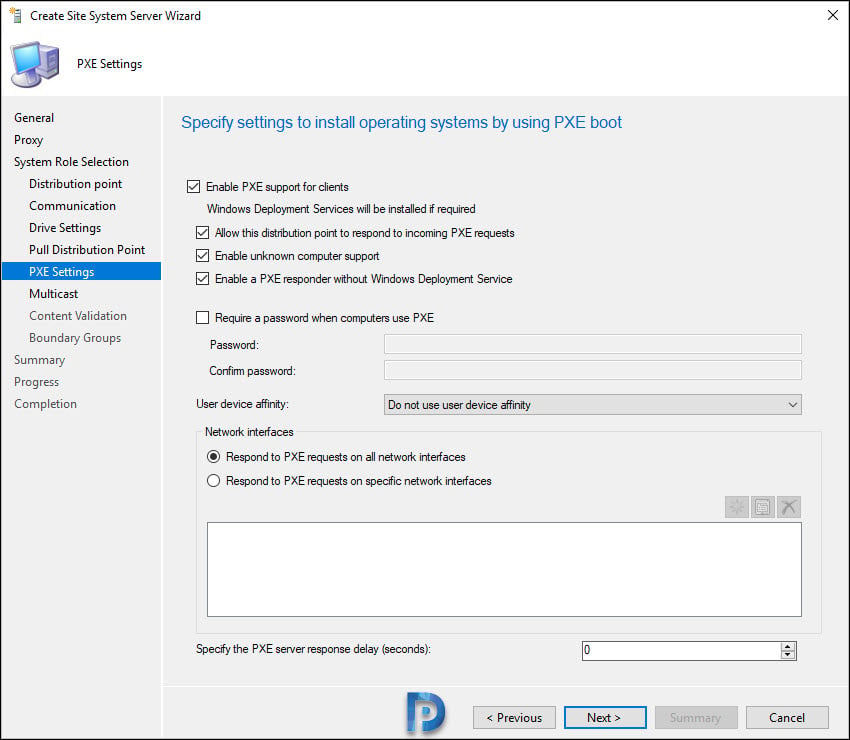
Enable SCCM PXE Responder on Windows 10 DP
We have come to the point where we enable SCCM PXE responder on Windows 10 distribution point. On the PXE settings page, enable the following.
- Enable PXE support for clients
- Allow this distribution point to respond to incoming PXE requests
- Enable unknown computer support
- Enable a PXE responder without Windows Deployment Service
Additionally, you may set or configure a password when computers use PXE.
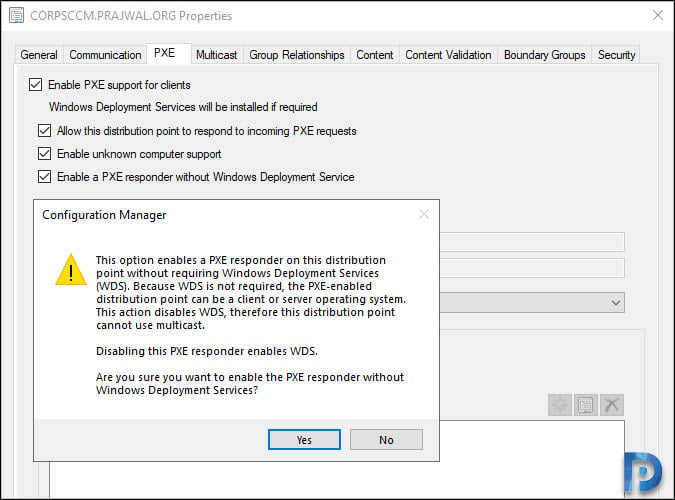
Notice that when you enable a PXE responder without Windows Deployment Service option, you get a warning box.
This option enables a PXE responder on this distribution point without requiring Windows Deployment Services (WDS). Because WDS is not required, the PXE enable distribution point can be a client or server operating system. This action disables WDS, therefore this distribution point cannot use multicast. Disabling PXE responder enables WDS.
When asked are you sure you want to enable PXE responder without WDS, click Yes.
The Multicast settings are automatically greyed out. Click Next.

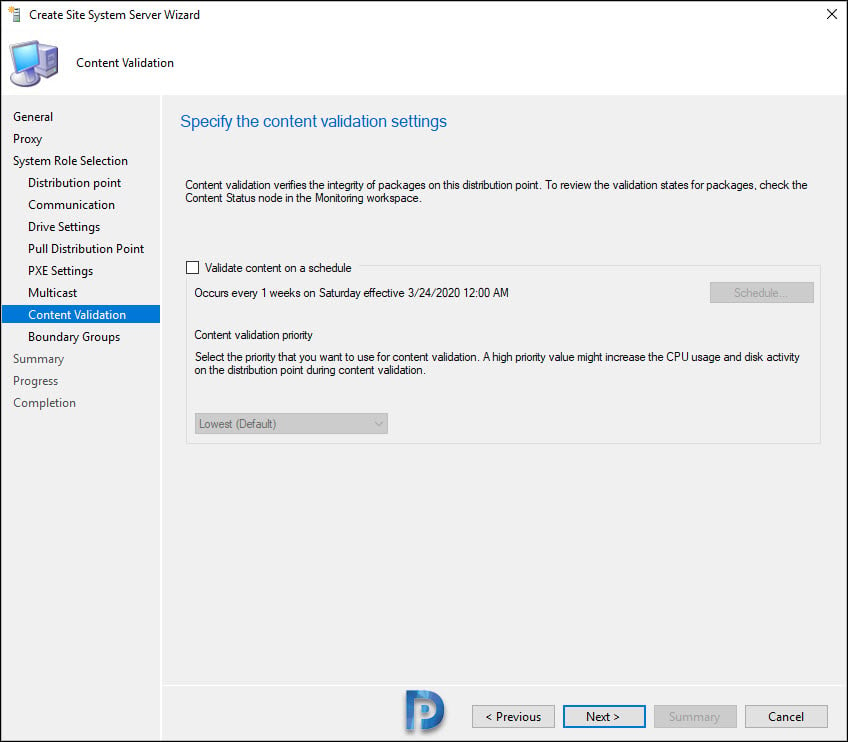
Content validation verifies the integrity of the packages on the SCCM distribution point. You can later enable the content validation on a DP by going to the DP properties. On the Content Validation page, click Next.
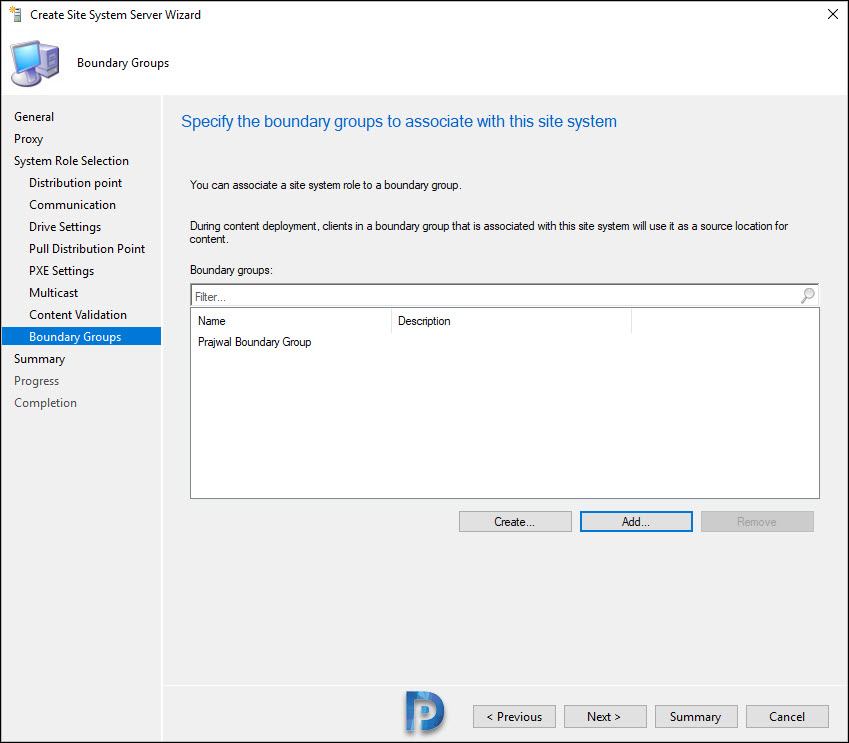
On the Boundary Groups page, you can associate the current DP with multiple boundary groups. To add the boundary group, click Add and select the boundary group(s). Click Next.
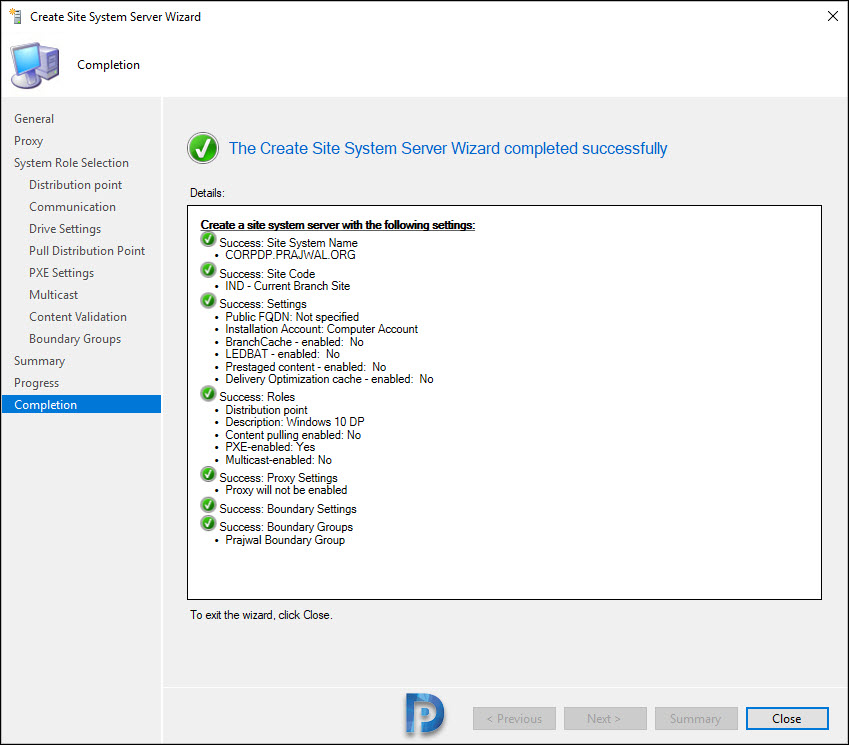
Click Next on Summary page and finally click Close. This completes the steps for installing distribution point role on Windows 10. In the next step, I will show you how to monitor the DP installation and verify whether the distribution point role installation is successful or not.
Monitor Distribution Point Role Installation on Windows 10
After installing the distribution point on Windows 10, there are two ways to keep an eye on the DP role installation.
- Monitoring workspace in Configuration Manager console.
- SCCM Log files.
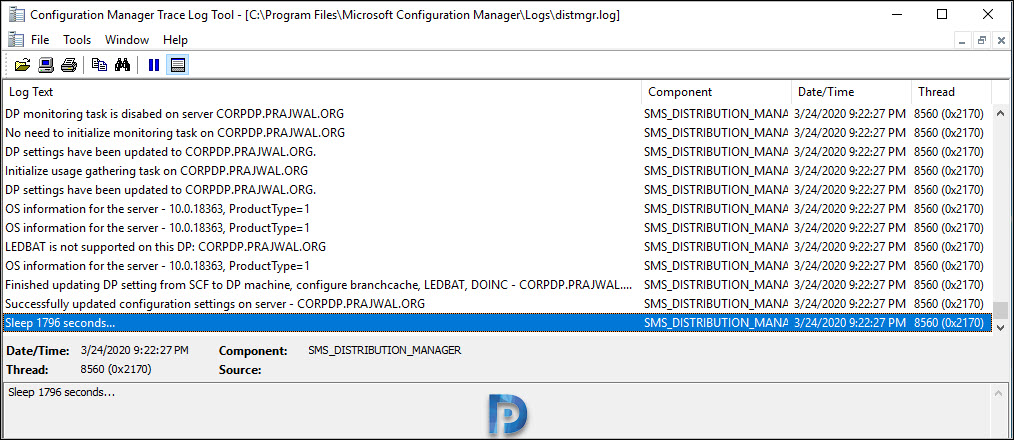
On the site server, open the Distmgr.log file. This file records content creation, compression, delta replication, and information updates. You can use the ConfigMgr log file viewer tools to read the SCCM log files.
From the screenshot below, we see the distmgr.log shows that the distribution point role has been successfully installed on the Windows 10. You don’t have to restart the Windows 10 device after the DP role is installed.
After few minutes, notice that on Windows 10 distribution point, the ConfigMgr PXE Responder Service is up and running. You can verify the status by going to services console on Windows 10 DP. If you don’t see this service listed, ensure you have enabled the PXE role without WDS.

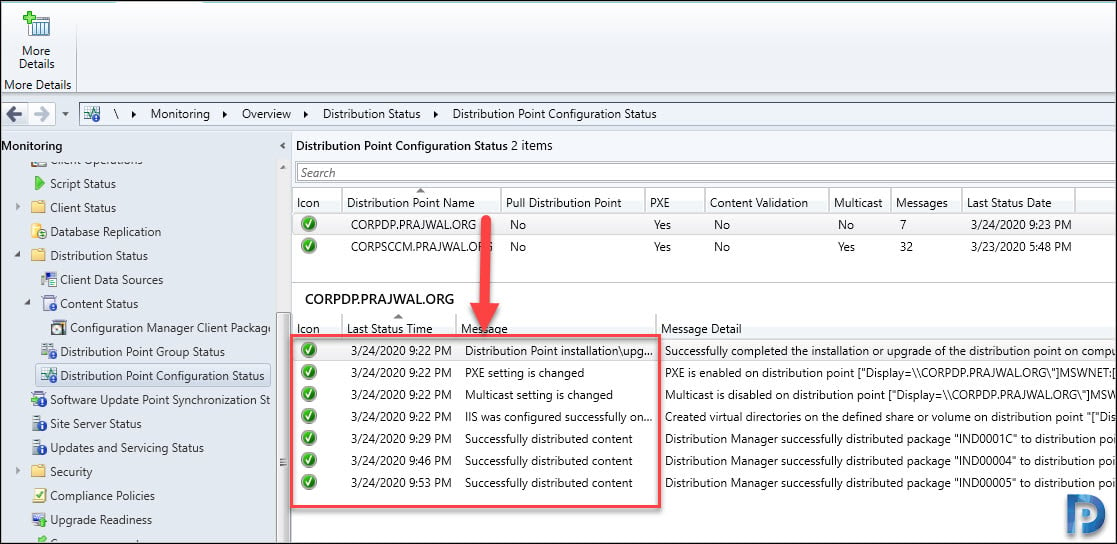
Another way to verify if the DP role status is by going to Monitoring > Overview > Distribution Status > Distribution Point Configuration Status. Select the Windows 10 distribution point and verify the status shows as green. The install SCCM distribution point on Windows 10 is now complete.
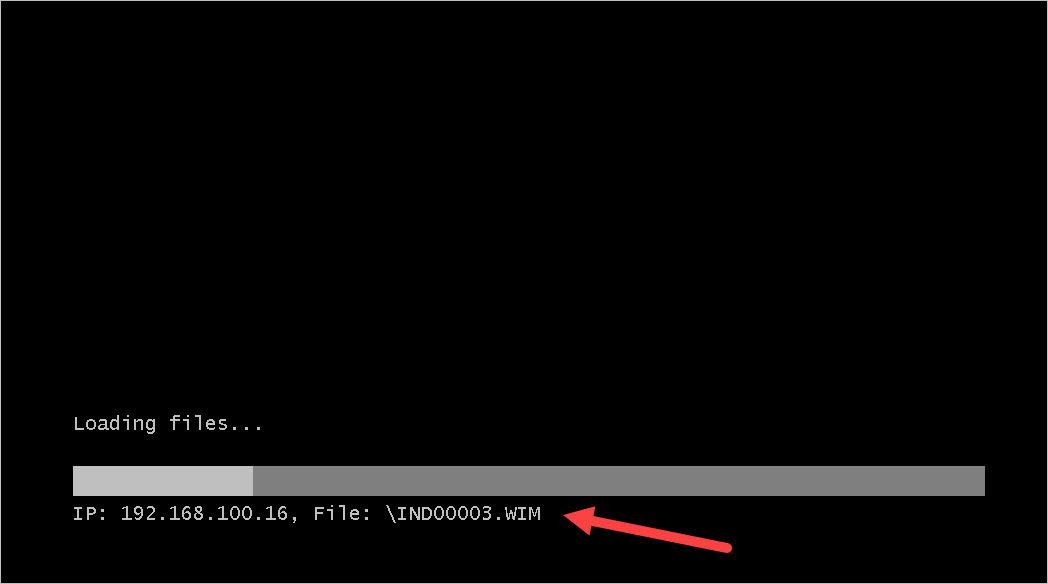
On the Windows 10 DP, open the SMSPXE.log file. Look for the line Start SCCM PXE as a service. Next, you can also see the sccmpxe.exe version 5.0.8913.1032 with file location.

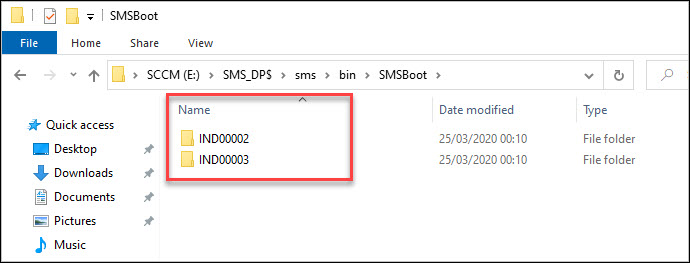
When you install SCCM distribution point on Windows 10 and enable PXE responder service, there is no RemoteInstall folder created. Instead, sccmpxe.exe executable will respond to PXE requests. In case you are wondering, the Boot Images and content are in the SCCMContentLib folder.
Note: If you have set up Windows 10 Distribution Point to run in HTTPS mode, you must perform an additional step. Launch IIS Manager > right click Default web site and click Edit Bindings. Ensure HTTPS is listed along with HTTP. Edit HTTPS and select a valid certificate. If you don’t do this, you may encounter socket connect failed 8007274d. Sending with winhttp failed 80072efd error.
Testing the OSD with Windows 10 DP
Once you determine the DP role installation is successful on Windows 10, let’s test the PXE and OSD. Before that ensure you distribute your SCCM boot Images and OSD content to the distribution point.
To distribute the boot images, go to Software Library > Operating Systems > Boot Images. Right-click Boot Image and select Distribute Content. Select the newly created Windows 10 Distribution Point from your DP List.
Congratulations on setting up a new Windows 10 distribution point. You can now use this DP to deploy the operating system deployment for new laptops and devices.

What are the recommended supported clients per site when thinking about a Win10/Win11 DP?
We have several sites that range from 50 > 3000 users.
Client wants to get rid of Server OS as far as possible.
any difference between a DP running on Windows 10/11 and DP running on Windows Server?
No difference.
Thanks for providing configuration details.
Configuration of Windows 10 DP is completed without any issues. But client is picking primary server instead of local Win 10 dp. Boundary changes are also done, but still client picks the primary server.
Any specific configurations to be made so can pick this dp
Re-check the boundary and boundary groups.
Hello
Great article, very usefull
Are you aware of any issues in regards of USMT services on this DP ?
Excellent, this could be the answer to my prayers.
However, what features do we lose or gain by not having WDS? Can we still use Task Sequences in the same way as if we had a DP?
Hi All,
Just I started configuring DP on windows 10 1809. I am getting the below error from Distmgr.log file. could you help on this error
DPID 9 – NAL Path [“Display=\\DPSERVER\”]MSWNET:[“SMS_SITE=ABC”]\\DPSERVER\ , ServerName = DPSERVER, DPDrive = C:, IsMulticast = 0, PXE = 0, RemoveWDS = 0, SccmPXE = 0
PullDP [“Display=\\DPSERVER\”]MSWNET:[“SMS_SITE=ABC”]\\DPSERVER\ is marked Uninstalled
Translated server name DPSERVER to ABC.com\DPSERVER.
CWmi::Connect() failed to connect to \\DPSERVER\root\CIMv2. Error = 0x800706BA
STATMSG: ID=2391 SEV=E LEV=M SOURCE=”SMS Server” COMP=”SMS_DISTRIBUTION_MANAGER” SYS=ADMIRAL.ABC.com SITE=ABC PID=13948 TID=2640 GMTDATE=Fri Jul 02 07:15:07.771 2021 ISTR0=”[“Display=\\DPSERVER\”]MSWNET:[“SMS_SITE=ABC”]\\DPSERVER\” ISTR1=”” ISTR2=”” ISTR3=”” ISTR4=”” ISTR5=”” ISTR6=”” ISTR7=”” ISTR8=”” ISTR9=”” NUMATTRS=1 AID0=404 AVAL0=”[“Display=\\DPSERVER\”]MSWNET:[“SMS_SITE=ABC”]\\DPSERVER\”
DPConnection::ConnectWMI() – Failed to connect to DPSERVER.
user(NT AUTHORITY\SYSTEM) runing application(SMS_DISTRIBUTION_MANAGER) from machine (Admiral.ABC.com) is submitting SDK changes from site(ABC)
STATMSG: ID=2370 SEV=E LEV=M SOURCE=”SMS Server” COMP=”SMS_DISTRIBUTION_MANAGER” SYS=ADMIRAL.ABC.com SITE=ABC PID=13948 TID=2640 GMTDATE=Fri Jul 02 07:15:07.805 2021 ISTR0=”[“Display=\\DPSERVER\”]MSWNET:[“SMS_SITE=ABC”]\\DPSERVER\” ISTR1=”DPSERVER” ISTR2=”” ISTR3=”” ISTR4=”” ISTR5=”” ISTR6=”” ISTR7=”” ISTR8=”” ISTR9=”” NUMATTRS=1 AID0=404 AVAL0=”[“Display=\\DPSERVER\”]MSWNET:[“SMS_SITE=ABC”]\\DPSERVER\”
Will try again after 20 minutes …
Check DNS records and see if you can resolve the computer name.
Anyone know if Win10 LTSC will work as a DP? Or does it need to be only Win10 Pro or Enterprise?
Dear sir,
I have configured the DP in workstation as you have mentioned but the image deployment not working.
Please suggest
Please include the error details so that I can troubleshoot the issue.
Hey, Prajwal. I just want to say you’re the main reason i’ve been able to hold down my job for the last five years.
This tutorial is EXACTLY what I needed right now. I’ve gone through the steps and it appears to complete, stating that IIS was successfully configured. However, when I hop into my Win 10 DP, I don’t see the IIS feature enabled.
Will it be okay if I enable IIS myself, or will I need to reinstall the DP?
Should I have enabled IIS before I started the DP install?
Can you uninstall and install the DP role again. I almost forgot I had installed DP role on Windows 10 🙂
Hello,
I’ve a problem. After the http/https choice when i click Next, the sccm console closes.
So i can’t finish the installation of distribution point.
(sorry for my English)
Hi there, if you wanted to use PXE to serve a lot of computers over multicast, how much work is involved in installing and configuring WDS with this method?
WDS is a component of Windows Server, and is not available on Windows 10. If you require multicast, your DP must be running a server OS.