In this post we will see how to deploy Windows 10 Enterprise using SCCM. If you have Microsoft System Center 2012 R2 Configuration Manager in your environment or higher version that that, you will most likely want to use it to deploy Windows 10. In this post we will cover the steps to deploy windows 10 using SCCM. If you are thinking if an in-place upgrade to Windows 10 is possible, then yes you can also upgrade to Windows 10 with System Center Configuration Manager which i will be covering in a separate post. You can use a System Center Configuration Manager task sequence to completely automate the process.
Before you start, ensure that you have Windows 10 iso file extracted to a folder. In my case I have extracted Windows 10 files to a folder.
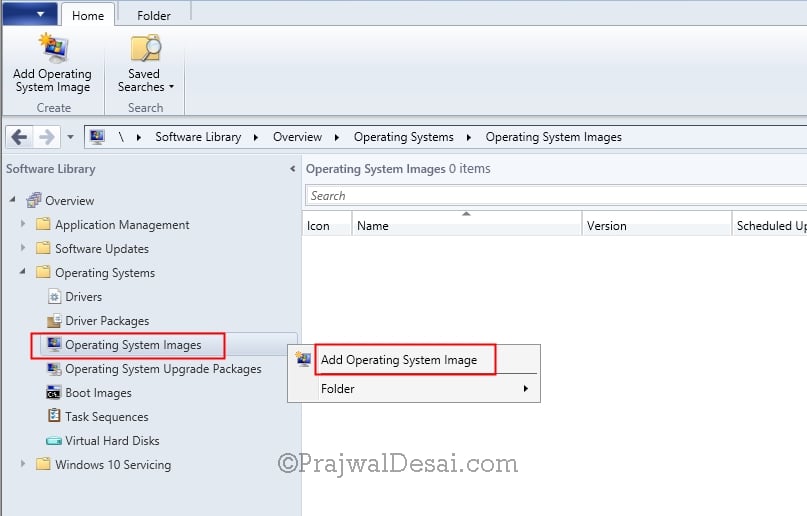
Launch the Configuration Manager console, click on Software Library, click Operating Systems, right click on Operating systems images and click on Add Operating System Image.
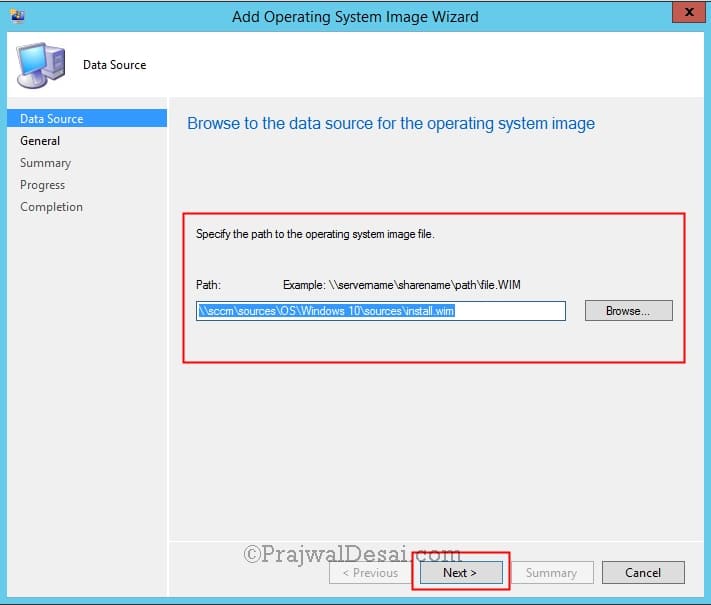
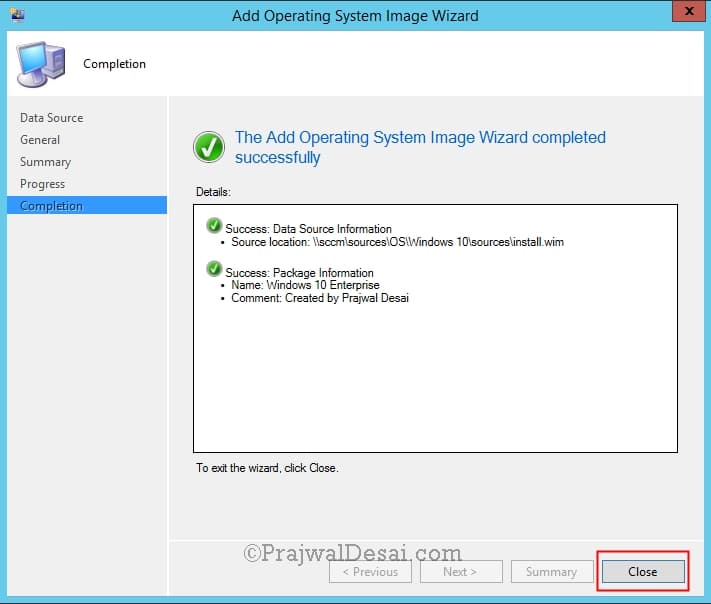
Specify the path where the install.wim is present. Click Next.
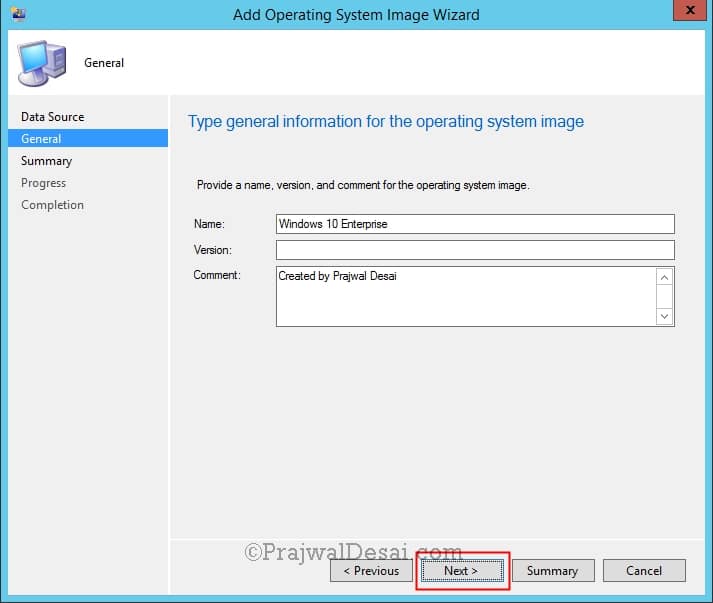
Provide some details for the operating system image. Click Next.
Complete the remaining steps and click close. After this step, ensure that you have distributed the OS to the distribution point.
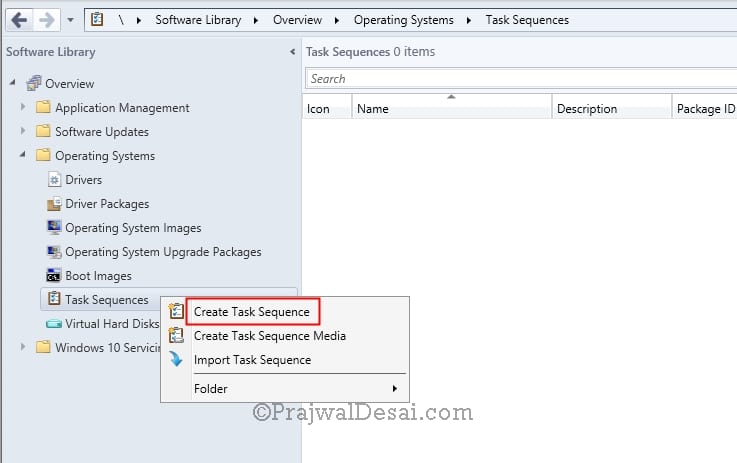
Launch the Configuration Manager console, click on Software Library, expand Overview, expand Operating Systems, right click Task Sequences and click Create Task Sequence.
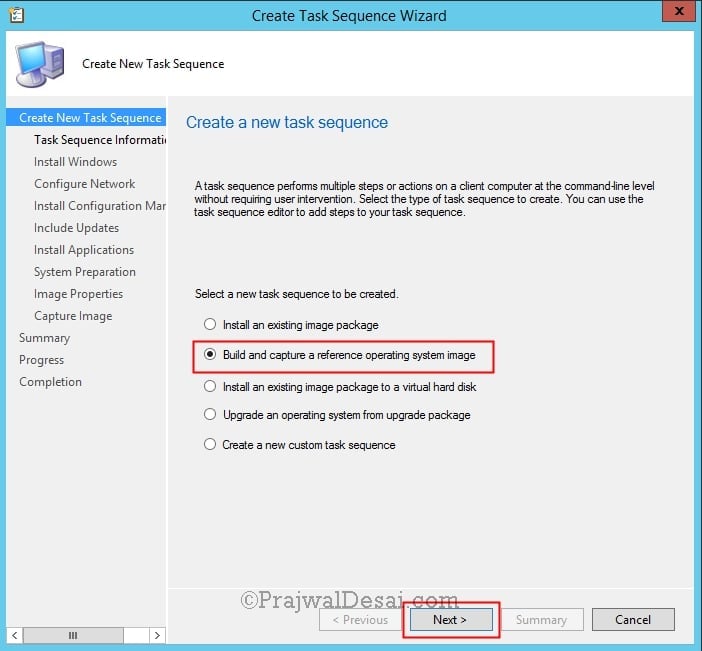
Choose Build and capture a reference operating system image. Click Next.
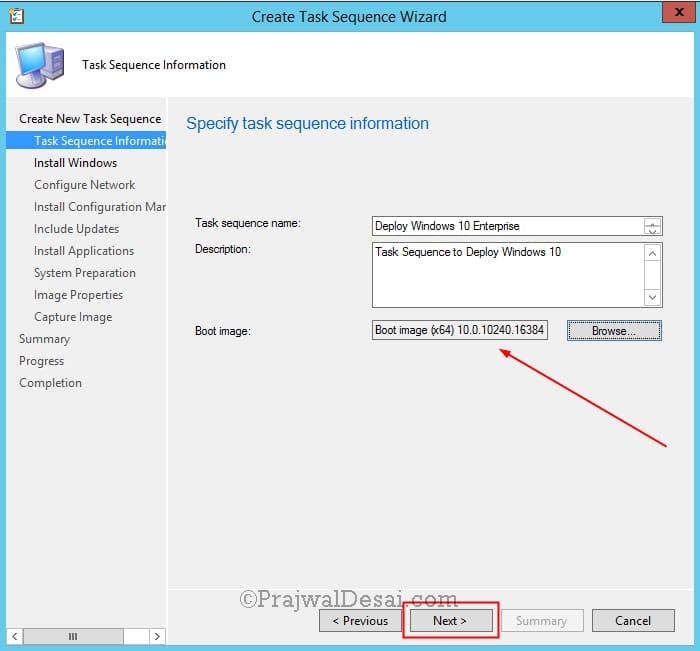
Provide a name to the Task Sequence and choose the boot image. Click Next.
NOTE – You must first enable the command support on both the boot images(x64 and x86) and then distribute it to the distribution point. To enable the command support right click on each of the boot image, click on properties and under Customization tab check the box Enable Command Support (testing only). Enable command support for both the boot images. By default the boot images are not distributed to DP and if you don’t distribute the boot images you will not be able to select the DP in the below step. To distribute the boot images to DP, right click on each boot image and click Distribute Content. Check this post for more info – https://www.prajwaldesai.com/boot-images-distribution-point-configuration-osd-sccm-2012-r2/
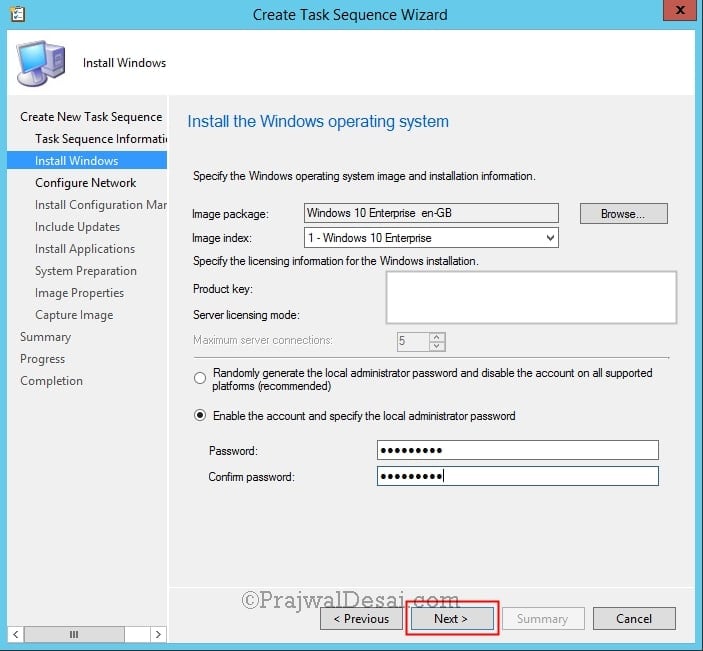
Specify a local administrator password and click Next.
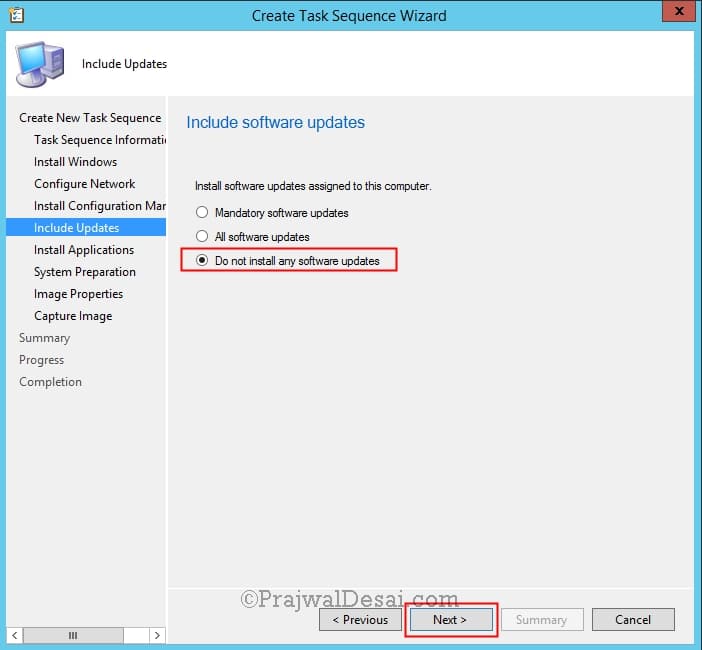
Decide if you want to include software updates during deployment, click Next. Complete the rest of steps and complete the TS wizard.
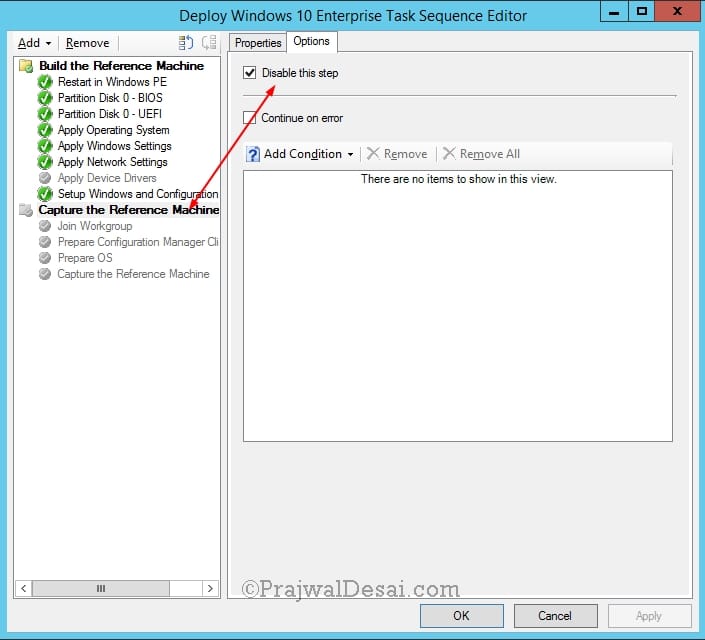
Since we had chosen build and capture OS method, I really don’t want to capture the OS. I just want to deploy it to a VM. We will disable the “Capture the Reference Machine” step in the TS. I am deploying the Windows 10 OS to a virtual machine so I have disabled the Apply Device Drivers step. If you are deploying the TS to a computer or laptop then please import the device drivers and then deploy the OS.
Deploy the Task Sequence to All Unknown computers collection.
Press F12 to boot from the network. The OSD process now begins.
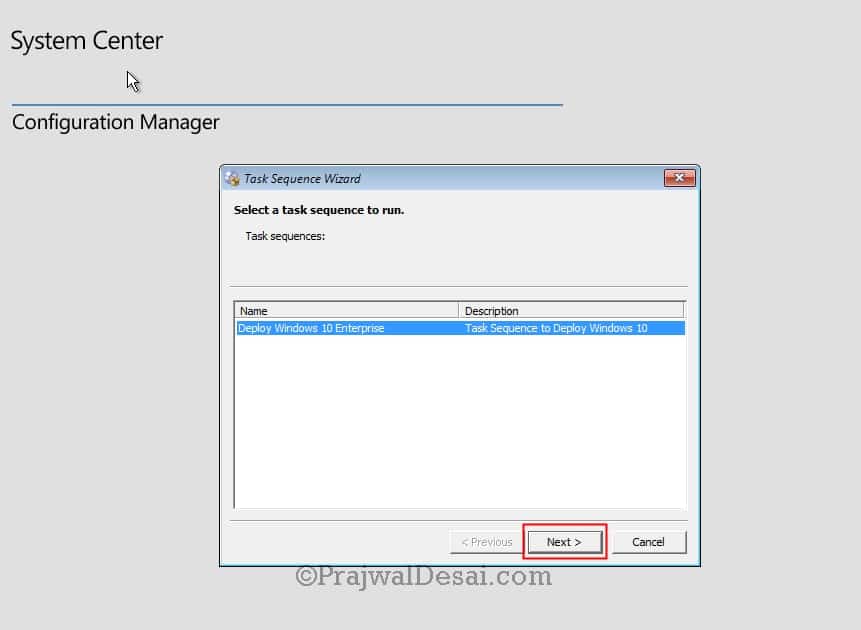
Choose the Task Sequence and click Next.
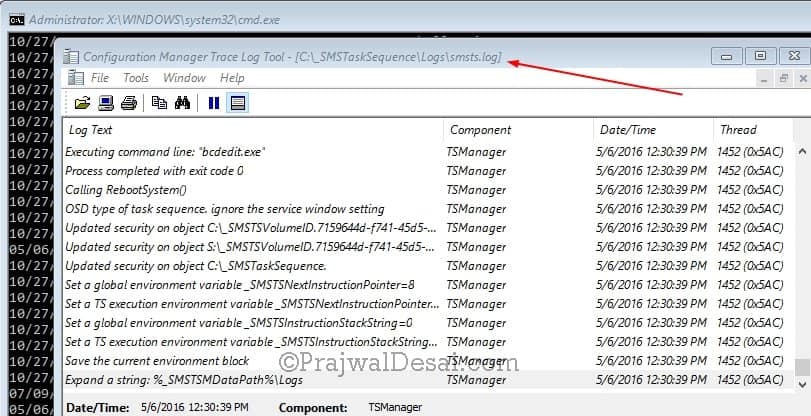
Monitor the OSD process by opening smsts.log file.
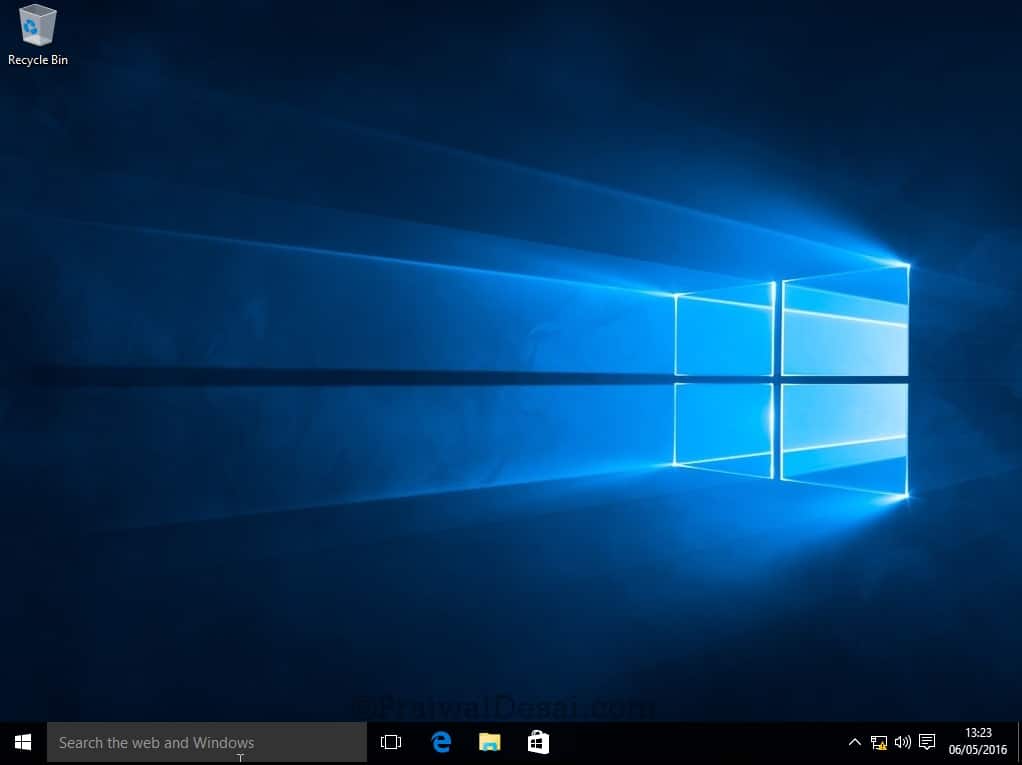
Wait for the Windows 10 to get installed.
There you go. We have installed Windows 10 successfully.





Hi Prajwal, can we deploy windows10 -1909 Using on SCCM 2012 R2 SP1
Hi
I have created a WIN 10 Entreprice image and wants to convert it to a wmi file for deployment with SCCM, can you please provide stemps
I was wondering if there is a way to install windows this way but come up to the OOBE like a standard windows installation? I’m trying to use a provisioning package.
I know this is an old post but I want to ask if this method can be used to mass deploy? I mean, is it necessary to capture a reference image at all? can I just create a task sequence like what you did here, then add a couple of apps and some updates, then use that to deploy to many machines?
Hi Prajwal,
Thank you for the post. I was able to deploy this task sequence and PXE boot a 2016 Gen 2 Hyper-V VM and install Windows 10. However, when I tried to do the same with a Gen1 VM, it wouldn’t work. The SMSPXE log said “Warning: Matching Processor Architecture Boot Image (0) not found”. So I checked my x86 Boot image’s “Deploy this boot image from the PXE-enabled distribution point” and tried again. Now when trying to PXE boot a Gen1 VM, it says “Boot failure. Reboot and Select proper Boot device or Insert Boot Media in selected Boot device”. Similar problem happened when I tried to PXE boot a laptop. How can I make this work for Gen1 VM and actual machines?
yes the administrator account is disabled when you install windows 10 for the first time.
How we can enable account?
How we can enabled the same? or any other option it automatically enabled after the Windows 10 Deployment?
Hi Prajwal,
After the deployment of windows 10 using SCCM(1606)
I am not able to log in into system Its show me Administrator account has been Disabled.
I ma using VLSC downloaded ISO.
Hi Prajwal,
My SCCM system do have Boot Image version 10.0.14393.0. Does it capable to make capture media and deploy newest windows OS? Is there anyway to update Boot Image?
What is the ADK version and SCCM version ?.
ADK version 10.1.15063.0 and SCCM version 1702
Hello.
I’m getting the error “Windows PE initialization failed with error code
0x80220014” while trying to install and capture the Windows 10 image.
I searched the Internet for similar threads but only found articles
related with ADK 1511, which shouldn’t apply to my case because I have
the latest version installed. Properties on the adksetup.exe file
indicates version 10.1.15063.0.
Any ideas?
Thanks in advance!
Cheers!
I have replied in the forums.
Dear Prajwal i already capture the image now i want to push the image in baremetal computers kindly send some document and nother issue i have is i need to push the fresh image to microsoft surface pro 3 and 4 device so do give some advice my contact is masood0404@gmail.com
Good Afternoon,
Thank you very much for this, everything works apart from that once deployed the Region & Language is English (United States) even though my Windows is en-GB?
Thank you KT 🙂
Hi Prajwal
Thank you very much for the post.
I did your step by step guide and deployed Windows 10 to 3 virtual client and 1 surface pro 4.
Unfortunatly in all 4 devices, the content cannot be somehow downloaded in the software center. The package is appears in the software center, but it just says “Downloading (0% complete)”.
Somehow the files cannot be downloaded it seems. DO you have any idea?
Hi, I want to backup the all user data and profile, then perform a clean windows deploy as you did, and finally restore all user data and profile. Do you know how can i do that?
USMT is what you need – https://technet.microsoft.com/en-us/library/hh397289.aspx
Hello,
I have a problem after installing my windows drive letter is X you have the solution?
Thank you
You must create a new task variable. Call it Preserve Drive letter Place it after Partition Disk variable and set settings as seen in picture. This worked for us! https://uploads.disquscdn.com/images/310c1d85faf5543027e206d6ebfbb0279e3d49971d1a60ccbbdbfa92993cf8ac.jpg
Hi
We have been trying to capture a windows 10 image from acer tab(acer switch 11 sw5 171 p 36vb) using SCCM capture media sequence(in USB) , capture task sequence fails after 0x80070714 error immediately when device boots in OOBE. However the same capture sequence is working for capturing a win7 laptop . Seems like the USB to Ethernet connector is unable to get IP in OOBE so is unable to save the image over network share.
I have questions regarding OSD on acer tab
1) simple USB to Ethernet connector will work for PXE booting over LAN, or is there any specific hardware I need to procure ?
2) Any windows 10 specific step that is needed to be performed, not much documentation is available right now over the internet.
3) Is MDT required for OSD of win 10 with sccm 2012 R2 sp1?
4) boot(x64) image present in sccm 2012 r2 sp1 can be used to deploy window 10 ? or any specific changes to be made
5) do I need to put the USB to Ethernet connectors driver in boot image, currently it is detected as a USB device in BIOS not as an external NIC ?
thanks in advance