


How to Uninstall SCEP Client using SCCM 2012 R2 In this post we will see how to uninstall SCEP client using SCCM 2012 R2. I have been asked most of the times in my Support Forums on what is the easiest way to uninstall the System center Endpoint protection client from windows computer. Most of the admins prefer to uninstall the SCEP client using group policy or a logon script. Well, I believe that method works fine however I wanted to uninstall the SCEP client using SCCM. We will now create a script that uninstalls the SCEP client from Windows computers. We will basically create a package and add the script to that package and then deploy it to computers.
Create a new text document and rename it to “Uninstall MEP.bat“. Right click the batch file and edit with Notepad. Now add the below code to the batch file and save the file. Let me tell you this is a very simple code and works correctly.
@echo off
C:Windowsccmsetupscepinstall.exe /u /s
If you are looking for a script that cleans up all the files associated with SCEP client then use the below script. I have had less success with the below script :). In this post I will be using the first code for uninstalling SCEP Clients.

cd /d "%ProgramFiles%Microsoft Security Client"

TASKKILL /f /im MsMpEng.exe

TASKKILL /f /im msseces.exe

TASKKILL /f /im MpCmdRun.exe

net stop MsMpSvc

sc delete MsMpSvc

REG DELETE "HKEY_LOCAL_MACHINESYSTEMCurrentControlSetservicesMsMpSvc" /f

REG DELETE "HKEY_LOCAL_MACHINESOFTWAREMicrosoftMicrosoft Antimalware" /f

REG DELETE "HKEY_LOCAL_MACHINESOFTWAREMicrosoftMicrosoft Security Client" /f

REG DELETE "HKEY_LOCAL_MACHINESOFTWAREPoliciesMicrosoftMicrosoft Antimalware" /f

REG DELETE "HKEY_LOCAL_MACHINESoftwareMicrosoftWindowsCurrent VersionRunMSC" /f

REG DELETE "HKEY_CLASSES_ROOTInstallerProducts4C677A77F01DD614880F352F9DCD9D3B" /f

REG DELETE "HKEY_CLASSES_ROOTInstallerProducts4D880477777087D409D44E533B815F2D" /f

REG DELETE "HKEY_LOCAL_MACHINESOFTWAREMicrosoftWindowsCurrentVersionUninstallMicrosoft Security Client" /f

REG DELETE "HKEY_LOCAL_MACHINESOFTWAREMicrosoftWindowsCurrentVersionUninstall{774088D4-0777-4D78-904D-E435B318F5D2}" /f

REG DELETE "HKEY_LOCAL_MACHINESOFTWAREMicrosoftWindowsCurrentVersionUninstall{77A776C4-D10F-416D-88F0-53F2D9DCD9B3}" /f

REG DELETE "HKEY_CLASSES_ROOTInstallerUpgradeCodes1F69ACF0D1CF2B7418F292F0E05EC20B" /f

REG DELETE "HKEY_CLASSES_ROOTInstallerUpgradeCodes11BB99F8B7FD53D4398442FBBAEF050F" /f

REG DELETE "HKEY_CLASSES_ROOTInstallerUpgradeCodes26D13F39948E1D546B0106B5539504D9" /f

REG DELETE "HKEY_LOCAL_MACHINESOFTWAREMicrosoftWindowsCurrentVersionInstallerUserDataS-1-5-18Products4C677A77F01DD614880F352F9DCD9D3B" /f

REG DELETE "HKEY_LOCAL_MACHINESOFTWAREMicrosoftWindowsCurrentVersionInstallerUserDataS-1-5-18Products4D880477777087D409D44E533B815F2D" /f

REG DELETE "HKEY_LOCAL_MACHINESOFTWAREMicrosoftWindowsCurrentVersionInstallerUpgradeCodes11BB99F8B7FD53D4398442FBBAEF050F" /f

REG DELETE "HKEY_LOCAL_MACHINESOFTWAREMicrosoftWindowsCurrentVersionInstallerUpgradeCodes1F69ACF0D1CF2B7418F292F0E05EC20B" /f

takeown /f "%ProgramData%MicrosoftMicrosoft Antimalware" /a /r

takeown /f "%ProgramData%MicrosoftMicrosoft Security Client" /a /r

takeown /f "%ProgramFiles%Microsoft Security Client" /a /r

REM Delete the MSE folders.

rmdir /s /q "%ProgramData%MicrosoftMicrosoft Antimalware"

rmdir /s /q "%ProgramData%MicrosoftMicrosoft Security Client"

rmdir /s /q "%ProgramFiles%Microsoft Security Client"

REM Stop the WMI and its dependency services

sc stop sharedaccess

sc stop mpssvc

sc stop wscsvc

sc stop iphlpsvc

sc stop winmgmt

REM Delete the Repository folder.

rmdir /s /q "C:WindowsSystem32wbemRepository"

sc stop

PAUSE

EXIT
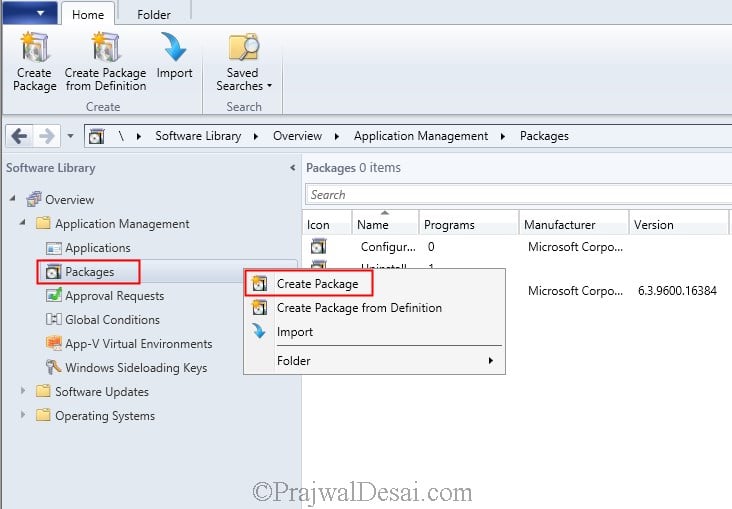
After you are ready with the batch file, create a new package in SCCM. Right click Packages and click Create Package.
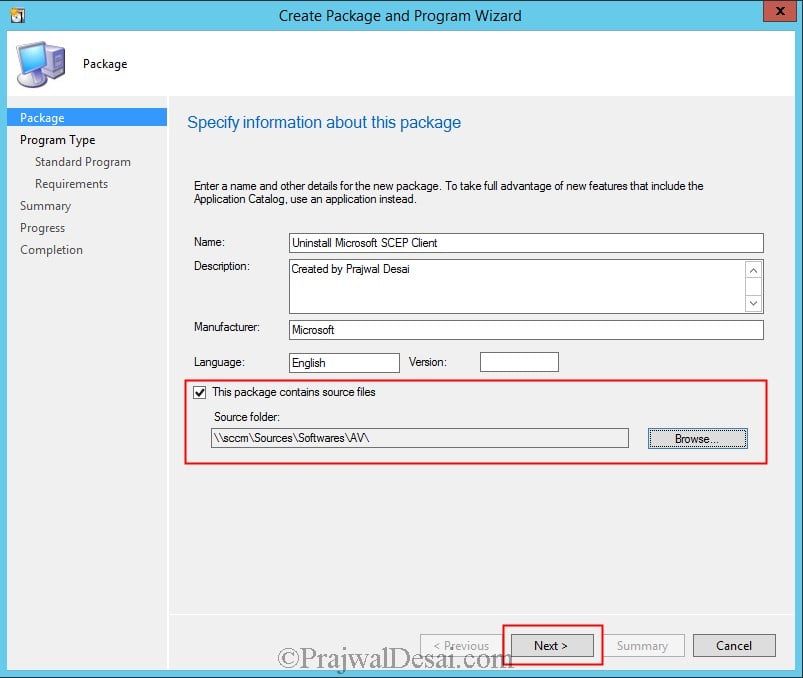
Specify the name for the package and browse to the folder where the script is located. Click Next.
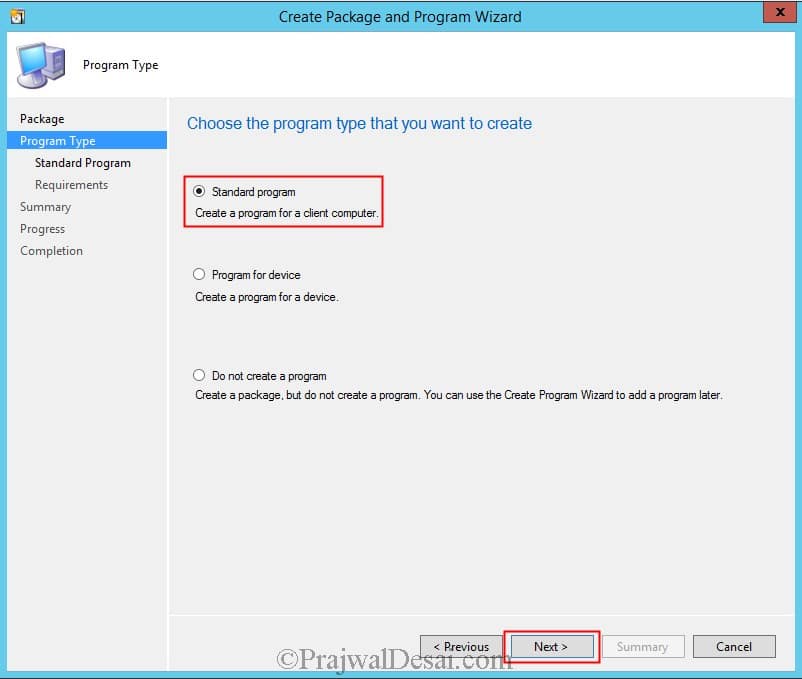
Choose the program type as Standard Program. Click Next.
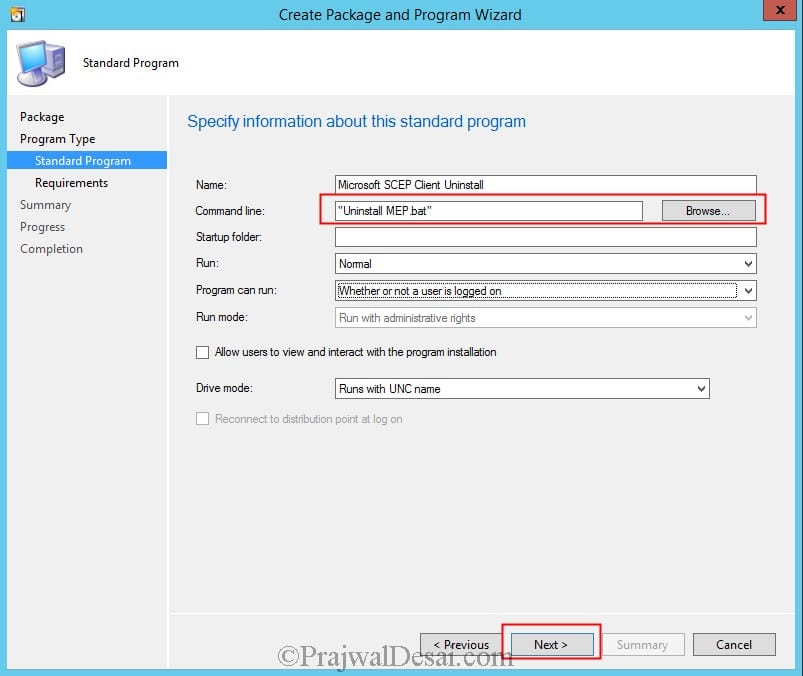
Specify the name of the standard program, in the command line text box click Browse and select the batch file and click Next.
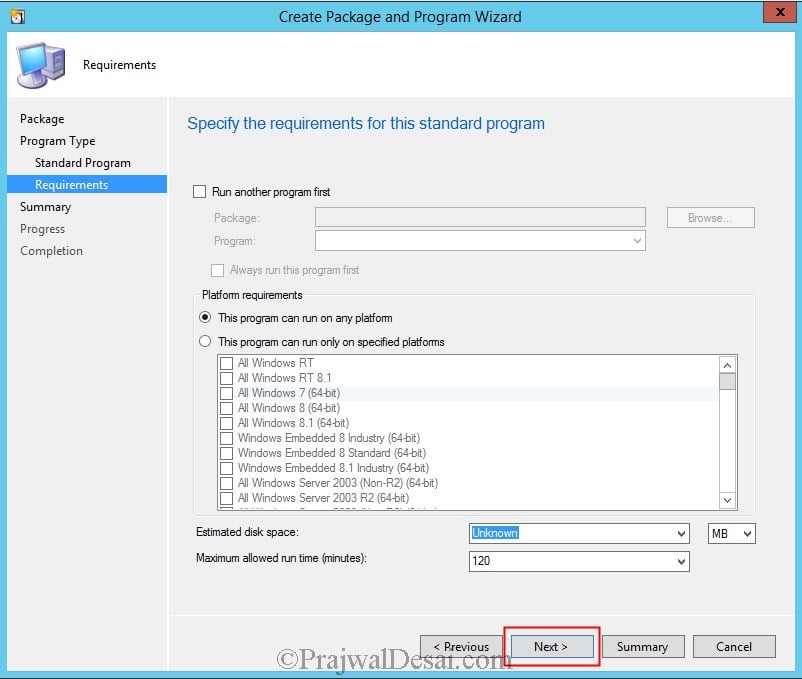
No changes to be made here, click Next.
Click on Close.

Note – You need to distribute the content to the DP. Right click on the package and click Distribute Content. Proceed to the below steps only when the package is available with DP.
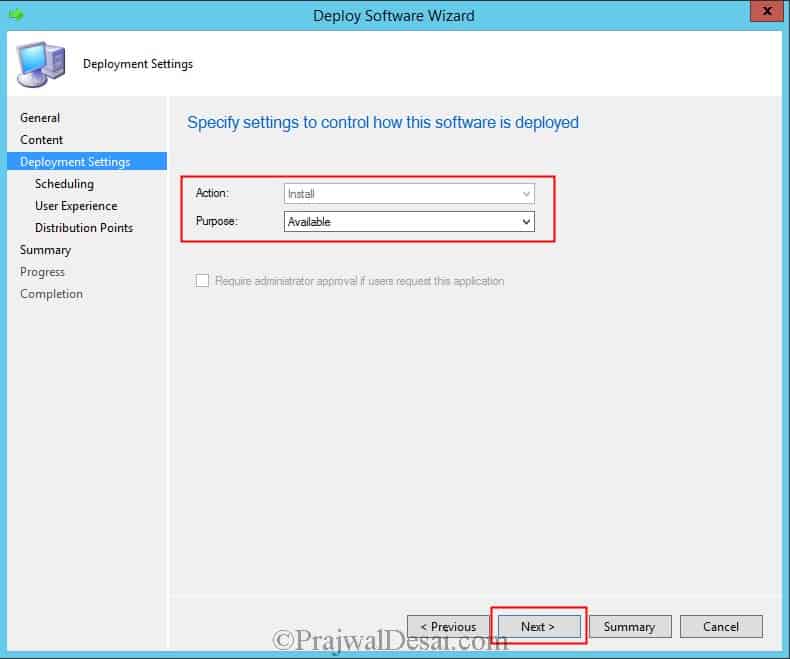
Right click on the package and click Deploy. Choose the Collection that you want to deploy. Click Next.

Set the Purpose as Available. Click Next.
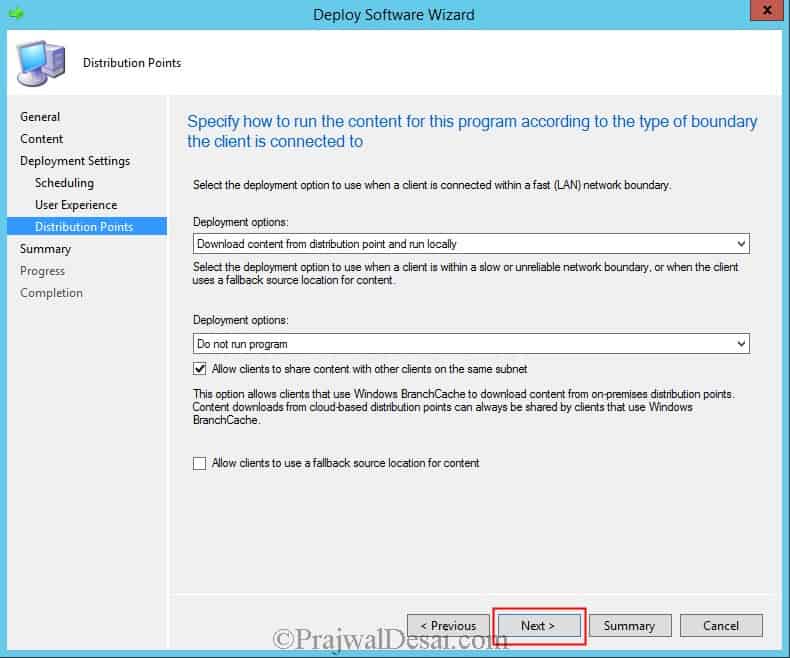
No changes to made here, click Next and complete the wizard.
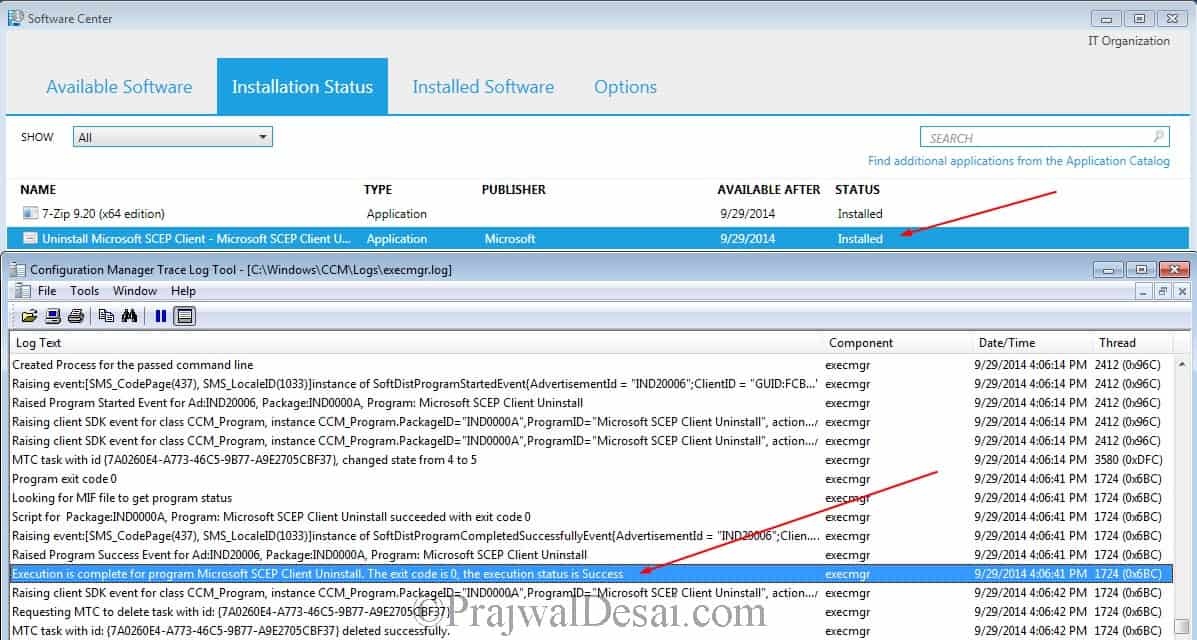
After few minutes, on the client computer the package is available. Select the package and click on Install.
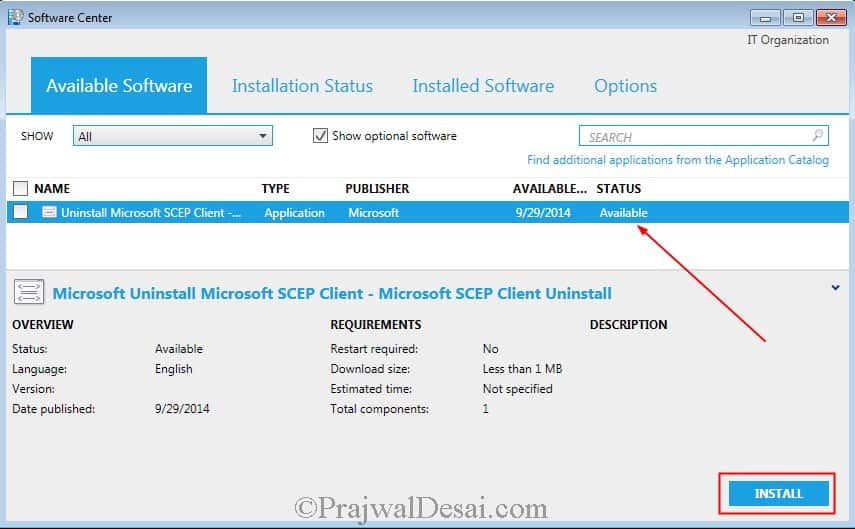
On the client computer open the execmgr.log file for troubleshooting purpose. We see that the script has been executed and the SCEP client has been uninstalled successfully from the computer.

Hi Paraj,
Thank you so much, it’s working properly. Can I know about how to deploy it Purpose on Required mood. I tried it but didn’t success.
Hi good afternoon;
How could I do to make the script run automatically?
Hi Paraj,
I followed above instructions and created a package. After that I included that in a Task Sequence as I need to uninstall SCEP otherwise Windows 7 in-place upgrade will fail. I also tried running as a package after deploying on a collection. Each time, I get an error 0x1(1).
When I go C:\Windows\CCMSetup folder and try to open, I get permissions denied error although I am the domain admin and local admin in that machine.
Do you think this could be the issue or something else. Please advise.
If you change the following setting will this automatically remove the client or just leave the client installed but unmanaged:
SCCM Client Settings > Endpoint Protection > Manage Endpoint Protection client on client computers > No
The same goes for the following setting if the above setting is set to ‘Yes’:
SCCM Client Settings > Endpoint Protection > Install Endpoint Protection client on client computers > No
Thanks
What is the application? That might be helpful in determining what switches are available.
its office 2010
exe file
Pranjwal Sir could you please guide me how can i uninstall an EXE package using SCCM.
Hi Prajwal,
very good guide! 😉
When I’am trying to kill the process MsMpEng.exe, I’am getting an access denied message. I couldn’t find a setting for that!
Thanks
Nice blog post. A good improvement would be to discuss how to prevent SCEP from re-installing itself.
Thank you Ted for the suggestion. I will work on it.
Honestly, what I’ve found is the only sure fire way is to remove the Endpoint Protection site role from the site. While you can set the policies not to enable real-time protection, etc. even after uninstalling, my experience has been that SCEP will reinstall itself no matter how you configure the EP policies.
Hi Prajwal,
Thanks for the Post of Uninstallation Package of EDP on clients side. I would like to know for installation package of EDP for the clients, I need to create as
Package & use as only Below command . Kindly confirm & if any do let me know it.
scepinstall.exe /s
Best Regards,
Arshad
I need to check the exact install command. Did scepinstall.exe /s command worked for you ?
@Arshad – why do you need a package for deploying EDP ? I believe you can do it from ConfigMgr console..