


How to Capture an Image from a Reference Computer Manually In this post we will see how to capture an image from a reference computer manually. You could use this procedure to capture an operating system image from a reference computer by using capture media. This method basically creates a CD that allows you to capture a reference system outside of a task sequence. However the image is not bootable and you must initiate it from within an installed OS using the Autoplay function or by manually running TSMBAutorun from the SMS>bin>i386 folder.
Requirements
To build the reference computer, the reference computer must meet the following requirements:
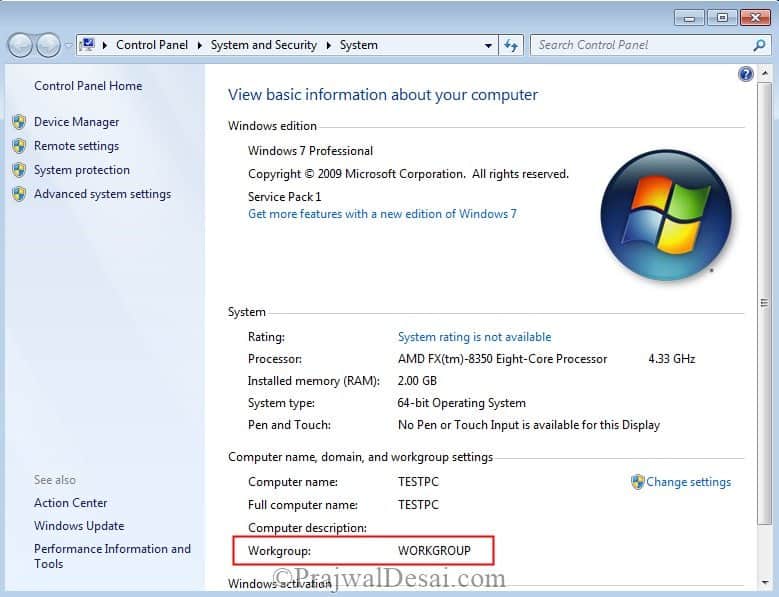
1) The computer must be a member of a WORKGROUP. If you try capturing the domain joined computer, Sysprep will fail.

2) The local Administrator password must be blank.
3) You must have administrative credentials on the reference computer to capture an image.
4) The computer shouldn’t have the Configuration Manager client installed. If its installed uninstall it. Note that this is not a strict requirement, but makes preparing the image easier.
5) The system’s security policy must not require strong passwords.
How to Capture an Image from a Reference Computer Manually
As mentioned in the requirements, the reference computer should not be a part of domain. Ensure that the computer is in WORKGROUP.
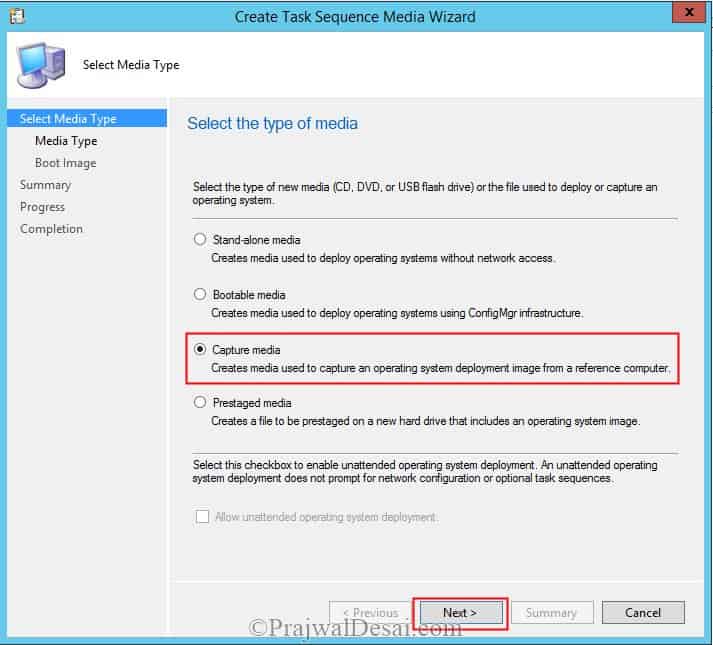
Open the ConfigMgr Console. Click on Software Library > Operating Systems > right click Task Sequences. Click on Create Task Sequence Media.

Select Capture media. Click Next.
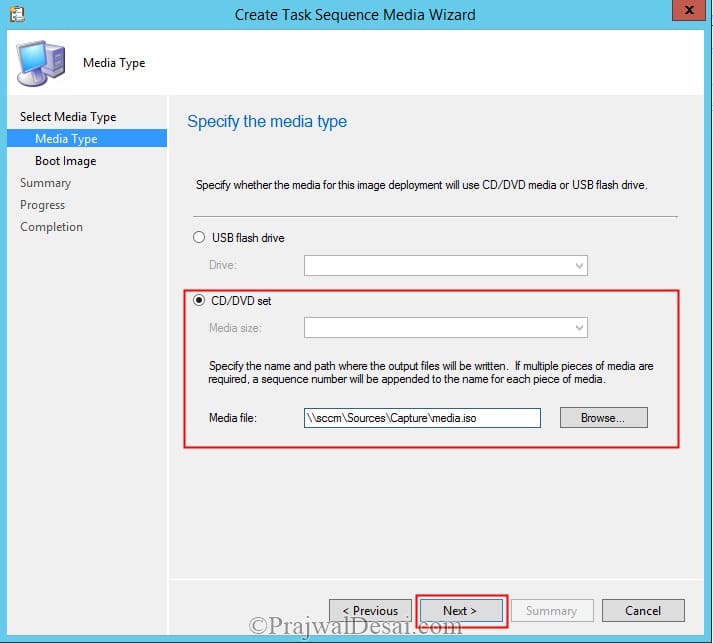
On the Media Type page, specify the type of media that you want to use for the capture media. You can specify a USB flash drive or CD or DVD set as the media type. If you specify a USB flash drive, make sure that the device is connected to the computer so that the necessary files can be written directly to the device. To specify the Media file, click on Browse, browse to the location where you want to create the media file, and type the name of the media file to be created. The file name should have ISO as extension. Click Next.
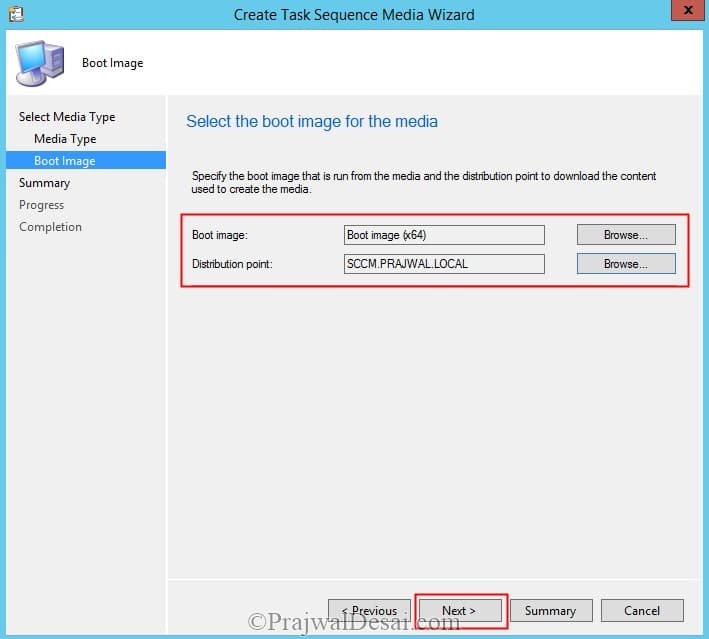
Select the boot image that should be associated with the media. Click Browse to specify the computer architecture to be targeted with the captured image in the Select a Boot Image dialog box. Boot images must be available on one or more distribution points. Click Next.
The Create Task Sequence Media Wizard is complete. Click on Close.

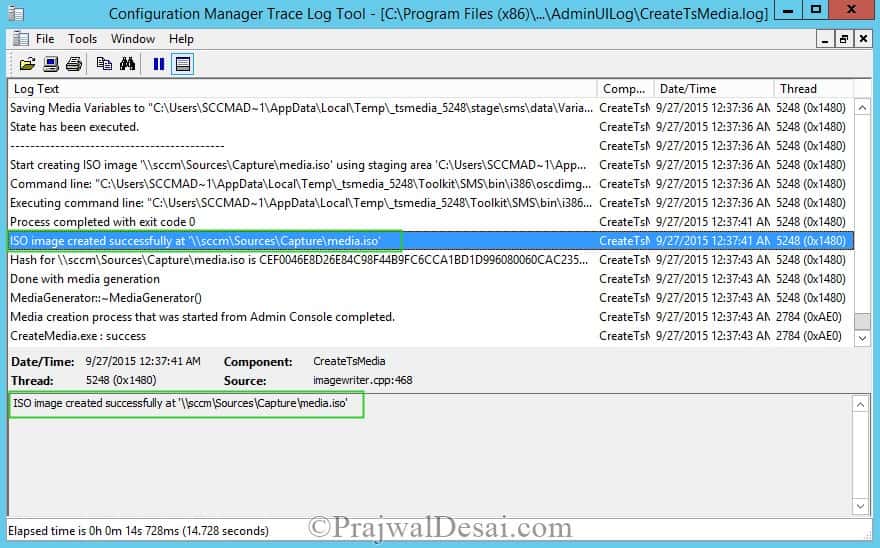
To verify whether the ISO image is created successfully, open the CreateTSMedia log file (Located at C >Program Files (x86)>Microsoft Configuration Manager>AdminConsole>AdminUILog) file and look for the lines.
“ISO image created successfully at “media location”
“CreateMedia: success”
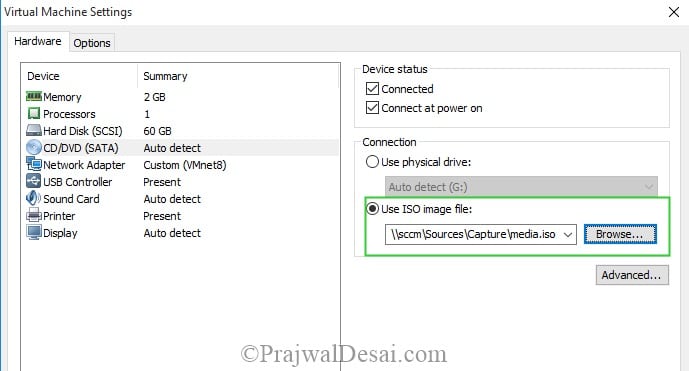
To create capture media, use an appropriate software application to burn the ISO file to CD media or DVD media. In my case the reference machine is a VM and I will be editing the VM settings > CD or DVD Options > Select Use ISO Image file > Provide the path where ISO file located. As the computer is in workgroup, to access the ISO file, authentication is required. Specify an account that has permissions to access the file. Once the ISO file is mounted click OK.
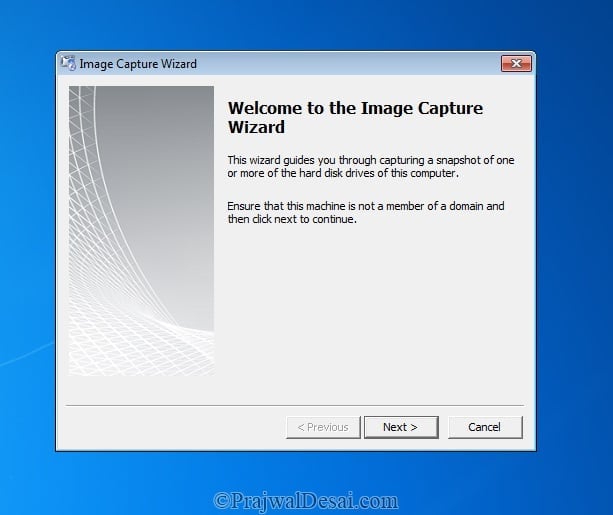
On the Autoplay window, click Run TSMBAutorun. If you don’t see the Autoplay window then you need to manually launch TSMBAutorun from the SMS>bin>i386 folder.

On the welcome page click Next.
Choose the destination where the captured OS should be stored. The file name can be anything but it should have wim as extension. Next, enter the user account details which has got enough permissions to write the wim file to the specified location. Click Next.

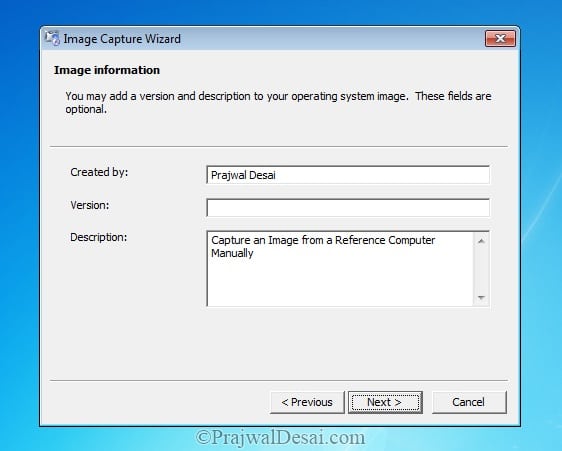
Specify some information related to image. Click Next.
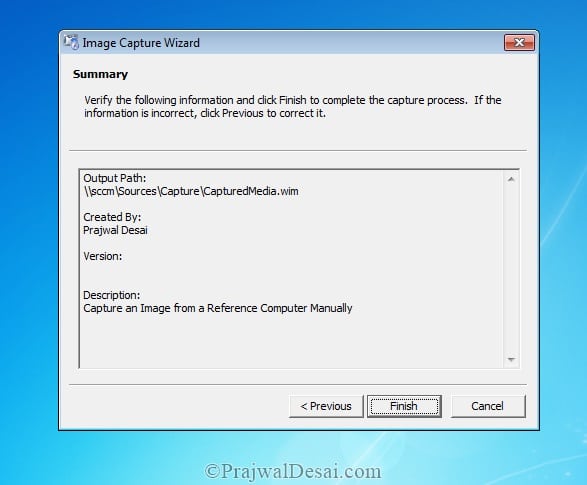
On the Summary page verify the information and click Finish.
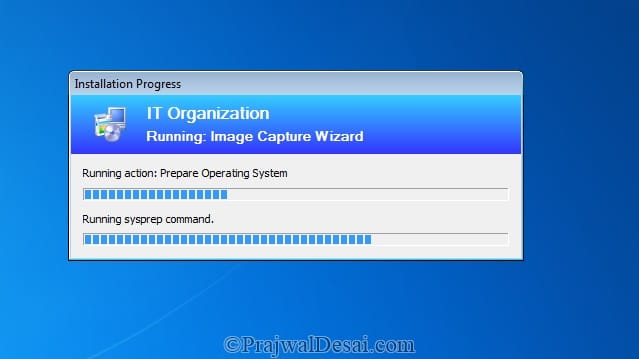
The image capture starts the process by carrying out a Sysprep of the computer. The computer now boots into Windows PE.
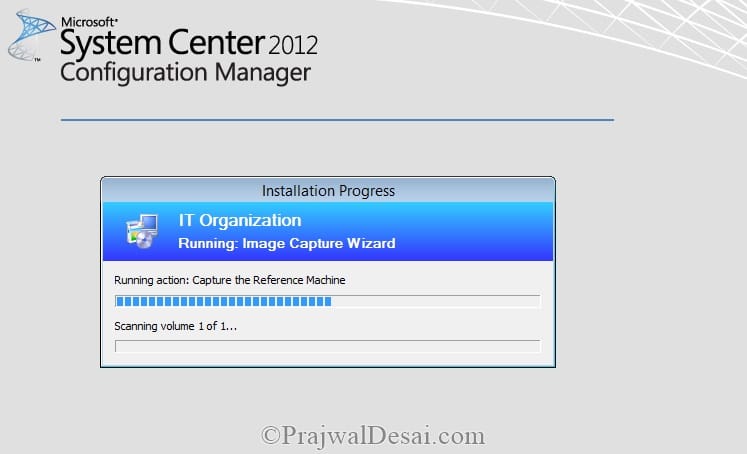
There you go !! The Image capture process is running.
The image has been captured successfully and we have the wim file with us. The machine now restarts and enters the Windows Out of Box experience. After the image capture is completed you could add the captured image to ConfigMgr as an image package and can then be deployed on target computers by using operating system deployment.


Why does my capture say that it is capturing more than one volume? 3 in total…
Hi there,
Do you know if I have to create a ”capture media” every time that I want to capture an Image from a reference computer?
Thank you in advance
When the image process starts, “IT Organization” is written above. I’m also writing a different post. How can I change this post?
Is it possibile to capture wim to external usb drive or stick if no network available?
Im trying to Capture a windows 10 pro image.
Everytime I try, it get stuck at the preparing Sysprep command. with error code 0x0004005.
disable Bitlocker 😉
It wasnt enabled in the first place for me. Do i have to change it in registry also?
Does this work with Windows 10 2004 20h1? Mine won’t capture. Wondering if I need to add 2004 to SCCM then create a new capture media iso?
You are the best reference in SCCM 🙂
Using this method has worked well for me with the exception of allowing me to name the computer when deploying the image.
Hi Prajwal,
I have got a completely different error while following the same steps provided above. Sysprep command works successfully and after the restart, I am getting “Image capture wizard has failed with error code (0x8007000d)” and the system restarts in 15 minutes to OOBE. I am trying to capture 1803 image and not able to get through this screen after 10 successful attempts. Please share your suggestion.
Hi Prajwal,
Me too getting the 0x00004005 error please share your idea to fix this issue. i have full rights on the shared folder.
I found this to be caused by the Windows Store Apps. If this is the case you look in the SMSTS logs C:\users\useraccount\appdata\local\temp and find the sysprep failed log. Then go to %windir%\system32\sysprep\panther and look at the setupact log to verify that sysprep failed because of Bing New or Candy crush or any of a number of different apps.
Open powershell and run get-appxpackage -allusers | remove-appxpackage
Then re-run your sccm capture again.
hi Default Apps you have to remove
Thank you very much for your blog.
It is being helpful to start in this world of SCCM.
Kind Regards
Thank you Inaki
Hi Prajwal,
I am trying to do this with a Windows 10 v1709 reference image. The SysPrep seems to work, and the TS reboots. However, once in WinPE it fails, stating it can not connect to the network share. I have configured the share with “everybody” has read/write/execute, and I can ping the server from inside WinPE. Any idea what might be going wrong?
-Tom
@TOM ensure you are connected with cable to your network not wireless.
i had same error and using cable solved it for me.
I just did exactly what is written above. But the sysprep routine cleared all my customizations even I sticked an unattended xml file.
I tried at least t10 times but it is always the same result..
Any idea?
Is there a way to have this not boot OOBE after capture?
I’ve got the same error. Try the TSAgent log to find out what’s going on.
while capturing win10 reference virtual machine i am getting task sequence error. code is 0x00004005. Pls help me in this
Hi Prajwal I have this error when the machine reboots after Sysprep. I followed the steps exactly like you described but I can’t create the image from a reference computer.
I tried inject the Vmware drivers to the boot image x64 in SCCM console but I have always the same error.
When I press F8 nothing showed up on screen.
Can you help me, please? Thank you.
have you checked this ? – http://www.jamesbannanit.com/2012/02/unable-to-read-task-sequence-configuration-disk-in-sccm-osd/
Hi Prajwal Desai
Im trying to Capture a windows 10 pro image.
Everytime I try, it get stuck at the preparing Sysprep command. with error code 0x0004005.
The Deploy and capture TS image very well.
And the Deploy TS works too.
Do you have any suggestion?