In the previous post we saw the steps to integrate Windows Deployment Services with Microsoft Deployment Toolkit. In this post we will see the steps to deploying windows 7 using Microsoft Deployment Toolkit. We would be making use of WDS and MDT in deploying windows 7 to a client machine. Before you start deploying windows 7 using MDT please go through my previous post on Installing and Configuring Windows Deployment Services and Integrating WDS with MDT. When you talk about deploying operating system using MDT, there are two types of deployment – Lite-Touch Deployment and Zero-Touch Deployment. The difference between the two is a Lite-Touch Installation requires limited interaction at the beginning of installation whereas a Zero-Touch Installation is fully automated and will not require user interaction.
Task Sequence – Task sequences provide the mechanism for performing multiple steps or tasks on a client computer at the command-line level without requiring user intervention. Task sequences do not represent a full scripting language. Task sequences can be advertised to computers but cannot be advertised to users. You can create task sequences that will allow you to install an existing image package, build and capture a reference operating system image, or create a custom task sequence that will perform a customized task using variables. Custom task sequences can be used to perform specialized operating system deployments or to perform other custom actions or steps.
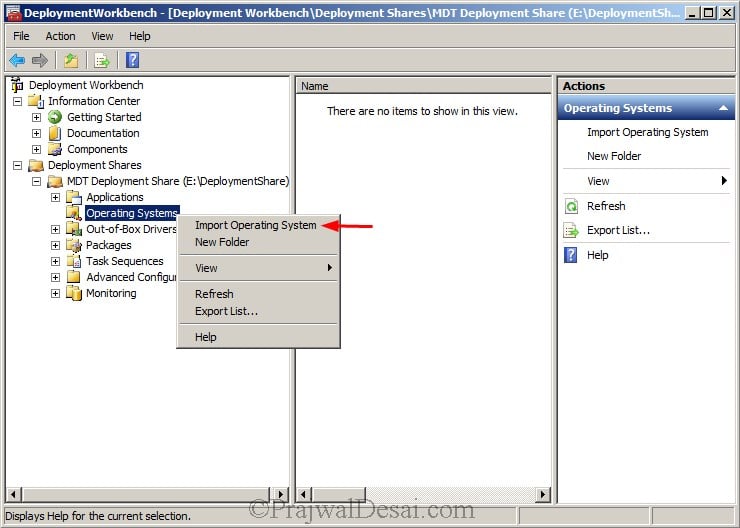
Before we deploy windows 7 to our client machine, we must import operating system to the deployment share. To do that launch the Deployment Workbench. Click on MDT Deployment Share, right click on Operating Systems and click on Import Operating System.
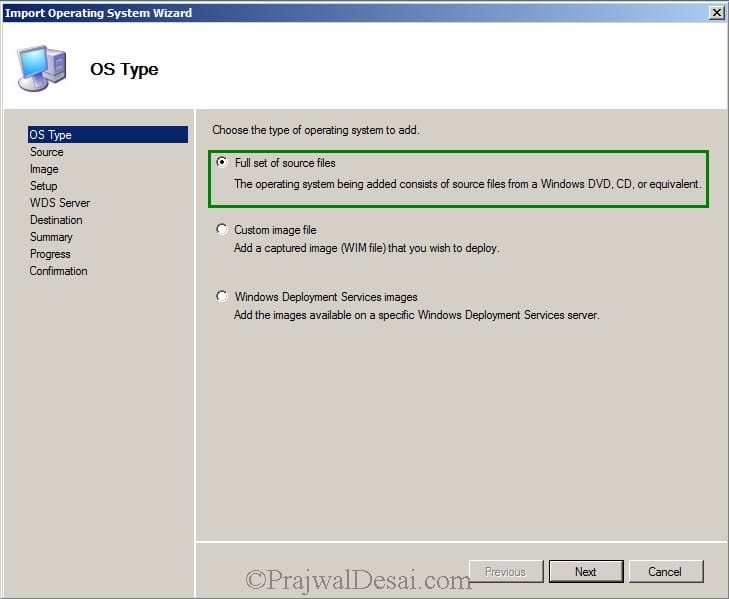
OS Type – There are 3 options to add operating system to our deployment share.
Full set of source files – Select this option if you have the operating system source files in the DVD, CD or source files stored in a folder.
Custom Image File – Select this option if you have a captured image file of an operating system with you. The captured OS file must have an extension as.wim.
Windows Deployment Services Images – Select this option if you have OS images available on your windows deployment services server.
In this post we will be mounting a windows 7 dvd to the dvd-rom and that shall be our source directory. We will be choosing the first option Full set of source files. Click on Next.
Source Directory – Browse to the path where the operating system source files are located. Click on Next.
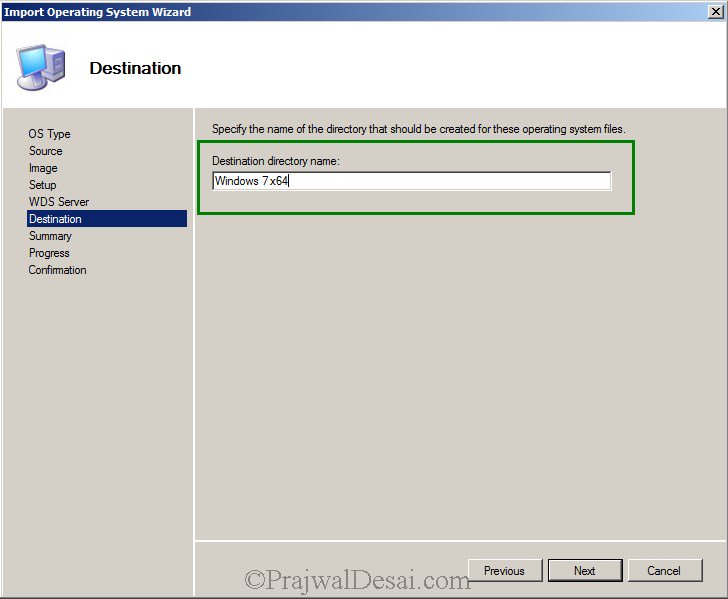
Destination Directory Name – Provide a directory name which would be created under Deployment share. This folder will contain the operating system files.
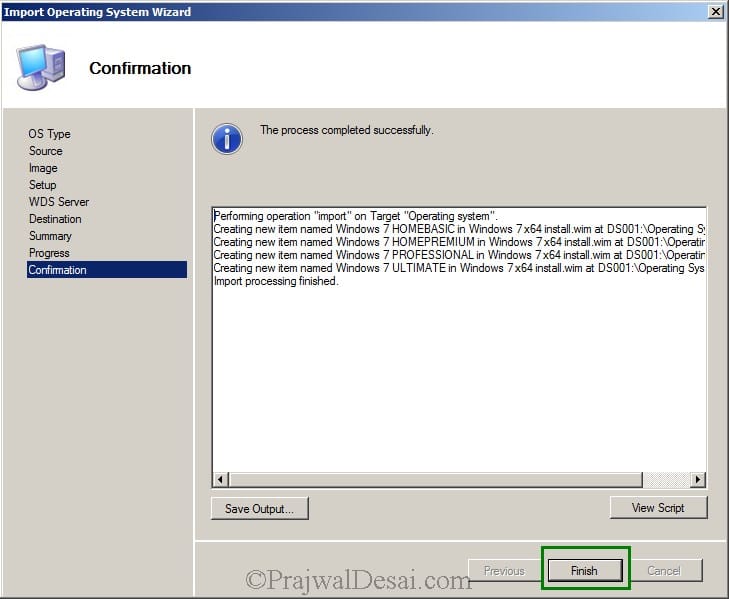
In this step the operating system will be imported to the deployment share. If you have multiple editions of windows 7 in a single DVD, then all the editions will be imported. Click on Finish to close the import operating system wizard.
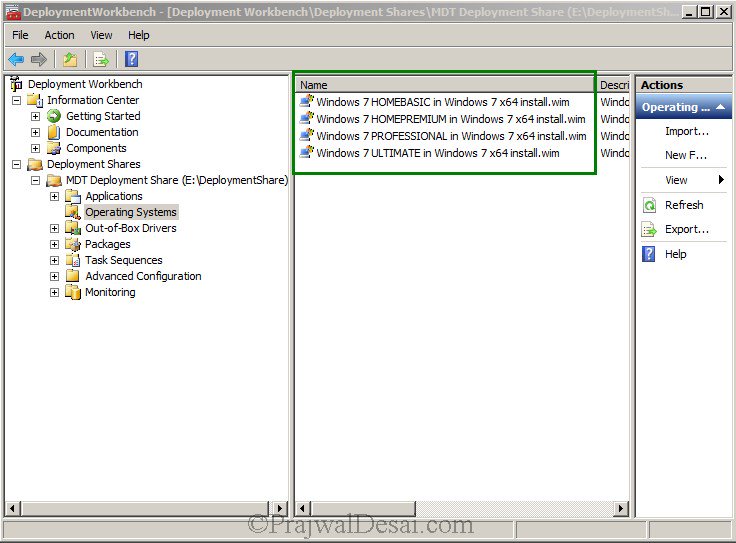
The operating system has been imported successfully to our deployment share.
If you would want to know where the OS files are copied, open the deployment share, Operating systems folder and inside the destination directory you will find the OS source files.
After importing the operating system, the next step is to create a task sequence. Right click on Task Sequence and click on New Task Sequence.
Provide the Task Sequence ID, Task Sequence Name and click on Next.
Select Task Sequence Template as Standard Client Task Sequence. Click on Next.
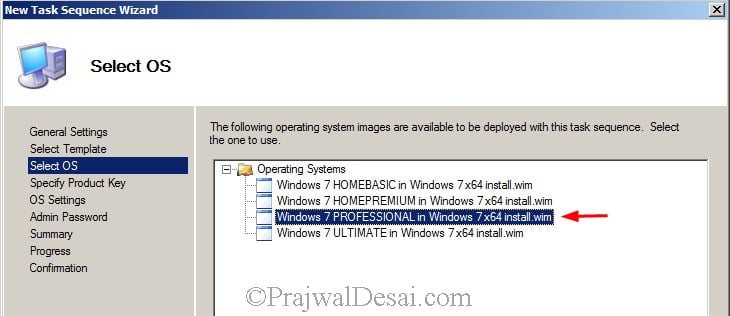
Choose the Windows 7 edition that you would want to install. Click on Next.
Choose the option Do not specify a product key at this time. If you have a MAK key for activating the operating system that you have selected then choose the second option. Click on Next.
Provide the OS settings details like Full name, Organization Name, IE home page. Click on Next.
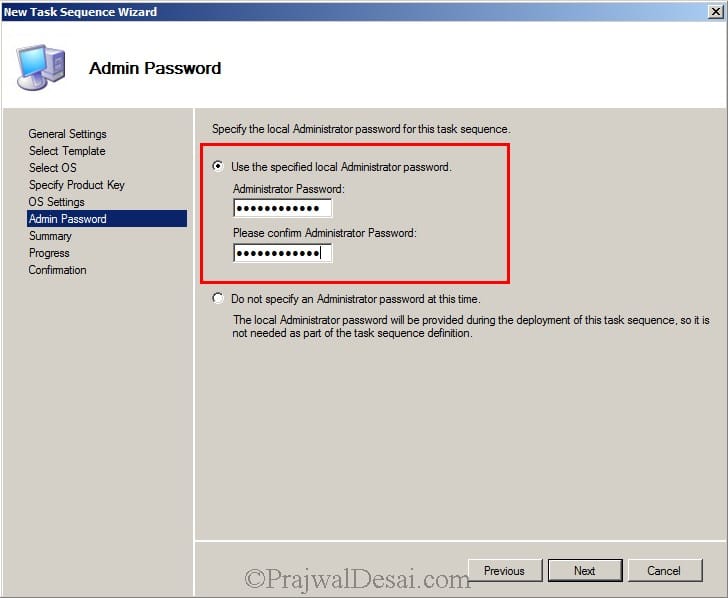
Provide the local administrator password for this task sequence. You can choose the second option and provide the password during the deployment of task sequence. click on Next.
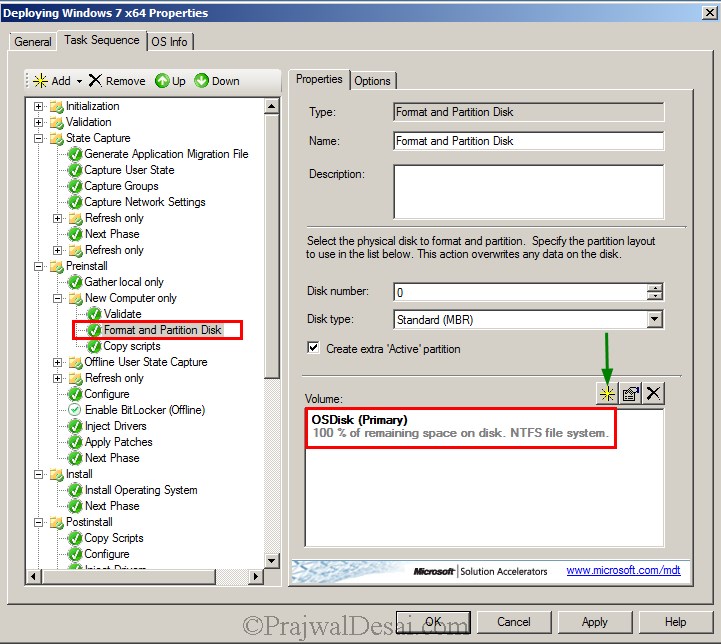
Right click the Task Sequence that you just created, click on Properties. Click on Task Sequence, expand Preinstall and click on Format and Partition Disk. Click on edit button as shown in the picture below.
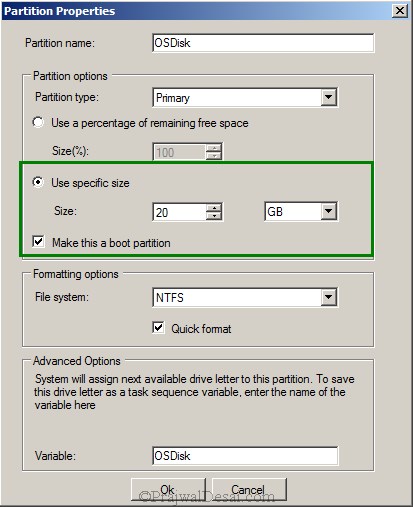
Under Partition Options, choose Use specific size and provide the size value as 20 GB. This means that the operating system will be installed on the C drive with 20 GB as the disk space. Click on Ok.
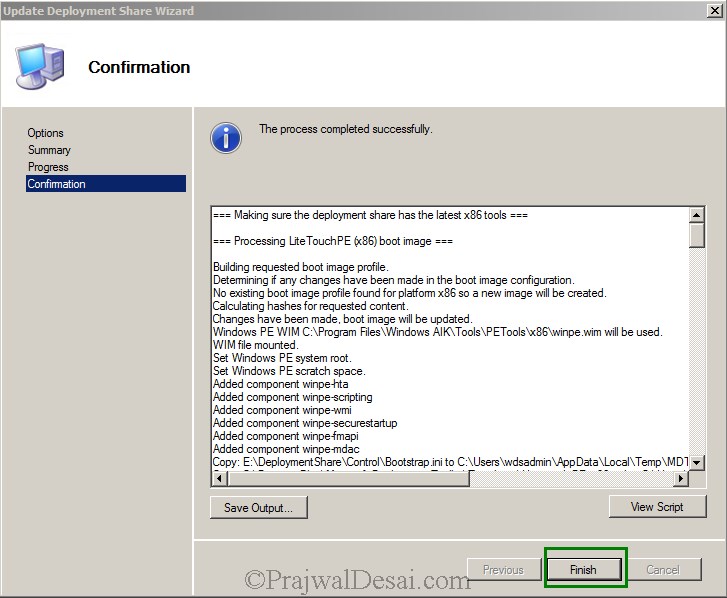
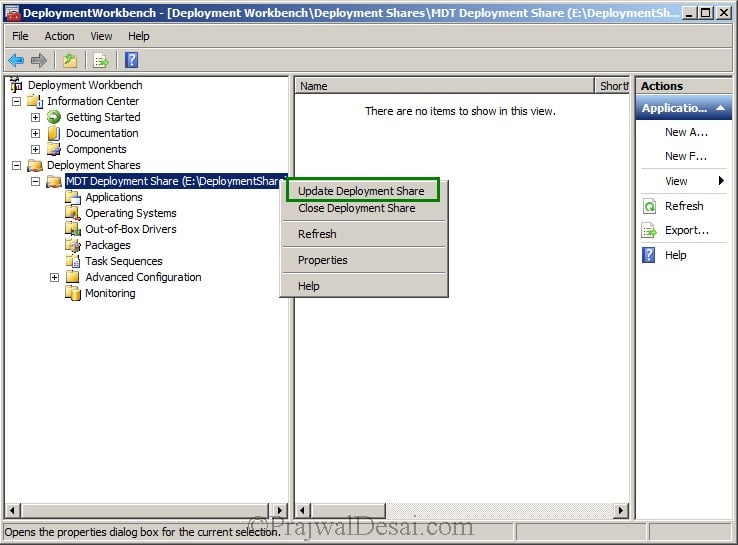
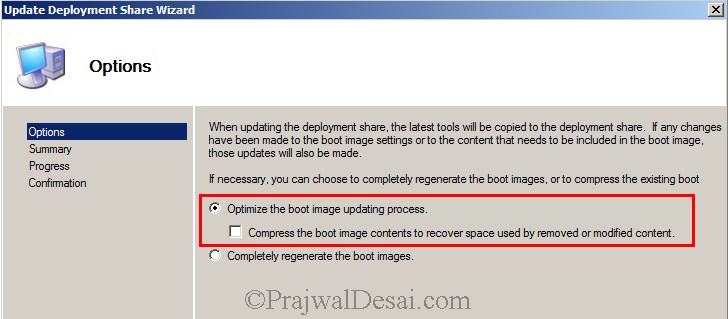
We have imported operating system and added the task sequence and the deployment share should now be updated. To update the deployment share, right click Deployment Share and click on Update Deployment Share.
Choose Optimize the boot image updating process. Click on Next.
On the confirmation page click on Finish.








Hi Praj,
Please help me, I am getting “Product.cab is corrupt ” error while installing the MDT 2012 or 2013 tool in WIndows 2008r2 server. Please give me a solution for this
Are you getting this error while installing MDT or while importing the drivers ?
Hi Prajwal,
i have one query actually i need to format only c drive but it was deleting all the partitions i need the data in D drive it should be like that only can you help on this issue.
Thanks,
lokesh .v
Hi Prajwal,
thanks for your guides/tutorials they are very useful and easy to follow. I have a question though I’m hoping you can help me with.
I currently run WDS on Server 08 R2 and I have the AIK and MDT installed but never really used them to actually store & deploy images. I simply use WDS with an automated script so that it’s ‘touch free’ install. it works fine as the images already have the software we need installed in them. but now I’m doing a new WDS on Server 2012 R2 and i’m going through your guide and I see you use MDT in order to store & deploy images and my question is, why? what is the difference between simply using WDS and using WDS with MDT. could you explain to me how MDT works a little better? I’m probably asking for too much but I just don’t see why use MDT when WDS does the job on it’s own, plus we already ‘installed’ the .wims in your previous guide. why now install the ‘full set of files’ from the dvd on MDT ?
the way we do it is we prepare a machine with the software we use and then run a sysprep and after capture an image of it in WDS, with no specific hardware software/drivers, then that’s it. it’s saved in the WDS and next time PXE a machine I have the choice to pick which ever image I have saved. how would WDS work? (different?) also all the network and graphics drivers are ‘installed’ into the WDS Drivers folder.
thanks!
I am also wondering this very same thing! Can someone please advise?
Hello Prajwal,
I currently work IT and we are just Interating MDT into SCCM. My Question to you is do you have some information on the different default templates and what they are designed for?
Client Task Sqeuence
Client Replace Task Sequence
Microsoft Deployment Custon Task Sequence
Server Task Sequence
User Driven Installation Replace Task Sequence
Any information you can provide would be a great help