In this post we will look at the steps for deploying applications to users using SCCM 2012 R2. In SCCM 2012 R2, an application basically contains the files and information that are required to deploy software to a device. In one of my post that I had posted when I was deploying SCCM 2012 we had seen the steps for deploying applications to devices using SCCM 2012. Applications in Configuration Manager support user-centric management so that you can associate specific users with specific devices. Instead of having to remember the name of a user’s device, you can now deploy software to the user and to the device. This functionality can help you make sure that the most important software is always available on each device that a specific user accesses. If a user acquires a new computer, you can automatically install the user’s applications on the device before the user logs on.
If an application is deployed by SCCM 2012 R2 and has been installed on a device, the Configuration Manager always checks whether the application is present on the device or not. Let’s say if the application was uninstalled by the user then at the next evaluation cycle, Configuration Manager detects that the application is not present and re-installs it. This is one of the good feature I liked about Configuration Manager.
The re-evaluation interval for application deployments can be configured by using the Schedule re-evaluation for deployments client setting. The default value is every 7 days. You can also initiate this action from a Configuration Manager client computer by selecting the action Application Deployment Evaluation Cycle from the Actions tab of Configuration Manager in Control Panel.
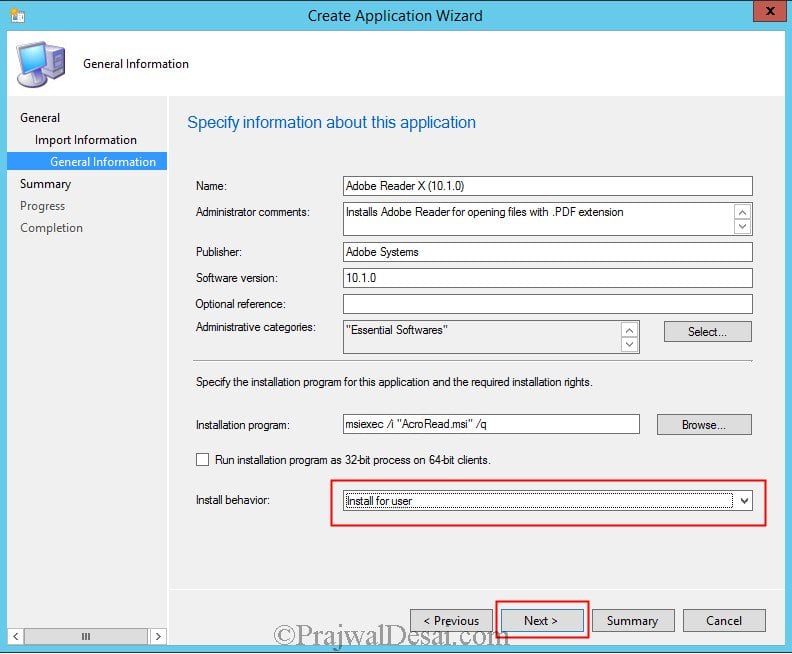
In this post we will be deploying a simple application to the user and this application won’t install unless the SCCM administrator/approver approves it. In the below example I am creating a application for Adobe Reader and this will be deployed to the user group. You can take any application of your choice and follow the below screenshots. Enter the information about the application and choose the Install behavior as Install for User and click Next and complete the App creation wizard.
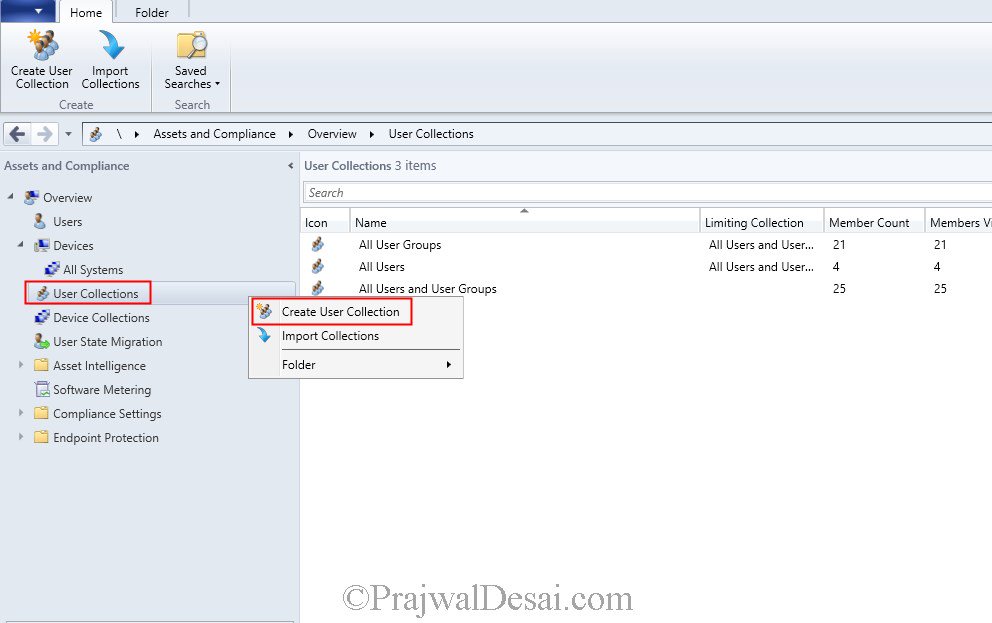
Since we will be deploying the application to the users, we will first create a group in active directory and add the user to that group. I have skipped the screenshots as it’s fairly simple to create a group and add user to it. Once you have done that, right click the User Collections and click Create User Collection.
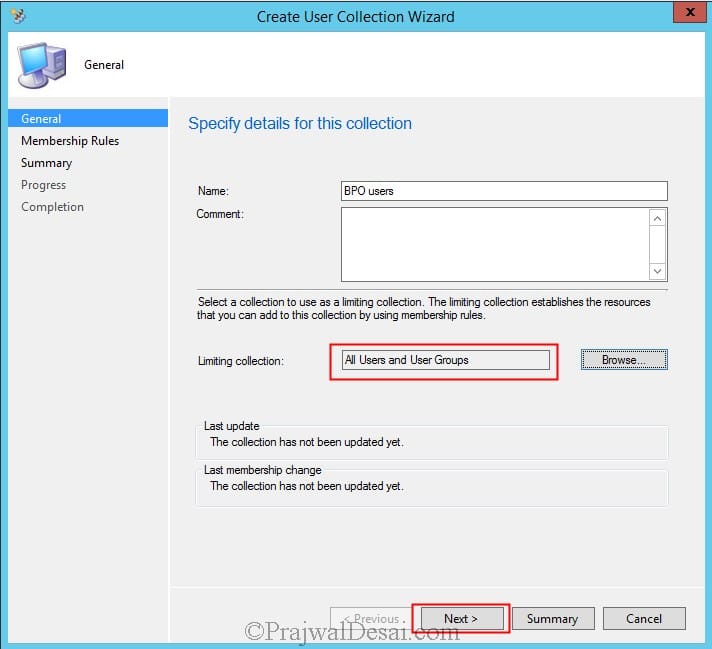
Specify a name to the user collection and set the Limiting collection to All Users and User Groups. Click Next.
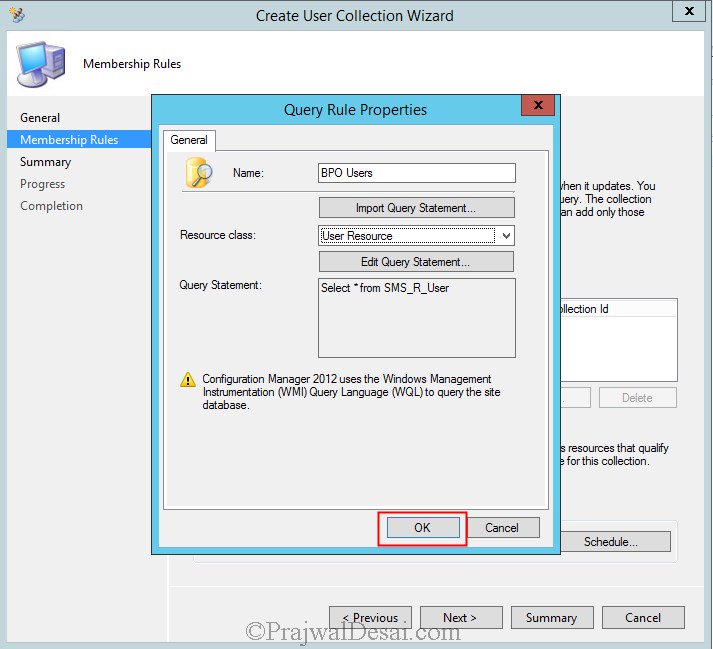
Now let’s create a query which will add the user group to the collection. Click Add Rule and select Query Rule. Specify a name for the query and Click Edit Query Statement.
On the Query Statement Properties window click on tab named Criteria and click on yellow icon. On the Criterion Properties window, set Attribute Class to User Resource, set Attribute to User Group Name. Set the Value as the name of the group that you created in your active directory. In this example BPO Users is the group that is created in active directory that contains user named Eric. Click OK and then click Next and complete the User Collection wizard.
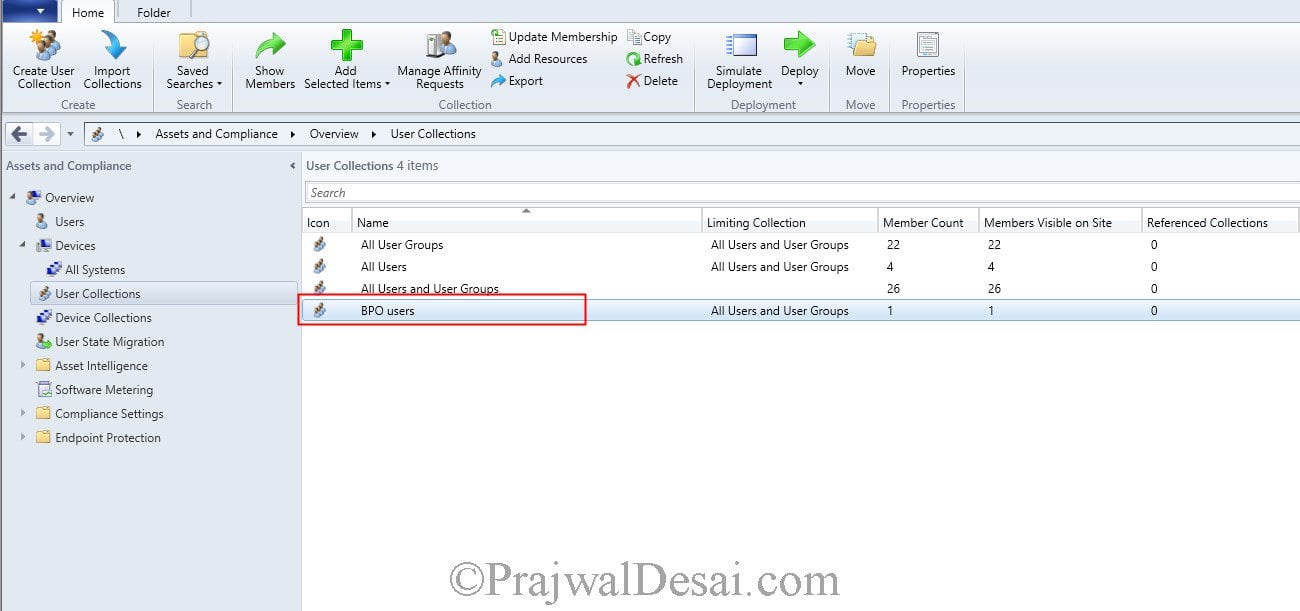
In the Configuration Manager console, when we click User Collections, we see that the user collection BPO Users has been created.
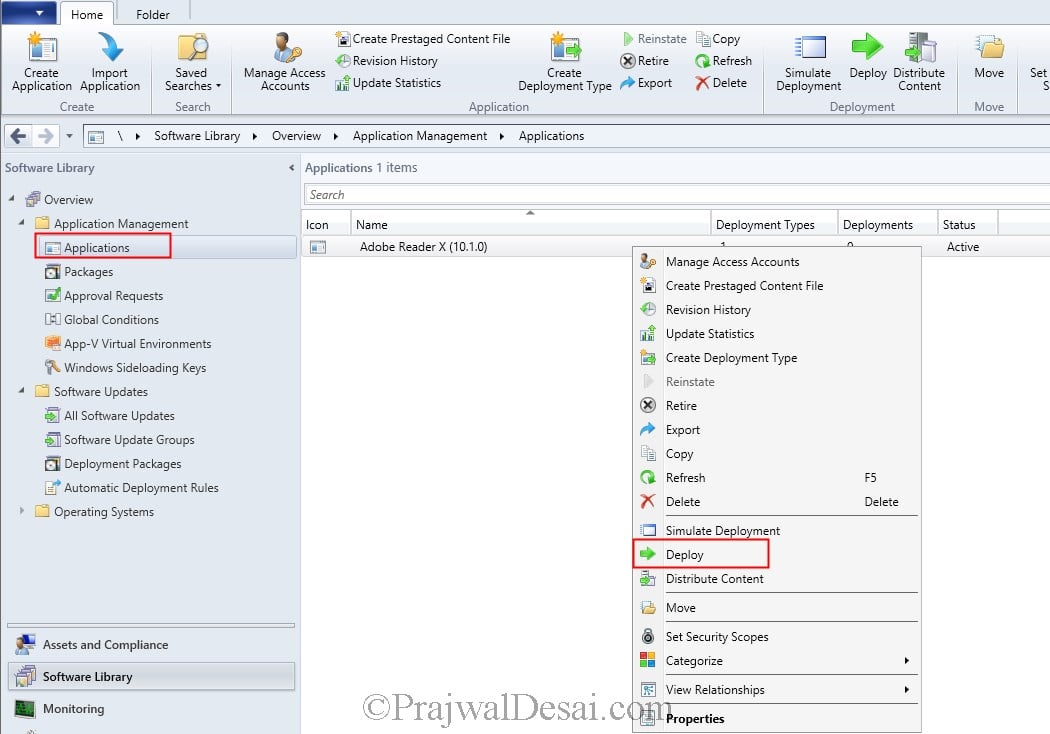
Next we will deploy the application to the user collection. Right click the Adobe application and click Deploy.
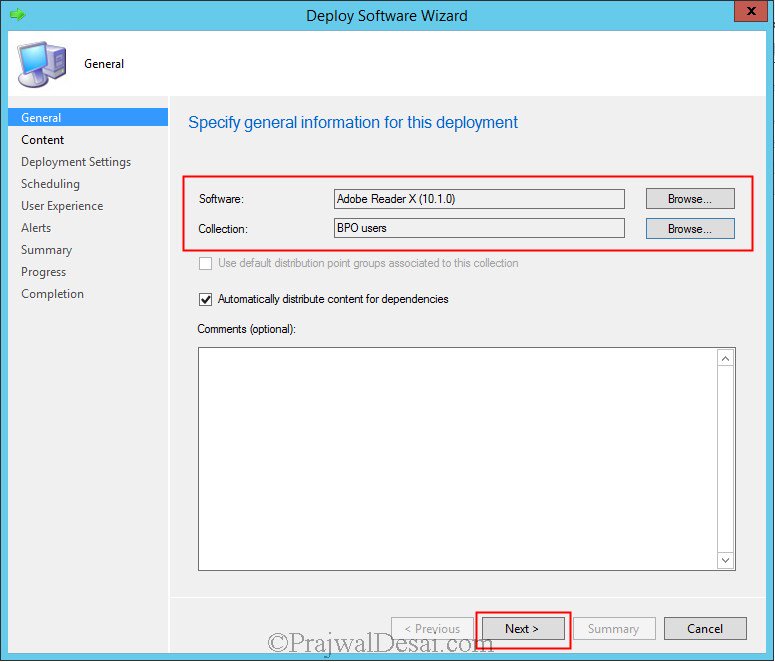
Click Browse and choose the collection as BPO Users. Click Next.
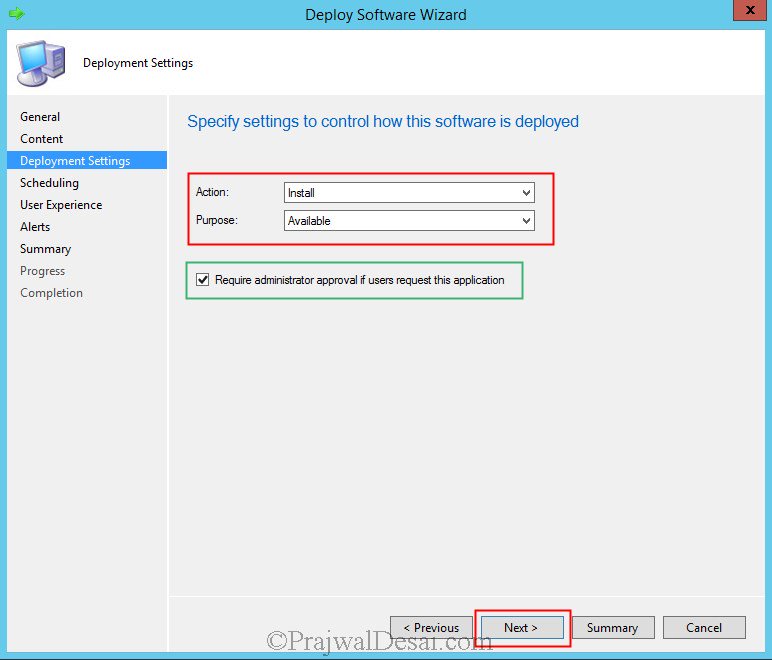
Specify the Deployment Settings, choose Action as Install and Purpose as Available. Check box “Require administrator approval if users request this application“. When you check this option, the application will be available to the user but it cannot be installed without SCCM administrator/approver approving it. Click Next and complete the wizard.
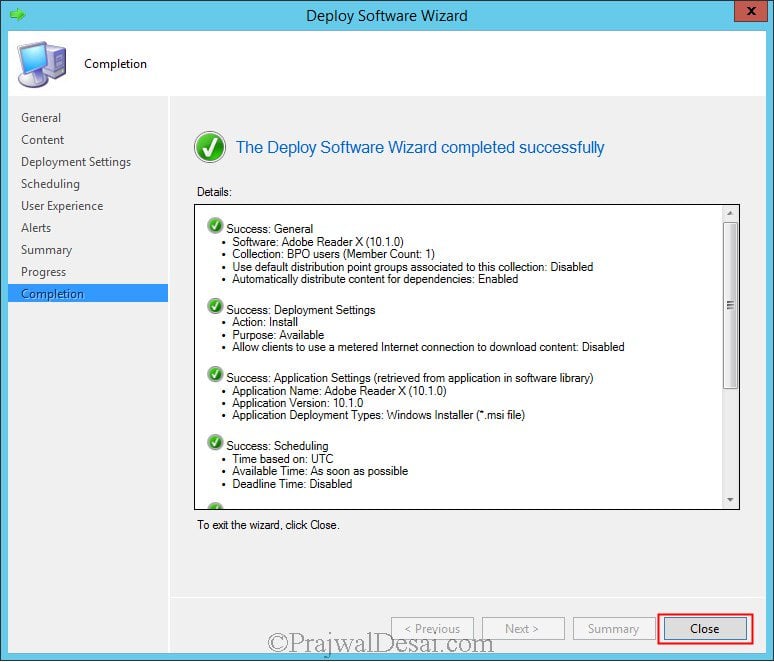
We have deployed the application to the user. Click Close.
The software has been deployed to the user group. Let’s login with the user account that is member of BPO Users group. Launch the Software Center and click on Find additional applications from the Application Catalog. When you click the link you will be prompted for user authentication, provide the username and password of logged in user account.
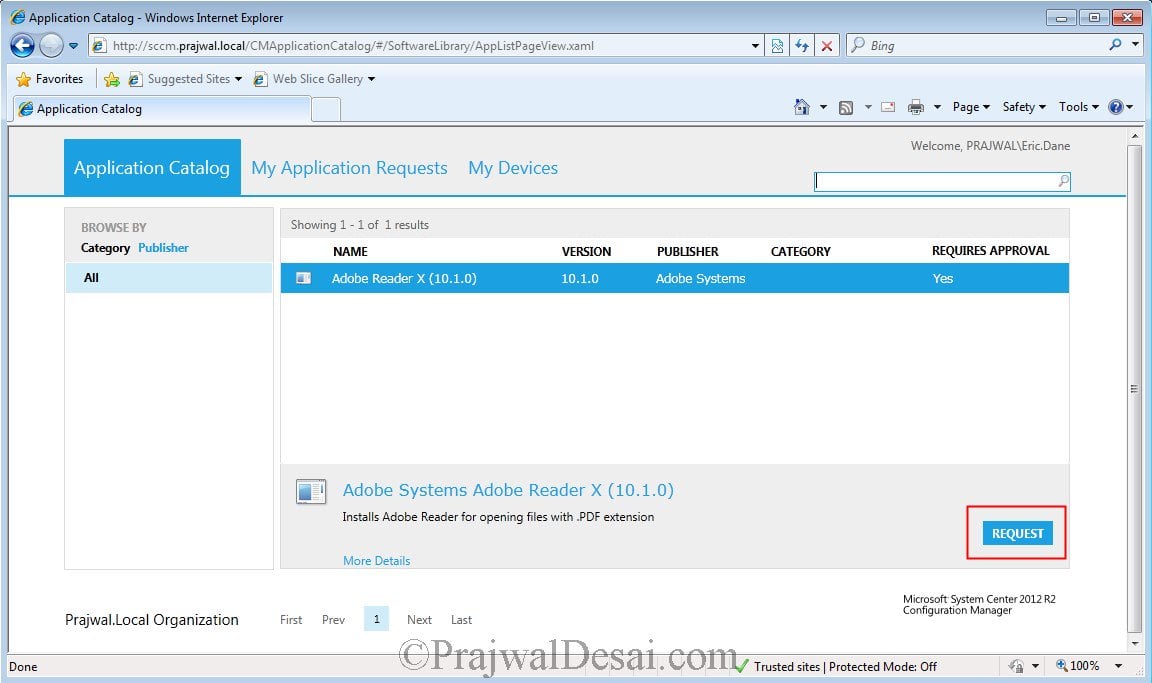
When you click Application Catalog, we see the Adobe application over there. There is no Install option seen because during our application deployment we have defined that the user must first request the SCCM administrator/approver for installing the software. So click on REQUEST.
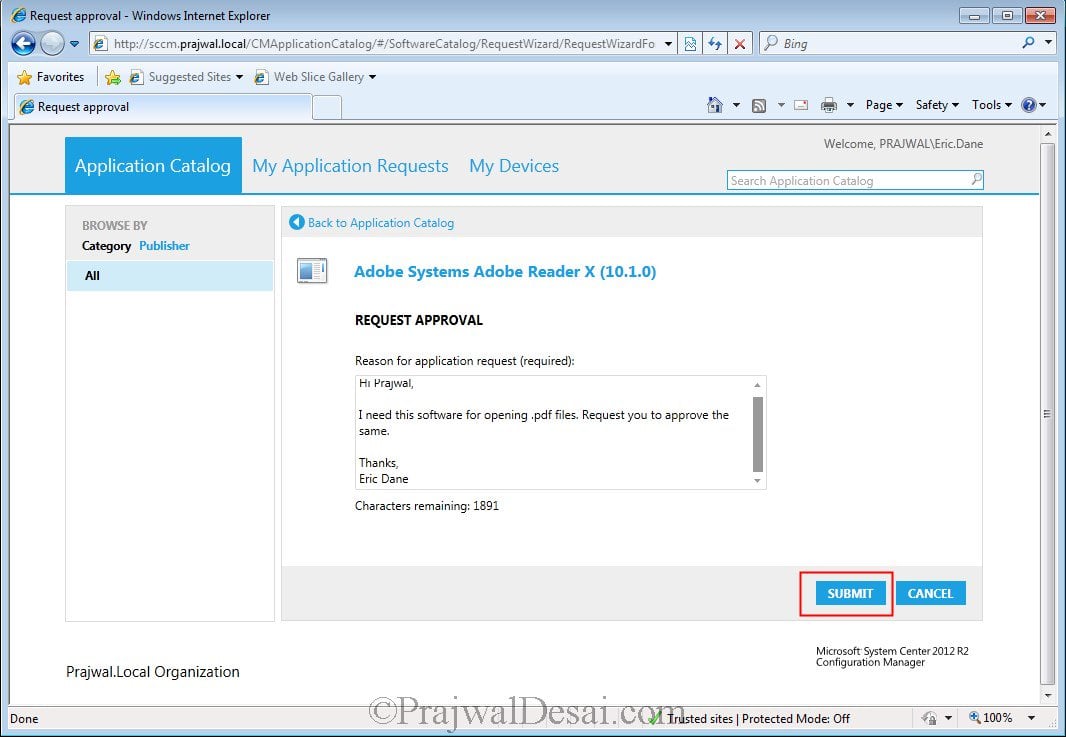
You can send the reason for application request so that administrator/approver can know why exactly you need the software. Click on SUBMIT.
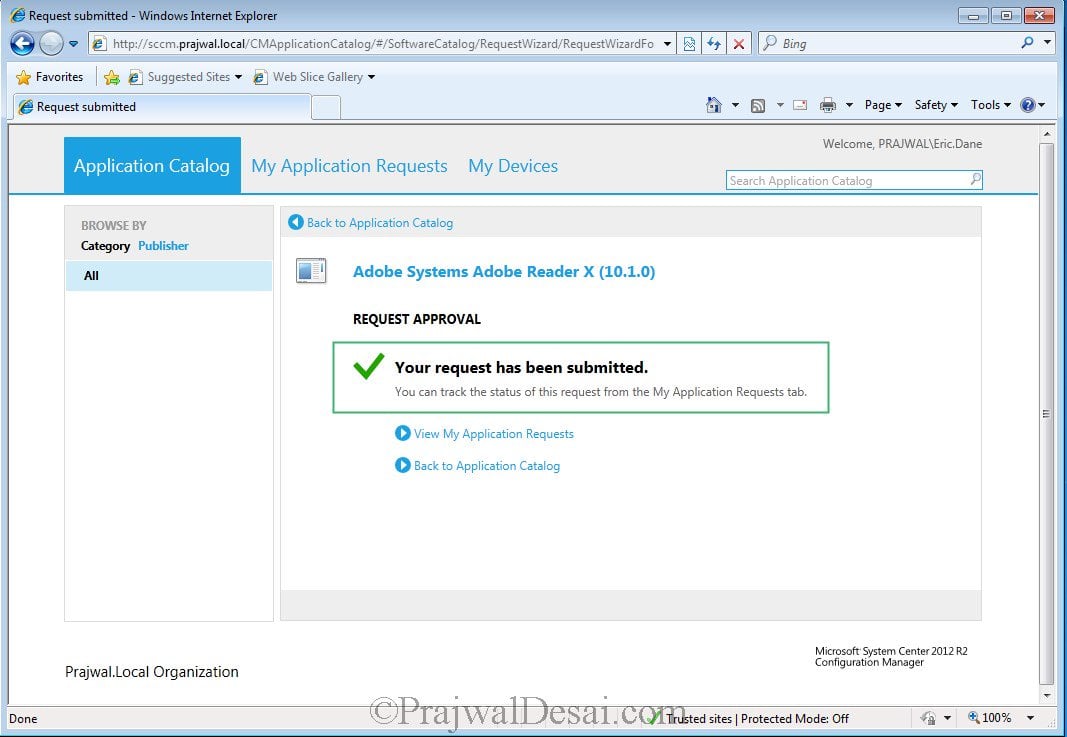
The approval request has now been sent to the administrator/approver. Let’s go back to Configuration Manager console and check it.
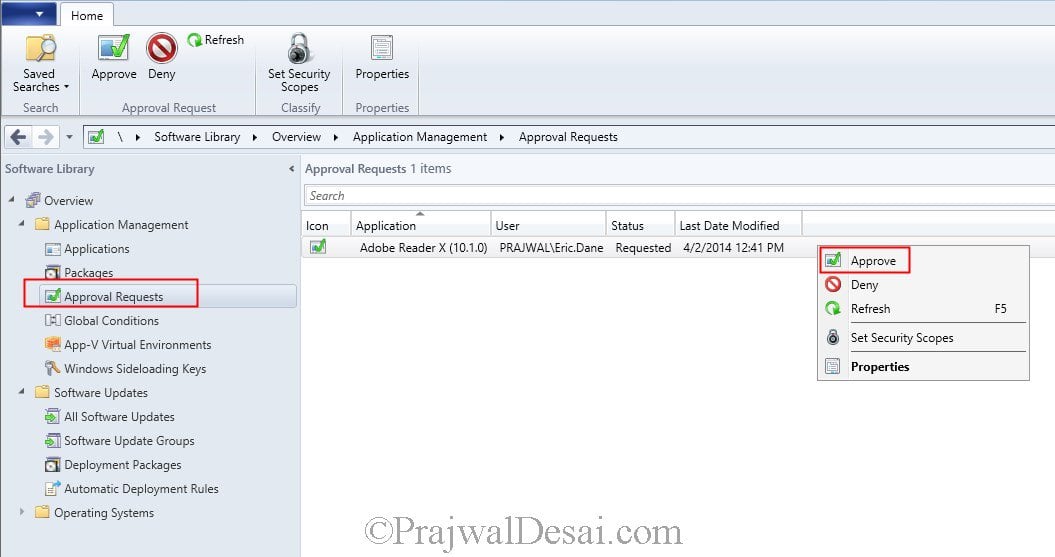
In the Configuration Manager console, under Application Management, click Approval Requests. We see that there is one request from the user Eric. To approve the application, right click the application and click Approve.
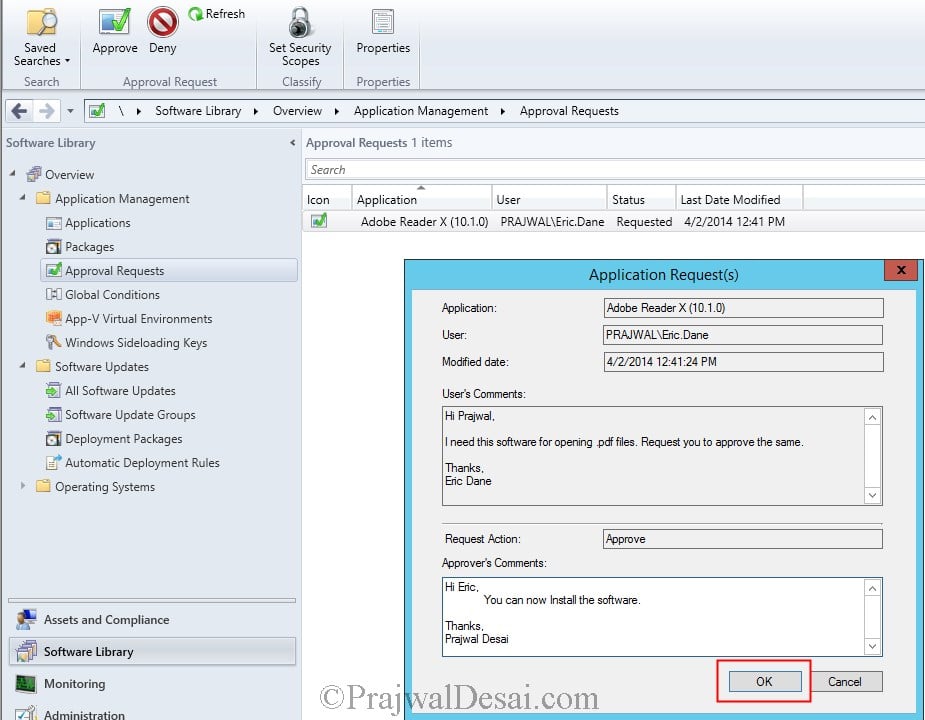
On the Application Request window the administrator/approver can see user comments and even add the comments. Click on OK.
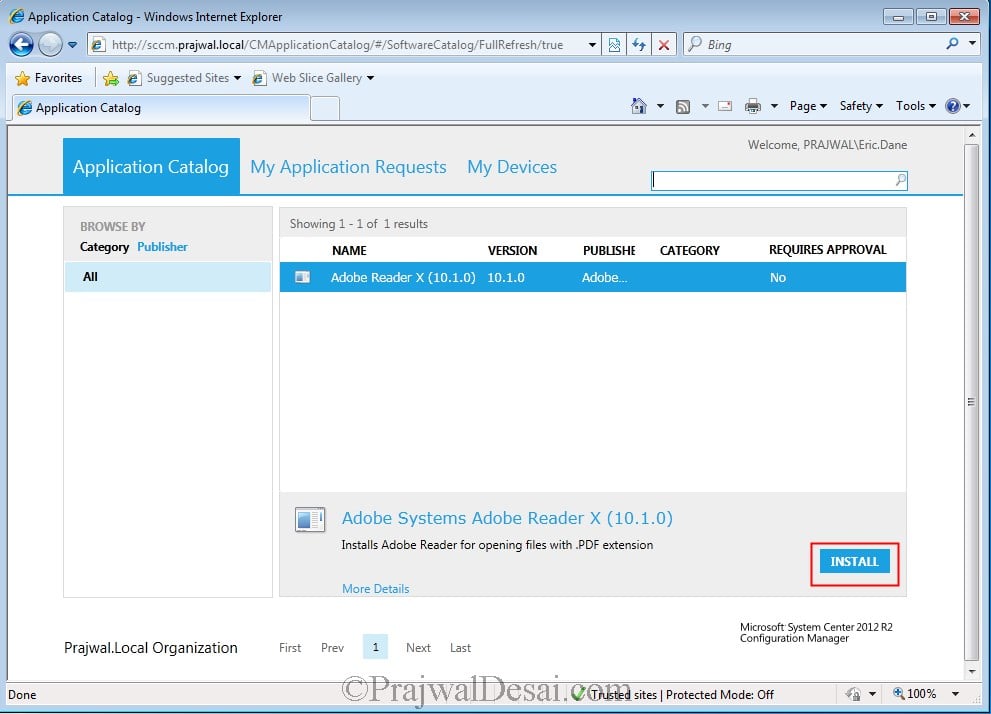
On the client machine refresh the link once and we see the INSTALL option. Also under REQUIRES APPROVAL we see its No, that means the application has been approved for installation.Click on Install to install the application.
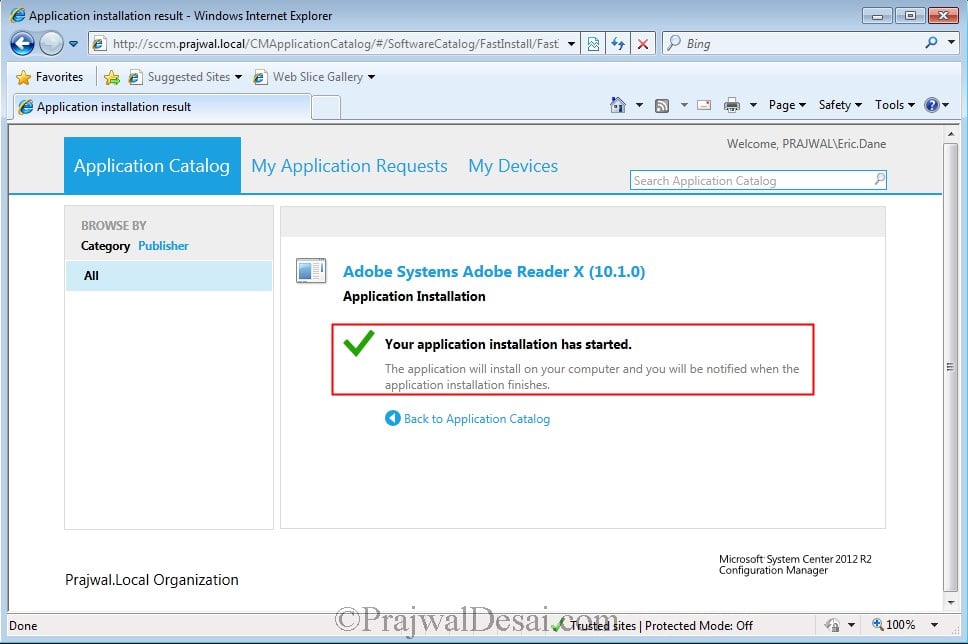
The application installation has started and it will be installed.
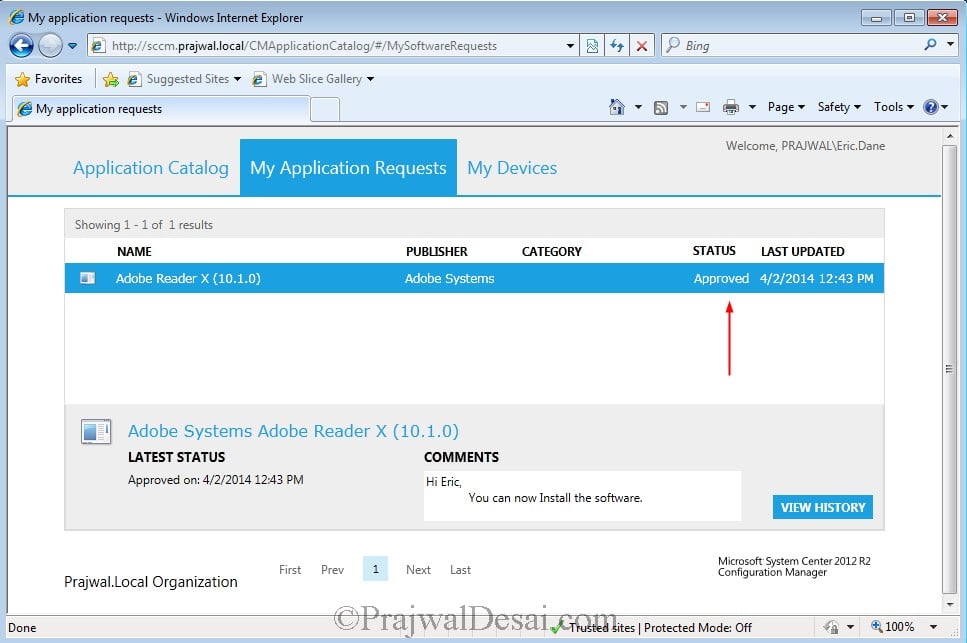
You can always check you application requests by clicking on My Application Requests.






Good post, I’m trying to do something like that but the difference is that I need to create and empty folder c:\users\useraccount\appdata\local\nameofthefolder I try basic cmd prompt but it will run for the user that it’s already logon to the computer. I already try c:\users\administrator\appdata\local\nameofthefolder. c:\users\default\appdata\local\nameofthefolder
c:\users\public\appdata\local\nameofthefolder
If I do a deployment thru sccm to a specific group of users will the folder will install after they log in to the machine, no matter what machine?
Thanks in advance
Hello Prajwal,
i created a package et deployed it to some machines, on the clients side all packages appeared and their status are “installed” but they are not. i only find a copy of the install files on the client c:\ .
I need to deploy the package and install them as well without any needed action from the client user.
How can i do it?
thank you for your help
Hi How to achieve an uninstall if the user is not part of the Security Group
do we have similar article for deploying packages to users?
Hello Prajwal:
I am Deploying an Application to a User Collection queried into and AD User Group.
Application is set to “Install for System” and “Whether or not a user is logged on”
Deployment Settings = Required
Scheduling = Schedule the application to be available at 6PM and Installation Deadline is set to “As soon as possible after the available time”
Question: I want the install to start at 6:01PM. Will the install start at 6:01PM? Do I need to change anything above? thanks for your attention
Setup.exe is not running from locally copied contents automatically. But if access the client remotely, and run the setup.exe command from the local cache, it is working fine. Do I need to give path for local cache in my application setting.
It is copying the file to local c:\windows\ccmcache, but it is not installing from there. Command line to install the setup file from the same location is not working. If I run the same command from CMD from the client, it is working fine
Thanks Prajwal. How to give the path of the local cache content in my application deployment? Setup.exe file has to run from the locally copied content. How to define the path in application that it should from the local cached content.
The setup files are copied to windows\ccmcache folder on client computer. You define the source path of the app while configuring the app and rest of the deployment is taken care by SCCM.
Hey Prajwal, I need to deploy Adobe Photoshop CC to 30 lab computers. Application is 2 GB in size. As per Adobe, we can not install it from Network share. It has to get copied locally on the client and then need to run the setup from there. How can I define this path in application or during deploying process. Thanks in advance.
2GB size is fine, when you deploy it using SCCM, the package is copied over to the client machine and then installed. Ensure your client cache size is set to size above 2 GB that’s all.
any help
I am looking for some help. I have adobe cc package to be deployed in the lab machines (30). As per Adobe, package has to be copied locally to those machines and then run setup from there.
How can I specify the path of the application which is copied locally on the machine through SCCM with application deployment.
why we need to create group in ad ,which users add in ad group if we want large number of users?
Hey Prajwal, what if we need to deploy an app (VMWare) to bunch of users and make sure it run as admin when it is deployed through SCCM as users dont have admin rights. what setting do we need to use in sccm 2012.
ello all, I am fairly new to SCCM 2012 and my question is for deployment.
Now what I would like to do is set up a job to Deploy 3rd party software (custom application) of to all clients in a perpendicular group, but what i would like to do is deploy it out to everyone but not install for 2 weeks. My thoughts here are that everyone in my domain will get the software but it will install all at the same time. is that possible in SCCM 2012 ?
Only choose the “Install behavior” as “Install for user” option if you want the application to run with the current logged-on user’s credentials. If the users does not have administrator right, the application may not install.
Hello all, I am fairly new to SCCM 2012 and my question is for deployment.
Now what I would like to do is set up a job to Deploy 3rd party software (custom application) of to all clients in a perpendicular group, but what i would like to do is deploy it out to everyone but not install for 2 weeks. My thoughts here are that everyone in my domain will get the software but it will install all at the same time. is that possible in SCCM 2012 ?
Hello,
I have a question related to application deployment:
In my case I deployed previously an application through the OS capture, so the application is installed with OS deployment.
This year, I received a new version of the application which need to be installed on over 1000 workstations.
The application provider ask to uninstall the previous application before reinstalling the new one.
I know sccm 2012r2 include the superseded property. But I can not find the old application ???
I want to know how to proceed?
Thank you
Deploy to a Device Collection, not a User Collection.
What is the account used for installation? For example, if user does not have local administrator rights to the machine – will he/she be able to install?
Hi I am trying to deploy a script through SCCM either as an application or package which copies files and folders to user profiles and in program files, which way would be best. I am trying so far as application with script file as app deployment type, it works but fails at the detection rule. well, there is no application installed, its just files being copied over into 2 different folders when user logged on. (e.g. program files & userprofile). can you please check and reply on this. thx
Hi,
What would the solution be for deploying to Users but only to a single computer they access?
For example we wouldn’t want to deploy to them on a conference computer.
That’s the issue because when you deploy an app to a user, wherever the user logs in the app is available to the user. I don’t think restricting a user to login to only one computer is something that cannot be done through SCCM.
Thanks but I wonder if there’s a way with SCCM to deploy it to a user but only their Primary Device?
Hello Prajwal,
thanks for you blog
I have a problem with the approval request.
When I try to get an application, I write some text to explain why I want this software and then I click submit, I ve got an error, Impossible to send ou to ask this software
Have you already see this message ?
Bye
Hello Prajwal
I have a different problem
Although I do not see anything sccm successful updates.
Thank you
https://uploads.disquscdn.com/images/965c7eabec0e2ced7e4d3358c43850ae87ff6743674322651b612406bdb3a545.jpg
Hello Prajwal
Can you help me?
I can not find solution to such a problem
Thenk you
https://uploads.disquscdn.com/images/f0ec0e1327425a80154867eed5162d0f15eab0f02b65fbeefc4806270dff44b9.jpg
I see the role was uninstalled successfully. Is it the error in the log file you are concerned about ?.
thank you
I found an error
Without using Query Rule, cant we use Direct Rule to AD Group
Hi Prajwal… Is it possible to enable mail trigger when user request for application..can we get the mail as well instead of seeing in configuration manager….
Hello
in software center i have a trouble.
application catalog “Cannot Connect to the application server”
?
@Davood – Do you see any errors in SMSAWEBSVCSetup.log file ?
Yes, Error Code: 125
====================================================================
SMSAWEBSVC Setup Started….
Parameters: C:Program FilesMicrosoft Configuration Managerbinx64rolesetup.exe /install /siteserver:CLOUD-PC SMSAWEBSVC 0
Installing Pre Reqs for SMSAWEBSVC
======== Installing Pre Reqs for Role SMSAWEBSVC ========
Found 1 Pre Reqs for Role SMSAWEBSVC
Pre Req SqlNativeClient found.
SqlNativeClient already installed (Product Code: {8F2916BE-1821-487F-8139-22906D4837DF}). Would not install again.
Pre Req SqlNativeClient is already installed. Skipping it.
======== Completed Installation of Pre Reqs for Role SMSAWEBSVC ========
Installing the SMSAWEBSVC
Passed OS version check.
IIS Service is installed.
Checking whether IIS ASP.NET component is installed
IIS component ASP.NET is not installed. Please install it.
Installation Failed. Error Code: 125
~RoleSetup().
====================================================================
Checking whether IIS ASP.NET component is installed
IIS component ASP.NET is not installed. Please install it.
You have not installed ASP.NET. Refer this post and install the component.
https://www.prajwaldesai.com/installing-prerequisites-for-configuration-manager-2012-r2/
Error still exists.
This is my last log in SMSAWEBSVCSetup.log file:
SMSAWEBSVC Setup Started….
Parameters: C:Program FilesMicrosoft Configuration Managerbinx64rolesetup.exe /deinstall /siteserver:CLOUD-PC SMSAWEBSVC 0
Deinstalling the SMSAWEBSVC
CWmi::Initialize(): CoCreateInstance(WbemLocator) failed. – 0x800401f0
Enabling MSI logging. awebsvc.msi will log to C:Program FilesMicrosoft Configuration ManagerlogsawebsvcMSI.log
Deinstalling SMSAWEBSVC, with product code {288EF826-5D73-4301-B5FE-5EAF0873AD69}
AWEBSVCNAME=”CMApplicationCatalogSvc” SMSSSLSTATE=0 AWEBSVCPATH=”C:Program FilesSMS_CCMCMApplicationCatalogSvc” AWEBSVCLOGMAXSIZE=8000000
SMSAWEBSVC deinstall exited with return code: 0
Deinstallation was successful.
Removing AWebSvc Registry.
~RoleSetup().
Error still exists
this is my last log in SMSAWEBSVCSetup.log :
SMSAWEBSVC Setup Started….
Parameters: C:Program FilesMicrosoft Configuration Managerbinx64rolesetup.exe /deinstall /siteserver:CLOUD-PC SMSAWEBSVC 0
Deinstalling the SMSAWEBSVC
CWmi::Initialize(): CoCreateInstance(WbemLocator) failed. – 0x800401f0
Enabling MSI logging. awebsvc.msi will log to C:Program FilesMicrosoft Configuration ManagerlogsawebsvcMSI.log
Deinstalling SMSAWEBSVC, with product code {288EF826-5D73-4301-B5FE-5EAF0873AD69}
AWEBSVCNAME=”CMApplicationCatalogSvc” SMSSSLSTATE=0 AWEBSVCPATH=”C:Program FilesSMS_CCMCMApplicationCatalogSvc” AWEBSVCLOGMAXSIZE=8000000
SMSAWEBSVC deinstall exited with return code: 0
Deinstallation was successful.
Removing AWebSvc Registry.
~RoleSetup().
1) Uninstall both Application Catalog roles
2) Check SMSPORTALWEBSetup.log and SMSAWEBSVCSetup.log in the Configuration Manager folder to track the uninstall progress
3) Install both Application Catalog roles with defaults
Run %windir%Microsoft.NETFramework64v4.0.30319aspnet_regiis.exe /-i –enable
Than you so much, fixed.
you’re my angel !
Hi Prajwal,
I am replying on this same comment since I am having same issue and followed all steps you mentioned above.
while accessing application catalog getting windows authentication and if its dosn’t allow the access with 401 forbidden access denied error.
Please check logs below:
====================================================================
SMSAWEBSVC Setup Started….
Parameters: D:\Program Files\Microsoft Configuration Manager\bin\x64\rolesetup.exe /deinstall /siteserver:USEEGSCCMPRI01 SMSAWEBSVC 0
Deinstalling the SMSAWEBSVC
CWmi::Initialize(): CoCreateInstance(WbemLocator) failed. – 0x800401f0
Enabling MSI logging. awebsvc.msi will log to D:\Program Files\Microsoft Configuration Manager\logs\awebsvcMSI.log
Deinstalling SMSAWEBSVC, with product code {750EF794-4F71-48C4-9F72-90E05D9143EA}
AWEBSVCNAME=”CMApplicationCatalogSvc” SMSSSLSTATE=0 AWEBSVCPATH=”D:\Program Files\SMS_CCM\CMApplicationCatalogSvc” AWEBSVCLOGMAXSIZE=8000000
SMSAWEBSVC deinstall exited with return code: 0
Deinstallation was successful.
Removing AWebSvc Registry.
~RoleSetup().
====================================================================
SMSAWEBSVC Setup Started….
Parameters: D:\Program Files\Microsoft Configuration Manager\bin\x64\rolesetup.exe /install /siteserver:USEEGSCCMPRI01 SMSAWEBSVC 0
Installing Pre Reqs for SMSAWEBSVC
======== Installing Pre Reqs for Role SMSAWEBSVC ========
Found 1 Pre Reqs for Role SMSAWEBSVC
Pre Req SqlNativeClient found.
SqlNativeClient already installed (Product Code: {B9274744-8BAE-4874-8E59-2610919CD419}). Would not install again.
Pre Req SqlNativeClient is already installed. Skipping it.
======== Completed Installation of Pre Reqs for Role SMSAWEBSVC ========
Installing the SMSAWEBSVC
Passed OS version check.
IIS Service is installed.
Checking whether IIS ASP.NET component is installed
IIS component ASP.NET is installed
Checking whether WCF 40 is activated
WCF 40 is activated
Checking whether IIS ASP.NET is registered
IIS ASP.NET is registered
AWEBSVCNAME=”CMApplicationCatalogSvc” SMSSSLSTATE=0 AWEBSVCPATH=”D:\Program Files\SMS_CCM” AWEBSVCLOGMAXSIZE=8000000
No versions of SMSAWEBSVC are installed. Installing new SMSAWEBSVC.
Enabling MSI logging. awebsvc.msi will log to D:\Program Files\Microsoft Configuration Manager\logs\awebsvcMSI.log
Installing D:\Program Files\Microsoft Configuration Manager\bin\x64\awebsvc.msi AWEBSVCNAME=”CMApplicationCatalogSvc” SMSSSLSTATE=0 AWEBSVCPATH=”D:\Program Files\SMS_CCM” AWEBSVCLOGMAXSIZE=8000000
awebsvc.msi exited with return code: 0
Installation was successful.
~RoleSetup().
Thanks in advance !! 🙂
Hello Prajwal,
I cannot get my clients to populate in the new user collection I have made.
The user account is definitely a part of the AD group I typed in when creating the colleciton.
Any hints to troubleshoot please?
Are you using a query to group the clients to a collection ?.
Hi Prajwal,
i am successfully deploying my applications to my devices but i see it takes about 30 minutes before the client starts installing. whether its a small app like vlc or firefox or winzip. is there somewhere i can check so it starts quickly? or thats how its suppose to ?
Thanks
@Sion – Have you configured BITS in your client device setttings ? If it is not configured then there should not be any issue related to BITS, if you have configured BITS then let me know what are the settings..
The next thing you need to check is client policy polling interval (client device settings), it is set to 60 minutes by default, set it to 5 minutes.
Also, open the execmgr.log file on the client machine to see if the application is taking time to download from DP.
Hi Prajwal,
no i did not configure BITS. and yes the client policy polling interval is set to 5 mins. but still the same.
i some how dont really understand the execmgr.log on the client machine. there’s little data.
like i said it is installing its just that it takes more than 35 mins before you see anything on the client, even before coping the files to the client device.
Attached Screenshot should help you..
Hi prajval / codi
No codi, it dont need any additional efforts to deploy an application to device collection other than selecting system resources or directly adding machines to the collection.
The idea behind this post is to show end result I.e. deploying to user resource will target application to go to application catalag while deploying to system resource will target it to software centre, previously known as RAP In sccm 2007.
Again our motive is not to make user request the s/w ALWAYS before installing it coz there is option available while creating an application which can help user to directly install application from application calalog. But some licensed based applications need approval.
Nice post prajval.. really nice to read it.
Prajwal,
How’s come it is necessary to search for ‘find additional applications from the application catalog’ rather than reader being within the ‘available software’ category? Is this due to the need for administrator approval? Is deployment to a device collection require any additional steps other than choosing device collection rather than user collection?
Hi Codi,
When you deploy the applications to the device collection you would see the application in the Software Center. And you will not find the option “Require administrator approval if users request this application” when you are deploying apps to device collection.
When it comes to user collection you can specify the application to be approved by administrator first before the user installs it. The application deployed to user collection will be found in the Application Catalog > Application Requests. So once the user installs the application from there, it can now be seen under Software Center.
I didn’t get the last part of you question -“Is deployment to a device collection require any additional steps other than choosing device collection rather than user collection? ”