

In this post we will look at the steps to deploy dot net Framework 3.5 (.NET Framework 3.5) using ConfigMgr. We will deploy .NET Framework 3.5 using ConfigMgr task sequence.
In one of my previous post, I covered on how to enable .NET framework 3.5 using SCCM. However, that method used a PowerShell script to install Dot Net Framework 3.5 on Windows 10 machines.
The method that I am going to use to deploy Dot Net Framework 3.5 involves creating a package and adding it to the SCCM task sequence. The advantage of using this method is you can inject or enable the Dot Net Framework 3.5 during operating system deployment.

There are several ways to deploy the .NET framework 3.5. No matter what method you choose to deploy, the final goal is to ensure the .Net Framework 3.5 is installed on Windows 10 computers.
You can also use DISM or group policy or PowerShell to enable .NET framework 3.5 feature on Windows 10 computers. We will use a basic way to deploy the dot net framework 3.5 using SCCM task sequence.
You might wonder why are we even deploying such an old .Net Framework 3.5 when there is already .NET 4.8 framework available for download. The answer is some applications still require .Net Framework 3.5 as prerequisite.
Download Dot Net Framework 3.5
The Dot Net Framework 3.5 installation file is included with the Windows 10 ISO (media). You don’t need to download it from elsewhere because there is a chance that you may download an outdated version.
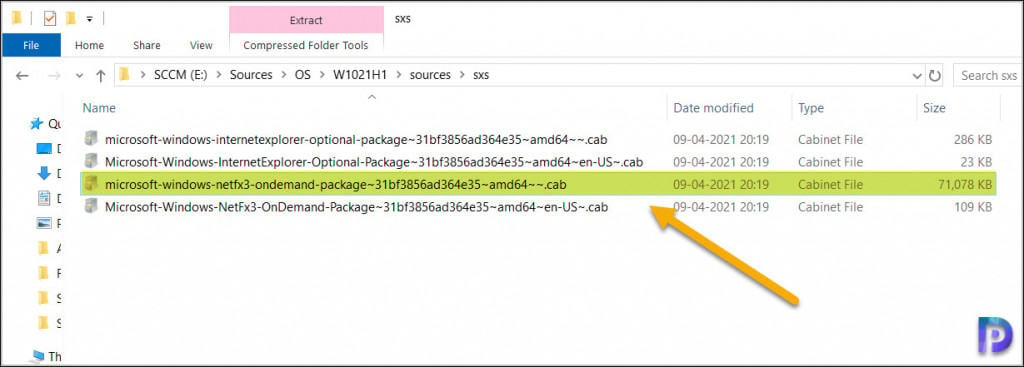
Let me show you the exact location of Dot Net Framework 3.5 files. First mount the Windows 10 ISO file which in my case is Windows 10 21H1. Go to Sources > SXS folder and there you will find microsoft-windows-netfx3-ondemand-package~31bf3856ad364e35~amd64~~.cab file. The size of this file is approx. 70 MB and that’s the file which enables Dot Net Framework 3.5 feature.
So now that you are aware of the Dot Net Framework 3.5 installation file, copy the file to a separate folder on SCCM server. Also create a new text file and paste the below code in to the file and save this file as installdotnet35.bat.
DISM.exe /Image:%1\ /Enable-Feature /FeatureName:NetFx3 /All /LimitAccess /Source:"%~dp0sxs"The above command uses DISM to enable or install .Net Framework 3.5 feature on Windows 10 computers.

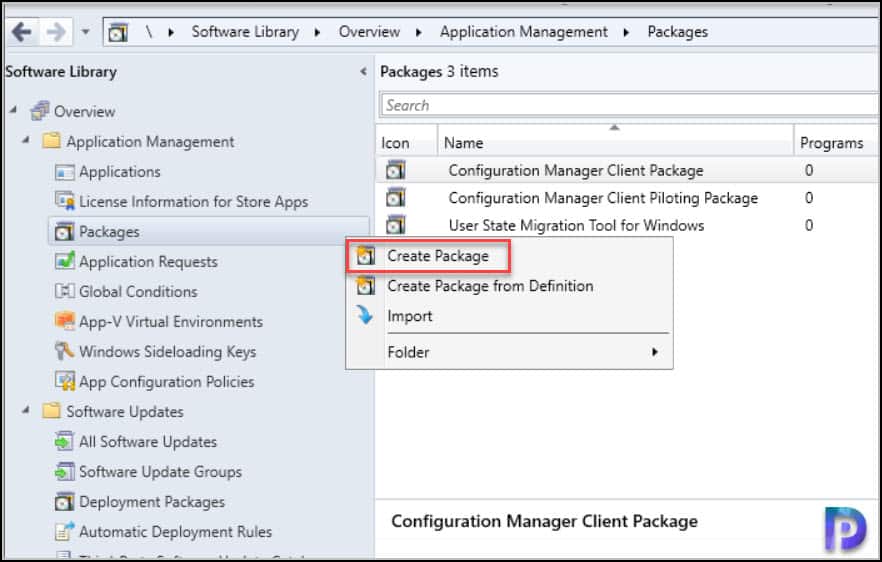
Create .Net Framework 3.5 Package in SCCM
In this step we will create a new package for .Net Framework 3.5 in SCCM. In the ConfigMgr console, navigate to Software Library\Overview\Application Management\Packages. Right click Packages and click Create Package.
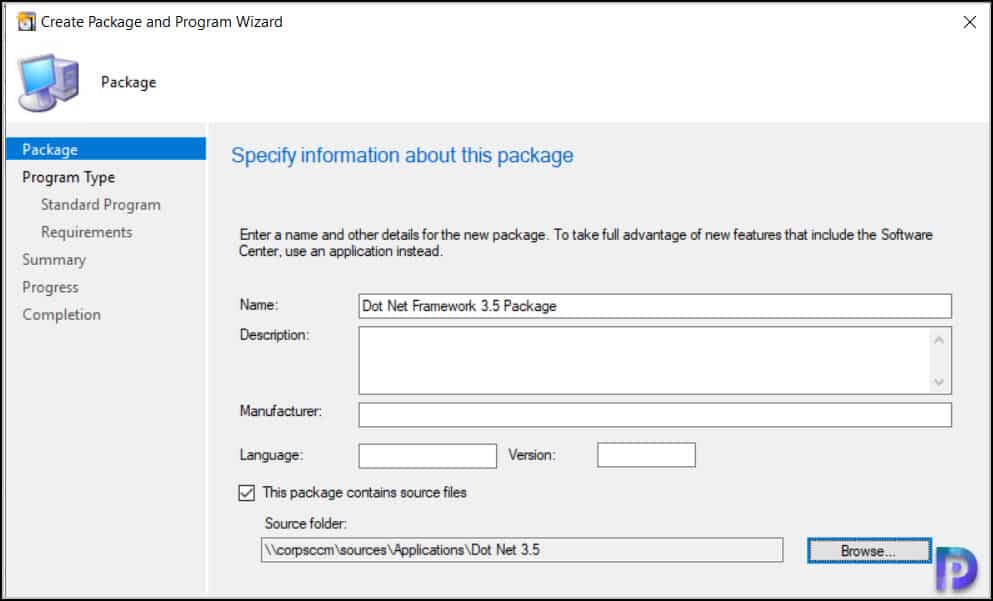
On the first screen, specify the name of the package for ex. Dot Net Framework 3.5 Package or something similar. Select This package contains source files and specify the folder path that contains the Dot Net Framework 3.5 files. Click Next.
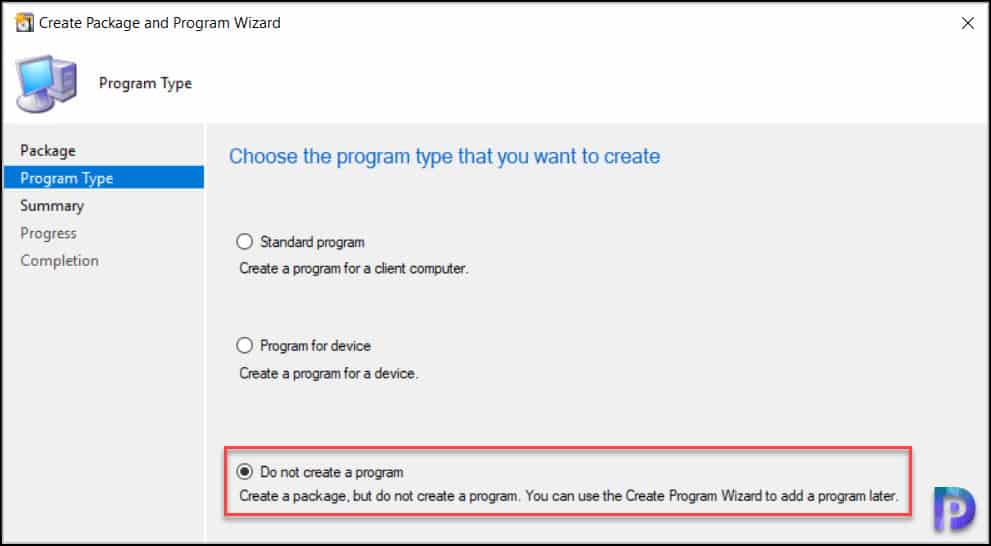
On the Program type window, select Do not create a program. Click Next.
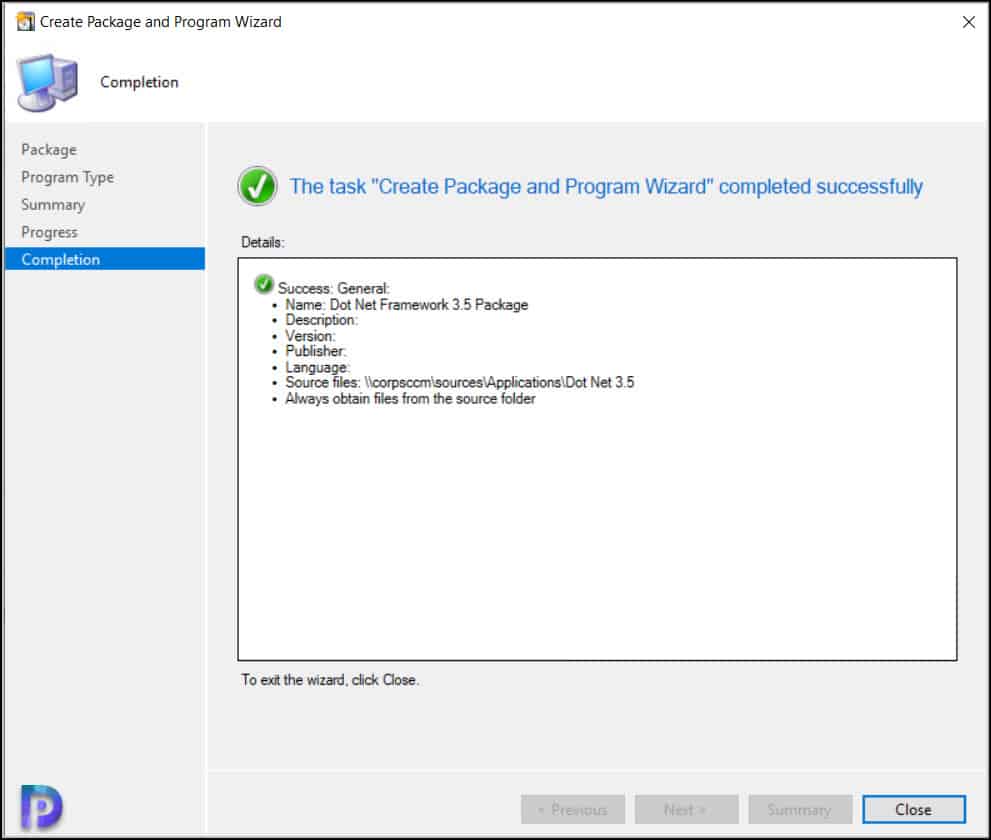
Click Next on remaining pages and on Completion window, click Close.
In the next step, distribute the Dot Net Framework 3.5 package to all your distribution points.
Deploy Dot Net Framework 3.5 using ConfigMgr Task Sequence
In this step we will edit our ConfigMgr task sequence and include Dot Net Framework 3.5 package and this gets deployed to Windows 10 computers.
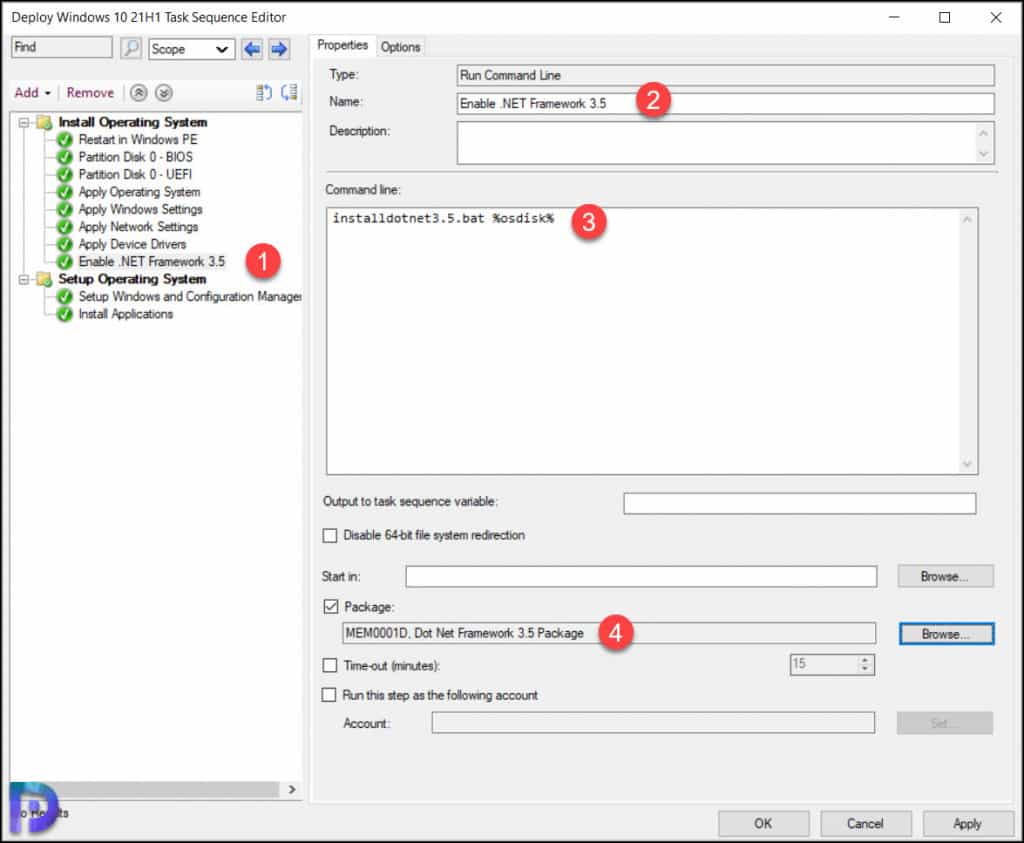
Edit your ConfigMgr task sequence and just before Setup Windows and Configuration Manager step, add a new Command Line step. Specify the name as Enable .NET framework 3.5 and enter the command as installdotnet3.5.bat %osdisk%. You must click Browse and select the Dot Net Framework 3.5 package.
Next, you must set a variable on Windows partitions within all Partition Disk tasks to osdisk. In the task sequence editor, select Partition Disk 0 – UEFI. Right click Windows (Primary) and click Properties.
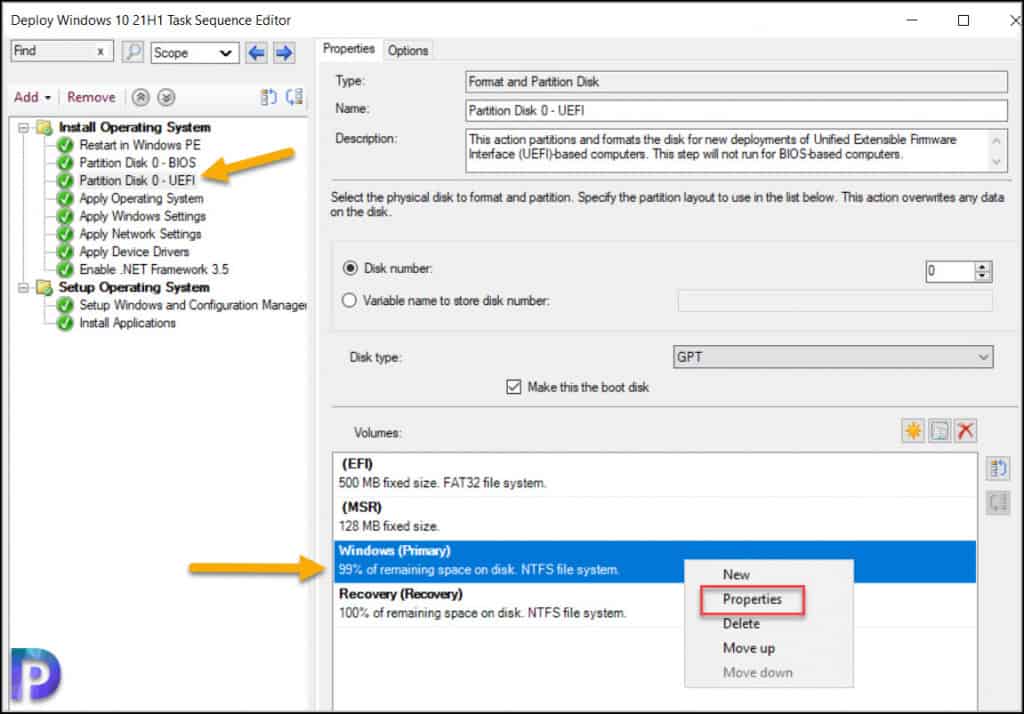
In the Windows partition properties window, under Advanced Options, enter the variable as osdisk. Click OK.
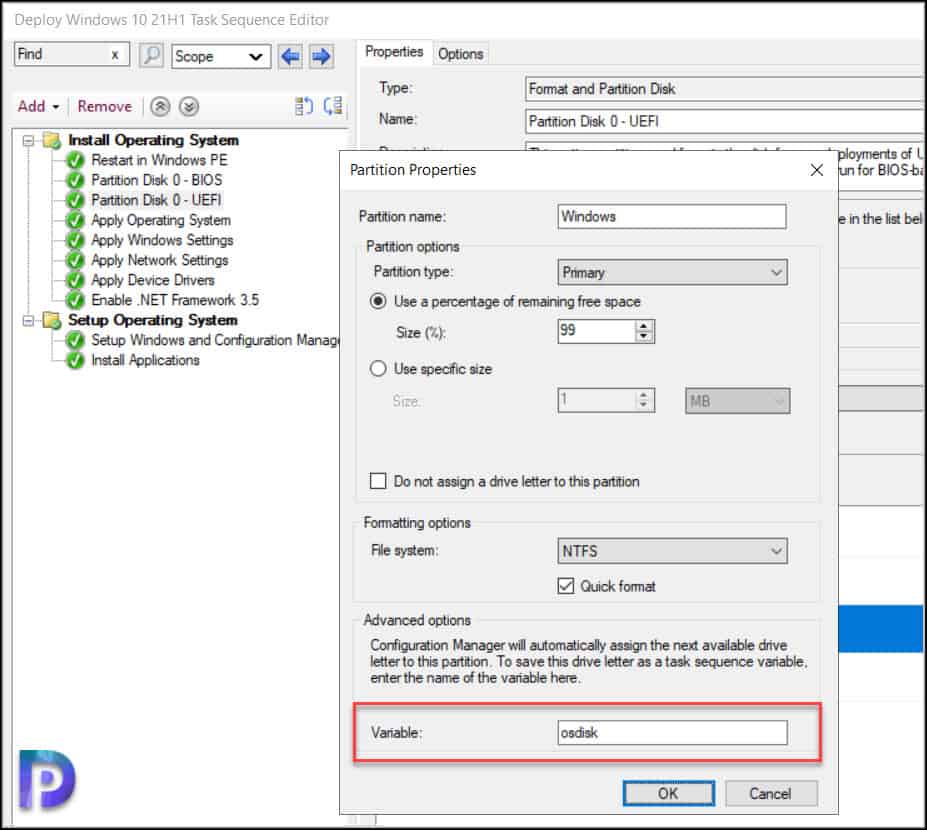
Repeat the same steps for Partition Disk 0 – BIOS and save the task sequence. If you haven’t deployed the task sequence, deploy it to your device collection.
The .NET framework 3.5 feature should be enabled after the task sequence completes its execution. In case you encounter any errors, refer .NET Framework 3.5 installation errors: 0x800F0906, 0x800F081F, 0x800F0907, 0x800F0922.

Hello, I received this error code 0x800F081F. I did change the source based on George G’s response. Any ideas and how to resolve this?
setlocal
CD /d %~dp0
DISM.exe /Image:%1\ /Enable-Feature /FeatureName:NetFx3 /All /LimitAccess /Source:”%~dp0″
endlocal
Hello,
I received this error code 0x800F081F during the process. Per George G’s response, I changed /Source:”%~dp0sxs” to /Source:”%~dp0″. I’ll try adding the sxs folder and leaving the command as is, but any ideas?
How do you deploy this to an already running windows 10 system. Can it only be done through Task sequence
excellent information. Typo on batch file name? Initially installdotnet35.bat, later installdotnet3.5.bat %osdisk%
It’s a command to install the Dot net 3.5
I tried this once and it didn’t work. I was tired. The I tried it again and realized I had misread it the first time. This time the task sequence fails right after the two collection variables are processed stating the distributed package cannot be found. This version of the task sequence was copied and built from my working gold TS.
Script looks for sxs folder which is not present following the guide. When creating a sxs folder and placing the cab file the installation works. or just change /Source:”%~dp0sxs” to /Source:”%~dp0″.
Dear Walhalla,
no. You need the correct .cab file for each windows 10 version.
Is the .cab-file the same for all Windows 10 Versions?