


This guide is for administrators who are looking to deploy TeamViewer using SCCM. We’ll show you how to download and package the TeamViewer application in Configuration Manager and deploy it to Windows devices.
TeamViewer is an app that allows you to remotely connect to multiple workstations. There are numerous apps that allow remote control of various systems, but TeamViewer is designed to be both accessible and powerful.
This guide covers both EXE and MSI deployment of the TeamViewer application in Configuration Manager. Organizations licensed for Team Viewer must use the MSI deployment method because it is the recommended method.

Mass deployment methods for TeamViewer
To mass deploy TeamViewer within your environment, you can use one of the methods listed below:
- Group Policy
- Configuration Manager
- Microsoft Intune
- TeamViewer management console
Download TeamViewer Installer
TeamViewer offers installers for a wide range of operating systems, which include Windows, macOS, Linux, Chrome OS, Android, and iOS.
For Windows, TeamViewer offers an executable installer (.exe) and an MSI installer (.msi). The TeamViewer MSI Package requires a corporate license, whereas the executable installer is available for download by anyone.
With TeamViewer MSI installer, the deployment using SCCM is much easier when compared to using an executable installer. That’s because you don’t have to define a detection method with the MSI installer, as it is retrieved from the installer directly by Configuration Manager.
You can download either 64-bit or 32-bit TeamViewer installers based on the operating system architecture you’ve got. If you have a mix of both, you will have to download both of them and package them separately in Configuration Manager.
Deploy TeamViewer using SCCM
This method covers the steps for deploying the TeamViewer executable installer using Configuration Manager.
Download TeamViewer EXE installer
You can get the TeamViewer full client installer for Windows from the download site. The download link is accessible for everyone, and you don’t have to log in to get the installer.
Run the TeamViewer executable file and on the Welcome screen, do not click Install or Next. When you run the executable file, another executable file and a .ini file are extracted. These setup files can be found in C:\Users\useraccount\AppData\Local\Temp folder.
If you are unable to find the TeamViewer application in the Temp folder, you can clear the files from the directory and then run the original setup file. The new folder that is created will contain the TeamViewer application.
Copy TeamViewer_.exe to the folder on the SCCM server. You can also download an icon for the application and use it to display in the software center for users. We will use this executable file to install TeamViewer on Windows endpoints with the help of Configuration Manager.

Add TeamViewer EXE Application in SCCM
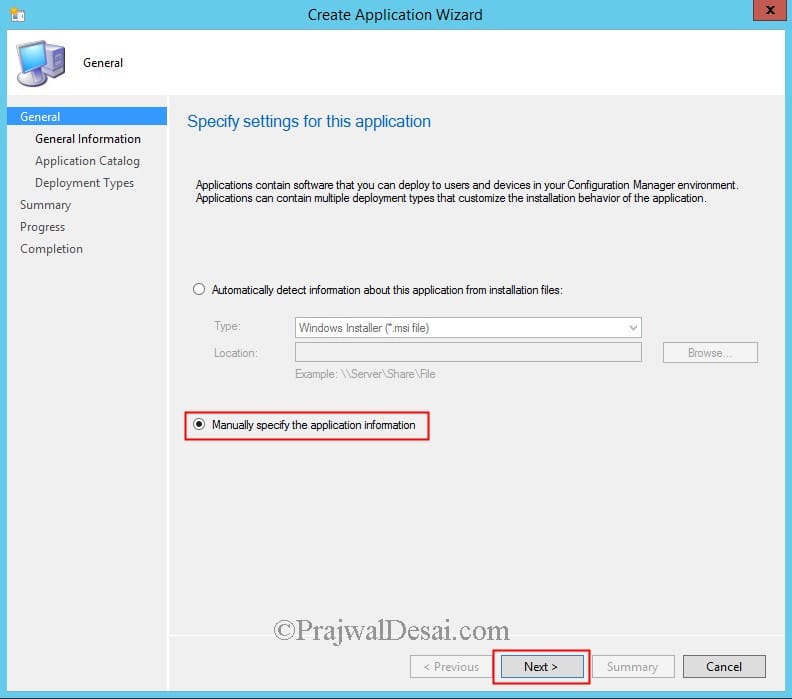
Launch the Configuration Manager console, click Software Library, under Application Management right click Applications and click Create Application. Choose Manually specify the application information and click Next.
On the General Information page, specify some information about the application, such as name, publisher, etc. Click Next.

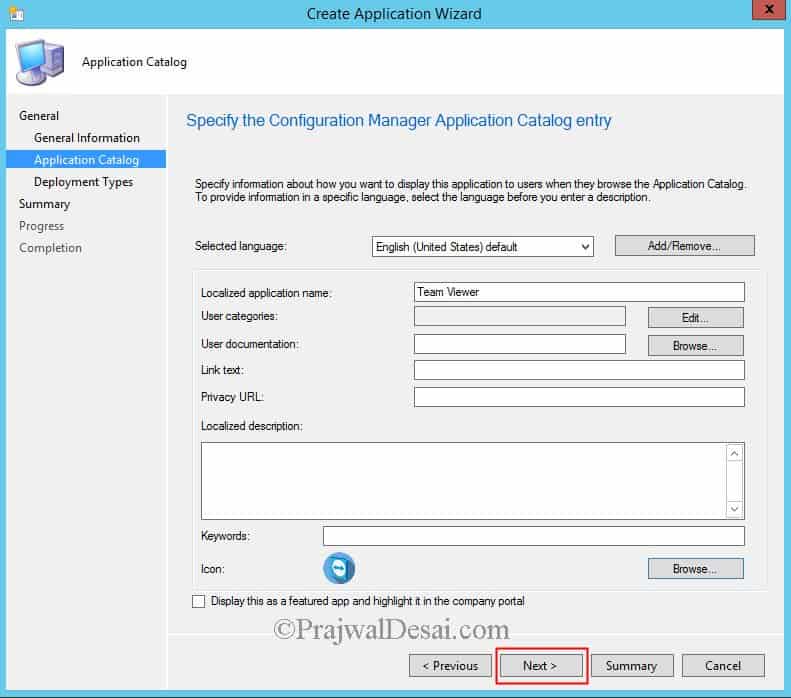
You can specify more information about the TeamViewer application here, the information specified here will be seen by the user in the Software Center. Click Next.
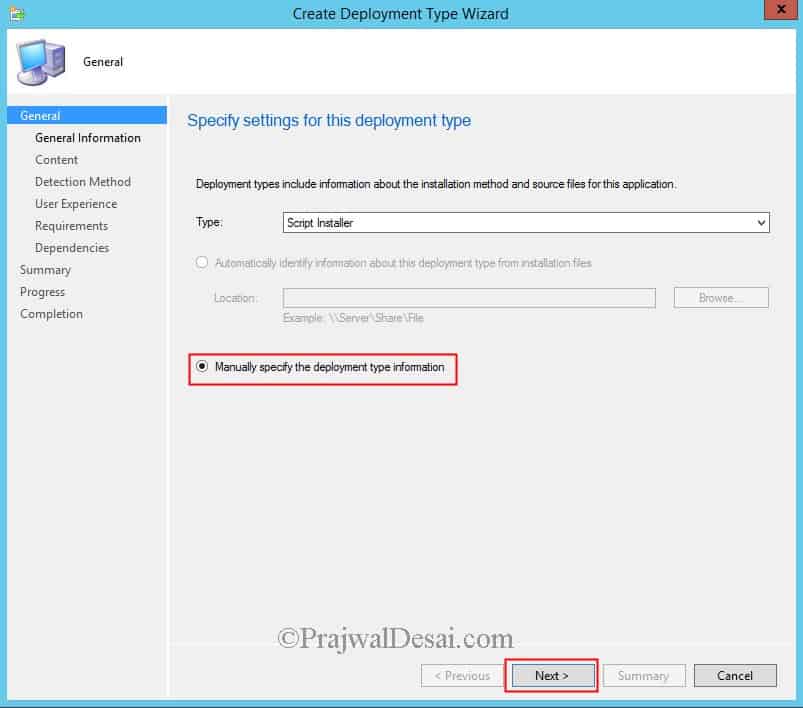
We will configure the Deployment Type for TeamViewer software. Click on Add. In the General page, choose Type as Script Installer click Manually specify the deployment type information. Click Next
Specify Install and Uninstall Information
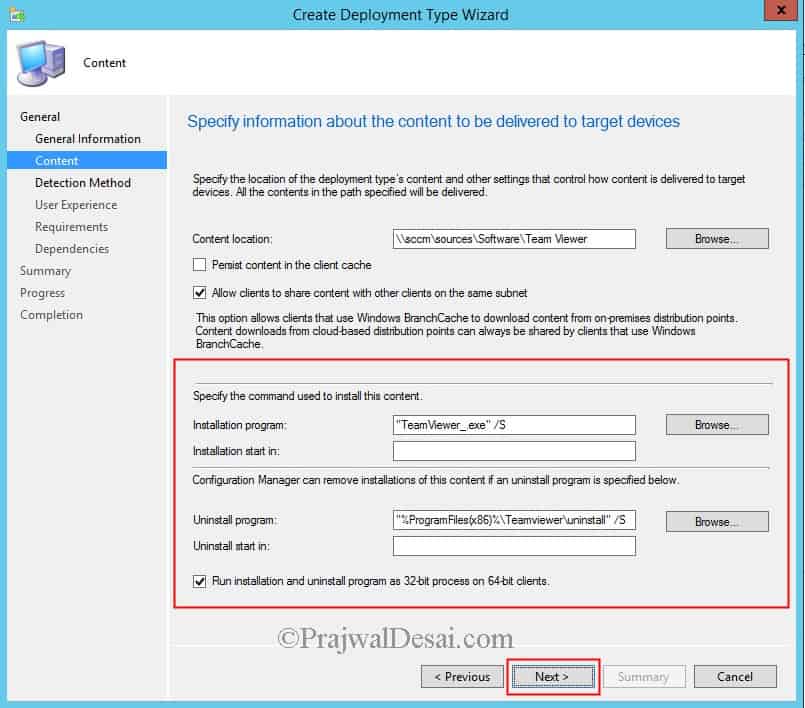
With the TeamViewer EXE application deployment, you’ll have to specify the installation and uninstall commands. If you specify incorrect commands, your application may fail to install or uninstall.
In general, the TeamViewer client can be silently installed and uninstalled with these commands:
For 32 bit TeamViewer: "C:\Program Files (x86)\TeamViewer\uninstall.exe" /S
For 64 bit TeamViewer: "C:\Program Files\TeamViewer\uninstall.exe" /S
- Content Location: Provide the path where the TeamViewer setup file is located.
- Installation Program: “TeamViewer_.exe” /S
- Uninstall Program: “%ProgramFiles(x86)%\TeamViewer\uninstall.exe” /S
Note – For silent installation and uninstallation of TeamViewer, use /S (uppercase S). The /s (lowercase) will not work.
Once you’ve specified the above details, click Next.
Configure detection method for TeamViewer
The detection method allows the administrator to check if an application is already installed. It can also prevent an installation of an application if it conflicts with another application that is already installed.
To configure the detection methods for TeamViewer EXE application, click Configure rules to detect the presence of this deployment type and select Add Clause.
On the Detection Rule window, configure the following:
- Setting Type: File System
- Type: File
- Path: %ProgramFiles(x86)%\TeamViewer\
- File or Folder name: TeamViewer.exe
Next, select the option “The file system setting must satisfy the following rule to indicate the presence of this application” and configure the following:
- Set Property: Version
- Operator: Equals
- Value: 11.0.63017.0
Note: This value that you specify here is actually the version of TeamViewer that you’re deploying. You can get the Value by checking the properties of the TeamViewer app.
Click OK and then Next.

Specify the user experience settings for TeamViewer application deployment.
- Installation behavior: Install for system.
- Logon requirement: Whether or not a user is logged on.
- Installation program visibility: Hidden.
Click Next.

Additionally, you can specify the requirements and dependencies for the application. Click Next and on Completion window, click Close.
This completes the process for creating the TeamViewer EXE application in SCCM. The application will appears in the Applications node of the Configuration Manager console.
Deploy TeamViewer EXE application to Windows devices
Right-click the TeamViewer application and click on Distribute Content. After you distribute the application to DP, right-click on the TeamViewer EXE app and click on Deploy. Choose the Collection where this application is to be deployed.
After a few minutes, the TeamViewer software is listed in the Software Center. Select the app and click on Install. The app is downloaded from the DP and installed.
TeamViewer MSI deployment using SCCM
This method shows the procedure for deploying the TeamViewer using the MSI package via SCCM.
Download TeamViewer MSI Installer
The first step is to download the TeamViewer MSI installer for deployment. To deploy TeamViewer successfully, you need the .msi package matching your module. In addition, you should have a company account to get the version 15 or newer installer.
Sign in to the TeamViewer management console and go to Design & Deploy and download the MSI 64-bit installer (Host & Full Client for Windows).

Save the TeamViewer MSI Installer in a folder for deployment using SCCM. In our case, the installer is saved in the sources folder for deployment. We have also downloaded the TeamViewer application icon and this icon will appear along with the application in Software Center for users.

Create TeamViewer MSI application in SCCM
Perform the following steps to create a new MSI application for TeamViewer in SCCM.
- Right-click Applications and select Create Application.
- Launch the Configuration Manager console.
- Go to Software Library > Overview > Application Management.

In the General tab of the Create Application Wizard, ensure the application type is Windows Installer (*.msi file). For location, specify the TeamViewer MSI installer path and click Next.

The Configuration Manager reads the application information from the Team Viewer Installer file. We see the product code is populated from the setup file. Click Next.
Application name: TeamViewer
Publisher:
Software version:

Deployment type name: TeamViewer - Windows Installer (*.msi file)
Product Code: {3BADF1F2-223A-4877-AA44-763F65CB5022}
Installation behavior: Install for system

Content location: \\corpcm\Sources\Applications\TeamViewer\TeamViewer 15 (x64) - MSI Install\
Number of files: 2
Content files:
     teamviewer.png
     TeamViewer_Full.msi

In the General Information page, specify the details of the TeamViewer application. The setup command is automatically read from the MSI installer, so you don’t need to enter anything for the installation program. Set the application installation behavior to Install for System. Click Next.

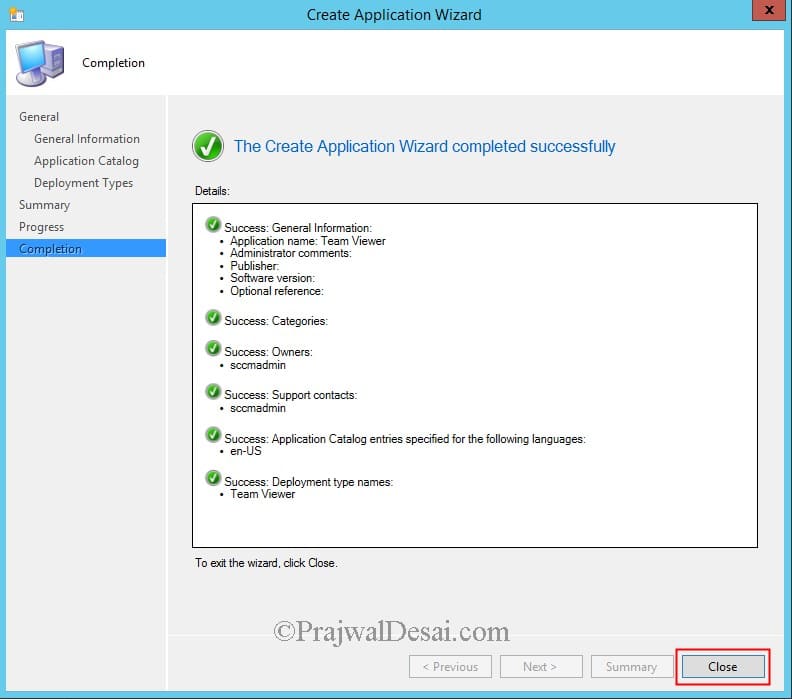
Review the application settings on the Summary page and click Next. On the completion window, click Close. This completes the procedure to create TeamViewer MSI application in SCCM.

You should find the newly added Team Viewer application listed under Applications in the SCCM console. Let’s assign an icon to this application. To specify the icon for the application, right-click the Team Viewer application and select Properties. In the app properties window, click Software Center tab. At the bottom, click on Browse, select the icon and click Apply and OK.

Deploy TeamViewer MSI application
We will now deploy the TeamViewer app to a device collection in SCCM. You can create a device collection and include a set of devices for testing the application deployment.
Refer to the below guides to create device collections in ConfigMgr for Windows 10 and Windows 11 devices.
To deploy the TeamViewer MSI application in the SCCM console, go to Software Library > Application Management > Application. Right-click the TeamViewer for Windows app and select Deploy.

On the General page of the Deploy Software Wizard, click Browse and select a device collection to which you want to deploy the TeamViewer application. Click Next.

On the Content page, click the Add button and specify the distribution points to which you would like to distribute the application content. You may also select distribution point groups. Click Next to continue.

On the Deployment Settings window, specify the settings to control the deployment. Select the Action as Install and Purpose as Available. Learn the difference between Available and Required deployment in SCCM. Click Next.

Complete the remaining steps of the deployment software wizard and close it. The Team Viewer application is now distributed to the DP and the client machines should now have the application listed in the Software Center.
This completes the steps for deploying the TeamViewer MSI application using Configuration Manager.

Verify TeamViewer installation on Windows Devices
In this section, we will verify if the TeamViewer MSI deployment is successful on Windows devices. Log in to a client computer and launch the software center.
Click on the Applications tab and select the TeamViewer for Windows application. On the application details page, click Install. The application is now downloaded from the local distribution point server for installation.

You can review the application installation progress using AppEnforce.log. To know the location of this file and other files, refer to the SCCM log files. Matched exit code 0 to a Success entry in the exit codes table confirms that the Jabber application has been installed successfully.

With the MSI deployment, the TeamViewer uninstallation works flawlessly. In our lab we could successfully uninstall TeamViewer from the Software Center.
Read Next
Consider reading some useful application deployment guides with Configuration Manager.

Hi Sir,
Thank you so much for sharing this info.
File system detection method is working fine.
Hi Sir,
Getting exit code 2 stating, the system can’t find the file specified.
In testing environment, it has worked fine but while deploying into pilot, I’m getting this error.
To avoid i have used registry as well and have made many changes with detection method but still same error.
Hi Prajwal. I am following your blog and even this blog to deploy team viewer 13. however deployment status just shows as ‘Already Compliant’ so it looks like it is just detecting but not installing it. my requirement is to install this on all system even it has older version. do you prefer other detection method so that it doesn’t stick to specific version but install it on client system.
Hi Prajwal. I am regularly following up your blog and I am sccm admin too. I followed this and did deployment. however status still shows as ‘Already Compliant’ but it seems it is just detecting but not installing on client system. Is thee any other way you suggest for detection. my requirement is to install TV 13 on all system/user even they have any previous version. I selected as ‘Required’.
you need to manage them by policy from the teamviewer console which also means you need to deploy them with an account assignment
How teamviewer uninstall using sccm 2012?
Isn’t the uninstall command working when you have specified it while configuring app ?.
No, How can remove the teamviewer programs installed on client computers using sccm;?
there seems to be an issue with timing, the app uninstalls but reports a failed status. Appenforce shows that after you click uninstall, it still is able to detect the application, so the detection happens too soon…Then if you click retry it reports OK
So that means the detection method is not working correctly. I didn’t face this issue when i tested the uninstalls. Did you add any other detection methods and test ?.
I’m just having this issue too. Apparently it is because the uninstaller forks another process and quits, so when SCCM do its check, the file is still there; but gets deleted seconds later by this new process. I have worked around it by changing the uninstall program to a .cmd file that runs the uninstall command and then waits for 10 seconds (with a ping), and that worked. Not a clean solution but that will do for a quick fix…
i have same trouble too
Hi Prajwal,
how can i handle the many patches and updates that come with teamviewer? I deployed it as described but when the users update their installations, softwarecenter tries to reinstall the old version and breaks with an error that is visible to the users….
thanks,
Markus
I believe that can done using a script.
Hey mate, just wondering if there is a way to roll out team viewer with pre-configured settings together with account assignment via Config Manager?