


In this post, I will show you how to fix the Windows Update error 0x80248007 that appears when you attempt to download the latest Windows updates online. We will look at multiple ways to resolve the Windows Update Download Error 0x80248007.
On my Windows 11 VM running in Azure, I encountered error 0x80248007 while downloading an update via Windows Updates. The same error also prevented the download of the other updates on the computer.
Numerous things could prevent Windows Updates from downloading, but the error code is crucial to figuring out what’s wrong. Computers running Windows 10 and Windows 11 can both experience the 0x80248007 error while downloading updates via Windows Updates. Not to worry, I’ll outline some crucial steps you can take to resolve error 0x80248007.

Related Article: How to Fix Windows Update Download Error 0x8024a206
When do you see Windows Update Download Error 0x80248007?
The error code 0x80248007 appears when you’re trying to update Windows or any Windows drivers using Windows Update. You encounter Windows Update error 0x80248007 where there are either missing files in the Windows Update or Windows Update can’t locate the Microsoft Software License Terms.
The below screenshot illustrates the Windows update download error 0x80248007 when attempting to download the latest Windows updates online. There is a retry option which basically attempts to download and reinstall the KB4023057 update. However, the retry option didn’t help much in my case.
Recommended: How to Uninstall Windows 11 22H2 Update Rollback Build
Info: The KB4023057 update includes files and resources that address issues that affect the update processes in Windows and may prevent important Windows updates from being installed.

Fix: Windows Update Error 0x80248007
There are a few things you can try to help fix error 0x80248007 and update Windows and the drivers until Microsoft fixes it in a Windows update. Microsoft has acknowledged this error, and it should be fixed in a Windows update. I’ll now outline a few steps you can take if you ever experience error 0x80248007 while downloading Windows Updates.
Also Read: How to Install Windows Admin Center Updates
Step 1: Manually Start the Windows Installer Service
Manually starting the Windows Installer Service on a computer will help you to resolve most of the update download errors. Use the following steps to start the Windows Installer Service:
- Right-click on Start and select Run.
- In the Run box, enter the command services.msc and click OK.
- In the Services console, scroll to find Windows Installer Service.
- Right-click Windows Installer Services and select Start.

Another way to start this service is to open the command prompt in elevated mode and run the command “net start msiserver“.
In some cases, you may see Windows Installer service in a running state. What you can do is right-click the Windows Installer service and select Restart. Wait for the service to restart, and now you can run Check for Updates. That should resolve the Windows update download error 0x80248007.

Step 2: Restart Windows Update Service
The Windows Update Service enables the detection, download, and installation of updates for Windows and other programs. If an update introduces changes to Windows Update components, you may encounter error 0x80248007 which will prevent downloading of other updates.
What you can try is restart the Windows Update service after stopping it, deleting the temporary update files, and starting it again. By deleting any temporary files that could be the source of this problem, Windows Update will be able to run without any issues. You must be logged on as an administrator in order to complete the steps, so keep that in mind.
Also Read: Remove Windows 11 Update Patch using Different Methods
To restart the Windows Update service, run the command services.msc. Right-click on Windows Update service and select Restart. With this step, you basically restart the Windows Update components which should help you resolve the Windows update error 0x80248007 on Windows 11.

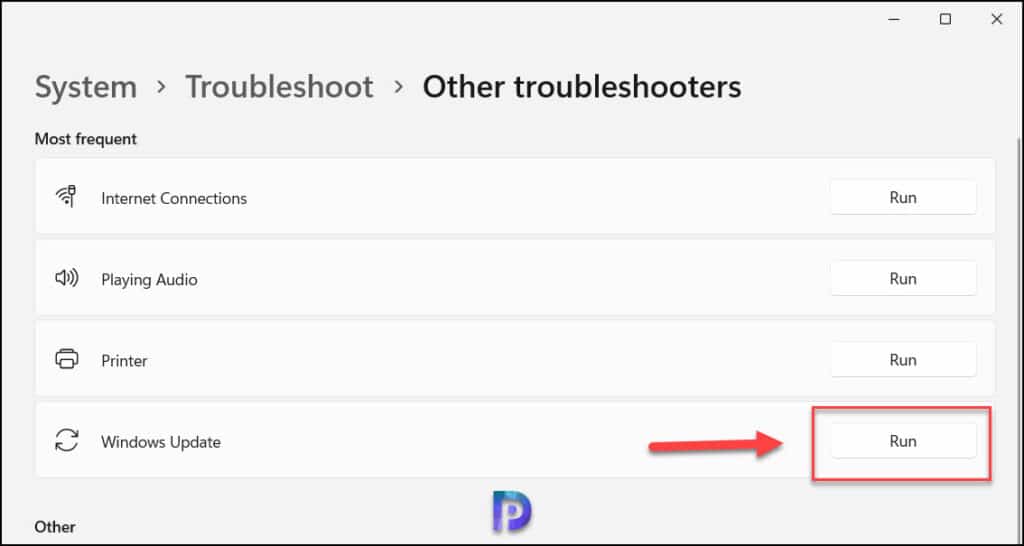
Step 3: Run the Windows Update Troubleshooter
Another common troubleshooting step that you can use when you encounter update download errors is to run the built-in Windows update troubleshooter. This tool will run on your computer and will report issues with Windows update components.
You can run the Windows update troubleshooter on your Windows 11 computer with the following steps. Right-click the taskbar’s Start icon to select Settings. Scroll down the System tab to select Troubleshoot. Click Other troubleshooters to view the troubleshooters. Then select the Run option for Windows Update.
The Windows Update troubleshooter launches, and this tool scans for issues related to Windows updates. The Windows update troubleshooter can identify the errors such as 0x80248007 and resolve it. The Windows update troubleshooting report shows the list of issues found on the PC. Normally, a restart is recommended after running the Windows update troubleshooter.
Useful Read: Fix Windows Server 2012 Reboot Loop Issue
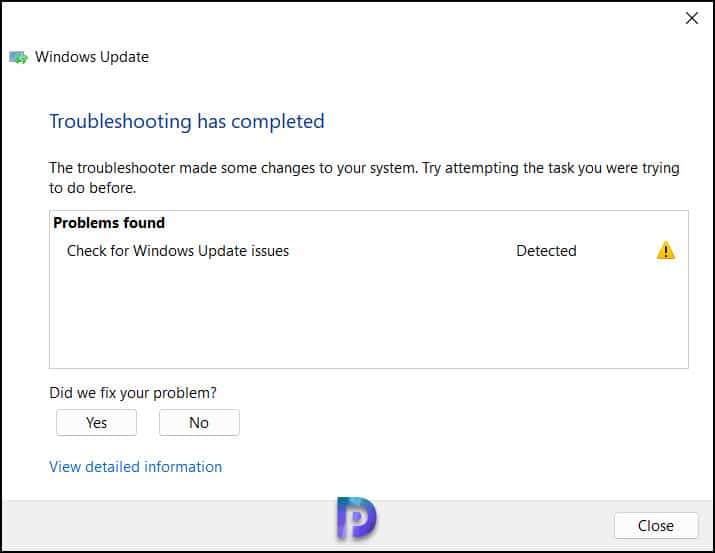
Close the Windows update troubleshooter and restart your Windows computer and now the Windows update download error 0x80248007 should be resolved.

Step 4: Clear the SoftwareDistribution folder
If Windows Update isn’t working, it could be caused by a problem with the SoftwareDistribution folder, and I will show you how to clear the SoftwareDistribution folder on Windows PC. The Software Distribution folder contains several files related to Windows Updates. Whenever the components or files get corrupt, you may encounter errors while downloading new updates. Deleting certain folders in the SoftwareDistribution folder will resolve these issues.
Perform the following steps to clear the SoftwareDistribution folder on Windows PC:
- Launch the File Explorer by pressing Windows+E keys on your keyboard.
- Press Ctrl+L at the same time to access the Address Bar, and type in %systemroot%\SoftwareDistribution, then press enter key. This will open the SoftwareDistribution folder.
- Inside it, locate the DataStore and Download folders and delete the contents of both folders.
- Reboot your computer and the updates should be work properly.


Service “Delivery Optimization” must be enabled or else w11 will give 0x80004002 error. Only way is using REGEDIT , navigate to: HKLM\SYSTEM\CurrentControlSet\Services\DoSvc ; RightClick, Permissions, Administrators, Check FullControl; then change “Start” key to 3 (Manual) and restart windows. Updates will start working.
0x80248007 may also appear if DoSvc is disabled.
Steps 1 and 3 cleared these errors up for me today. Thanks very much for your easy to follow explanations.
option 1 worked for me on a brand new laptop today, thank you very much
thanks man
It won’t let me clear the entire file because it’s open on the update installer. Idk how to fix it. I tried rebooting. It started to install it to 10% and then stopped and gave me the same error.
Thanks!
Option 1 resolved my issue. Thanks for the clear instructions and contribution!