


In this tutorial, we’ll go over the steps to enable secure boot for a virtual machine. You can turn on UEFI secure boot on a VMware VM when you create it or on a virtual machine that is already running.
Installing Windows 11 on a VMware virtual machine involves two things: encrypting the VM and enabling the TPM and securing the VM by enabling the UEFI secure boot. Secure boot is a security standard made by people in the PC industry to make sure that only software trusted by the Original Equipment Manufacturer (OEM) can be used to start up a device.
According to VMware, the UEFI Secure Boot is a security standard that helps ensure that your PC boots using only software that is trusted by the PC manufacturer. For certain virtual machine hardware versions and operating systems, you can enable secure boot just as you can for a physical machine.

For Windows 11, your device must have Trusted Platform Module (TPM) version 2.0 turned on. You can download and run the PC Health Check app to see if your current PC meets the requirements to run Windows 11.
If you want to install Windows 11 on a VM, you have to first encrypt the VM and then enable the TPM. You can also enable secure boot for a virtual machine. All this can be done from the virtual machine settings. Take a look at this useful guide that shows how to encrypt the VM and enable TPM.
Prerequisites
Make sure the operating system and firmware of the virtual machine support UEFI boot before enabling the UEFI secure boot for that machine. Listed below are the prerequisites for enabling secure boot for a virtual machine.
- EFI firmware
- Virtual hardware version 13 or later.
- Operating system that supports UEFI secure boot.
- You can add a Trusted Platform Module to an encrypted virtual machine with a minimum hardware version of 14 that uses the UEFI firmware type.
- VMware Tools version 10.1 or later is required for virtual machines that use UEFI secure boot. You can upgrade those virtual machines to a later version of VMware Tools when it becomes available.
Create a new VM and enable Secure Boot for a virtual machine
Let’s look at the steps to enable secure boot for a new virtual machine. We will go through the steps to create a new virtual machine now. Launch the VMware workstation on your PC and create a new virtual machine by selecting Custom (Advanced) configuration. Select the virtual machine’s hardware compatibility with the latest version and click Next.

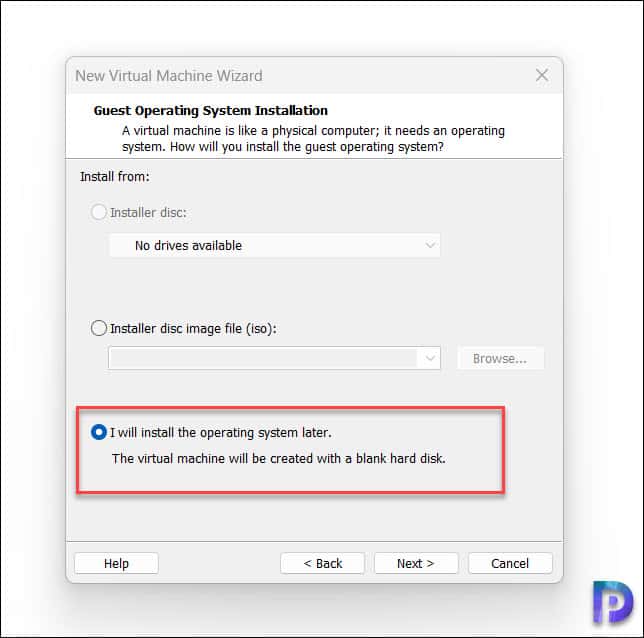
Select “I will install the operating system later” and click Next.
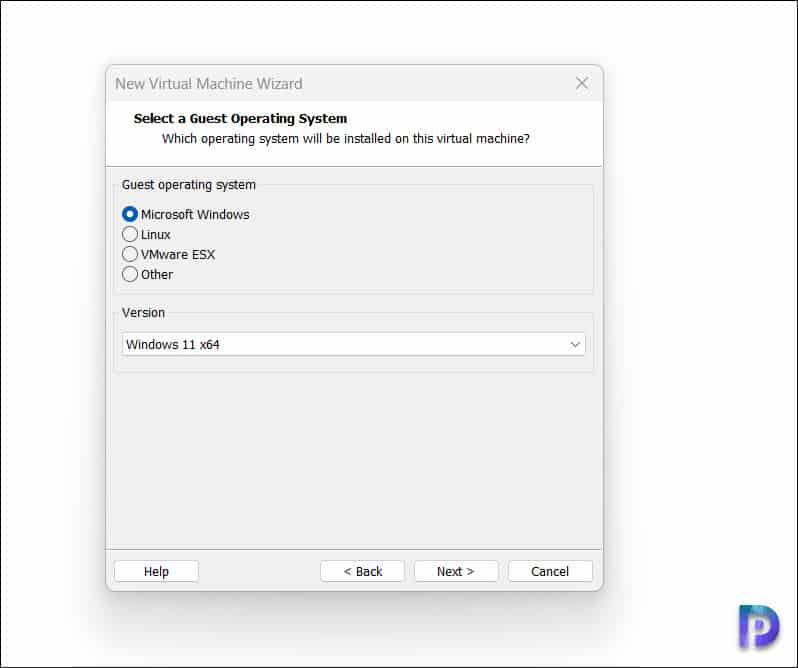
Select the guest operating system as Microsoft Windows and choose the version as Windows 11 x64. Click Next.
Specify the virtual machine name as Windows 11 x64 or anything else that you want. You may click Browse and specify a different location for the virtual machine. Click Next.

For the Firmware type, select UEFI – Secure Boot. Click Next.

Complete the remaining VM wizard steps and click Finish on the ready to create virtual machine window.

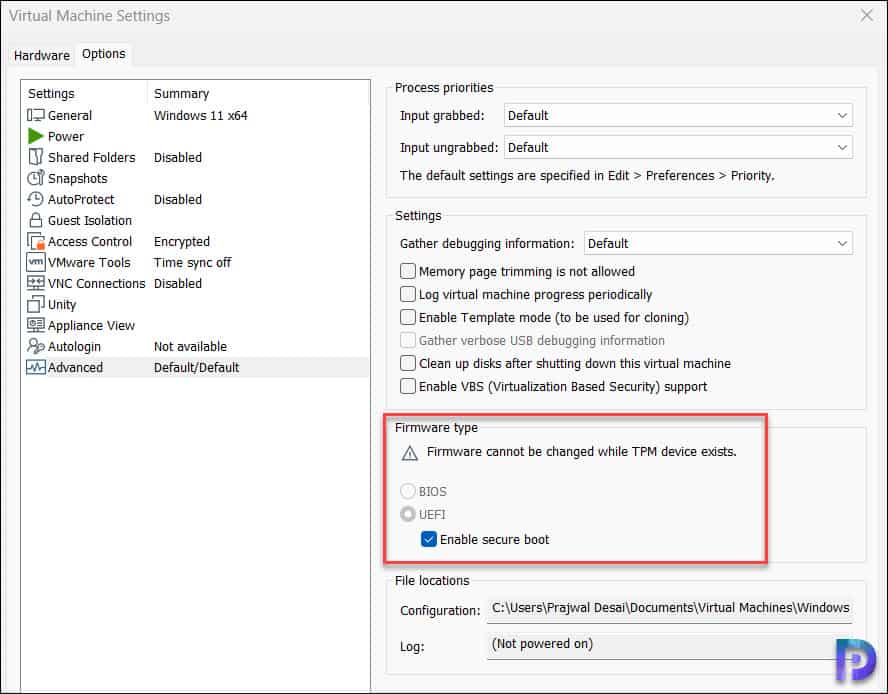
Let’s check the newly created VM to see if secure boot has been enabled. Go to the virtual machine properties and switch to the options tab. Under Settings, select Advanced and under the Firmware type, we see UEFI – Secure boot is enabled.
Enable Secure Boot on an existing VM
On existing virtual machines, you can enable the UEFI secure boot from the VM settings with the following steps:
- Power off the VM and select edit Virtual Machine settings.
- On the VM settings window, switch to the Options tab.
- Under Settings, select Advanced. Under the Firmware type section, select UEFI and check the box “Enable Secure Boot“.
- Click Apply and OK to apply the changes.

