This article details the steps to update VMware tools to the latest version. Your virtual machines will run better and smooth when you upgrade VMware tools to the latest version.
According to VMware, VMware Tools is a set of services and components that enable several features in various VMware products for better management and seamless user interactions with guest operating systems.
On a VMware Workstation, when you create a VM and install the OS, the VMware tools are automatically installed.
If you’re running multiple virtual machines in your lab, it is important to upgrade the VMware tools. Luckily, when you power on a VM, you get a notification about the VMware tools update.
Learn: How to install VMware Tools on Windows 11 VM
Ways to Upgrade VMware Tools
There are two ways to upgrade the VMware tools on your VM:
- From the VMware tools update notification, run Update Tools.
- Right-click the VM and select Update VMware Tools.
You can use any of the above methods to upgrade the VMware tools for every virtual machine. Refer to the following guide on how to deploy VMware tools using SCCM.
Read: How to Configure Autologin for VM
Upgrading the VMware Tools eliminates or improves these issues :-
- Low video resolution
- Inadequate color depth
- Incorrect display of network speed
- Restricted movement of the mouse
- Inability to copy and paste and drag-and-drop files
- Missing sound
- Synchronizes the time in the guest operating system with the time on the host
If you want to check the installed version of VMware tools, go to Control Panel > Programs > Programs and Features. From the list of installed programs, look for VMware tools and check the version column.
In the below example, the installed VMware Tools version is 11.2.6.17901274. The version will get incremented after upgrading the VMware tools.

How to Update VMware Tools to Latest Version
Let’s look at the steps to update VMware tools. First, Power On the Virtual Machine. The VM can detect if it’s running an older version of VMware tools.
In case there is an update available for VMware tools, you will see an yellow notification bar. You can click Update Tools to start the VMware Tools update.

In case you have skipped the update notification, you can right-click the VM and select Update VMware Tools.

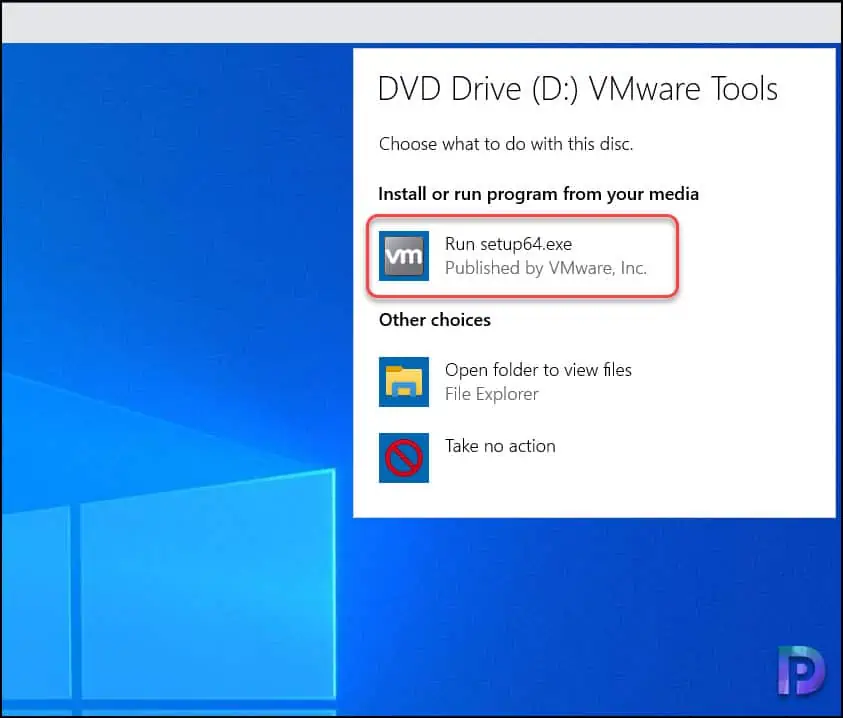
Now you should see an autoplay window displaying the VMware Tools options. Select Run setup64.exe and this should begin upgrading the VMware tools installation on the virtual machine.

The VMware Tool setup installation wizard will install latest version of VMware tools on your computer. Click Next.

On Choose setup type screen, you must select a setup type. Here is a brief description of each VMware Tools Setup type:
- Typical – Installs only program features used by VMWare product.
- Complete – Select the option to install all the mandatory, recommended and optional components.
- Custom – Pick this option to choose which program features you want to install and the location to install.
Select Typical and click Next.

To begin installing the update for VMware tools, click Install.

The VMware tools installation is now complete. Click Finish.

Let’s check the update version of VMware tools on our VM. Go to Control Panel > Programs > Programs and Features. From the list of installed programs, look for VMware tools and check the version column.
The updated version of VMware tools is 11.3.5.18557794. Restart the VM after you upgrade VMware tools.

I hope this article helps you to update the VMware tools to latest version. In case if you have any questions or suggestions, let me know them in comments section.


