When you install VMWare Tools on Windows 11 virtual machine, you get optimized performance. Your Windows 11 VM will run better and smoothly after installing the VMware tools.
I am going to cover the steps to install VMware tools on Windows 11 virtual machine. The same steps can be used to install the VMWare tools on Windows 10 VM.
Windows 11 is a new client operating system released by Microsoft. The latest version of VMware workstation should support installation of Windows 11 and VMWare tools.
While creating a new VM, if the VMware workstation recognizes the Windows 11 operating system, VMWare tools should be installed automatically on it.
If not, you can always manually initiate the VMware tools installation on Windows 11 VM. It takes just few steps to install the VMware tools.
Note – If you are installing Windows 11 on a virtual machine, you must enable the TPM first. Refer the following guide to enable trusted platform module on Windows 11 virtual machine.
Download VMware Tools for Windows 11
If you need to download the latest version of VMware tools for Windows 11, you can download it from VMware Customer Connect site.
On the Product Downloads section, ensure you download the correct edition of VMware tools for Windows. The installers are available for both x64 and x86 operating systems.
If you have got virtual machine running Mac, you can download and install VMware Tools on macOS.
The VMware tools are downloaded in a .zip file. You can extract the .zip file to a folder using 7zip, WinRAR or any other similar software.

Why should you install VMware Tools on Windows 11 VM
Without VMware Tools installed in your Windows 11 operating system, guest performance lacks important functionality.
According to VMware, Installing VMware Tools eliminates or improves these issues :-
- Low video resolution
- Inadequate color depth
- Incorrect display of network speed
- Restricted movement of the mouse
- Inability to copy and paste and drag-and-drop files
- Missing sound
- Synchronizes the time in the guest operating system with the time on the host
Ways to install VMware Tools on Windows 11 Virtual Machine
After you create a Windows 11 VM, if the VMware tools aren’t installed automatically, there are 2 manual ways to install VMware tools.
- Download and Install VMware Tools from VMware Customer Connect site.
- Use the VMware Tools installer embedded in the VMware Workstation
The first method requires you to download the VMware tools and manually install on the Windows virtual machine. You must copy the VMWare tools installer on VM first and then run the setup.
While the second method is easy because you initiate the installation of VMware tools on Windows 11 via the workstation itself. The VMWare Tools setup wizard installs the required components.
Install VMware Tools on Windows 11 VM
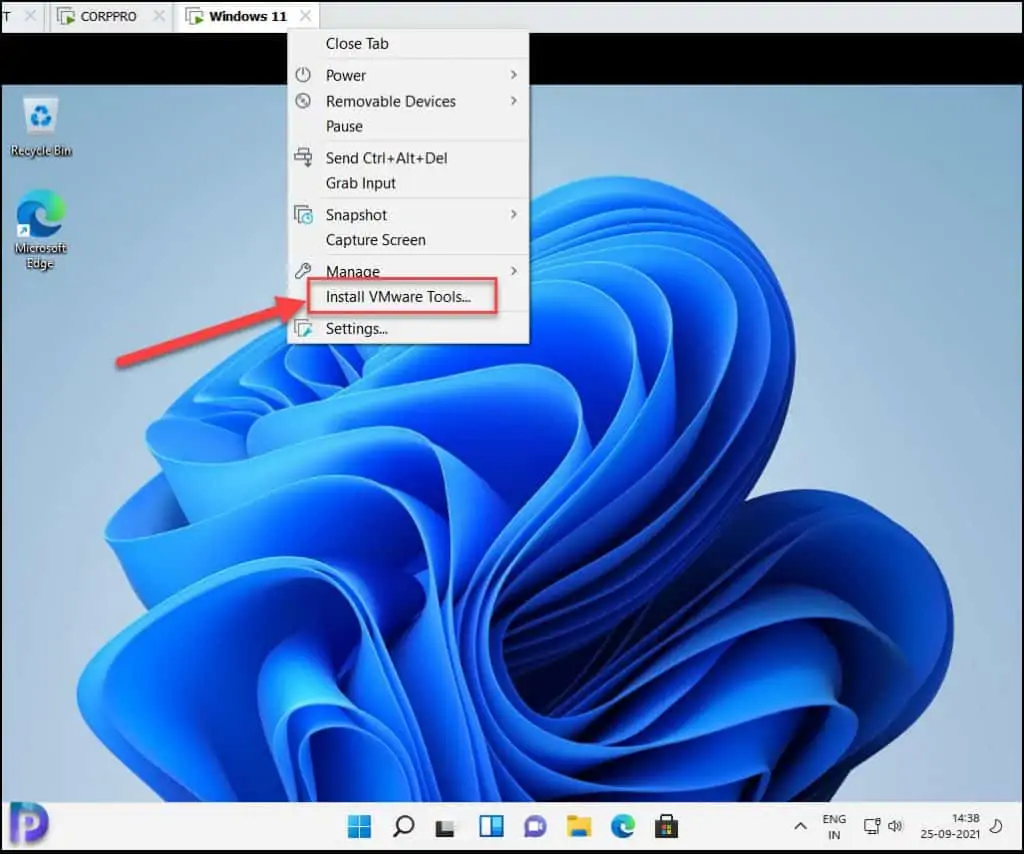
Let’s look at the steps to install VMware tools on Windows 11 virtual machine. Ensure the Windows 11 VM is powered on. Right-click on the Windows 11 VM name and select “Install VMware Tools“.

An Autoplay notification appears and if you click it, you get an option to run the VMware tools installer.
If you don’t see any notification, open the explorer, and you should find a new virtual drive that contains the VMware tools installation files. Right-click the drive and start the VMware tools installation.

Select Run setup64.exe and this should begin the VMware tools installation on Windows 11 virtual machine.

The VMware Tool setup installation wizard will install VMware tools on your computer. Click Next.

On Choose setup type screen, you must select a setup type.
Honestly, I never bothered about these options and always chose the default option, i.e. Typical. However let me reveal what each setup type option does.
- Typical – Installs only program features used by VMWare product.
- Complete – Select the option to install all the mandatory, recommended and optional components.
- Custom – Pick this option to choose which program features you want to install and the location to install.
For now, I am going to select the setup type as Typical. Click Next.

To begin the VMware tools installation of Windows 11 VM, click Install.

The VMware tools installation is now complete. Click Finish.

To complete the VMware tools installation, you must restart your system. Click Yes to restart the virtual machine.

Confirm the VMware Tools Installation on Windows 11 VM
In this final step, we will log in to Windows 11 virtual machine and check if the VMware tools have been successfully installed and running.
Click Start > type Add or Remove Programs. This loads the Apps & features window displaying the list of installed applications on Windows 11.
Scroll down, and you should find the VMware Tools installed along with version, installation date and total install size.

When you install VMware tools on a virtual machine, the VMware tools service is also installed along with other files.
The VMware Tools service provides support for synchronizing objects between the host and guest operating systems.
Launch the services console and if you see VMware Tools service in running status, that confirms the VMware Tools installation on Windows 11 VM.


